

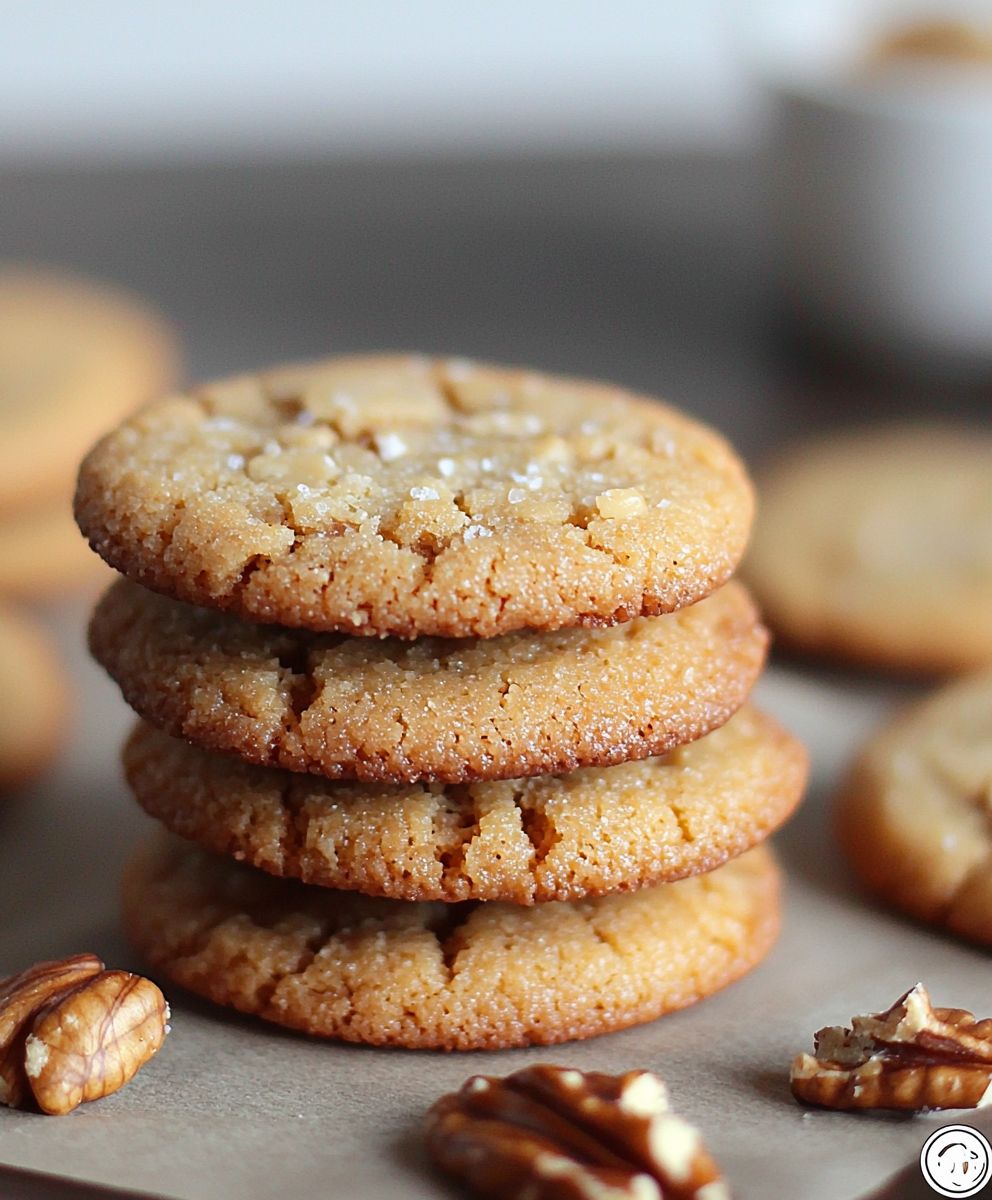
Walnut butter cookies, those melt-in-your-mouth morsels of nutty goodness, are about to become your new favorite baking obsession. Imagine sinking your teeth into a delicate, crumbly cookie, infused with the rich, earthy flavor of toasted walnuts and the comforting warmth of butter. Are you drooling yet? I know I am just thinking about them!
These aren’t just any cookies; they’re a testament to the enduring appeal of simple, high-quality ingredients. While the exact origins of walnut butter cookies are debated, similar shortbread-style cookies have graced tables across Europe for centuries, often associated with festive celebrations and family gatherings. The addition of walnuts elevates them to something truly special.
What makes these cookies so irresistible? It’s the perfect balance of textures the slight crispness around the edges giving way to a tender, almost sandy interior. The buttery richness is perfectly complemented by the slightly bitter, yet sweet, notes of the walnuts. Plus, they’re surprisingly easy to make! Whether you’re a seasoned baker or just starting out, this recipe is foolproof and guaranteed to impress. Get ready to experience cookie perfection!

Ingredients:
- 1 cup (2 sticks) unsalted butter, softened
- ¾ cup granulated sugar
- ¾ cup packed light brown sugar
- 2 large eggs
- 1 teaspoon vanilla extract
- 1 cup walnut butter (smooth or chunky, your preference!)
- 2 ¼ cups all-purpose flour
- 1 teaspoon baking soda
- 1 teaspoon baking powder
- ½ teaspoon salt
- ½ cup chopped walnuts, for topping (optional)
Preparing the Dough:
- Cream the Butter and Sugars: In a large bowl, or the bowl of your stand mixer, cream together the softened butter, granulated sugar, and brown sugar until light and fluffy. This usually takes about 3-5 minutes on medium speed. Make sure to scrape down the sides of the bowl occasionally to ensure everything is evenly mixed. This step is crucial for creating a tender cookie, so don’t rush it!
- Incorporate the Eggs and Vanilla: Beat in the eggs one at a time, mixing well after each addition. Then, stir in the vanilla extract. The mixture should be smooth and well combined.
- Add the Walnut Butter: Now for the star of the show! Add the walnut butter to the mixture and beat until fully incorporated. The dough will become slightly thicker and have a beautiful nutty aroma. If you’re using chunky walnut butter, you’ll already have some walnut pieces in your cookies, which is fantastic!
- Combine the Dry Ingredients: In a separate medium bowl, whisk together the all-purpose flour, baking soda, baking powder, and salt. Whisking ensures that the baking soda and baking powder are evenly distributed throughout the flour, which will help the cookies rise properly.
- Gradually Add Dry Ingredients to Wet Ingredients: Gradually add the dry ingredients to the wet ingredients, mixing on low speed until just combined. Be careful not to overmix the dough, as this can lead to tough cookies. Mix until you no longer see streaks of flour.
- Chill the Dough: Cover the bowl with plastic wrap and chill the dough in the refrigerator for at least 30 minutes, or up to 2 hours. Chilling the dough helps to prevent the cookies from spreading too much during baking and allows the flavors to meld together. If you chill it for longer than 2 hours, you might need to let it sit at room temperature for a few minutes to soften slightly before scooping.
Baking the Cookies:
- Preheat the Oven: Preheat your oven to 375°F (190°C). Line baking sheets with parchment paper or silicone baking mats. Parchment paper helps prevent the cookies from sticking and makes cleanup a breeze.
- Scoop the Dough: Use a cookie scoop or spoon to drop rounded tablespoons of dough onto the prepared baking sheets, leaving about 2 inches between each cookie. This allows the cookies to spread without running into each other.
- Add Toppings (Optional): If desired, gently press chopped walnuts onto the tops of the cookies before baking. This adds a nice crunch and visual appeal.
- Bake the Cookies: Bake for 9-11 minutes, or until the edges are golden brown and the centers are set. Keep a close eye on them, as baking times can vary depending on your oven. You want them to be slightly soft in the center for the best texture.
- Cool the Cookies: Remove the baking sheets from the oven and let the cookies cool on the baking sheets for a few minutes before transferring them to a wire rack to cool completely. This prevents them from breaking while they’re still warm and soft.
Tips and Variations:
- Adjusting Sweetness: If you prefer a less sweet cookie, you can reduce the amount of granulated sugar or brown sugar by ¼ cup each.
- Adding Chocolate Chips: For a chocolatey twist, add ½ cup of chocolate chips (milk, dark, or semi-sweet) to the dough along with the dry ingredients.
- Spicing it Up: Add ½ teaspoon of ground cinnamon or nutmeg to the dry ingredients for a warm, spiced flavor.
- Using Different Nuts: While this is a walnut butter cookie recipe, you can experiment with other nut butters like almond butter or cashew butter. The flavor will change, but the texture should remain similar.
- Making Gluten-Free Cookies: Substitute the all-purpose flour with a gluten-free all-purpose flour blend. Be sure to choose a blend that contains xanthan gum for best results.
- Storing the Cookies: Store the cooled cookies in an airtight container at room temperature for up to 5 days. They can also be frozen for up to 2 months.
Troubleshooting:
- Cookies Spreading Too Much: If your cookies are spreading too much, make sure your butter wasn’t too soft to begin with. Also, ensure you chilled the dough for the recommended time. You can also try adding a tablespoon or two of flour to the dough.
- Cookies Too Dry: If your cookies are too dry, try reducing the baking time by a minute or two. Also, make sure you’re not overmixing the dough.
- Cookies Not Spreading Enough: If your cookies aren’t spreading enough, make sure your baking soda and baking powder are fresh. You can also try pressing down on the cookies slightly before baking.
Enjoy!
These walnut butter cookies are best enjoyed with a glass of milk or a cup of coffee. They’re perfect for an afternoon treat or a special occasion. I hope you enjoy baking and eating them as much as I do!
Conclusion:
And there you have it! These walnut butter cookies are more than just a sweet treat; they’re a little piece of nutty, buttery heaven that I truly believe everyone should experience. From the satisfyingly crumbly texture to the rich, almost caramel-like flavor that the walnuts impart, these cookies are a symphony of deliciousness in every bite. I know there are a million cookie recipes out there, but trust me when I say this one is special. It’s the kind of recipe that becomes a family favorite, passed down through generations, and requested at every holiday gathering.
Why is this recipe a must-try? Well, beyond the incredible taste, it’s surprisingly simple to make. You don’t need any fancy equipment or hard-to-find ingredients. Most of what you need is likely already in your pantry. Plus, the aroma that fills your kitchen while these cookies are baking is simply divine a warm, inviting scent that will make your house feel like home. And let’s be honest, who doesn’t love a cookie that’s both delicious and easy to make?
But the best part? These cookies are incredibly versatile! While they’re absolutely perfect on their own, served with a cold glass of milk or a warm cup of coffee, there are so many ways to customize them to your liking.
Serving Suggestions and Variations:
* Drizzle with Chocolate: Once cooled, drizzle the cookies with melted dark or milk chocolate for an extra touch of indulgence. A sprinkle of sea salt on top of the chocolate adds a delightful salty-sweet contrast.
* Sandwich Cookies: Make a batch of buttercream frosting (vanilla, chocolate, or even a walnut-flavored buttercream would be amazing!) and sandwich two cookies together for a decadent treat.
* Add Spices: Experiment with adding a pinch of cinnamon, nutmeg, or cardamom to the dough for a warm, spiced flavor. These spices complement the walnuts beautifully and add a festive touch, especially during the holidays.
* Glaze them: A simple powdered sugar glaze, flavored with a touch of vanilla extract or almond extract, adds a beautiful sheen and a touch of extra sweetness.
* Nutty Variations: While this recipe focuses on walnuts, feel free to experiment with other nuts! Pecans, hazelnuts, or even almonds would be delicious substitutes. Just be sure to chop them finely before adding them to the dough.
* Espresso Boost: Add a teaspoon of instant espresso powder to the dough for a subtle coffee flavor that enhances the richness of the walnuts.
* Citrus Zest: A little bit of orange or lemon zest can brighten up the flavor of the cookies and add a refreshing twist.
I truly hope you’ll give these walnut butter cookies a try. I’m confident that you’ll love them as much as I do. They’re perfect for a cozy night in, a special occasion, or simply a little something to brighten your day.
Once you’ve baked a batch (or two!), I’d absolutely love to hear about your experience. Did you try any of the variations I suggested? Did you add your own special touch? What did your family and friends think? Share your photos and stories with me in the comments below! I can’t wait to see your creations and hear all about your baking adventures. Happy baking! And remember, the best cookies are always the ones made with love.
Walnut Butter Cookies: The Ultimate Guide to Baking Perfection
Soft and chewy walnut butter cookies with a rich, nutty flavor. Easy to make and perfect for any occasion!
Ingredients
- 1 cup (2 sticks) unsalted butter, softened
- ¾ cup granulated sugar
- ¾ cup packed light brown sugar
- 2 large eggs
- 1 teaspoon vanilla extract
- 1 cup walnut butter (smooth or chunky, your preference!)
- 2 ¼ cups all-purpose flour
- 1 teaspoon baking soda
- 1 teaspoon baking powder
- ½ teaspoon salt
- ½ cup chopped walnuts, for topping (optional)
Instructions
- Cream the Butter and Sugars: In a large bowl, or the bowl of your stand mixer, cream together the softened butter, granulated sugar, and brown sugar until light and fluffy (3-5 minutes on medium speed). Scrape down the sides of the bowl occasionally.
- Incorporate the Eggs and Vanilla: Beat in the eggs one at a time, mixing well after each addition. Stir in the vanilla extract.
- Add the Walnut Butter: Add the walnut butter and beat until fully incorporated.
- Combine the Dry Ingredients: In a separate medium bowl, whisk together the all-purpose flour, baking soda, baking powder, and salt.
- Gradually Add Dry Ingredients to Wet Ingredients: Gradually add the dry ingredients to the wet ingredients, mixing on low speed until just combined. Do not overmix.
- Chill the Dough: Cover the bowl with plastic wrap and chill the dough in the refrigerator for at least 30 minutes, or up to 2 hours.
- Preheat the Oven: Preheat your oven to 375°F (190°C). Line baking sheets with parchment paper or silicone baking mats.
- Scoop the Dough: Use a cookie scoop or spoon to drop rounded tablespoons of dough onto the prepared baking sheets, leaving about 2 inches between each cookie.
- Add Toppings (Optional): Gently press chopped walnuts onto the tops of the cookies before baking.
- Bake the Cookies: Bake for 9-11 minutes, or until the edges are golden brown and the centers are set.
- Cool the Cookies: Remove the baking sheets from the oven and let the cookies cool on the baking sheets for a few minutes before transferring them to a wire rack to cool completely.
Notes
- Adjusting Sweetness: Reduce granulated sugar or brown sugar by ¼ cup each for a less sweet cookie.
- Adding Chocolate Chips: Add ½ cup of chocolate chips to the dough along with the dry ingredients.
- Spicing it Up: Add ½ teaspoon of ground cinnamon or nutmeg to the dry ingredients.
- Using Different Nuts: Experiment with other nut butters like almond butter or cashew butter.
- Making Gluten-Free Cookies: Substitute the all-purpose flour with a gluten-free all-purpose flour blend that contains xanthan gum.
- Storing the Cookies: Store the cooled cookies in an airtight container at room temperature for up to 5 days. They can also be frozen for up to 2 months.
- Cookies Spreading Too Much: Make sure your butter wasn’t too soft to begin with. Also, ensure you chilled the dough for the recommended time. You can also try adding a tablespoon or two of flour to the dough.
- Cookies Too Dry: Try reducing the baking time by a minute or two. Also, make sure you’re not overmixing the dough.
- Cookies Not Spreading Enough: Make sure your baking soda and baking powder are fresh. You can also try pressing down on the cookies slightly before baking.


Leave a Comment