

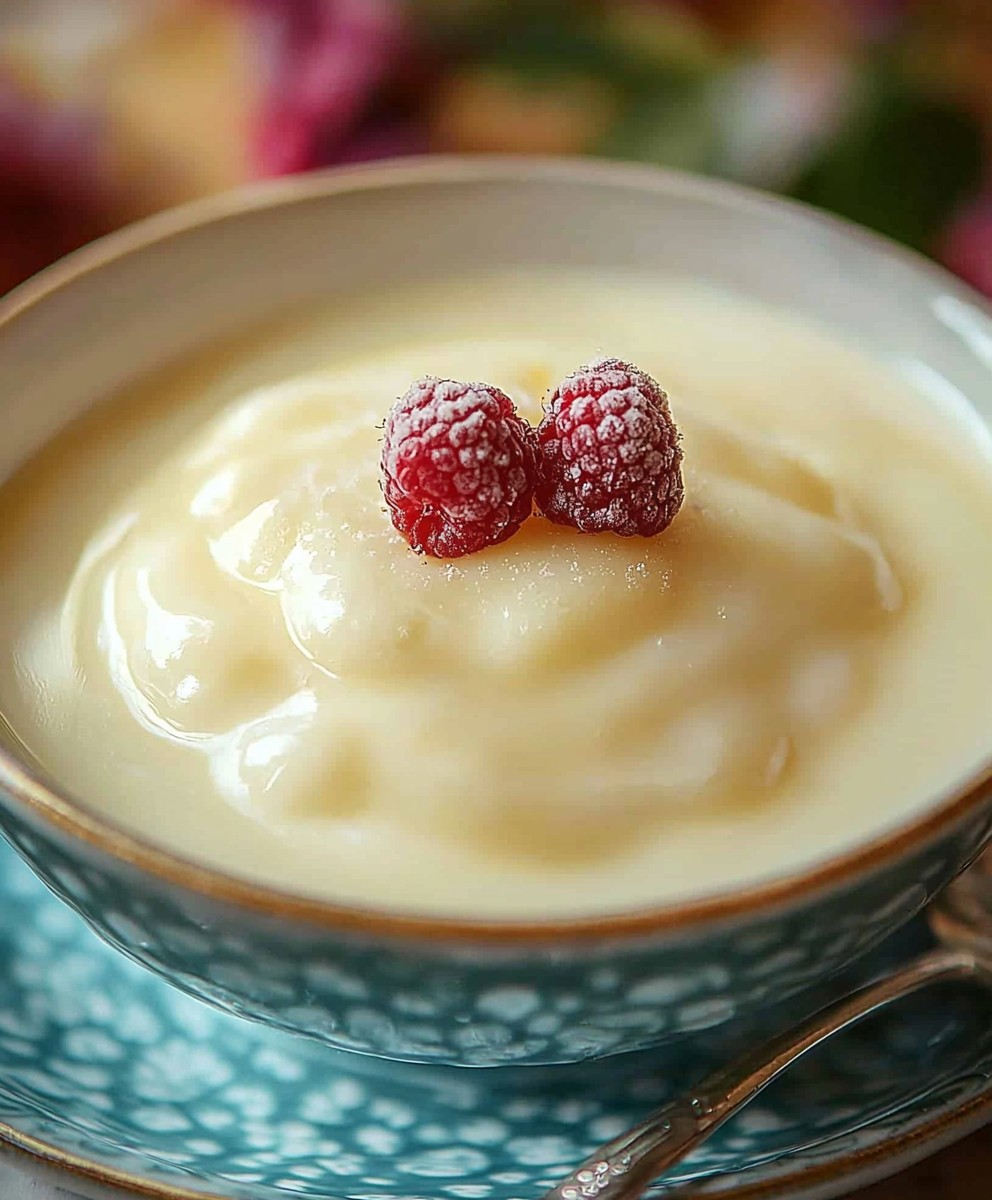
Vanilla pudding, oh, where do I even begin? This isn’t just a dessert; it’s a creamy, dreamy spoonful of nostalgia that takes me right back to childhood. Remember those after-school snacks, the comforting sweetness after a long day? That’s the magic of vanilla pudding!
While its exact origins are debated, pudding, in its various forms, has been a beloved treat for centuries. From medieval custards to the instant mixes we know today, it’s a testament to our enduring love for simple, satisfying desserts. But what makes vanilla pudding so universally appealing? It’s the velvety smooth texture, the delicate vanilla flavor that dances on your tongue, and the sheer versatility. You can enjoy it straight from the bowl, layer it in parfaits, or use it as a base for more elaborate creations.
For me, it’s the ultimate comfort food. It’s quick, easy, and always hits the spot. Plus, it’s a blank canvas for creativity! Add fresh berries, a sprinkle of cinnamon, or even a dollop of whipped cream for an extra touch of indulgence. So, are you ready to rediscover the simple joy of homemade vanilla pudding? Let’s get started!

Ingredients:
- 1 cup granulated sugar
- 1/4 cup cornstarch
- 1/4 teaspoon salt
- 3 cups whole milk
- 2 large eggs
- 2 tablespoons unsalted butter
- 2 teaspoons vanilla extract
Preparing the Pudding Base:
- In a medium saucepan, whisk together the granulated sugar, cornstarch, and salt. Make sure there are no lumps of cornstarch. This is crucial for a smooth pudding! I usually whisk for a good minute or two to ensure everything is well combined.
- Gradually whisk in the whole milk until the mixture is smooth and there are no remaining clumps of dry ingredients. The milk helps to create a slurry with the cornstarch, which will thicken the pudding as it cooks.
- In a separate small bowl, lightly beat the eggs. This step is important because you don’t want to add the eggs directly to the hot milk mixture, as they will scramble.
Cooking the Pudding:
- Place the saucepan with the milk mixture over medium heat. Cook, stirring constantly with a whisk, until the mixture begins to thicken and simmer. This usually takes about 5-7 minutes. Don’t stop stirring! This is where patience comes in. If you stop stirring, the pudding can scorch on the bottom of the pan.
- Once the mixture is simmering and has thickened slightly, remove it from the heat.
- Temper the eggs: Slowly drizzle about 1/2 cup of the hot milk mixture into the beaten eggs, whisking constantly. This process, called tempering, gradually raises the temperature of the eggs and prevents them from scrambling when added to the hot pudding.
- Pour the tempered egg mixture back into the saucepan with the remaining milk mixture.
- Return the saucepan to medium heat and continue to cook, stirring constantly, until the pudding thickens significantly and coats the back of a spoon. This usually takes another 2-3 minutes. You’ll know it’s ready when you can run your finger across the back of the spoon and the line holds its shape. Be careful not to overcook the pudding, as it can become too thick.
- Remove the saucepan from the heat.
- Stir in the unsalted butter until it is completely melted and incorporated into the pudding. The butter adds richness and a lovely sheen to the finished pudding.
- Stir in the vanilla extract. The vanilla extract enhances the flavor of the pudding and adds a warm, comforting aroma.
Cooling and Storing the Pudding:
- Pour the pudding into a serving bowl or individual ramekins.
- To prevent a skin from forming on the surface of the pudding, press a piece of plastic wrap directly onto the surface. This is a crucial step! The plastic wrap should be touching the entire surface of the pudding.
- Refrigerate the pudding for at least 2 hours, or preferably longer, to allow it to cool completely and set. The longer it chills, the thicker and more flavorful it will become. I often make it the night before I plan to serve it.
- Once the pudding is chilled, remove the plastic wrap and serve. You can garnish it with whipped cream, fresh fruit, chocolate shavings, or any other toppings you like.
- Store any leftover pudding in an airtight container in the refrigerator for up to 3 days.
Tips and Variations:
- For a richer pudding: Use heavy cream instead of some of the milk. You could substitute up to 1 cup of the milk with heavy cream.
- For a chocolate pudding: Add 1/4 cup of unsweetened cocoa powder to the dry ingredients (sugar, cornstarch, and salt) before whisking in the milk.
- For a butterscotch pudding: Use brown sugar instead of granulated sugar.
- For a vegan pudding: Use plant-based milk (such as almond milk, soy milk, or oat milk) and a vegan butter substitute. You can also use a cornstarch slurry to replace the eggs (mix 2 tablespoons of cornstarch with 1/4 cup of cold water for each egg).
- Preventing Lumps: The key to a smooth pudding is to whisk constantly while cooking and to make sure the cornstarch is fully dissolved before adding the milk. If you do get lumps, you can try straining the pudding through a fine-mesh sieve after cooking.
- Serving Suggestions: Vanilla pudding is delicious on its own, but it’s also a great base for other desserts. Try layering it with cookies and fruit in a trifle, or using it as a filling for cream puffs or eclairs.
- Adjusting Sweetness: Taste the pudding after it has thickened and adjust the amount of sugar to your liking.
- Using Different Extracts: Experiment with different extracts, such as almond extract, lemon extract, or rum extract, to create unique flavor combinations. Just be sure to use them sparingly, as they can be quite potent.
Troubleshooting:
- Pudding is too thin: If your pudding is too thin, it may not have been cooked long enough. Return it to the heat and continue to cook, stirring constantly, until it thickens to your desired consistency.
- Pudding is too thick: If your pudding is too thick, you can thin it out by whisking in a little bit of milk until it reaches your desired consistency.
- Pudding has lumps: If your pudding has lumps, you can try straining it through a fine-mesh sieve. You can also try using an immersion blender to smooth it out.
- Pudding is scorched: If your pudding is scorched, unfortunately, there’s not much you can do to save it. The burnt flavor will permeate the entire pudding. It’s best to start over and be more careful to stir constantly while cooking.
Enjoy your homemade vanilla pudding!
Conclusion:
And there you have it! This isn’t just any vanilla pudding recipe; it’s a creamy, dreamy, utterly irresistible experience that will transport you back to your childhood while simultaneously impressing your adult palate. I truly believe this is a must-try vanilla pudding, and here’s why: the texture is unbelievably smooth, the vanilla flavor is rich and authentic (thanks to the real vanilla bean!), and it’s surprisingly simple to make. Forget those store-bought puddings filled with artificial ingredients; this homemade version is a game-changer. But the best part? The possibilities are endless! Serve it chilled in elegant parfait glasses for a sophisticated dessert, or spoon it into individual ramekins and top with fresh berries for a light and refreshing treat. For a more decadent experience, try layering it with crushed chocolate cookies and whipped cream to create a delightful pudding parfait. Feeling adventurous? Stir in a spoonful of peanut butter for a peanut butter vanilla pudding twist, or add a splash of rum extract for a grown-up flavor. You could even use it as a filling for cream puffs or a base for a delicious vanilla pudding pie. Here are a few more serving suggestions to get your creative juices flowing:- Warm Vanilla Pudding with Cinnamon: Serve it warm with a sprinkle of cinnamon for a cozy and comforting dessert on a chilly evening.
- Vanilla Pudding with Caramel Sauce: Drizzle with homemade or store-bought caramel sauce for an extra touch of sweetness and indulgence.
- Vanilla Pudding with Toasted Coconut: Sprinkle with toasted coconut flakes for a tropical twist.
- Vanilla Pudding with Fresh Fruit: Top with your favorite fresh fruits, such as strawberries, blueberries, raspberries, or bananas.
- Vanilla Pudding with Chocolate Shavings: Add chocolate shavings for a classic and irresistible combination.

Vanilla Pudding: The Ultimate Guide to Homemade Perfection
- Total Time: 135 minutes
- Yield: 4 servings 1x
Description
Creamy, classic vanilla pudding made from scratch. A comforting and delicious dessert that’s easy to make!
Ingredients
- 1 cup granulated sugar
- 1/4 cup cornstarch
- 1/4 teaspoon salt
- 3 cups whole milk
- 2 large eggs
- 2 tablespoons unsalted butter
- 2 teaspoons vanilla extract
Instructions
- In a medium saucepan, whisk together the granulated sugar, cornstarch, and salt. Make sure there are no lumps of cornstarch. Whisk for a good minute or two to ensure everything is well combined.
- Gradually whisk in the whole milk until the mixture is smooth and there are no remaining clumps of dry ingredients.
- In a separate small bowl, lightly beat the eggs.
- Place the saucepan with the milk mixture over medium heat. Cook, stirring constantly with a whisk, until the mixture begins to thicken and simmer (about 5-7 minutes). Don’t stop stirring!
- Once the mixture is simmering and has thickened slightly, remove it from the heat.
- Temper the eggs: Slowly drizzle about 1/2 cup of the hot milk mixture into the beaten eggs, whisking constantly.
- Pour the tempered egg mixture back into the saucepan with the remaining milk mixture.
- Return the saucepan to medium heat and continue to cook, stirring constantly, until the pudding thickens significantly and coats the back of a spoon (about 2-3 minutes).
- Remove the saucepan from the heat.
- Stir in the unsalted butter until it is completely melted and incorporated into the pudding.
- Stir in the vanilla extract.
- Pour the pudding into a serving bowl or individual ramekins.
- To prevent a skin from forming on the surface of the pudding, press a piece of plastic wrap directly onto the surface.
- Refrigerate the pudding for at least 2 hours, or preferably longer, to allow it to cool completely and set.
- Once the pudding is chilled, remove the plastic wrap and serve. Garnish with whipped cream, fresh fruit, or chocolate shavings, if desired.
- Store any leftover pudding in an airtight container in the refrigerator for up to 3 days.
Notes
- For a richer pudding: Use heavy cream instead of some of the milk (up to 1 cup).
- For a chocolate pudding: Add 1/4 cup of unsweetened cocoa powder to the dry ingredients.
- For a butterscotch pudding: Use brown sugar instead of granulated sugar.
- For a vegan pudding: Use plant-based milk and a vegan butter substitute. Use a cornstarch slurry to replace the eggs (mix 2 tablespoons of cornstarch with 1/4 cup of cold water for each egg).
- Preventing Lumps: Whisk constantly while cooking and ensure cornstarch is fully dissolved. Strain if lumps occur.
- Serving Suggestions: Layer with cookies and fruit in a trifle, or use as a filling for cream puffs or eclairs.
- Adjusting Sweetness: Taste and adjust sugar after thickening.
- Using Different Extracts: Experiment with almond, lemon, or rum extract sparingly.
- Pudding is too thin: Cook longer, stirring constantly.
- Pudding is too thick: Whisk in a little milk.
- Pudding has lumps: Strain or use an immersion blender.
- Pudding is scorched: Start over, stirring constantly.
- Prep Time: 5 minutes
- Cook Time: 10 minutes


Leave a Comment