

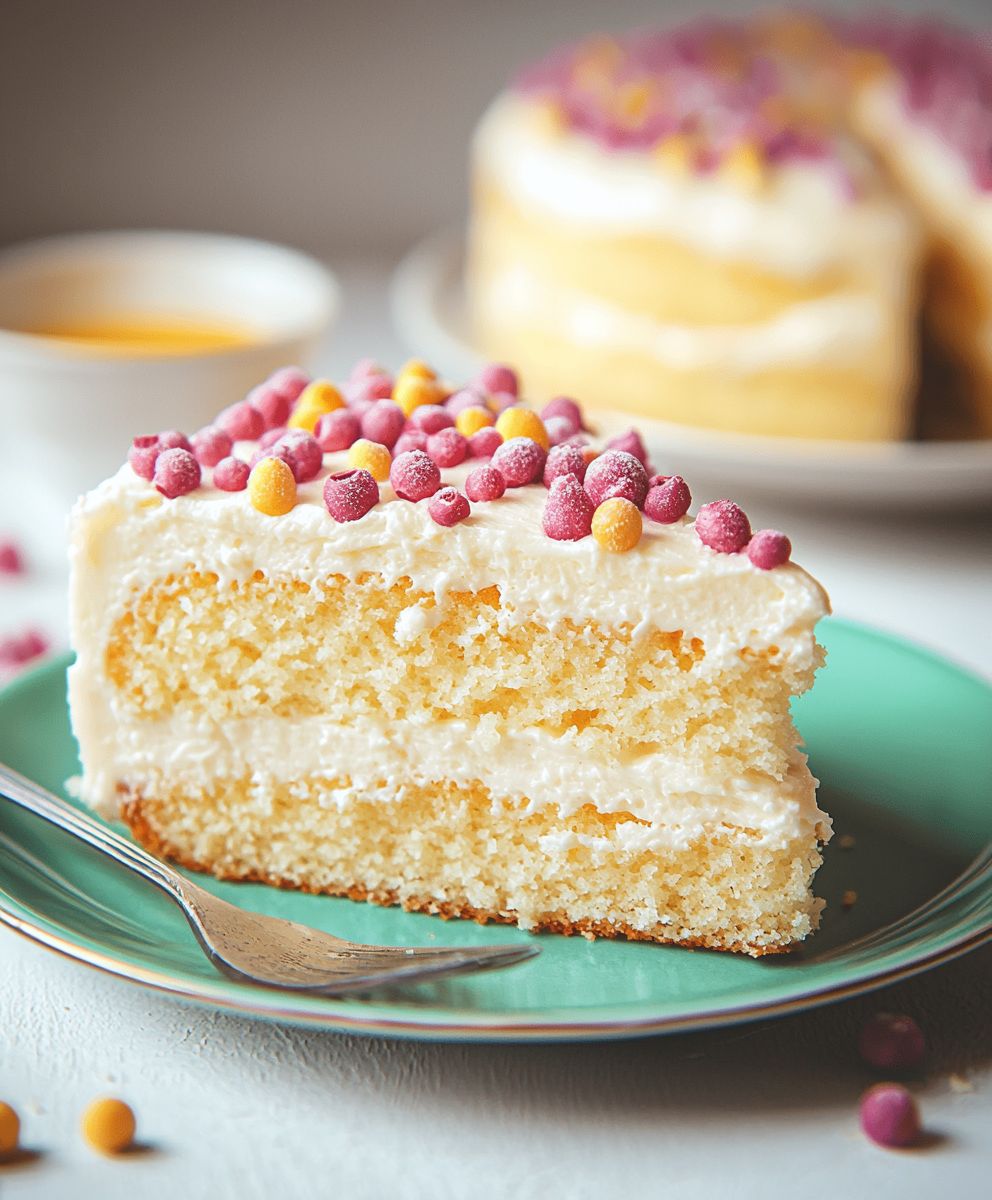
Vanilla Cake: Is there anything more comforting than the aroma of a freshly baked vanilla cake wafting through your home? I think not! This isn’t just any cake; it’s a slice of pure nostalgia, a taste of childhood birthdays, and a blank canvas for countless celebrations. From simple afternoon tea to elaborate wedding desserts, the humble vanilla cake has proven its versatility and enduring appeal.
The history of vanilla cake is as rich and complex as the flavor itself. While the exact origins are debated, the use of vanilla in baking gained popularity in the 18th century, transforming simple cakes into something truly special. Vanilla, derived from the vanilla orchid, was once a rare and exotic spice, making vanilla cake a symbol of luxury and indulgence. Today, while more accessible, it still retains that touch of elegance.
But what is it about vanilla cake that makes it so universally loved? Perhaps it’s the delicate balance of sweet and buttery flavors, the soft and tender crumb, or the sheer simplicity that allows the vanilla to truly shine. Its a cake thats easy to customize with your favorite frostings, fillings, and toppings. Whether you prefer a classic buttercream, a tangy cream cheese frosting, or a simple dusting of powdered sugar, the vanilla cake is the perfect foundation for your culinary creativity. Join me as we explore the secrets to baking the perfect vanilla cake, a recipe that will become a cherished part of your baking repertoire.

Ingredients:
- 2 1/2 cups (300g) all-purpose flour
- 1 tablespoon baking powder
- 1/2 teaspoon baking soda
- 1/2 teaspoon salt
- 1 cup (2 sticks or 226g) unsalted butter, softened
- 1 3/4 cups (350g) granulated sugar
- 2 large eggs
- 2 large egg whites
- 1 tablespoon pure vanilla extract
- 1 1/4 cups (300ml) buttermilk, room temperature
Preparing the Cake Batter:
- Preheat your oven and prepare your pans. First things first, let’s get that oven preheated to 350°F (175°C). This is crucial for even baking. While the oven is heating, grease and flour two 9-inch round cake pans. I like to use baking spray with flour already in it for convenience, but you can also grease with shortening or butter and then dust with flour. Make sure to tap out any excess flour you don’t want any white patches on your finished cake! Alternatively, you can line the bottom of the pans with parchment paper rounds for extra insurance against sticking.
- Whisk together the dry ingredients. In a large bowl, whisk together the flour, baking powder, baking soda, and salt. Whisking is important here, not just stirring, because it helps to evenly distribute the baking powder and baking soda throughout the flour. This ensures that your cake rises properly and has a consistent texture. Make sure there are no lumps of baking powder or baking soda remaining.
- Cream together the butter and sugar. In a separate large bowl (or the bowl of your stand mixer), cream together the softened butter and granulated sugar until light and fluffy. This usually takes about 3-5 minutes on medium speed. The mixture should become noticeably lighter in color and increase in volume. This step is essential for incorporating air into the batter, which contributes to the cake’s light and airy texture. Don’t rush this step! Scrape down the sides of the bowl occasionally to ensure that everything is evenly combined.
- Add the eggs and egg whites. Beat in the eggs one at a time, followed by the egg whites. Make sure each egg is fully incorporated before adding the next. After adding the eggs and egg whites, beat in the vanilla extract. The egg whites add extra moisture and structure to the cake, resulting in a lighter and more tender crumb. Again, scrape down the sides of the bowl as needed to ensure everything is well combined.
- Alternate adding the dry and wet ingredients. Gradually add the dry ingredients to the wet ingredients, alternating with the buttermilk, beginning and ending with the dry ingredients. Add the dry ingredients in three additions and the buttermilk in two additions. So, it’s dry, wet, dry, wet, dry. This method helps to prevent the gluten in the flour from developing too much, which can result in a tough cake. Mix on low speed until just combined after each addition. Be careful not to overmix the batter! Overmixing will develop the gluten and make the cake tough. A few streaks of flour are okay at this point.
- Final mixing and dividing the batter. Give the batter one final gentle stir to ensure everything is evenly combined. Divide the batter evenly between the prepared cake pans. I like to use a kitchen scale to ensure that each pan has the same amount of batter, which helps the cakes bake evenly.
Baking the Cakes:
- Bake the cakes. Bake in the preheated oven for 30-35 minutes, or until a wooden skewer inserted into the center comes out clean. The baking time may vary depending on your oven, so start checking for doneness around 30 minutes. The cakes should be golden brown on top and spring back lightly when touched.
- Cool the cakes. Let the cakes cool in the pans for 10-15 minutes before inverting them onto a wire rack to cool completely. Cooling the cakes in the pans allows them to set up slightly, which makes them easier to handle. Make sure the cakes are completely cool before frosting. Trying to frost a warm cake will result in a melty, messy disaster!
Preparing the Vanilla Buttercream Frosting:
- 1 cup (2 sticks or 226g) unsalted butter, softened
- 3-4 cups (360-480g) powdered sugar, sifted
- 1/4 cup (60ml) milk or heavy cream
- 2 teaspoons pure vanilla extract
- Pinch of salt
- Cream the butter. In a large bowl (or the bowl of your stand mixer), cream the softened butter until smooth and creamy. This usually takes about 2-3 minutes on medium speed. Make sure the butter is truly softened, but not melted, for the best results.
- Add the powdered sugar. Gradually add the sifted powdered sugar, one cup at a time, beating on low speed until combined. Sifting the powdered sugar helps to prevent lumps in the frosting. If the frosting seems too thick, add a tablespoon or two of milk or heavy cream.
- Add the milk, vanilla, and salt. Add the milk (or heavy cream), vanilla extract, and salt. Beat on medium-high speed for 2-3 minutes, or until the frosting is light and fluffy. The longer you beat the frosting, the lighter and fluffier it will become.
- Adjust consistency. If the frosting is too thick, add more milk or cream, one tablespoon at a time, until you reach the desired consistency. If the frosting is too thin, add more powdered sugar, one tablespoon at a time.
Assembling the Cake:
- Level the cakes (optional). If your cakes have a domed top, use a serrated knife to level them. This will make it easier to stack and frost the cakes.
- Place the first cake layer on a serving plate or cake stand. Add a dollop of frosting to the plate to prevent the cake from sliding around.
- Frost the first layer. Spread a generous layer of frosting evenly over the top of the first cake layer.
- Place the second cake layer on top. Carefully place the second cake layer on top of the frosted first layer.
- Frost the entire cake. Frost the top and sides of the cake with the remaining frosting. You can use a spatula or an offset spatula to create a smooth finish. For a more rustic look, you can leave the frosting swirled.
- Decorate (optional). Decorate the cake as desired. You can use sprinkles, chocolate shavings, fresh fruit, or anything else you like.
- Chill the cake (optional). Chilling the cake for 30 minutes before serving will help the frosting to set and make it easier to slice.
Conclusion:
This isn’t just another cake recipe; it’s your new go-to for celebrations big and small. This vanilla cake is a must-try because of its incredibly moist texture, its delicate vanilla flavor that isn’t overpowering, and its versatility. It’s the kind of cake that disappears quickly, leaving everyone wanting more. I’ve baked countless cakes in my time, and this one consistently receives rave reviews. It’s simple enough for a weeknight treat, yet elegant enough to serve at a special occasion. The secret lies in the quality of the ingredients and the careful attention to detail in the instructions trust me, it makes all the difference!
But the best part? It’s incredibly adaptable. For a classic presentation, frost it with a simple vanilla buttercream, adding a few fresh berries for a pop of color. Or, if you’re feeling adventurous, try a chocolate ganache for a richer, more decadent experience. A lemon curd filling would also be divine, adding a tangy counterpoint to the sweetness of the cake. You could even split the layers and soak them in a coffee liqueur for a sophisticated adult dessert.
Serving suggestions are endless! A slice of this cake pairs perfectly with a scoop of vanilla ice cream and a drizzle of chocolate sauce. It’s also wonderful with a cup of hot coffee or tea. For a brunch gathering, serve it alongside fresh fruit and yogurt. And for a truly special occasion, consider layering it with whipped cream and macerated berries to create a stunning trifle.
Don’t be afraid to experiment with different flavor combinations and toppings. Perhaps add a sprinkle of toasted almonds or coconut flakes for added texture. Or, infuse the batter with a hint of citrus zest for a brighter, more vibrant flavor. You could even try using different extracts, such as almond or lemon, to create a unique twist on the classic vanilla flavor.
I truly believe that everyone should have a reliable vanilla cake recipe in their repertoire, and this one is, without a doubt, my favorite. It’s a crowd-pleaser, a confidence booster, and a guaranteed success.
So, what are you waiting for? Preheat your oven, gather your ingredients, and get ready to bake the most delicious vanilla cake you’ve ever tasted. I’m confident that you’ll love it as much as I do.
And most importantly, I want to hear about your experience! Did you try a variation? Did you add a special ingredient? Did you serve it at a particular event? Share your photos and stories in the comments below. I can’t wait to see what you create! Baking is all about sharing and inspiring each other, so let’s connect and celebrate the joy of homemade cake. Happy baking! I am sure you will find that this recipe is a keeper.
Vanilla Cake: The Ultimate Guide to Baking Perfection
Classic vanilla layer cake with a light and fluffy vanilla buttercream frosting. Perfect for birthdays or any special occasion!
Ingredients
- 2 1/2 cups (300g) all-purpose flour
- 1 tablespoon baking powder
- 1/2 teaspoon baking soda
- 1/2 teaspoon salt
- 1 cup (2 sticks or 226g) unsalted butter, softened
- 1 3/4 cups (350g) granulated sugar
- 2 large eggs
- 2 large egg whites
- 1 tablespoon pure vanilla extract
- 1 1/4 cups (300ml) buttermilk, room temperature
- 1 cup (2 sticks or 226g) unsalted butter, softened
- 3-4 cups (360-480g) powdered sugar, sifted
- 1/4 cup (60ml) milk or heavy cream
- 2 teaspoons pure vanilla extract
- Pinch of salt
Instructions
- Preheat your oven to 350°F (175°C). Grease and flour two 9-inch round cake pans. Tap out any excess flour. Alternatively, line the bottom of the pans with parchment paper rounds.
- In a large bowl, whisk together the flour, baking powder, baking soda, and salt.
- In a separate large bowl (or the bowl of your stand mixer), cream together the softened butter and granulated sugar until light and fluffy (3-5 minutes on medium speed). Scrape down the sides of the bowl occasionally.
- Beat in the eggs one at a time, followed by the egg whites. Make sure each egg is fully incorporated before adding the next. After adding the eggs and egg whites, beat in the vanilla extract. Scrape down the sides of the bowl as needed.
- Gradually add the dry ingredients to the wet ingredients, alternating with the buttermilk, beginning and ending with the dry ingredients. Add the dry ingredients in three additions and the buttermilk in two additions (dry, wet, dry, wet, dry). Mix on low speed until just combined after each addition. Be careful not to overmix the batter! A few streaks of flour are okay at this point.
- Give the batter one final gentle stir to ensure everything is evenly combined. Divide the batter evenly between the prepared cake pans. I like to use a kitchen scale to ensure that each pan has the same amount of batter, which helps the cakes bake evenly.
- Bake in the preheated oven for 30-35 minutes, or until a wooden skewer inserted into the center comes out clean. The baking time may vary depending on your oven, so start checking for doneness around 30 minutes. The cakes should be golden brown on top and spring back lightly when touched.
- Let the cakes cool in the pans for 10-15 minutes before inverting them onto a wire rack to cool completely. Make sure the cakes are completely cool before frosting.
- In a large bowl (or the bowl of your stand mixer), cream the softened butter until smooth and creamy (2-3 minutes on medium speed).
- Gradually add the sifted powdered sugar, one cup at a time, beating on low speed until combined. If the frosting seems too thick, add a tablespoon or two of milk or heavy cream.
- Add the milk (or heavy cream), vanilla extract, and salt. Beat on medium-high speed for 2-3 minutes, or until the frosting is light and fluffy.
- If the frosting is too thick, add more milk or cream, one tablespoon at a time, until you reach the desired consistency. If the frosting is too thin, add more powdered sugar, one tablespoon at a time.
- If your cakes have a domed top, use a serrated knife to level them.
- Place the first cake layer on a serving plate or cake stand. Add a dollop of frosting to the plate to prevent the cake from sliding around.
- Spread a generous layer of frosting evenly over the top of the first cake layer.
- Carefully place the second cake layer on top of the frosted first layer.
- Frost the top and sides of the cake with the remaining frosting. You can use a spatula or an offset spatula to create a smooth finish. For a more rustic look, you can leave the frosting swirled.
- Decorate the cake as desired. You can use sprinkles, chocolate shavings, fresh fruit, or anything else you like.
- Chilling the cake for 30 minutes before serving will help the frosting to set and make it easier to slice.
Notes
- Make sure your butter and buttermilk are at room temperature for the best results.
- Don’t overmix the cake batter, as this can result in a tough cake.
- Sifting the powdered sugar helps to prevent lumps in the frosting.
- Adjust the amount of powdered sugar and milk in the frosting to achieve your desired consistency.
- For a richer flavor, use heavy cream instead of milk in the frosting.

Leave a Comment