

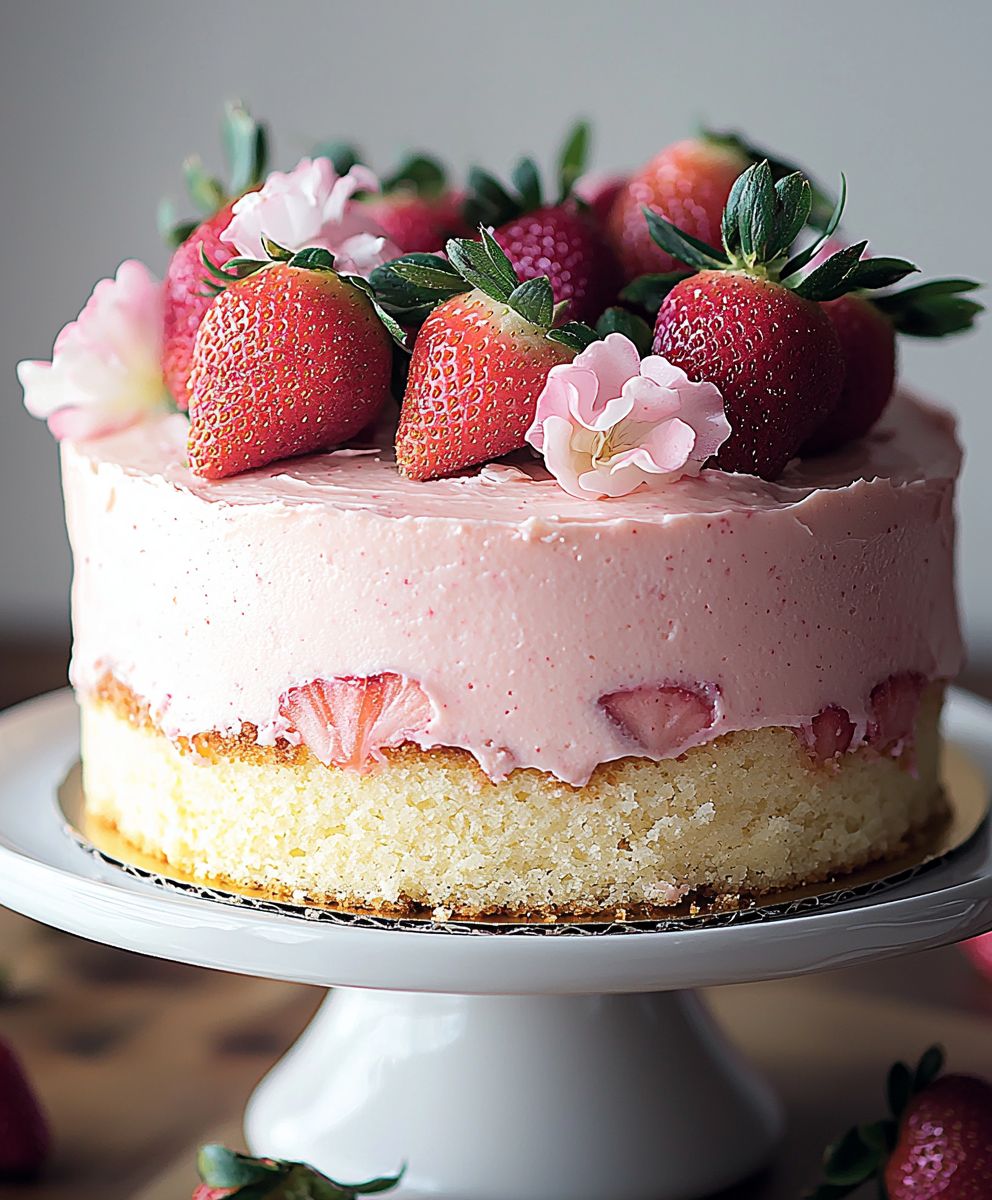
Vanilla Bean Strawberry Cake: just the name conjures up images of sun-drenched picnics, celebratory gatherings, and pure, unadulterated joy, doesn’t it? This isn’t just any cake; it’s a slice of summer on a plate, a testament to the simple yet exquisite combination of creamy vanilla and sweet, juicy strawberries. Imagine sinking your fork into a moist, tender crumb infused with the delicate aroma of vanilla bean, perfectly complemented by the burst of fresh strawberry flavor in every bite.
While the exact origins of strawberry cake are debated, the pairing of strawberries and cream has been a beloved culinary tradition for centuries, particularly in European and American baking. The addition of vanilla bean elevates this classic combination, adding a layer of sophistication and depth that transforms a simple dessert into something truly special.
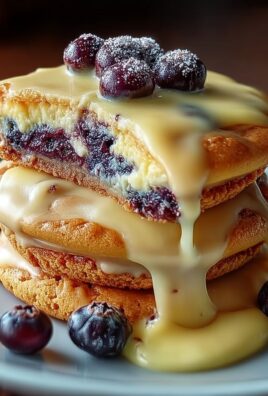
People adore this Vanilla Bean Strawberry Cake for so many reasons. Beyond its stunning visual appeal the vibrant red strawberries against the creamy white frosting is simply irresistible it’s the taste and texture that truly captivate. The cake is incredibly moist, thanks to the use of quality ingredients and a careful baking process. The vanilla bean adds a subtle warmth and complexity that complements the sweetness of the strawberries perfectly. And let’s not forget the convenience! While it looks impressive, this cake is surprisingly easy to make, making it perfect for both experienced bakers and those just starting out. Whether you’re looking for a show-stopping dessert for a special occasion or a simple treat to brighten up your day, this cake is guaranteed to be a crowd-pleaser.

Ingredients:
- For the Vanilla Bean Cake:
- 2 ½ cups (300g) cake flour, sifted
- 1 tablespoon baking powder
- ½ teaspoon baking soda
- ½ teaspoon salt
- 1 cup (2 sticks or 226g) unsalted butter, softened
- 1 ¾ cups (350g) granulated sugar
- 1 vanilla bean, split and seeds scraped (reserve pod for other uses)
- 4 large eggs
- 1 cup (240ml) buttermilk, room temperature
- 2 teaspoons vanilla extract
- For the Strawberry Filling:
- 2 pounds (900g) fresh strawberries, hulled and sliced
- ½ cup (100g) granulated sugar
- 2 tablespoons lemon juice
- 1 tablespoon cornstarch
- For the Vanilla Bean Swiss Meringue Buttercream:
- 6 large egg whites
- 1 ¼ cups (250g) granulated sugar
- 1 ½ cups (3 sticks or 340g) unsalted butter, softened
- 1 vanilla bean, split and seeds scraped
- Pinch of salt
Preparing the Vanilla Bean Cake:
- Preheat and Prep: First things first, preheat your oven to 350°F (175°C). Grease and flour three 8-inch round cake pans. I like to use baking spray with flour already in it for extra insurance against sticking. You can also line the bottoms with parchment paper rounds for easy removal.
- Dry Ingredients: In a large bowl, whisk together the sifted cake flour, baking powder, baking soda, and salt. Sifting the cake flour is crucial for a light and airy cake, so don’t skip this step!
- Cream Butter and Sugar: In the bowl of a stand mixer fitted with the paddle attachment (or using a hand mixer), cream together the softened butter and granulated sugar until light and fluffy. This usually takes about 3-5 minutes. Make sure to scrape down the sides of the bowl occasionally to ensure everything is evenly mixed.
- Add Vanilla Bean: Add the vanilla bean seeds to the butter and sugar mixture and mix until well combined. The vanilla bean adds such a wonderful depth of flavor!
- Incorporate Eggs: Add the eggs one at a time, mixing well after each addition. Again, scrape down the sides of the bowl as needed.
- Alternate Wet and Dry: In a separate measuring cup, whisk together the buttermilk and vanilla extract. Gradually add the dry ingredients to the wet ingredients, beginning and ending with the dry ingredients. So, add about one-third of the dry ingredients to the butter mixture, mix until just combined, then add half of the buttermilk mixture, mix until just combined. Repeat with another third of the dry ingredients, the remaining buttermilk mixture, and then the final third of the dry ingredients. Be careful not to overmix! Overmixing can lead to a tough cake.
- Divide and Bake: Divide the batter evenly among the prepared cake pans. I like to use a kitchen scale to ensure each pan has the same amount of batter for even baking. Bake for 25-30 minutes, or until a wooden skewer inserted into the center comes out clean.
- Cool Completely: Let the cakes cool in the pans for 10 minutes before inverting them onto a wire rack to cool completely. Make sure the cakes are completely cool before frosting!
Preparing the Strawberry Filling:
- Macerate Strawberries: In a medium bowl, combine the sliced strawberries, granulated sugar, and lemon juice. Gently toss to combine and let the mixture sit for at least 30 minutes, or up to an hour, at room temperature. This process, called maceration, draws out the juices from the strawberries, creating a delicious syrup.
- Cook the Filling: After the strawberries have macerated, transfer the mixture to a saucepan. Place the saucepan over medium heat and bring to a simmer.
- Thicken the Filling: In a small bowl, whisk together the cornstarch and 1 tablespoon of cold water to create a slurry. Pour the cornstarch slurry into the simmering strawberry mixture and stir constantly until the filling thickens. This usually takes just a minute or two.
- Cool Completely: Remove the saucepan from the heat and let the strawberry filling cool completely before using it to assemble the cake. Cooling the filling prevents it from melting the buttercream.
Preparing the Vanilla Bean Swiss Meringue Buttercream:
- Combine Egg Whites and Sugar: In the heatproof bowl of a stand mixer (or a large stainless steel bowl), combine the egg whites and granulated sugar.
- Heat Over Simmering Water: Place the bowl over a saucepan of simmering water, making sure the bottom of the bowl doesn’t touch the water. Whisk constantly until the sugar is completely dissolved and the mixture is hot to the touch. You should be able to rub a small amount of the mixture between your fingers without feeling any sugar granules. This step is crucial for a smooth buttercream.
- Whip to Stiff Peaks: Remove the bowl from the heat and place it on the stand mixer fitted with the whisk attachment. Whip the egg white mixture on high speed until stiff, glossy peaks form and the bowl is cool to the touch. This can take 5-10 minutes. The meringue should be thick and stable.
- Add Butter Gradually: Reduce the mixer speed to medium and begin adding the softened butter, one tablespoon at a time, mixing well after each addition. The mixture may look curdled at first, but don’t worry! Just keep mixing, and it will eventually come together.
- Add Vanilla Bean and Salt: Once all the butter has been added, add the vanilla bean seeds and a pinch of salt. Mix until smooth and creamy.
- Adjust Consistency: If the buttercream is too soft, chill it in the refrigerator for a few minutes, then whip it again. If it’s too stiff, add a tablespoon or two of milk or cream until you reach the desired consistency.
Assembling the Cake:
- Level the Cakes: If your cake layers are uneven, use a serrated knife to level them. This will ensure a perfectly stacked and even cake.
- Place First Layer: Place one cake layer on a cake stand or serving plate.
- Frost and Fill: Spread a generous layer of vanilla bean Swiss meringue buttercream over the first cake layer. Create a dam around the edge of the buttercream with a slightly thicker layer to prevent the strawberry filling from seeping out.
- Add Strawberry Filling: Spoon half of the cooled strawberry filling into the center of the buttercream dam.
- Repeat Layers: Place the second cake layer on top of the strawberry filling. Repeat the buttercream and strawberry filling layers.
- Top Layer and Crumb Coat: Place the final cake layer on top. Apply a thin layer of buttercream all over the cake to create a crumb coat. This seals in any loose crumbs and provides a smooth surface for the final layer of frosting.
- Chill the Crumb Coat: Chill the cake in the refrigerator for at least 30 minutes to allow the crumb coat to set.
- Final Frosting: Once the crumb coat is set, apply a final, thicker layer of vanilla bean Swiss meringue buttercream all over the cake. Smooth the frosting with an offset spatula or cake smoother.
- Decorate (Optional): Decorate the cake as desired. You can add fresh strawberries, buttercream swirls, sprinkles, or any other decorations you like.
- Chill and Serve: Chill the assembled cake in the refrigerator for at least 30 minutes before serving. This allows the frosting to firm up and the flavors to meld together.
Conclusion:
This Vanilla Bean Strawberry Cake isn’t just another cake recipe; it’s a celebration of flavor, texture, and the simple joy of baking. From the delicate crumb infused with the intoxicating aroma of vanilla bean to the juicy bursts of fresh strawberries in every bite, this cake is guaranteed to impress. I truly believe this is a must-try recipe for anyone who loves baking, or simply loves a delicious dessert. But what truly sets this cake apart is its versatility. While it’s absolutely divine as is, served with a dollop of freshly whipped cream or a scoop of vanilla ice cream, there are so many ways to make it your own. Feeling adventurous? Try adding a hint of lemon zest to the batter for a bright, citrusy twist that complements the strawberries beautifully. Or, for a richer, more decadent experience, consider using brown butter instead of regular melted butter the nutty notes will add a whole new dimension of flavor. For a truly stunning presentation, consider layering the cake with a homemade strawberry compote and a light mascarpone frosting. The compote will add an extra layer of strawberry intensity, while the mascarpone frosting will provide a creamy, tangy counterpoint to the sweetness of the cake. You could even get creative with the decoration, using fresh strawberries, edible flowers, or a simple dusting of powdered sugar to create a visually appealing masterpiece. If you’re looking for a simpler variation, try baking the batter in muffin tins for individual strawberry vanilla bean cupcakes. These are perfect for parties, picnics, or simply a quick and easy treat. You can even add a swirl of strawberry jam to the top of each cupcake before baking for an extra burst of flavor. And don’t forget about the glaze! A simple glaze made with powdered sugar and a splash of milk or lemon juice can add a touch of sweetness and shine to the cake. For a more sophisticated glaze, try using a vanilla bean-infused glaze, made by steeping a vanilla bean in warm milk before mixing it with the powdered sugar. I’ve poured my heart into perfecting this recipe, and I’m confident that you’ll love it as much as I do. It’s the perfect cake for birthdays, anniversaries, holidays, or any occasion that calls for a little bit of sweetness. It’s also a wonderful way to showcase the beauty and flavor of fresh, seasonal strawberries. So, what are you waiting for? Gather your ingredients, preheat your oven, and get ready to bake the most delicious Vanilla Bean Strawberry Cake you’ve ever tasted. I promise, you won’t be disappointed. And once you’ve tried it, I’d love to hear about your experience! Share your photos, your variations, and your feedback in the comments below. Let me know what you loved about the recipe, what you changed, and how you made it your own. I’m always eager to learn from my readers and see how they’re putting their own spin on my recipes. Happy baking! I can’t wait to see your creations! Print
Vanilla Bean Strawberry Cake: A Delicious Recipe & Baking Guide
- Total Time: 120 minutes
- Yield: 12–16 servings 1x
Description
Vanilla bean cake layered with fresh strawberry filling and silky smooth vanilla bean Swiss meringue buttercream.
Ingredients
- 2 ½ cups (300g) cake flour, sifted
- 1 tablespoon baking powder
- ½ teaspoon baking soda
- ½ teaspoon salt
- 1 cup (2 sticks or 226g) unsalted butter, softened
- 1 ¾ cups (350g) granulated sugar
- 1 vanilla bean, split and seeds scraped (reserve pod for other uses)
- 4 large eggs
- 1 cup (240ml) buttermilk, room temperature
- 2 teaspoons vanilla extract
- 2 pounds (900g) fresh strawberries, hulled and sliced
- ½ cup (100g) granulated sugar
- 2 tablespoons lemon juice
- 1 tablespoon cornstarch
- 6 large egg whites
- 1 ¼ cups (250g) granulated sugar
- 1 ½ cups (3 sticks or 340g) unsalted butter, softened
- 1 vanilla bean, split and seeds scraped
- Pinch of salt
Instructions
- Preheat oven to 350°F (175°C). Grease and flour three 8-inch round cake pans. Line bottoms with parchment paper rounds.
- In a large bowl, whisk together sifted cake flour, baking powder, baking soda, and salt.
- In a stand mixer, cream together softened butter and granulated sugar until light and fluffy (3-5 minutes). Scrape down the sides of the bowl.
- Add vanilla bean seeds to the butter and sugar mixture and mix until combined.
- Add eggs one at a time, mixing well after each addition. Scrape down the sides of the bowl.
- In a separate measuring cup, whisk together buttermilk and vanilla extract. Gradually add dry ingredients to wet ingredients, beginning and ending with dry ingredients. Mix until just combined. Do not overmix.
- Divide batter evenly among prepared cake pans.
- Bake for 25-30 minutes, or until a wooden skewer inserted into the center comes out clean.
- Let cakes cool in pans for 10 minutes before inverting them onto a wire rack to cool completely.
- In a medium bowl, combine sliced strawberries, granulated sugar, and lemon juice. Toss gently and let sit for at least 30 minutes, or up to an hour, at room temperature.
- Transfer the mixture to a saucepan. Place the saucepan over medium heat and bring to a simmer.
- In a small bowl, whisk together cornstarch and 1 tablespoon of cold water to create a slurry. Pour the cornstarch slurry into the simmering strawberry mixture and stir constantly until the filling thickens (1-2 minutes).
- Remove the saucepan from the heat and let the strawberry filling cool completely before using it to assemble the cake.
- In the heatproof bowl of a stand mixer, combine egg whites and granulated sugar.
- Place the bowl over a saucepan of simmering water, making sure the bottom of the bowl doesn’t touch the water. Whisk constantly until the sugar is completely dissolved and the mixture is hot to the touch.
- Remove the bowl from the heat and place it on the stand mixer fitted with the whisk attachment. Whip the egg white mixture on high speed until stiff, glossy peaks form and the bowl is cool to the touch (5-10 minutes).
- Reduce the mixer speed to medium and begin adding the softened butter, one tablespoon at a time, mixing well after each addition.
- Once all the butter has been added, add the vanilla bean seeds and a pinch of salt. Mix until smooth and creamy.
- If the buttercream is too soft, chill it in the refrigerator for a few minutes, then whip it again. If it’s too stiff, add a tablespoon or two of milk or cream until you reach the desired consistency.
- If your cake layers are uneven, use a serrated knife to level them.
- Place one cake layer on a cake stand or serving plate.
- Spread a generous layer of vanilla bean Swiss meringue buttercream over the first cake layer. Create a dam around the edge of the buttercream with a slightly thicker layer to prevent the strawberry filling from seeping out.
- Spoon half of the cooled strawberry filling into the center of the buttercream dam.
- Place the second cake layer on top of the strawberry filling. Repeat the buttercream and strawberry filling layers.
- Place the final cake layer on top. Apply a thin layer of buttercream all over the cake to create a crumb coat.
- Chill the cake in the refrigerator for at least 30 minutes to allow the crumb coat to set.
- Once the crumb coat is set, apply a final, thicker layer of vanilla bean Swiss meringue buttercream all over the cake. Smooth the frosting with an offset spatula or cake smoother.
- Decorate the cake as desired.
- Chill the assembled cake in the refrigerator for at least 30 minutes before serving.
Notes
- Sifting the cake flour is crucial for a light and airy cake.
- Make sure the butter is softened, but not melted, for both the cake and the buttercream.
- Don’t overmix the cake batter, as this can lead to a tough cake.
- Ensure the cakes are completely cool before frosting to prevent the buttercream from melting.
- When making Swiss meringue buttercream, it’s important to heat the egg whites and sugar until the sugar is completely dissolved. This will result in a smooth and stable buttercream.
- If the buttercream looks curdled after adding the butter, don’t worry! Just keep mixing, and it will eventually come together.
- Chilling the cake after the crumb coat helps to set the crumbs and makes it easier to apply the final layer of frosting.
- Prep Time: 90 minutes
- Cook Time: 30 minutes
Leave a Comment