

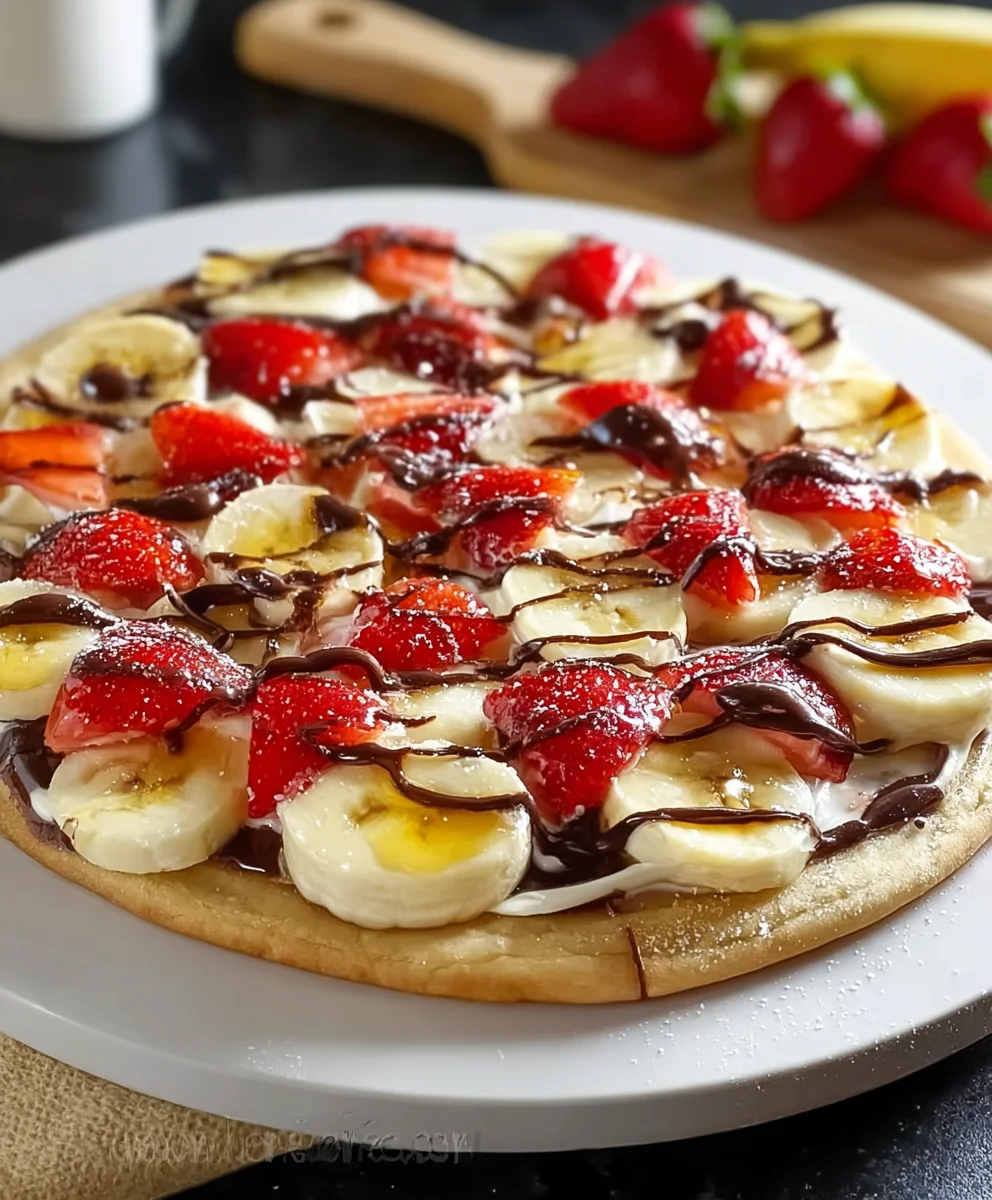
Banana Split Fruit Pizza – just hearing those words evokes a sense of playful indulgence, doesn’t it? I am absolutely thrilled to share a recipe that transforms a timeless dessert classic into a vibrant, shareable masterpiece perfect for any gathering. Imagine a tender, cookie-like crust, generously slathered with a rich, creamy topping, and then adorned with a colorful mosaic of fresh fruits, mimicking the iconic flavors of its namesake. This isn’t just a dessert; it’s a delightful experience waiting to unfold on your palate, offering a brilliant fusion of nostalgia and fresh innovation.
For generations, the traditional banana split has held a special place in our hearts, symbolizing sweet moments at old-fashioned soda fountains. Our modern interpretation, the Banana Split Fruit Pizza, pays homage to that beloved treat while offering unparalleled convenience and visual appeal. I truly believe people adore this dish not only for its incredible taste – the perfect balance of sweet, tangy, and creamy – but also for its fascinating interplay of textures, from the soft crust to the crisp fruit. It’s an ideal choice for potlucks, birthday parties, or simply a joyful weekend dessert, promising smiles with every slice.

Ingredients:
My friends, let’s gather our wonderful ingredients to craft the most delightful Banana Split Fruit Pizza you’ve ever tasted! This recipe is designed for a large, crowd-pleasing dessert, perfect for parties or a special family treat.
For the Sugar Cookie Crust:
- 1 cup (2 sticks) unsalted butter, softened to room temperature. Using softened butter is crucial for a smooth, lump-free dough that bakes evenly. I always take mine out an hour or two before I plan to bake.
- 1 ½ cups granulated sugar. This gives our crust that classic sweet sugar cookie flavor.
- 2 large eggs. These bind our dough together and add richness.
- 2 teaspoons pure vanilla extract. Don’t skimp on good vanilla! It makes a world of difference in the flavor of your crust.
- 3 cups all-purpose flour. Measured correctly, this will give us the perfect crumb. Remember to spoon and level for accuracy!
- 1 teaspoon baking powder. This helps our crust get a slight lift and a tender texture.
- ½ teaspoon salt. A little salt balances the sweetness and enhances all the other flavors.
For the Creamy Banana Split Topping:
- 16 ounces (2 blocks) full-fat cream cheese, softened to room temperature. Full-fat cream cheese provides the best richness and stability for our topping, making it feel truly decadent.
- 1 cup powdered sugar (confectioners’ sugar). Sifted, if you want an extra smooth consistency, but usually I just whisk it in well.
- 1 teaspoon pure vanilla extract. Again, good vanilla is key here to complement the cream cheese.
- 2-3 tablespoons milk or heavy cream. This is adjustable; I use it to reach my desired smooth, spreadable consistency. Start with two and add more if needed.
For the Fresh Fruit & Banana Split Garnishes:
- 3-4 medium bananas, ripe but firm. We want them sweet but not mushy, as they’ll be sliced and arranged.
- 1 pound fresh strawberries, hulled and sliced. Look for bright red, sweet-smelling berries.
- 1 (20-ounce) can crushed pineapple, very well drained. Draining is critical! Squeeze out as much liquid as you can so your pizza doesn’t get soggy.
- 1 (8-ounce) container whipped topping (like Cool Whip), thawed, or 1 ½ cups homemade whipped cream. I often go for homemade, but store-bought is a convenient option!
- ¼ cup chocolate syrup or fudge sauce. For that essential banana split drizzle!
- ¼ cup chopped nuts (walnuts, pecans, or peanuts), optional. I love the crunch, but feel free to omit if you have nut allergies.
- 10-12 maraschino cherries with stems. The classic finishing touch for any banana split!
- 1 tablespoon lemon juice, for bananas (optional, but highly recommended). This prevents them from browning too quickly.
Equipment You’ll Need:
Having the right tools always makes the baking process smoother and more enjoyable. For this delightful Banana Split Fruit Pizza, I recommend having these items on hand:
- Large baking sheet: A standard 15×10-inch or a 17×11-inch baking sheet with a rim is perfect for this generously sized pizza.
- Parchment paper: Absolutely essential for easy removal of the cookie crust and fuss-free cleanup.
- Electric mixer (stand or hand-held): This will make quick work of creaming the butter and sugar, and whipping up that dreamy cream cheese topping.
- Large mixing bowls (2-3): One for dry ingredients, one for wet, and another for the topping.
- Spatula or wooden spoon: For mixing and scraping down the sides of your bowls.
- Wire cooling rack: Crucial for allowing your cookie crust to cool completely and evenly.
- Measuring cups and spoons: Precision is a baker’s best friend!
- Sharp knife and cutting board: For preparing all that beautiful fresh fruit.
- Small brush or pastry brush: Handy for applying lemon juice to your banana slices.
- Offset spatula or butter knife: For spreading the cream cheese topping smoothly.
Preparing the Sugar Cookie Crust:
The foundation of our Banana Split Fruit Pizza is a tender, chewy sugar cookie crust. It’s simple to make, but a few key steps ensure it’s perfect every time.
- Preheat Your Oven & Prep Your Pan: First things first, let’s get that oven ready. Preheat your oven to 375°F (190°C). While it’s heating, grab your large baking sheet (I usually use a 15×10-inch jelly roll pan). Line it completely with parchment paper, leaving a slight overhang on the sides if possible; this creates little handles that make lifting the cooled crust super easy later on. If your pan is non-stick, a light spray of cooking oil might still be a good idea under the parchment to keep it from shifting, but it’s not strictly necessary.
- Cream Butter and Sugar: In a large mixing bowl, using your electric mixer on medium speed, beat the softened butter and granulated sugar together. You want to beat them until the mixture is light, fluffy, and noticeably paler in color, which usually takes about 3-5 minutes. This creaming process incorporates air, which contributes to the cookie’s tender texture. Don’t rush this step!
- Add Wet Ingredients: Once the butter and sugar are beautifully creamy, crack in the two large eggs, one at a time, beating well after each addition until fully incorporated. Then, pour in the pure vanilla extract and beat for another minute until everything is smoothly combined. Scrape down the sides of the bowl with a spatula to ensure everything is mixed in.
- Combine Dry Ingredients: In a separate medium bowl, whisk together the all-purpose flour, baking powder, and salt. Whisking them ensures they are evenly distributed throughout the dry mixture, which helps with uniform rising and seasoning of your crust.
- Gradually Mix Dry into Wet: With your mixer on low speed, gradually add the dry ingredient mixture to the wet ingredients. Mix until just combined. Stop mixing as soon as you no longer see streaks of flour. Overmixing at this stage can develop the gluten too much, leading to a tough, less tender cookie crust. We’re aiming for soft and chewy!
- Press Dough onto Pan: Now, transfer the cookie dough to your prepared baking sheet. Using your hands (I sometimes lightly flour mine if the dough is sticky) or the back of a lightly floured spoon, evenly press the dough across the entire bottom of the parchment-lined pan. Try to get it as uniform in thickness as possible, right up to the edges. This can take a few minutes, but an even thickness ensures even baking.
- Bake to Golden Perfection: Place the baking sheet into your preheated oven and bake for 12-18 minutes. Baking times can vary slightly depending on your oven, so keep an eye on it. You’re looking for the edges to be lightly golden brown and the center to be set. It might look slightly soft in the very middle, but it will firm up as it cools.
- Cool Completely: Once baked, remove the pan from the oven and immediately transfer the parchment paper with the cookie crust still on it to a wire cooling rack. Allow the crust to cool completely to room temperature. This is a crucial step! Attempting to spread the cream cheese topping on a warm crust will cause it to melt and create a messy situation. Patience is key for this glorious Banana Split Fruit Pizza.
Crafting the Creamy Banana Split Topping:
This is where we build the “cream” in our Banana Split Fruit Pizza! This creamy, dreamy, slightly tangy topping provides the perfect counterpoint to the sweet cookie crust and fresh fruit.
- Ensure Cream Cheese is Soft: Just like the butter for the crust, your full-fat cream cheese needs to be very soft. This will prevent lumps and ensure a silky-smooth topping. If you forgot to take it out, you can carefully soften it in the microwave for 15-20 seconds.
- Beat Cream Cheese Until Smooth: In a medium mixing bowl, using your electric mixer on medium-high speed, beat the softened cream cheese for 2-3 minutes. You want it to be incredibly smooth, light, and airy, with no lumps whatsoever. Scrape down the sides of the bowl frequently to ensure everything gets incorporated.
- Gradually Add Powdered Sugar: With the mixer on low speed, gradually add the powdered sugar to the cream cheese. Once all the sugar has been added, increase the speed to medium-high and beat for another 2-3 minutes until the mixture is light, fluffy, and well combined. This step is important for getting that perfect, sweet-but-not-too-sweet flavor.
- Stir in Vanilla and Adjust Consistency: Beat in the pure vanilla extract. Then, add the milk or heavy cream, starting with 2 tablespoons. Beat until the topping reaches a smooth, spreadable consistency. If it seems too thick, add the remaining tablespoon of milk or cream, a little at a time, until you achieve your desired texture. It should be easy to spread but still hold its shape.
- Chill (Optional but Recommended): For best results, I often cover the bowl and refrigerate the cream cheese topping for at least 30 minutes. This allows it to firm up slightly, making it even easier to spread evenly over the cooled crust. It also helps the flavors meld together beautifully for our Banana Split Fruit Pizza.
Prepping Your Fruit & Garnishes:
The vibrant, fresh fruit is truly the star of our Banana Split Fruit Pizza! Careful preparation ensures they look beautiful and taste their best.
- Wash and Hull Strawberries: Rinse your fresh strawberries under cool running water. Pat them dry gently with a paper towel. Then, hull them (remove the green leafy tops and the small white core) and slice them into uniform pieces, about ¼-inch thick. I like to slice them lengthwise for an attractive fan shape, but rounds work too. Set aside.
- Drain Crushed Pineapple Thoroughly: Open your can of crushed pineapple and pour it into a fine-mesh sieve set over a bowl. Press down on the pineapple with the back of a spoon to extract as much liquid as possible. For extra dryness (which I highly recommend to prevent a soggy pizza), transfer the crushed pineapple to a few layers of paper towels and gently press more liquid out. This step is crucial for the success of your Banana Split Fruit Pizza. Set aside.
- Slice Bananas and Prevent Browning: This step is best done just before assembly to minimize browning. Peel your bananas and slice them into ¼-inch thick rounds. Immediately after slicing, gently brush or toss the banana slices with a little lemon juice. This acidic bath helps to slow down the oxidation process that turns bananas brown. Don’t drench them, just a light coating is enough! Arrange them on a plate so they’re easy to grab during assembly.
- Prepare Other Garnishes: If using nuts, finely chop them if they aren’t already. Ensure your maraschino cherries are stemmed and gently patted dry if they’re very wet from their syrup. Have your chocolate syrup or fudge sauce ready to drizzle.
Assembling Your Spectacular Banana Split Fruit Pizza:
Now for the grand finale – bringing all these delicious components together to create our show-stopping Banana Split Fruit Pizza! This is where the magic happens, and a little artistic flair comes in handy.
- Spread the Creamy Topping: Once your sugar cookie crust is completely cool (I mean, completely cool – this is so important!), gently slide the parchment paper with the crust onto a clean, flat surface. Take your chilled cream cheese topping and use an offset spatula or a butter knife to spread it evenly over the entire surface of the cookie crust, going right up to the edges. Aim for a smooth, consistent layer. This creamy base is what truly makes this a “pizza”!
- Arrange the Banana Slices: Working fairly quickly (especially if you didn’t use lemon juice), start arranging your banana slices over the cream cheese topping. I like to start from the outer edge and work my way in, creating concentric circles or an appealing pattern. Overlap them slightly for a fuller look.
- Add the Sliced Strawberries: Next, artfully arrange your sliced strawberries. You can place them between the banana slices, create separate sections, or simply scatter them beautifully. The vibrant red of the strawberries always pops against the white topping and yellow bananas.
- Sprinkle the Crushed Pineapple: Gently sprinkle the thoroughly drained crushed pineapple over the entire pizza. Try to distribute it as evenly as possible. The tropical sweetness of the pineapple is a key component of the “banana split” flavor profile.
- Dollop with Whipped Cream: Now, for a soft, pillowy touch! Take your thawed whipped topping or homemade whipped cream and dollop it generously over the fruit. You can create small peaks or spread it in a more cloud-like fashion. I sometimes use a piping bag with a star tip for a fancier presentation, but a spoon works perfectly fine! This really adds to the classic Banana Split Fruit Pizza feel.
- Drizzle with Chocolate Syrup: Grab your chocolate syrup or fudge sauce. With a steady hand, drizzle it generously back and forth over the entire pizza. You can create a classic criss-cross pattern or freehand a design. Don’t be shy here; chocolate is a must for a true banana split!
- Scatter with Chopped Nuts: If you’re using them, sprinkle the chopped nuts over the chocolate drizzle. The nuts add a wonderful texture and classic banana split crunch that elevates the whole experience.
- Place the Maraschino Cherries: Finally, strategically place your maraschino cherries with stems on top of the whipped cream dollops. These are the iconic crowns of any banana split and they truly complete the look of your magnificent Banana Split Fruit Pizza.
- Serve Immediately or Chill Briefly: For the absolute best appearance and freshest taste, I recommend serving your Banana Split Fruit Pizza immediately after assembling. However, if you need to hold it for a short time (say, 30 minutes to an hour), you can chill it in the refrigerator. Just be aware that the bananas will start to soften and the crust can become slightly less crisp over time.
Tips for the Perfect Banana Split Fruit Pizza:
Creating a truly outstanding Banana Split Fruit Pizza isn’t hard, but a few insider tips can elevate your dessert from great to absolutely unforgettable!
- Room Temperature Ingredients are Key: I cannot stress this enough for both the cookie crust and the cream cheese topping. Softened butter and cream cheese cream up smoothly, ensuring no lumps and a perfectly consistent texture. Forget to take them out? A few seconds in the microwave (on low power!) can help, but room temp is always best.
- Don’t Overmix the Cookie Dough: Once you add the flour, mix only until just combined. Overmixing develops gluten, which can lead to a tough, dense cookie crust. We want tender and chewy for our fruit pizza!
- Cool the Crust Completely: Patience is a virtue, especially when it comes to the crust. Spreading the cold cream cheese topping on a warm crust will cause it to melt and get watery, making a big mess. Let it cool fully, even if that means waiting an hour or two.
- Prevent Banana Browning: The lemon juice trick is your best friend here. A light brush or toss of lemon juice on the banana slices will significantly slow down the browning process, keeping your pizza looking fresh and appetizing for longer. This is particularly important if you won’t be serving immediately.
- Drain Pineapple Thoroughly: I mentioned it in the prep, but it’s worth reiterating. Excess moisture from the pineapple can make your crust soggy. Use paper towels to really press out that extra liquid.
- Assemble Just Before Serving: While the pizza can hold up for a short while in the fridge, for the absolute best look and taste, I always recommend assembling your Banana Split Fruit Pizza right before you plan to serve it. The fruit will be at its freshest, the whipped cream still fluffy, and the crust perfectly crisp.
- Customize Your Fruit: While bananas, strawberries, and pineapple are classic for a banana split, feel free to get creative! Kiwi, mandarin oranges, blueberries, or even sliced peaches could be delicious additions or substitutions, depending on what’s in season and what you love.
- Chill for Easier Slicing: If you find the assembled pizza a bit soft or messy to slice, pop it into the refrigerator for 20-30 minutes. This will firm up the topping and make for cleaner cuts.
Serving and Storage Suggestions:
You’ve put so much love into creating this incredible Banana Split Fruit Pizza, so let’s make sure you enjoy every last bite and know how to keep it fresh!
- Serving Presentation: Once assembled, I like to serve the pizza directly from the baking sheet, using a large spatula or pie server to cut and lift individual slices. You can cut it into squares, wedges, or even smaller “party squares” if you’re serving a crowd. The vibrant colors of the fruit and the drizzles of chocolate always make for a show-stopping presentation!
- Best Enjoyed Fresh: As I’ve mentioned, this fruit pizza is truly at its peak when enjoyed within a few hours of assembly. The cookie crust will be crisp, the cream cheese topping perfectly creamy, and the fruit bright and fresh.
- Short-Term Storage: If you have leftovers, or need to store it for a short period before serving, gently cover the baking sheet loosely with plastic wrap or aluminum foil. Refrigerate the Banana Split Fruit Pizza. It will keep well in the refrigerator for up to 1-2 days.
- What to Expect with Storage:
- Bananas: Even with lemon juice, bananas will eventually start to brown and soften after about 24 hours. They’ll still be edible, just not as pristine.
- Crust: The cookie crust will gradually soften as it absorbs moisture from the cream cheese topping and fruit. It will still taste delicious, but it won’t be as crisp as when first made.
- Whipped Cream: Store-bought whipped topping holds up quite well, but homemade whipped cream might deflate a little over time.
- Freezing is Not Recommended: Due to the fresh fruit and the delicate nature of the whipped cream and cookie crust, I do not recommend freezing the assembled Banana Split Fruit Pizza. The textures would change significantly upon thawing, leading to a watery and mushy result.
- Make-Ahead Components: If you want to get a head start, you can:
- Bake and cool the cookie crust a day in advance. Store it uncovered at room temperature or lightly covered (to prevent condensation) if your climate is humid.
- Prepare the cream cheese topping a day in advance and store it covered in the refrigerator. Just give it a good whisk or beat it briefly with your electric mixer before spreading to restore its fluffy texture.
- Have your nuts chopped and pineapple drained.
Then, simply prep your fresh fruit and assemble closer to serving time for the ultimate fresh experience. This makes the whole process much less daunting when you’re entertaining!

Conclusion:
And there you have it, my friends! We’ve journeyed through the creation of what I truly believe is not just a dessert, but an experience. This incredible recipe for
Banana Split Fruit Pizza
is more than just a sweet treat; it’s a celebration of flavors, a canvas of vibrant colors, and a testament to how simple ingredients can come together to create something truly extraordinary. I can’t emphasize enough why this particular recipe is an absolute must-try for anyone who appreciates a delightful blend of fresh fruit, creamy goodness, and a touch of nostalgic charm. It takes the beloved elements of a classic banana split and ingeniously transforms them into an accessible, shareable, and utterly beautiful dessert pizza that will undoubtedly steal the show at any gathering or simply brighten a quiet afternoon.
The magic of this dish lies in its exquisite balance. You have the crisp, buttery sweetness of the cookie crust providing a perfect foundation. Layered atop is that luscious, tangy cream cheese frosting, which I promise you is so good it might just become your new favorite frosting recipe for everything! And then, the crowning glory: an abundance of fresh, juicy fruits. The natural sweetness of ripe bananas, the burst of strawberries, the vibrant pop of blueberries, and the tropical tang of pineapple all harmonize wonderfully, creating a symphony of textures and tastes with every single bite. It’s light yet satisfying, refreshing yet decadent, making it suitable for almost any occasion. Trust me when I say, the visual appeal alone is enough to elicit oohs and aahs, and the taste? Even better.
Serving Suggestions & Creative Variations to Elevate Your Banana Split Fruit Pizza Experience!
While this recipe is absolutely perfect as written, I always love to encourage a little culinary creativity! When it comes to serving, this fruit pizza shines as a show-stopping dessert for summer BBQs, potlucks, birthday parties, or even a fancy brunch spread. I often slice it into generous wedges and arrange them on a large platter, allowing guests to admire the colorful artistry before diving in. For a more elegant presentation, you could cut smaller, bite-sized squares, making it an ideal finger food for mingling. Consider serving it alongside a scoop of vanilla bean ice cream or a dollop of freshly whipped cream for an extra layer of indulgence – though honestly, it’s rich and creamy enough on its own.
Now, let’s talk variations! The beauty of this
Banana Split Fruit Pizza
is its incredible adaptability. Feeling adventurous? Swap out some of the traditional fruits for your seasonal favorites! Kiwi slices add a gorgeous green and a tart punch, while mango chunks bring an exotic sweetness. Blackberries or raspberries could introduce a deeper berry flavor. For the crust, while my sugar cookie base is undeniably delicious, a sturdy graham cracker crust (made with crushed graham crackers and melted butter) would offer a lovely textural contrast and a slightly different flavor profile. You could also experiment with a shortbread crust for a richer, more buttery base. As for the frosting, a touch of almond extract instead of vanilla can offer a subtle, sophisticated twist, or a hint of lemon zest could brighten it further. Don’t shy away from drizzles either! A swirl of chocolate syrup is classic for a banana split, but a caramel drizzle or even a white chocolate ganache could add another layer of flavor and visual appeal. For those with dietary restrictions, a gluten-free sugar cookie dough works beautifully for the crust, and dairy-free cream cheese options are widely available, ensuring everyone can enjoy this delightful creation.
I truly hope this recipe inspires you to get into the kitchen and create something truly memorable. There’s an immense satisfaction that comes from baking something beautiful and delicious from scratch, and I promise you, this
Banana Split Fruit Pizza
delivers on all fronts. It’s incredibly forgiving, making it perfect for both seasoned bakers and those just starting their culinary journey. The smiles you’ll see and the compliments you’ll receive will be all the reward you need.
So, please, gather your ingredients, follow these simple steps, and prepare to delight your taste buds. Once you’ve made your own magnificent fruit pizza, I would absolutely love to hear about it! Did you try a new fruit combination? Did you create a unique drizzle? What was your favorite part of making and, most importantly, eating it? Share your experiences, your photos, and your tips with me and our wonderful community. Your feedback and creativity inspire us all. Happy baking, and enjoy every single delightful bite!
Banana Split Fruit Pizza
A delightful recipe that transforms a timeless dessert classic into a vibrant, shareable masterpiece. Featuring a tender cookie crust, creamy topping, and a colorful mosaic of fresh fruits, mimicking the iconic flavors of a traditional banana split. Perfect for potlucks, parties, or a joyful weekend dessert.
Ingredients
-
1 cup (2 sticks) unsalted butter, softened
-
1 ½ cups granulated sugar
-
2 large eggs
-
2 teaspoons pure vanilla extract (for crust)
-
3 cups all-purpose flour
-
1 teaspoon baking powder
-
½ teaspoon salt
-
16 ounces (2 blocks) full-fat cream cheese, softened
-
1 cup powdered sugar
-
1 teaspoon pure vanilla extract (for topping)
-
2-3 tablespoons milk or heavy cream
-
3-4 medium bananas
-
1 pound fresh strawberries, hulled and sliced
-
1 (20-ounce) can crushed pineapple, very well drained
-
1 (8-ounce) container whipped topping, thawed, or 1 ½ cups homemade whipped cream
-
¼ cup chocolate syrup or fudge sauce
-
¼ cup chopped nuts (walnuts, pecans, or peanuts), optional
-
10-12 maraschino cherries with stems
-
1 tablespoon lemon juice, for bananas (optional)
Instructions
-
Step 1
Preheat oven to 375°F (190°C). Line a 15×10-inch baking sheet with parchment paper. -
Step 2
In a large bowl, cream softened butter and granulated sugar with an electric mixer until light and fluffy (3-5 minutes). -
Step 3
Beat in eggs one at a time, then add 2 teaspoons vanilla extract and mix until combined. Scrape bowl sides. -
Step 4
In a separate medium bowl, whisk together flour, baking powder, and salt. -
Step 5
Gradually add dry ingredients to the wet mixture on low speed. Mix until just combined; do not overmix. -
Step 6
Evenly press cookie dough onto the prepared baking sheet. Bake for 12-18 minutes, until edges are lightly golden and center is set. -
Step 7
Remove from oven. Transfer crust (on parchment) to a wire rack and cool completely to room temperature. -
Step 8
In a medium bowl, beat softened cream cheese with an electric mixer until smooth and airy (2-3 minutes). Gradually beat in powdered sugar until light and fluffy. -
Step 9
Stir in 1 teaspoon vanilla extract. Add 2-3 tablespoons milk or heavy cream, beating until smooth and spreadable. Chill for 30 minutes if desired. -
Step 10
Wash, hull, and slice strawberries. Thoroughly drain crushed pineapple, pressing out excess liquid. Peel and slice bananas (¼-inch thick) just before assembly; toss with 1 tablespoon lemon juice to prevent browning. -
Step 11
Once crust is completely cool, spread the chilled cream cheese topping evenly over the entire crust. -
Step 12
Artfully arrange banana slices, then sliced strawberries, and sprinkle the thoroughly drained crushed pineapple over the cream cheese topping. -
Step 13
Dollop generously with thawed whipped topping or homemade whipped cream. Drizzle chocolate syrup or fudge sauce over the entire pizza. -
Step 14
Sprinkle with chopped nuts (if using). Strategically place maraschino cherries on top. Serve immediately for best freshness, or chill briefly (30-60 minutes) before serving. Store leftovers covered in the refrigerator for up to 1-2 days.
Important Information
Nutrition Facts (Per Serving)
It is important to consider this information as approximate and not to use it as definitive health advice.
Allergy Information
Please check ingredients for potential allergens and consult a health professional if in doubt.


Leave a Comment