

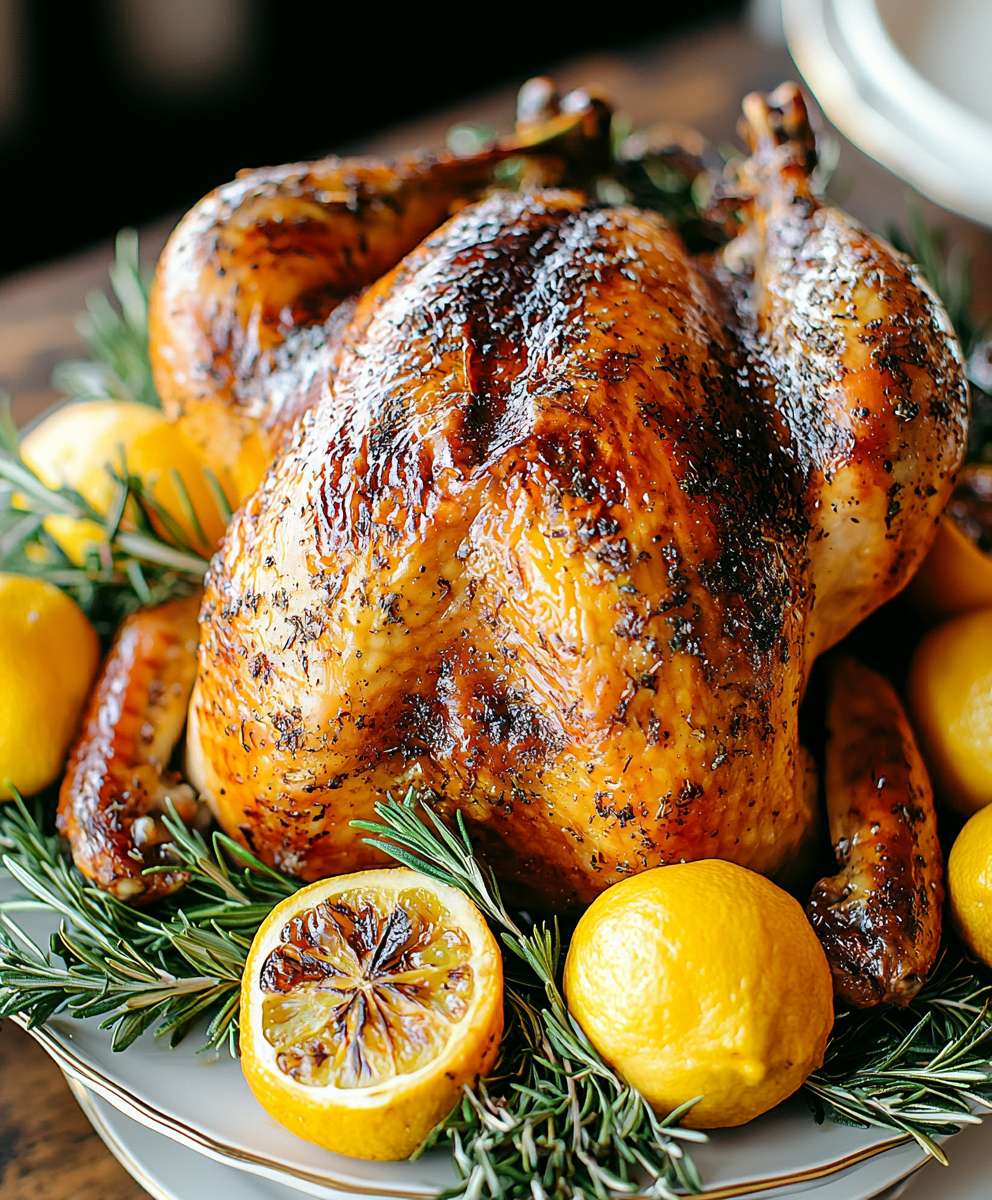
Thanksgiving turkey: the centerpiece of the holiday feast, the star of the show, and often, the source of both anticipation and a little bit of kitchen anxiety! Let’s face it, roasting a perfect turkey can feel like a high-stakes culinary challenge. But fear not, because this year, we’re banishing dry, bland birds to the history books. I’m going to guide you through creating a Thanksgiving turkey that’s so juicy, flavorful, and beautifully browned, it will have your guests singing your praises.
The Thanksgiving turkey tradition is deeply rooted in American history, dating back to the early harvest celebrations of the Pilgrims. While the exact menu of that first Thanksgiving is debated, turkey quickly became a symbol of abundance and gratitude, solidifying its place at the heart of the holiday. Over the years, countless variations and techniques have emerged, each family adding their own special touch to this iconic dish.
What is it about a perfectly roasted turkey that makes it so irresistible? It’s the combination of tender, succulent meat, crispy skin, and the savory aroma that fills the house, creating a sense of warmth and togetherness. Plus, let’s be honest, the leftovers are pretty amazing too! From sandwiches to casseroles, the possibilities are endless. So, are you ready to master the art of the Thanksgiving turkey? Let’s get started!

Ingredients:
- Turkey: 1 (12-14 pound) turkey, thawed completely
- Brine:
- 1 gallon water
- 1 cup kosher salt
- 1/2 cup sugar
- 1 tablespoon black peppercorns
- 1 tablespoon dried juniper berries (optional)
- 1 orange, quartered
- 1 lemon, quartered
- 4 sprigs fresh rosemary
- 4 sprigs fresh thyme
- 6 cloves garlic, smashed
- Aromatic Vegetables:
- 1 large onion, quartered
- 2 carrots, roughly chopped
- 2 celery stalks, roughly chopped
- Herb Butter:
- 1 cup (2 sticks) unsalted butter, softened
- 1/4 cup chopped fresh parsley
- 1/4 cup chopped fresh sage
- 2 tablespoons chopped fresh thyme
- 2 cloves garlic, minced
- 1 teaspoon lemon zest
- 1/2 teaspoon salt
- 1/4 teaspoon black pepper
- Turkey Gravy:
- 4 tablespoons turkey drippings (from roasting pan)
- 4 tablespoons all-purpose flour
- 4 cups turkey or chicken broth
- Salt and pepper to taste
- 1 tablespoon chopped fresh parsley (optional, for garnish)
- Other:
- Vegetable oil or olive oil
- Kitchen twine
Brining the Turkey (Optional but Recommended):
Brining the turkey is a crucial step for ensuring a moist and flavorful bird. It’s an extra step, but trust me, it’s worth it! This process allows the turkey to absorb moisture and seasoning, resulting in a much more tender and delicious Thanksgiving centerpiece.
- Prepare the Brine: In a large pot (that will fit inside your refrigerator), combine the water, salt, sugar, peppercorns, juniper berries (if using), orange quarters, lemon quarters, rosemary sprigs, thyme sprigs, and smashed garlic.
- Bring to a Simmer: Heat the brine over medium heat, stirring until the salt and sugar are completely dissolved. Once dissolved, remove from heat and let it cool completely. This is very important! You don’t want to put your turkey into a warm brine.
- Submerge the Turkey: Place the thawed turkey in a large brining bag or a food-safe bucket. Pour the cooled brine over the turkey, ensuring it is completely submerged. If necessary, weigh the turkey down with a plate or a heavy object to keep it submerged.
- Refrigerate: Seal the bag or cover the bucket and refrigerate the turkey for 12-24 hours. I usually go for 18 hours it seems to be the sweet spot.
- Rinse and Pat Dry: After brining, remove the turkey from the brine and discard the brine. Rinse the turkey thoroughly under cold running water. Pat the turkey completely dry inside and out with paper towels. This is essential for achieving crispy skin.
Preparing the Turkey for Roasting:
Now that our turkey is brined (or not, if you skipped that step!), it’s time to get it ready for the oven. This involves prepping the vegetables, making the herb butter, and getting everything tucked in nicely.
- Preheat the Oven: Preheat your oven to 450°F (232°C). This high initial temperature helps to brown the skin quickly.
- Prepare the Aromatic Vegetables: In a large roasting pan, spread the quartered onion, chopped carrots, and chopped celery stalks. These vegetables will create a flavorful base for the turkey and add depth to the drippings, which we’ll use for the gravy.
- Make the Herb Butter: In a medium bowl, combine the softened butter, chopped parsley, chopped sage, chopped thyme, minced garlic, lemon zest, salt, and pepper. Mix well until everything is evenly distributed. This herb butter is the key to a flavorful and moist turkey.
- Loosen the Skin: Gently loosen the skin of the turkey breast from the meat, starting at the neck cavity. Be careful not to tear the skin. You can use your fingers or a small spatula to help with this process.
- Apply the Herb Butter: Spread about two-thirds of the herb butter under the skin of the turkey breast, ensuring it’s evenly distributed. This will infuse the breast meat with flavor and help keep it moist during roasting. Spread the remaining herb butter all over the outside of the turkey skin.
- Season the Cavity: Season the inside cavity of the turkey with salt and pepper. You can also add a few sprigs of fresh herbs (rosemary, thyme, sage) to the cavity for extra flavor.
- Truss the Turkey: Use kitchen twine to tie the turkey legs together. This helps the turkey cook evenly and maintains its shape. Tuck the wing tips under the body of the turkey to prevent them from burning.
- Place on Vegetables: Place the prepared turkey on top of the aromatic vegetables in the roasting pan.
Roasting the Turkey:
The roasting process is where the magic happens! It’s important to monitor the turkey’s temperature and adjust the cooking time as needed to ensure it’s cooked through but not dry. Patience is key here!
- Initial Roasting: Place the roasting pan in the preheated oven. Roast the turkey at 450°F (232°C) for 30 minutes. This initial high heat helps to brown the skin.
- Reduce Heat and Continue Roasting: After 30 minutes, reduce the oven temperature to 325°F (163°C). Continue roasting the turkey, basting it with pan drippings every 45 minutes to an hour. Basting helps to keep the skin moist and adds flavor.
- Monitor the Internal Temperature: Use a meat thermometer to monitor the internal temperature of the turkey. Insert the thermometer into the thickest part of the thigh, without touching the bone. The turkey is done when the internal temperature reaches 165°F (74°C).
- Estimate Roasting Time: As a general guideline, roast the turkey for approximately 13 minutes per pound. However, this is just an estimate, and the actual cooking time may vary depending on your oven and the size of the turkey. A 12-14 pound turkey will likely take around 2.5 to 3 hours.
- Tent with Foil (If Needed): If the turkey skin starts to brown too quickly, tent it loosely with aluminum foil. This will prevent the skin from burning while allowing the turkey to continue cooking through.
- Check for Doneness: In addition to the internal temperature, you can also check for doneness by piercing the thigh with a fork. If the juices run clear, the turkey is likely done.
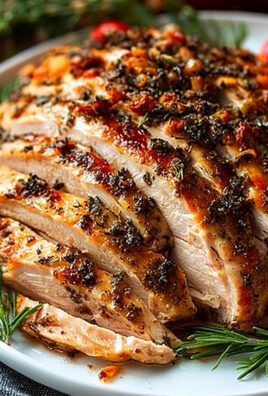
Resting and Carving:
Resting the turkey is just as important as roasting it! This allows the juices to redistribute throughout the meat, resulting in a more tender and flavorful bird. Carving it properly also makes a big difference in presentation and ease of serving.
- Rest the Turkey: Once the turkey reaches 165°F (74°C), remove it from the oven and transfer it to a cutting board. Tent it loosely with aluminum foil and let it rest for at least 30 minutes, or up to an hour.
- Prepare the Gravy (While Turkey Rests): While the turkey is resting, prepare the gravy. Skim off any excess fat from the roasting pan, leaving about 4 tablespoons of turkey drippings. Place the roasting pan over medium heat.
- Make a Roux: Whisk in the all-purpose flour into the drippings and cook for 1-2 minutes, stirring constantly, until a smooth paste forms (this is called a roux). This will help thicken the gravy.
- Add Broth: Gradually whisk in the turkey or chicken broth, making sure to scrape up any browned bits from the bottom of the pan. Bring the gravy to a simmer, stirring occasionally, and cook for 5-7 minutes, or until it has thickened to your desired consistency.
- Season and Strain: Season the gravy with salt and pepper to taste. For a smoother gravy, you can strain it through a fine-mesh sieve. Stir in the chopped fresh parsley (if using).
- Carve the Turkey:
Conclusion:
This isn’t just another Thanksgiving turkey recipe; it’s a gateway to a truly memorable holiday feast. From the aromatic herb butter slathered under the skin to the perfectly browned, crispy skin and the unbelievably juicy meat, this method guarantees a show-stopping centerpiece that will have your guests raving for years to come. Seriously, prepare for compliments! I’ve tried countless turkey recipes over the years, and this one consistently delivers the best results, making it a must-try for anyone looking to elevate their Thanksgiving game. But the best part? It’s surprisingly straightforward. While it requires a little planning and attention to detail, the steps are easy to follow, and the reward is well worth the effort. You don’t need to be a professional chef to achieve turkey perfection with this recipe. I’ve broken it down into manageable steps, so even beginner cooks can confidently tackle this Thanksgiving classic. And because I love to give you options, let’s talk serving suggestions and variations! For a classic Thanksgiving spread, serve this magnificent bird alongside creamy mashed potatoes, savory stuffing, tangy cranberry sauce, and roasted Brussels sprouts. Don’t forget the gravy! A rich, flavorful gravy made from the turkey drippings is the perfect finishing touch. Looking to add a little twist? Consider experimenting with different herb combinations in the butter. Rosemary and thyme are always a winning combination, but you could also try adding sage, oregano, or even a touch of citrus zest for a brighter flavor. For a spicier kick, incorporate a pinch of red pepper flakes into the butter. Another variation I love is to brine the turkey before roasting. Brining helps to ensure that the meat stays incredibly moist and flavorful. If you choose to brine, be sure to reduce the amount of salt in the herb butter to avoid over-salting the turkey. And speaking of sides, feel free to get creative! Roasted sweet potatoes with marshmallows, green bean casserole, and corn pudding are all classic Thanksgiving favorites that pair perfectly with this turkey. Don’t be afraid to try new recipes and add your own personal touch to the meal. Ultimately, the goal is to create a Thanksgiving feast that you and your loved ones will enjoy. This Thanksgiving turkey recipe is a fantastic starting point, but feel free to adapt it to your own tastes and preferences. I’m so confident that you’ll love this recipe that I can’t wait to hear about your experience! Give it a try this Thanksgiving, and be sure to share your photos and feedback with me. Did you make any variations? What were your guests’ reactions? I’m always eager to learn from your culinary adventures. So, gather your ingredients, preheat your oven, and get ready to create a Thanksgiving turkey that will be the star of your holiday celebration. Happy cooking, and happy Thanksgiving! I hope this recipe brings you and your loved ones joy and delicious memories for years to come. Don’t forget to tag me in your Thanksgiving photos I can’t wait to see your culinary masterpieces! Print
Thanksgiving Turkey: Your Ultimate Guide to a Perfect Bird
- Total Time: 195 minutes
- Yield: 8–12 servings 1x
Description
A classic roasted turkey with flavorful herb butter and homemade gravy. Brining recommended for extra moistness!
Ingredients
Scale- 1 (12-14 pound) turkey, thawed completely
- 1 gallon water
- 1 cup kosher salt
- 1/2 cup sugar
- 1 tablespoon black peppercorns
- 1 tablespoon dried juniper berries (optional)
- 1 orange, quartered
- 1 lemon, quartered
- 4 sprigs fresh rosemary
- 4 sprigs fresh thyme
- 6 cloves garlic, smashed
- 1 large onion, quartered
- 2 carrots, roughly chopped
- 2 celery stalks, roughly chopped
- 1 cup (2 sticks) unsalted butter, softened
- 1/4 cup chopped fresh parsley
- 1/4 cup chopped fresh sage
- 2 tablespoons chopped fresh thyme
- 2 cloves garlic, minced
- 1 teaspoon lemon zest
- 1/2 teaspoon salt
- 1/4 teaspoon black pepper
- 4 tablespoons turkey drippings (from roasting pan)
- 4 tablespoons all-purpose flour
- 4 cups turkey or chicken broth
- Salt and pepper to taste
- 1 tablespoon chopped fresh parsley (optional, for garnish)
- Vegetable oil or olive oil
- Kitchen twine
Instructions
- In a large pot (that will fit inside your refrigerator), combine the water, salt, sugar, peppercorns, juniper berries (if using), orange quarters, lemon quarters, rosemary sprigs, thyme sprigs, and smashed garlic.
- Heat the brine over medium heat, stirring until the salt and sugar are completely dissolved. Once dissolved, remove from heat and let it cool completely.
- Place the thawed turkey in a large brining bag or a food-safe bucket. Pour the cooled brine over the turkey, ensuring it is completely submerged. If necessary, weigh the turkey down with a plate or a heavy object to keep it submerged.
- Seal the bag or cover the bucket and refrigerate the turkey for 12-24 hours.
- After brining, remove the turkey from the brine and discard the brine. Rinse the turkey thoroughly under cold running water. Pat the turkey completely dry inside and out with paper towels.
- Preheat your oven to 450°F (232°C).
- In a large roasting pan, spread the quartered onion, chopped carrots, and chopped celery stalks.
- In a medium bowl, combine the softened butter, chopped parsley, chopped sage, chopped thyme, minced garlic, lemon zest, salt, and pepper. Mix well until everything is evenly distributed.
- Gently loosen the skin of the turkey breast from the meat, starting at the neck cavity. Be careful not to tear the skin.
- Spread about two-thirds of the herb butter under the skin of the turkey breast, ensuring it’s evenly distributed. Spread the remaining herb butter all over the outside of the turkey skin.
- Season the inside cavity of the turkey with salt and pepper. You can also add a few sprigs of fresh herbs (rosemary, thyme, sage) to the cavity for extra flavor.
- Use kitchen twine to tie the turkey legs together. Tuck the wing tips under the body of the turkey to prevent them from burning.
- Place the prepared turkey on top of the aromatic vegetables in the roasting pan.
- Place the roasting pan in the preheated oven. Roast the turkey at 450°F (232°C) for 30 minutes.
- After 30 minutes, reduce the oven temperature to 325°F (163°C). Continue roasting the turkey, basting it with pan drippings every 45 minutes to an hour.
- Use a meat thermometer to monitor the internal temperature of the turkey. Insert the thermometer into the thickest part of the thigh, without touching the bone. The turkey is done when the internal temperature reaches 165°F (74°C).
- As a general guideline, roast the turkey for approximately 13 minutes per pound. A 12-14 pound turkey will likely take around 2.5 to 3 hours.
- If the turkey skin starts to brown too quickly, tent it loosely with aluminum foil.
- In addition to the internal temperature, you can also check for doneness by piercing the thigh with a fork. If the juices run clear, the turkey is likely done.
- Once the turkey reaches 165°F (74°C), remove it from the oven and transfer it to a cutting board. Tent it loosely with aluminum foil and let it rest for at least 30 minutes, or up to an hour.
- While the turkey is resting, prepare the gravy. Skim off any excess fat from the roasting pan, leaving about 4 tablespoons of turkey drippings. Place the roasting pan over medium heat.
- Whisk in the all-purpose flour into the drippings and cook for 1-2 minutes, stirring constantly, until a smooth paste forms (this is called a roux).
- Gradually whisk in the turkey or chicken broth, making sure to scrape up any browned bits from the bottom of the pan. Bring the gravy to a simmer, stirring occasionally, and cook for 5-7 minutes, or until it has thickened to your desired consistency.
- Season the gravy with salt and pepper to taste. For a smoother gravy, you can strain it through a fine-mesh sieve. Stir in the chopped fresh parsley (if using).
- Carve the turkey and serve with the gravy.
Notes
- Brining the turkey is highly recommended for a more moist and flavorful bird.
- Use a reliable meat thermometer to ensure the turkey is cooked to a safe internal temperature.
- Resting the turkey is crucial for juicy meat. Don’t skip this step!
- Basting the turkey with pan drippings helps to keep the skin moist and adds flavor.
- Adjust roasting time based on the size of your turkey and your oven’s performance.
- Prep Time: 45 minutes
- Cook Time: 150 minutes

Leave a Comment