

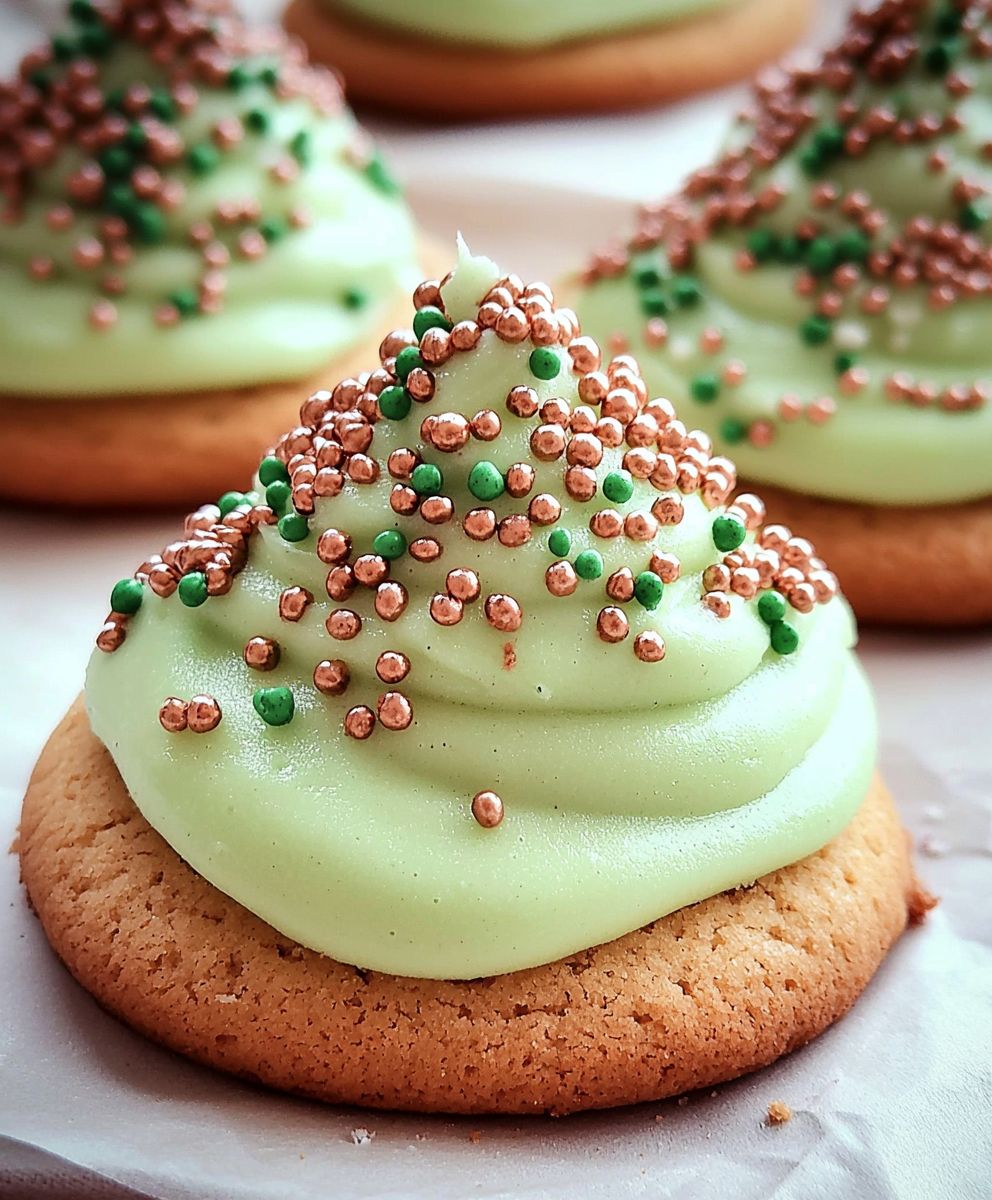
Sugar cookie frosting: the crowning glory of every holiday bake sale, the artistic medium for countless edible masterpieces, and the source of pure, unadulterated joy for cookie lovers of all ages. Have you ever bitten into a perfectly baked sugar cookie, only to be disappointed by a bland, chalky frosting? I certainly have, and that’s why I’m so excited to share my foolproof recipe for a sugar cookie frosting that’s guaranteed to elevate your cookies from ordinary to extraordinary!
While the exact origins of sugar cookies are debated, their frosted counterparts have become a beloved tradition, particularly during Christmas. From intricately decorated gingerbread men to simple, elegant snowflakes, the possibilities are endless. But beyond the visual appeal, it’s the taste and texture that truly captivate. A good sugar cookie frosting should be smooth, creamy, and just sweet enough to complement the buttery richness of the cookie itself. It should hold its shape beautifully, allowing for detailed designs, yet melt in your mouth with each bite.
This recipe delivers on all fronts. It’s incredibly easy to make, requiring only a few simple ingredients and minimal effort. Whether you’re a seasoned baker or a complete novice, you’ll be able to whip up a batch of this delectable frosting in no time. So, grab your mixer, gather your ingredients, and get ready to transform your sugar cookies into works of art that are as delicious as they are beautiful. Let’s get started!

Ingredients:
- 4 cups (approximately 1 pound) powdered sugar, sifted
- 1/2 cup (1 stick) unsalted butter, softened
- 1/4 cup milk (or more, as needed)
- 2 teaspoons vanilla extract
- 1/4 teaspoon almond extract (optional, but highly recommended!)
- Pinch of salt
- Food coloring (gel or liquid), as desired
Preparing the Buttercream Base
Alright, let’s get started on this delicious sugar cookie frosting! The key to a smooth and creamy frosting is starting with softened butter. Don’t melt it, just let it sit out at room temperature for about an hour, or until it’s easily pliable. If you’re in a hurry, you can carefully microwave it in 5-second intervals, but be super careful not to melt it!
- Cream the Butter: In a large mixing bowl (or the bowl of your stand mixer), beat the softened butter with an electric mixer on medium speed until it’s light and fluffy. This usually takes about 2-3 minutes. You want it to be almost whipped in appearance. This step is crucial for incorporating air into the frosting, which will make it light and airy. Don’t skip this step!
- Add the Powdered Sugar: Gradually add the sifted powdered sugar, one cup at a time, to the creamed butter. Beat on low speed after each addition to prevent a powdered sugar cloud from erupting in your kitchen. Trust me, you don’t want that! Sifting the powdered sugar is important because it removes any lumps, ensuring a smooth frosting. If you skip sifting, you might end up with little sugar clumps in your final product.
- Incorporate the Extracts: Add the vanilla extract and almond extract (if using) to the mixture. The almond extract adds a lovely depth of flavor that complements the sweetness of the sugar cookies perfectly. But if you’re not a fan of almond, feel free to omit it. Beat on low speed until just combined.
- Add the Milk: Gradually add the milk, one tablespoon at a time, while beating on low speed. You’re looking for a smooth and creamy consistency. The amount of milk you need will depend on the humidity and the exact texture of your butter and powdered sugar. So, add it slowly and check the consistency after each addition. You want the frosting to be spreadable but not too runny.
- Add a Pinch of Salt: A tiny pinch of salt enhances the sweetness and balances the flavors. Don’t skip this step! It makes a surprisingly big difference.
- Beat Until Smooth: Once all the ingredients are added, increase the mixer speed to medium and beat for another 1-2 minutes, or until the frosting is light, fluffy, and completely smooth. Scrape down the sides of the bowl as needed to ensure everything is evenly incorporated.
Adjusting the Consistency
Now, let’s talk about consistency. The perfect frosting consistency depends on how you plan to use it. For flooding sugar cookies, you’ll want a thinner consistency than for piping borders or adding details. Here’s how to adjust it:
- For Thicker Frosting (Piping): If your frosting is too thin, add more sifted powdered sugar, one tablespoon at a time, until you reach the desired consistency. Be sure to beat well after each addition.
- For Thinner Frosting (Flooding): If your frosting is too thick, add more milk, one teaspoon at a time, until you reach the desired consistency. Again, beat well after each addition. You want it to be thin enough to spread easily but not so thin that it runs off the edges of the cookie. A good test is to lift a spoonful of frosting and let it drizzle back into the bowl. If the drizzle disappears back into the frosting within 5-10 seconds, it’s likely the right consistency for flooding.
Coloring the Frosting
This is where the fun begins! You can leave your frosting white, or you can create a rainbow of colors. I prefer using gel food coloring because it’s more concentrated than liquid food coloring, so you don’t need to use as much, which means it won’t affect the consistency of your frosting as much. However, liquid food coloring will also work. Just be mindful of how much you’re adding.
- Divide the Frosting: If you want to make multiple colors, divide the frosting into separate bowls. The number of bowls will depend on how many colors you want to create.
- Add the Food Coloring: Add a small amount of food coloring to each bowl. Start with just a drop or two, and then mix well. You can always add more color, but you can’t take it away! So, it’s best to start small and gradually increase the intensity of the color.
- Mix Thoroughly: Use a spatula or spoon to mix the food coloring into the frosting until it’s evenly distributed. Be sure to scrape down the sides of the bowl to ensure that all the frosting is colored.
- Adjust the Color: If you want a deeper or more vibrant color, add more food coloring, one drop at a time, until you achieve the desired shade. Remember to mix well after each addition.
Tips and Tricks for Perfect Sugar Cookie Frosting
Here are a few extra tips and tricks to help you create the perfect sugar cookie frosting every time:
- Use High-Quality Ingredients: The quality of your ingredients will affect the taste and texture of your frosting. Use good-quality butter, vanilla extract, and powdered sugar for the best results.
- Don’t Overbeat: Overbeating the frosting can incorporate too much air, which can make it dry and crumbly. Beat until just smooth and creamy.
- Store Properly: Store leftover frosting in an airtight container at room temperature for up to 3 days, or in the refrigerator for up to a week. If refrigerating, let the frosting come to room temperature before using, and then re-beat it to restore its smooth consistency.
- Troubleshooting:
- Frosting is too thick: Add more milk, one teaspoon at a time, until you reach the desired consistency.
- Frosting is too thin: Add more sifted powdered sugar, one tablespoon at a time, until you reach the desired consistency.
- Frosting is grainy: This usually means that the powdered sugar wasn’t sifted properly. Try adding a tablespoon of milk and beating the frosting for a few more minutes. If that doesn’t work, you may need to start over with sifted powdered sugar.
- Frosting is too sweet: Add a pinch more salt or a teaspoon of lemon juice to balance the sweetness.
- Flavor Variations: Get creative with your frosting flavors! You can add a teaspoon of lemon zest for a lemon-flavored frosting, a tablespoon of cocoa powder for a chocolate frosting, or a pinch of cinnamon for a cinnamon-flavored frosting. The possibilities are endless!
Decorating Your Sugar Cookies
Now that you have your perfect sugar cookie frosting, it’s time to decorate your cookies! Here are a few ideas to get you started:
- Flooding: Use a piping bag or squeeze bottle to outline the cookie with a thicker frosting, and then fill in the center with a thinner frosting. Use a toothpick or scribe tool to smooth out the frosting and pop any air bubbles.
- Piping: Use a piping bag fitted with a decorating tip to create intricate designs on your cookies. You can pipe borders, flowers, dots, and other patterns.
- Sprinkles: Add sprinkles to your cookies while the frosting is still wet. This is a great way to add color and texture.
- Edible Markers: Use edible markers to draw designs on your cookies. This is a fun and easy way to add details.
- Fondant: Use fondant to create 3D decorations for your cookies. You can cut out shapes, mold figures, and add other embellishments.
Have fun and let your creativity shine! Decorating sugar cookies is a great way to express yourself and create beautiful and delicious treats.
Conclusion:
This isn’t just another frosting recipe; it’s your new secret weapon for creating truly unforgettable sugar cookies. I know, I know, bold statement, right? But trust me on this one. The silky smooth texture, the perfect balance of sweetness, and the incredible versatility of this sugar cookie frosting will elevate your baking game to a whole new level. It’s the kind of frosting that makes people ask, “Wow, did you buy these from a bakery?” And you get to proudly say, “Nope, made them myself!” Why is this a must-try? Because it’s foolproof. Seriously. Even if you’re a frosting novice, you can nail this recipe. The ingredients are simple, the instructions are clear, and the results are consistently amazing. Plus, it pipes like a dream, holding its shape beautifully for intricate designs or simple swirls. Forget about those runny, gloppy frostings that spread everywhere. This one stays put, creating a professional-looking finish every time. But the best part? It tastes incredible. It’s not overly sweet, which means it complements the flavor of your sugar cookies perfectly without overpowering them. It’s also incredibly adaptable. Want to add a hint of citrus? A little lemon or orange zest will do the trick. Craving something a bit more decadent? A splash of vanilla extract or a pinch of almond extract will take it to the next level. Speaking of variations, the possibilities are endless! For a festive touch, try adding a few drops of food coloring to create vibrant hues for holidays or special occasions. You can also experiment with different extracts, like peppermint for Christmas or lavender for a sophisticated touch. And don’t forget about sprinkles! They’re the perfect way to add a pop of color and fun to your sugar cookies.Serving Suggestions and Creative Ideas:
This frosting isn’t just for sugar cookies, either! It’s also fantastic on cupcakes, cakes, and even brownies. Imagine a batch of chocolate brownies topped with a generous swirl of this creamy frosting pure bliss! You can also use it as a filling for macarons or as a dip for graham crackers. Get creative and see what delicious combinations you can come up with! For serving, I love to arrange my frosted sugar cookies on a pretty platter or in a decorative tin. They make a wonderful gift for friends, family, or neighbors. And of course, they’re always a hit at parties and gatherings.Ready to Get Baking?
I’m so excited for you to try this recipe and experience the magic of this sugar cookie frosting for yourself. I truly believe it will become a staple in your baking repertoire. So, gather your ingredients, preheat your oven, and get ready to create some delicious memories. Don’t be afraid to experiment with different flavors and colors to make it your own. And most importantly, have fun! Baking should be a joyful experience, and I hope this recipe brings you lots of smiles and delicious treats. Once you’ve tried it, I’d love to hear about your experience! Share your photos and comments on social media using [Your Hashtag Here] or leave a review on the recipe page. I can’t wait to see what you create! Happy baking! Let me know if you have any questions, I’m always happy to help. Print
Sugar Cookie Frosting: The Ultimate Guide to Perfect Icing
- Total Time: 15 minutes
- Yield: 4 cups 1x
Description
Easy, delicious sugar cookie frosting for flooding, piping, or details. Customize colors and flavors!
Ingredients
- 4 cups (approximately 1 pound) powdered sugar, sifted
- 1/2 cup (1 stick) unsalted butter, softened
- 1/4 cup milk (or more, as needed)
- 2 teaspoons vanilla extract
- 1/4 teaspoon almond extract (optional, but highly recommended!)
- Pinch of salt
- Food coloring (gel or liquid), as desired
Instructions
- Cream the Butter: In a large mixing bowl (or the bowl of your stand mixer), beat the softened butter with an electric mixer on medium speed until it’s light and fluffy. This usually takes about 2-3 minutes.
- Add the Powdered Sugar: Gradually add the sifted powdered sugar, one cup at a time, to the creamed butter. Beat on low speed after each addition.
- Incorporate the Extracts: Add the vanilla extract and almond extract (if using) to the mixture. Beat on low speed until just combined.
- Add the Milk: Gradually add the milk, one tablespoon at a time, while beating on low speed. Add slowly and check the consistency after each addition.
- Add a Pinch of Salt: Add a tiny pinch of salt.
- Beat Until Smooth: Once all the ingredients are added, increase the mixer speed to medium and beat for another 1-2 minutes, or until the frosting is light, fluffy, and completely smooth. Scrape down the sides of the bowl as needed.
- Adjusting the Consistency:
- For Thicker Frosting (Piping): If your frosting is too thin, add more sifted powdered sugar, one tablespoon at a time, until you reach the desired consistency.
- For Thinner Frosting (Flooding): If your frosting is too thick, add more milk, one teaspoon at a time, until you reach the desired consistency.
- Coloring the Frosting:
- Divide the frosting into separate bowls.
- Add a small amount of food coloring to each bowl. Start with just a drop or two, and then mix well.
- Mix the food coloring into the frosting until it’s evenly distributed.
- Adjust the color by adding more food coloring, one drop at a time, until you achieve the desired shade.
Notes
- The key to smooth frosting is softened butter.
- Sifting powdered sugar prevents lumps.
- Almond extract adds a lovely depth of flavor (optional).
- Adjust milk to achieve desired consistency.
- Gel food coloring is recommended for vibrant colors without affecting consistency.
- Store leftover frosting in an airtight container at room temperature for up to 3 days, or in the refrigerator for up to a week. If refrigerating, let the frosting come to room temperature before using, and then re-beat it to restore its smooth consistency.
- Troubleshooting:
- Frosting is too thick: Add more milk, one teaspoon at a time, until you reach the desired consistency.
- Frosting is too thin: Add more sifted powdered sugar, one tablespoon at a time, until you reach the desired consistency.
- Frosting is grainy: This usually means that the powdered sugar wasn’t sifted properly. Try adding a tablespoon of milk and beating the frosting for a few more minutes. If that doesn’t work, you may need to start over with sifted powdered sugar.
- Frosting is too sweet: Add a pinch more salt or a teaspoon of lemon juice to balance the sweetness.
- Flavor Variations: Get creative with your frosting flavors! You can add a teaspoon of lemon zest for a lemon-flavored frosting, a tablespoon of cocoa powder for a chocolate frosting, or a pinch of cinnamon for a cinnamon-flavored frosting. The possibilities are endless!
- Prep Time: 10 minutes
- Cook Time: 5 minutes


Leave a Comment