

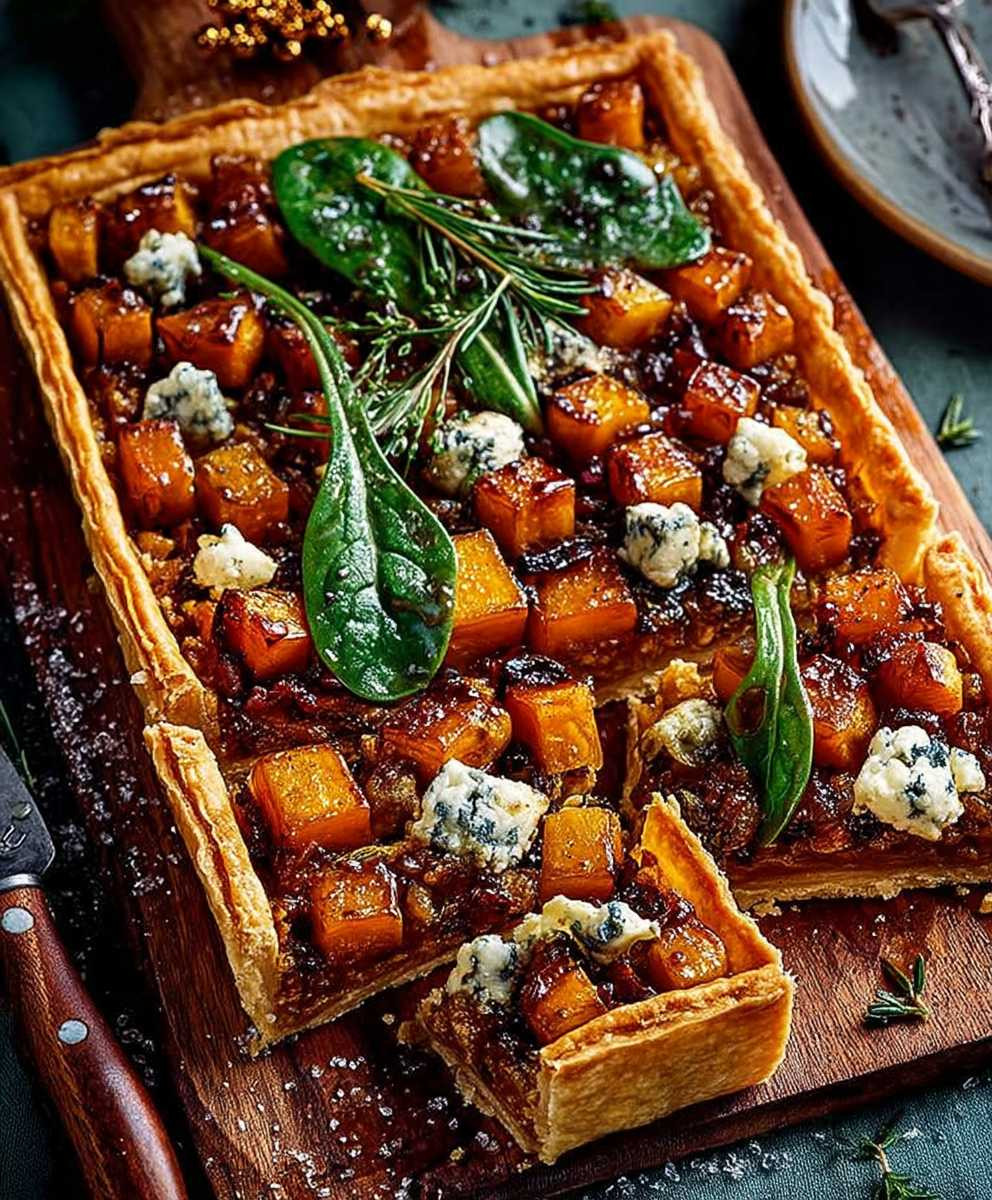
Squash Stilton Tart: Prepare to be captivated by a symphony of flavors! Imagine a buttery, flaky crust embracing the sweet earthiness of roasted squash, perfectly balanced by the sharp, creamy tang of Stilton cheese. This isn’t just a tart; it’s an experience, a culinary journey that will tantalize your taste buds and leave you craving more.
While the exact origins of combining squash and cheese in a tart are somewhat shrouded in culinary history, the pairing itself speaks to a deep-rooted appreciation for seasonal ingredients and contrasting flavors. Root vegetables like squash have been a staple in autumn and winter diets for centuries, providing sustenance and warmth. The addition of a robust cheese like Stilton, with its distinctive blue veins and pungent aroma, elevates the humble squash to new heights of sophistication.
People adore this squash stilton tart for its delightful complexity. The sweetness of the squash, often butternut or acorn, is beautifully offset by the salty, almost piquant, Stilton. The creamy texture of the cheese melts into the tender squash, creating a luxurious mouthfeel. Plus, it’s incredibly versatile! Serve it as an elegant appetizer at your next dinner party, a satisfying vegetarian main course, or even a sophisticated addition to your holiday table. Its vibrant colors and enticing aroma make it a feast for the senses, and its relatively simple preparation makes it a winner in my book. I can’t wait to share my foolproof recipe with you!

Ingredients:
- For the Pastry:
- 250g plain flour, plus extra for dusting
- 125g cold unsalted butter, cubed
- Pinch of salt
- 60-80ml ice-cold water
- For the Filling:
- 1 large butternut squash (about 1kg), peeled, deseeded, and cubed
- 2 tbsp olive oil
- 2 cloves garlic, minced
- 1 sprig fresh rosemary, leaves finely chopped
- 150g Stilton cheese, crumbled
- 3 large eggs
- 150ml double cream
- Salt and freshly ground black pepper, to taste
- Optional: A handful of toasted pumpkin seeds, for garnish
Preparing the Pastry:
Okay, let’s start with the pastry. This is the foundation of our delicious tart, so we want to get it right. Don’t be intimidated; it’s easier than you think!
- Combine the dry ingredients: In a large bowl, sift together the flour and salt. This helps to aerate the flour and ensures the salt is evenly distributed.
- Add the butter: Add the cubed cold butter to the flour mixture. The key here is to keep the butter cold! This will create flaky layers in your pastry.
- Rub the butter into the flour: Using your fingertips (or a pastry blender if you have one), rub the butter into the flour until the mixture resembles breadcrumbs. You want to see small pieces of butter still visible don’t overmix!
- Add the water: Gradually add the ice-cold water, a tablespoon at a time, mixing gently after each addition. The amount of water you need will vary depending on the humidity of your kitchen, so add it slowly until the dough just comes together.
- Form the dough: Once the dough starts to come together, gently press it into a disc. Be careful not to overwork the dough, as this will make it tough.
- Chill the dough: Wrap the dough in cling film and chill in the refrigerator for at least 30 minutes. This allows the gluten to relax and makes the pastry easier to roll out. You can even chill it for a few hours, or overnight, if you’re planning ahead.
Preparing the Butternut Squash:
While the pastry is chilling, let’s get the butternut squash ready. Roasting the squash brings out its natural sweetness and adds a lovely depth of flavor to the tart.
- Preheat the oven: Preheat your oven to 200°C (180°C fan/Gas Mark 6).
- Prepare the squash: In a large bowl, toss the cubed butternut squash with the olive oil, minced garlic, and chopped rosemary. Make sure the squash is evenly coated with the oil and seasonings.
- Roast the squash: Spread the squash in a single layer on a baking sheet. Roast in the preheated oven for 20-25 minutes, or until the squash is tender and slightly caramelized. Stir halfway through to ensure even cooking.
- Cool slightly: Once the squash is roasted, remove it from the oven and let it cool slightly.
Assembling and Baking the Tart:
Now for the fun part putting everything together! This is where the magic happens, and you’ll start to see your tart taking shape.
- Roll out the pastry: On a lightly floured surface, roll out the chilled pastry to a circle slightly larger than your tart tin (about 3cm larger). I usually use a 23cm tart tin with a removable base.
- Line the tart tin: Carefully lift the pastry and drape it over the tart tin. Gently press the pastry into the base and sides of the tin.
- Trim the edges: Trim off any excess pastry using a sharp knife. You can also crimp the edges for a decorative finish.
- Blind bake the pastry: Prick the base of the pastry with a fork. This will prevent it from puffing up during baking. Line the pastry with baking parchment and fill with baking beans or dried rice. Bake in the preheated oven for 15 minutes.
- Remove the baking beans: Remove the baking beans and parchment paper. Return the pastry to the oven and bake for another 5-10 minutes, or until the pastry is lightly golden brown. This is called blind baking, and it ensures that the pastry is cooked through before we add the filling.
- Prepare the filling: While the pastry is blind baking for the second time, in a bowl, whisk together the eggs and double cream. Season with salt and freshly ground black pepper to taste.
- Assemble the tart: Arrange the roasted butternut squash evenly over the base of the pre-baked pastry. Sprinkle the crumbled Stilton cheese over the squash.
- Pour in the egg mixture: Pour the egg and cream mixture over the squash and Stilton. Make sure the filling is evenly distributed.
- Bake the tart: Bake in the preheated oven for 25-30 minutes, or until the filling is set and golden brown. The tart should be slightly wobbly in the center, but not liquid.
- Cool slightly: Remove the tart from the oven and let it cool slightly in the tin before serving. This will help the filling to set further.
- Garnish and serve: If desired, garnish the tart with toasted pumpkin seeds before serving. Serve warm or at room temperature.
Tips for Success:
- Keep the butter cold: This is crucial for creating flaky pastry. If the butter gets too warm, the pastry will be tough.
- Don’t overwork the dough: Overworking the dough will develop the gluten and make the pastry tough. Mix the dough just until it comes together.
- Blind bake the pastry: This prevents the pastry from becoming soggy when you add the filling.
- Adjust the seasoning: Taste the filling before baking and adjust the seasoning as needed. Stilton can be quite salty, so you may not need to add much salt.
- Let the tart cool slightly: This allows the filling to set further and makes it easier to slice.
Variations:
- Add other vegetables: You can add other roasted vegetables to the tart, such as red onion, peppers, or mushrooms.
- Use different cheese: If you’re not a fan of Stilton, you can use other cheeses, such as goat cheese, Gruyere, or cheddar.
- Add herbs: Experiment with different herbs, such as thyme, sage, or oregano.
- Make it vegetarian: Ensure the Stilton you use is vegetarian, as some Stilton cheeses use animal rennet.
Enjoy your delicious homemade Butternut Squash and Stilton Tart! I hope you found this recipe easy to follow and that it becomes a new favorite in your kitchen.
Conclusion:
This isn’t just another recipe; it’s an invitation to experience a symphony of flavors and textures that will elevate your autumn dining. The creamy, tangy stilton perfectly complements the sweet, earthy squash, all nestled in a buttery, flaky crust. Its a dish thats both comforting and sophisticated, making it a true must-try. I genuinely believe this squash stilton tart will become a new favorite in your household.
Why is it a must-try? Because it’s surprisingly easy to make, even for novice bakers. The ingredients are readily available, and the steps are straightforward. But more importantly, it’s the taste! The combination of sweet and savory, creamy and crumbly, is simply irresistible. It’s a dish that will impress your guests at a dinner party, but it’s also perfect for a cozy night in. It’s versatile, adaptable, and utterly delicious.
But don’t just take my word for it! I urge you to try this recipe and discover the magic for yourself. And to help you make it your own, here are a few serving suggestions and variations to get you started.
For a delightful lunch, serve a slice of the tart with a simple green salad dressed with a light vinaigrette. The acidity of the vinaigrette will cut through the richness of the cheese and squash, creating a balanced and refreshing meal. You could also add a handful of toasted walnuts or pecans to the salad for extra crunch and flavor.
If you’re looking for a more substantial dinner option, consider serving the tart with roasted Brussels sprouts or a side of creamy polenta. The bitterness of the Brussels sprouts will complement the sweetness of the squash, while the creamy polenta will add another layer of comforting texture.
And for those who love to experiment in the kitchen, here are a few variations to try:
* Add some spice: A pinch of red pepper flakes or a dash of cayenne pepper will add a subtle kick to the tart.
* Swap the cheese: If you’re not a fan of stilton, you can substitute it with another blue cheese, such as gorgonzola or Roquefort. Or, for a milder flavor, try using goat cheese or feta.
* Incorporate herbs: Fresh sage, thyme, or rosemary will add a fragrant and earthy note to the tart. Simply sprinkle the herbs over the squash before baking.
* Make it vegetarian: Ensure your pastry is vegetarian-friendly.
* Play with the squash: Butternut squash is my go-to, but feel free to experiment with other varieties, such as acorn squash or kabocha squash. Each type of squash will bring its own unique flavor and texture to the tart.
I’m so excited for you to try this recipe and experience the joy of creating something truly special. Once you’ve made it, I would absolutely love to hear about your experience! Did you make any variations? What did you serve it with? What did your family and friends think? Please share your thoughts and photos in the comments below. Your feedback is invaluable, and it helps me to create even better recipes in the future. So go ahead, get baking, and let me know what you think of this incredible squash stilton tart! Happy cooking!
Squash Stilton Tart: A Delicious & Easy Recipe
Savory tart with sweet roasted butternut squash, creamy Stilton, and flaky homemade crust. Perfect for autumn.
Ingredients
- 250g plain flour, plus extra for dusting
- 125g cold unsalted butter, cubed
- Pinch of salt
- 60-80ml ice-cold water
- 1 large butternut squash (about 1kg), peeled, deseeded, and cubed
- 2 tbsp olive oil
- 2 cloves garlic, minced
- 1 sprig fresh rosemary, leaves finely chopped
- 150g Stilton cheese, crumbled
- 3 large eggs
- 150ml double cream
- Salt and freshly ground black pepper, to taste
- Optional: A handful of toasted pumpkin seeds, for garnish
Instructions
- Prepare the Pastry: In a large bowl, sift together the flour and salt. Add the cubed cold butter and rub it into the flour until the mixture resembles breadcrumbs. Gradually add the ice-cold water, mixing gently until the dough just comes together. Press the dough into a disc, wrap in cling film, and chill in the refrigerator for at least 30 minutes.
- Prepare the Butternut Squash: Preheat oven to 400°F (200°C). In a large bowl, toss the cubed butternut squash with the olive oil, minced garlic, and chopped rosemary. Spread the squash in a single layer on a baking sheet and roast for 20-25 minutes, or until tender and slightly caramelized, stirring halfway through. Cool slightly.
- Assemble and Bake the Tart: On a lightly floured surface, roll out the chilled pastry to a circle slightly larger than your tart tin (about 3cm larger). Line a 9-inch (23cm) tart tin with a removable base with the pastry. Trim the edges and prick the base with a fork. Line the pastry with baking parchment and fill with baking beans or dried rice. Bake in the preheated oven for 15 minutes.
- Remove the baking beans and parchment paper. Return the pastry to the oven and bake for another 5-10 minutes, or until the pastry is lightly golden brown.
- While the pastry is blind baking for the second time, in a bowl, whisk together the eggs and double cream. Season with salt and freshly ground black pepper to taste.
- Arrange the roasted butternut squash evenly over the base of the pre-baked pastry. Sprinkle the crumbled Stilton cheese over the squash.
- Pour the egg and cream mixture over the squash and Stilton.
- Bake in the preheated oven for 25-30 minutes, or until the filling is set and golden brown. The tart should be slightly wobbly in the center, but not liquid.
- Cool slightly in the tin before serving. Garnish with toasted pumpkin seeds, if desired. Serve warm or at room temperature.
Notes
- Keep the butter cold for flaky pastry.
- Don’t overwork the dough.
- Blind bake the pastry to prevent a soggy bottom.
- Adjust seasoning to taste, considering the saltiness of Stilton.
- Let the tart cool slightly for easier slicing.
- Variations: Add other roasted vegetables, use different cheeses (goat cheese, Gruyere, cheddar), experiment with herbs (thyme, sage, oregano), or ensure vegetarian Stilton is used.


Leave a Comment