

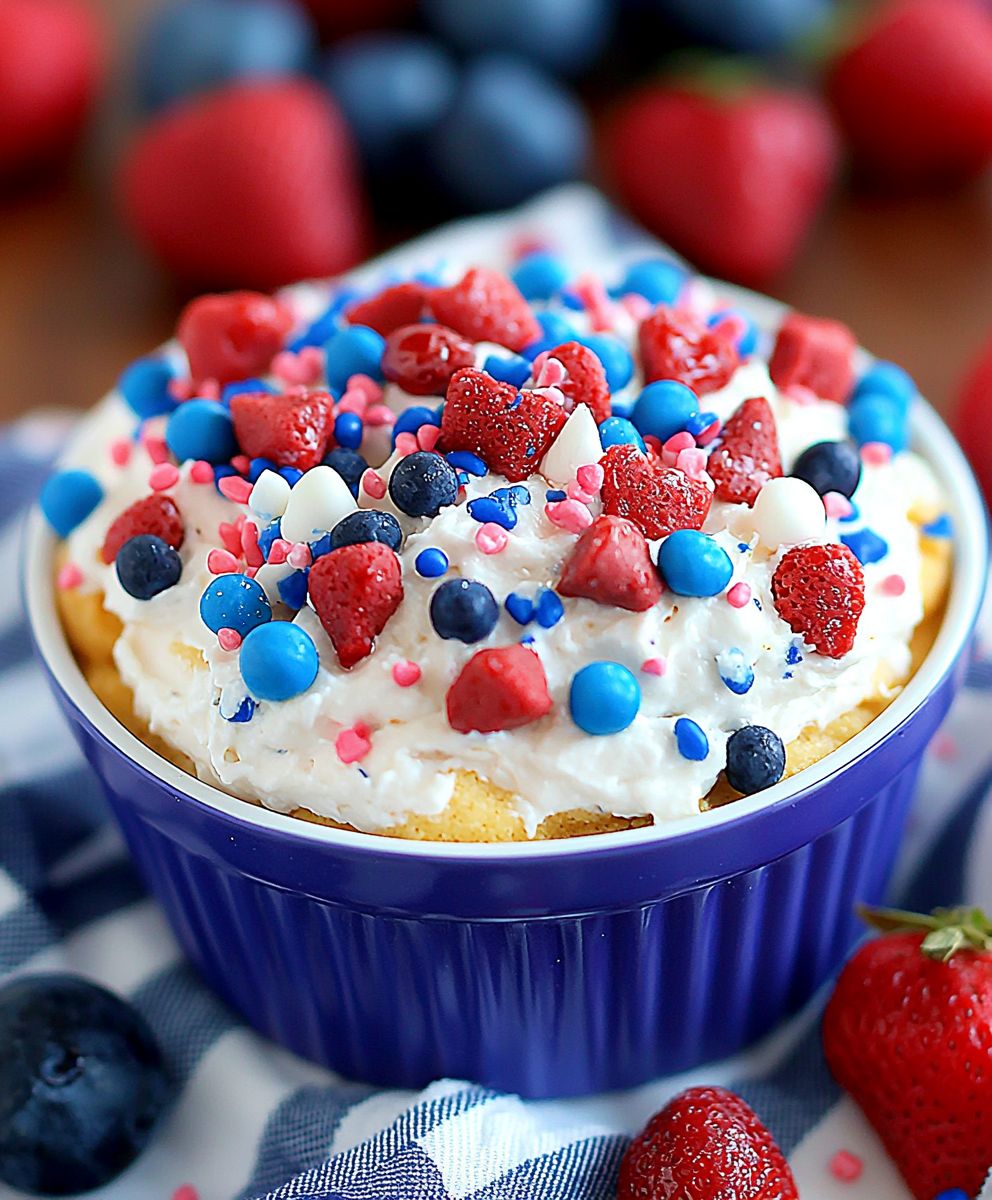
Red White Blue Cake Dip: the ultimate no-bake dessert that screams patriotism and party fun! Imagine sinking a graham cracker, pretzel, or even a fresh strawberry into a creamy, sweet concoction that tastes just like a vanilla cake, but without all the baking fuss. This isn’t just a dip; it’s a celebration in every bite, perfect for your Fourth of July barbecue, Memorial Day gathering, or any occasion where you want to show off your festive spirit.
While the exact origins of cake dip are shrouded in mystery, its popularity has exploded in recent years, becoming a staple at potlucks and parties across the nation. Its appeal lies in its simplicity and versatility. Who doesn’t love the taste of cake? And who has time to bake one when you’re already juggling a million other things? That’s where this Red White Blue Cake Dip comes in. It delivers all the deliciousness of cake in a fraction of the time and with minimal effort.
People adore this dish for its incredible taste and satisfying texture. The creamy base, combined with the bursts of color from the red, white, and blue sprinkles, creates a delightful sensory experience. Plus, it’s incredibly convenient. You can whip it up in minutes, chill it until you’re ready to serve, and watch as your guests devour every last spoonful. Get ready to be the star of the party with this easy and delicious treat!

Ingredients:
- 1 (8 ounce) package cream cheese, softened
- 1 (14 ounce) can sweetened condensed milk
- 1 teaspoon vanilla extract
- 1 (8 ounce) container frozen whipped topping, thawed
- 1 box (1 pound) angel food cake, cut into 1-inch cubes
- 1 cup fresh strawberries, hulled and sliced
- 1 cup fresh blueberries
- Red, white, and blue sprinkles (optional, for garnish)
- Graham crackers, vanilla wafers, or other cookies for dipping (optional)
Preparing the Cream Cheese Base
Okay, let’s get started! The first thing we need to do is create the creamy, dreamy base for our Red, White, and Blue Cake Dip. This part is super simple, but it’s important to get the consistency just right.
- Soften the Cream Cheese: This is crucial! Make sure your cream cheese is nice and soft. Take it out of the fridge at least an hour before you plan to start, or you can microwave it for about 15-20 seconds (but watch it carefully so it doesn’t melt!). Soft cream cheese will blend much easier and give you a smoother dip.
- Combine Cream Cheese and Sweetened Condensed Milk: In a large bowl, add the softened cream cheese and the entire can of sweetened condensed milk. Now, using an electric mixer (handheld or stand mixer), beat these two ingredients together until they are completely smooth and well combined. This might take a couple of minutes, so be patient and scrape down the sides of the bowl occasionally to make sure everything is incorporated. You want a velvety, lump-free mixture.
- Add Vanilla Extract: Once the cream cheese and sweetened condensed milk are perfectly blended, add the vanilla extract. This little touch of vanilla really enhances the flavor and adds a subtle sweetness. Mix it in until it’s evenly distributed.
- Fold in the Whipped Topping: This is where we add the light and airy texture to our dip. Gently fold in the thawed whipped topping. Important: Don’t overmix! Overmixing will deflate the whipped topping and make your dip less fluffy. Use a spatula and gently fold until just combined. You should still see some streaks of whipped topping.
Assembling the Red, White, and Blue Layers
Now for the fun part creating those beautiful red, white, and blue layers! This is where the cake and berries come into play, and it’s where your dip really starts to look festive.
- Prepare the Angel Food Cake: If you haven’t already, cut your angel food cake into 1-inch cubes. Angel food cake is perfect for this dip because it’s light, airy, and soaks up the creamy mixture beautifully.
- Layering in a Bowl or Dish: Choose a clear bowl or dish so you can see the layers. A trifle bowl works great, but any clear bowl will do. Start with a layer of angel food cake cubes at the bottom of the bowl.
- Add a Layer of Cream Cheese Mixture: Spoon about one-third of the cream cheese mixture over the angel food cake cubes, spreading it evenly.
- Add the Strawberry Layer: Arrange half of the sliced strawberries over the cream cheese mixture. Try to distribute them evenly so you get a taste of strawberry in every bite.
- Repeat Layers: Repeat the layers: angel food cake cubes, cream cheese mixture, and then the remaining strawberries.
- Add the Blueberry Layer: Now it’s time for the blueberries! Add a layer of angel food cake cubes, followed by the remaining cream cheese mixture. Top with all of the blueberries, arranging them evenly.
Chilling and Serving
Almost there! Chilling the dip is essential for allowing the flavors to meld together and for the cake to soak up the creamy mixture. It also helps the dip to firm up a bit, making it easier to serve.
- Chill the Dip: Cover the bowl or dish with plastic wrap and refrigerate for at least 2 hours, or preferably overnight. This will give the flavors time to meld together and the cake time to soften.
- Garnish (Optional): Just before serving, you can garnish the dip with red, white, and blue sprinkles for an extra festive touch. This is totally optional, but it adds a fun pop of color!
- Serve with Dippers: Serve the Red, White, and Blue Cake Dip with graham crackers, vanilla wafers, or any other cookies you like. You can also use fresh fruit like apple slices or even pretzels for a sweet and salty combination.
Tips and Variations
Want to customize your Red, White, and Blue Cake Dip? Here are a few ideas to get you started:
- Berry Variations: Feel free to use other berries like raspberries or blackberries in addition to or instead of strawberries and blueberries.
- Cake Variations: If you don’t have angel food cake, you can use pound cake or even a yellow cake. Just be aware that these cakes are denser and may not soak up the dip as well.
- Add a Crunch: For a little extra crunch, sprinkle some chopped nuts (like pecans or walnuts) on top of the dip before serving.
- Chocolate Chips: Add a handful of mini chocolate chips to the cream cheese mixture for a chocolatey twist.
- Liqueur: For an adult version, add a tablespoon or two of your favorite liqueur, such as amaretto or Grand Marnier, to the cream cheese mixture.
- Individual Cups: For easy serving at a party, you can assemble the dip in individual clear cups or glasses. This also makes it easier for guests to grab and go.
- Make it Healthier: Use a light cream cheese and a sugar-free whipped topping to reduce the calories and sugar in the dip.
Make Ahead Instructions
This Red, White, and Blue Cake Dip is a great make-ahead dessert, which is perfect for parties and gatherings. You can prepare the entire dip up to 24 hours in advance. Just cover it tightly with plastic wrap and store it in the refrigerator. The flavors will actually meld together even more overnight, making it even more delicious!
Storage Instructions
If you have any leftover dip (which is unlikely!), store it in an airtight container in the refrigerator. It will keep for up to 3 days. However, keep in mind that the cake may become a bit soggy over time. It’s best to enjoy it as soon as possible.
Why This Recipe Works
This Red, White, and Blue Cake Dip is a crowd-pleaser for several reasons:
- Easy to Make: It requires minimal effort and only a few simple ingredients.
- Festive and Colorful: The red, white, and blue layers make it perfect for holidays like the 4th of July, Memorial Day, or any patriotic celebration.
- Delicious Flavor: The combination of creamy cream cheese, sweet condensed milk, and fresh berries is simply irresistible.
- Versatile: You can easily customize it to your liking with different berries, cakes, or toppings.
- Make-Ahead Friendly: It can be made ahead of time, which is a huge time-saver when you’re hosting a party.
Troubleshooting
Here are a few common issues you might encounter and how to fix them:
- Dip is too thick: If your dip is too thick, you can add a tablespoon or two of milk or cream to thin it out.
- Dip is too thin: If your dip is too thin, you can add a little more softened cream cheese or chill it for a longer period of time.
- Cake is soggy: To prevent the cake from becoming too soggy, don’t add the cream cheese mixture until just before serving. Or, you can use a denser cake like pound cake.
- Berries are bleeding: To prevent the berries from bleeding into the cream cheese mixture, pat them dry with a paper towel before adding them to the dip.
Nutritional Information (Approximate)
Please note that the nutritional information is an estimate and may vary depending on the specific ingredients you use.
- Calories: Approximately 300-400 per serving (depending on serving size and ingredients)
- Fat: 15-25 grams
- Saturated Fat: 10-15 grams
- Cholesterol: 50-70 mg
- Sodium: 100-200 mg
- Carbohydrates: 30-40 grams
- Sugar: 25-35 grams
- Protein: 5-7 grams
Enjoy your
Conclusion:
This Red White Blue Cake Dip isn’t just a recipe; it’s a celebration in a bowl! I truly believe you absolutely must try this, and here’s why: it’s ridiculously easy to make, requires minimal baking (if any!), and delivers a burst of festive flavor that’s perfect for any patriotic gathering, summer barbecue, or even just a fun weekend treat. The creamy, sweet base combined with the bright, fruity notes of the berries creates a symphony of textures and tastes that will have everyone reaching for seconds (and thirds!). But the best part? It’s incredibly versatile! While I’ve presented it as a dip, don’t feel limited by that. Imagine using it as a frosting for cupcakes, layering it into a parfait with granola, or even spreading it on toast for a decadent breakfast. For serving suggestions, think beyond the usual graham crackers. Fresh strawberries, blueberries, and raspberries are obvious choices, but consider adding some pretzel sticks for a salty-sweet contrast, or even some vanilla wafers for a classic pairing. If you’re feeling adventurous, why not try some variations? For a richer flavor, use cream cheese instead of Greek yogurt as the base. A splash of vanilla extract or almond extract can add a subtle depth of flavor. And if you’re looking to reduce the sugar content, you can substitute the powdered sugar with a sugar-free alternative. You could even add a layer of crushed Oreos to the bottom of the bowl for a “dirt cake” effect, making it even more appealing to kids (and adults who are kids at heart!). Another fun variation is to swirl in some melted white chocolate for an extra touch of sweetness and elegance. Consider adding a hint of lemon zest to brighten the flavors even further.Serving Suggestions for the Perfect Red White Blue Cake Dip Experience
For the ultimate presentation, layer the dip in a clear glass bowl to showcase the vibrant colors. Arrange your dippers artfully around the bowl for an inviting display. And don’t forget the sprinkles! A generous sprinkle of red, white, and blue sprinkles adds a touch of whimsy and makes it even more festive. I’m confident that this Red White Blue Cake Dip will become a new favorite in your household. It’s the perfect way to add a touch of fun and festivity to any occasion. It’s also a fantastic recipe to get the kids involved in the kitchen. They can help with measuring ingredients, layering the dip, and of course, adding the sprinkles! So, what are you waiting for? Gather your ingredients, put on some music, and get ready to whip up this delicious and easy treat. I promise you won’t regret it!Share Your Creations!
I’m so excited for you to try this recipe! Once you’ve made it, I would absolutely love to see your creations. Please share your photos and experiences in the comments below. Let me know what variations you tried, what dippers you used, and what your family and friends thought. Your feedback is invaluable and helps me to continue creating recipes that you’ll love. Don’t forget to tag me on social media using #RedWhiteBlueCakeDip so I can see your amazing creations! Happy dipping! I can’t wait to hear all about your Red White Blue Cake Dip adventures! Print
Red White Blue Cake Dip: A Festive & Delicious Dessert Recipe
- Total Time: 135 minutes
- Yield: 10–12 servings 1x
Description
Festive Red, White, and Blue Cake Dip! Angel food cake, creamy cheesecake filling, and fresh berries create a perfect patriotic dessert. Easy to make and always a crowd-pleaser.
Ingredients
- 1 (8 ounce) package cream cheese, softened
- 1 (14 ounce) can sweetened condensed milk
- 1 teaspoon vanilla extract
- 1 (8 ounce) container frozen whipped topping, thawed
- 1 box (1 pound) angel food cake, cut into 1-inch cubes
- 1 cup fresh strawberries, hulled and sliced
- 1 cup fresh blueberries
- Red, white, and blue sprinkles (optional, for garnish)
- Graham crackers, vanilla wafers, or other cookies for dipping (optional)
Instructions
- Soften the Cream Cheese: Make sure your cream cheese is nice and soft. Take it out of the fridge at least an hour before you plan to start, or you can microwave it for about 15-20 seconds (but watch it carefully so it doesn’t melt!).
- Combine Cream Cheese and Sweetened Condensed Milk: In a large bowl, add the softened cream cheese and the entire can of sweetened condensed milk. Using an electric mixer (handheld or stand mixer), beat these two ingredients together until they are completely smooth and well combined. Scrape down the sides of the bowl occasionally.
- Add Vanilla Extract: Once the cream cheese and sweetened condensed milk are perfectly blended, add the vanilla extract. Mix it in until it’s evenly distributed.
- Fold in the Whipped Topping: Gently fold in the thawed whipped topping. Don’t overmix! Use a spatula and gently fold until just combined. You should still see some streaks of whipped topping.
- Prepare the Angel Food Cake: Cut your angel food cake into 1-inch cubes.
- Layering in a Bowl or Dish: Choose a clear bowl or dish so you can see the layers. Start with a layer of angel food cake cubes at the bottom of the bowl.
- Add a Layer of Cream Cheese Mixture: Spoon about one-third of the cream cheese mixture over the angel food cake cubes, spreading it evenly.
- Add the Strawberry Layer: Arrange half of the sliced strawberries over the cream cheese mixture. Try to distribute them evenly so you get a taste of strawberry in every bite.
- Repeat Layers: Repeat the layers: angel food cake cubes, cream cheese mixture, and then the remaining strawberries.
- Add the Blueberry Layer: Add a layer of angel food cake cubes, followed by the remaining cream cheese mixture. Top with all of the blueberries, arranging them evenly.
- Chill the Dip: Cover the bowl or dish with plastic wrap and refrigerate for at least 2 hours, or preferably overnight.
- Garnish (Optional): Just before serving, you can garnish the dip with red, white, and blue sprinkles for an extra festive touch.
- Serve with Dippers: Serve the Red, White, and Blue Cake Dip with graham crackers, vanilla wafers, or any other cookies you like. You can also use fresh fruit like apple slices or even pretzels for a sweet and salty combination.
Notes
- Berry Variations: Feel free to use other berries like raspberries or blackberries in addition to or instead of strawberries and blueberries.
- Cake Variations: If you don’t have angel food cake, you can use pound cake or even a yellow cake. Just be aware that these cakes are denser and may not soak up the dip as well.
- Add a Crunch: For a little extra crunch, sprinkle some chopped nuts (like pecans or walnuts) on top of the dip before serving.
- Chocolate Chips: Add a handful of mini chocolate chips to the cream cheese mixture for a chocolatey twist.
- Liqueur: For an adult version, add a tablespoon or two of your favorite liqueur, such as amaretto or Grand Marnier, to the cream cheese mixture.
- Individual Cups: For easy serving at a party, you can assemble the dip in individual clear cups or glasses. This also makes it easier for guests to grab and go.
- Make it Healthier: Use a light cream cheese and a sugar-free whipped topping to reduce the calories and sugar in the dip.
- Make Ahead: Prepare the entire dip up to 24 hours in advance. Just cover it tightly with plastic wrap and store it in the refrigerator.
- Storage: Store leftover dip in an airtight container in the refrigerator for up to 3 days.
- Prep Time: 15 minutes
- Cook Time: 0 minutes
Leave a Comment