

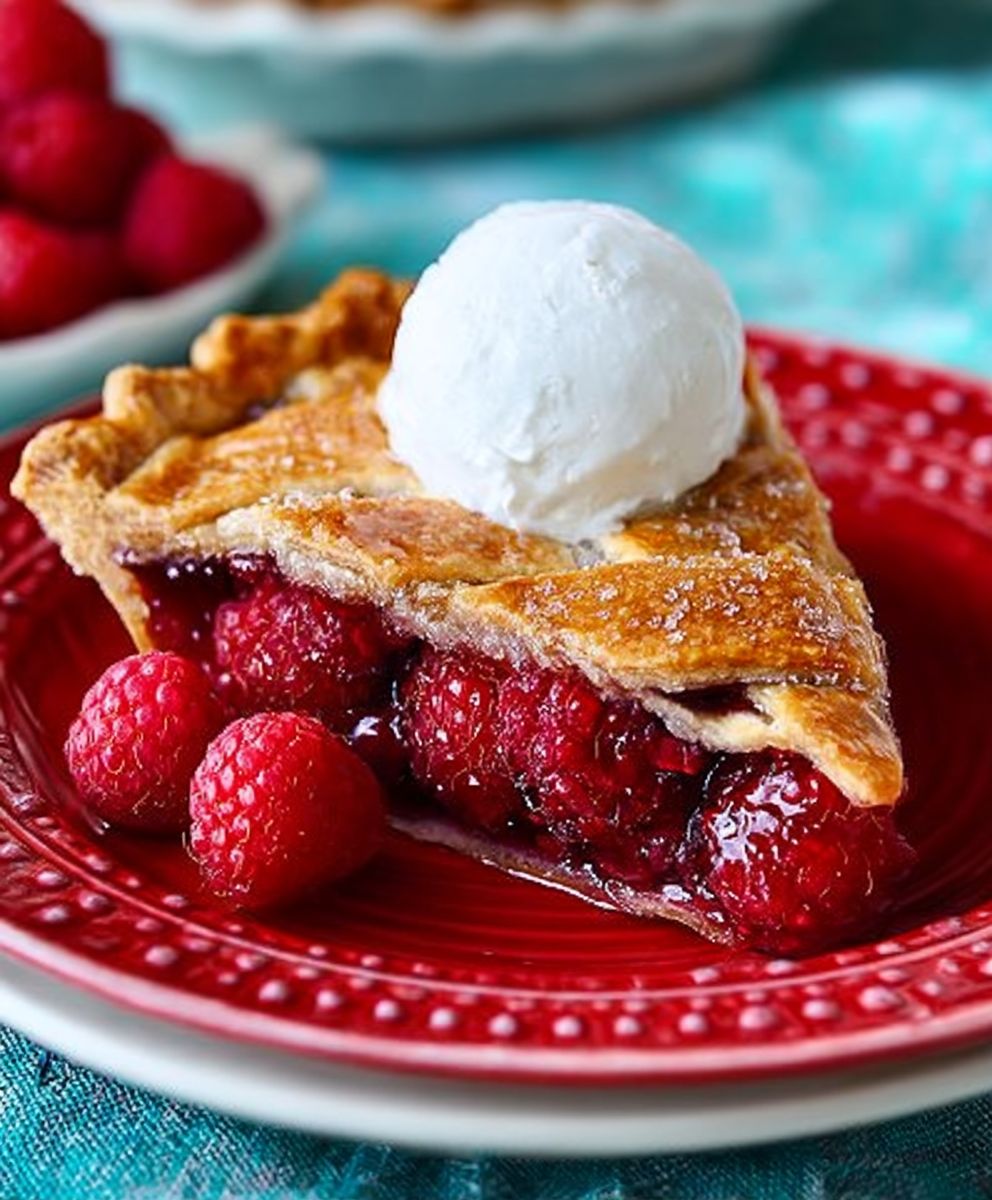
Raspberry pie, oh, where do I even begin? Imagine sinking your fork into a slice of pure summer bliss a flaky, golden crust giving way to a vibrant, ruby-red filling bursting with the sweet-tart flavor of fresh raspberries. It’s a dessert that evokes memories of sunny afternoons, grandma’s kitchen, and the simple joy of perfectly ripe fruit.
While the exact origins of fruit pies are debated, the concept of encasing fillings in pastry dates back to ancient civilizations. However, the raspberry pie as we know and love it likely evolved in Europe, where raspberries have been cultivated for centuries. It then made its way across the Atlantic, becoming a beloved staple in American baking traditions.
But what is it about this particular pie that makes it so irresistible? For me, it’s the perfect balance of flavors and textures. The buttery, crisp crust provides a delightful contrast to the soft, juicy raspberries. The slight tartness of the berries is beautifully complemented by the sweetness of the filling, creating a symphony of flavors that dance on your palate. Plus, it’s relatively easy to make, especially with my foolproof recipe! Whether you’re a seasoned baker or a kitchen novice, you can whip up a stunning raspberry pie that will impress your family and friends. So, let’s get baking!

Ingredients:
- For the Crust:
- 2 ½ cups all-purpose flour
- 1 teaspoon salt
- 1 cup (2 sticks) unsalted butter, very cold and cut into cubes
- ½ cup vegetable shortening, very cold
- 6-8 tablespoons ice water
- For the Raspberry Filling:
- 6 cups fresh raspberries (about 3 pints)
- ¾ cup granulated sugar (adjust to taste depending on raspberry sweetness)
- ¼ cup cornstarch
- 2 tablespoons lemon juice
- 1 tablespoon unsalted butter, cut into small pieces
- Pinch of salt
- 1 large egg, beaten (for egg wash)
- Turbinado sugar, for sprinkling (optional)
Preparing the Pie Crust:
Okay, let’s start with the crust. This is the foundation of our amazing raspberry pie, and a good crust makes all the difference. Don’t be intimidated; I’ll walk you through it!
- Combine Dry Ingredients: In a large bowl, whisk together the flour and salt. This ensures the salt is evenly distributed, which is important for flavor.
- Cut in the Butter and Shortening: Add the cold, cubed butter and shortening to the flour mixture. This is where the magic happens! You want to “cut” the fat into the flour until the mixture resembles coarse crumbs. You can use a pastry blender, your fingertips (work quickly to keep the butter cold!), or a food processor. If using a food processor, pulse until the mixture reaches the desired consistency. Be careful not to over-process! We want small pieces of fat, not a smooth paste. The size of peas is a good target.
- Add Ice Water: Gradually add the ice water, one tablespoon at a time, mixing gently after each addition. The amount of water you need will vary depending on the humidity and the flour you’re using. Stop adding water when the dough just comes together. It should be moist but not sticky. Overworking the dough at this stage will develop the gluten too much, resulting in a tough crust.
- Form Dough Disks: Divide the dough in half and form each half into a flat disk. Wrap each disk tightly in plastic wrap. Flattening the disks helps them chill more evenly.
- Chill the Dough: Refrigerate the dough for at least 2 hours, or preferably overnight. This allows the gluten to relax and the butter to firm up, which will result in a flaky crust. Don’t skip this step! It’s crucial for a tender crust.
Making the Raspberry Filling:
While the crust is chilling, let’s get the raspberry filling ready. This is the star of the show, so we want it to be bursting with flavor!
- Prepare the Raspberries: Gently rinse the raspberries and pick out any stems or bruised berries. Be gentle; raspberries are delicate!
- Combine Filling Ingredients: In a large bowl, combine the raspberries, sugar, cornstarch, lemon juice, and salt. Gently toss everything together until the raspberries are evenly coated. The cornstarch will help thicken the filling as it bakes, and the lemon juice will enhance the raspberry flavor.
- Let the Filling Sit: Let the raspberry mixture sit for about 15-20 minutes. This allows the raspberries to release some of their juices, which will create a more flavorful and saucy filling.
Assembling and Baking the Pie:
Now for the fun part: putting it all together and baking our beautiful raspberry pie!
- Preheat Oven: Preheat your oven to 400°F (200°C). Place a baking sheet on the lower rack of the oven. This will catch any drips from the pie as it bakes.
- Roll Out the Bottom Crust: On a lightly floured surface, roll out one of the dough disks into a 12-inch circle. The circle should be large enough to fit into your pie plate with some overhang.
- Transfer to Pie Plate: Carefully transfer the rolled-out dough to a 9-inch pie plate. Gently press the dough into the bottom and up the sides of the plate. Trim any excess dough, leaving about a 1-inch overhang.
- Add the Filling: Pour the raspberry filling into the prepared pie crust. Dot the top of the filling with the small pieces of butter. This will add richness and flavor to the filling.
- Roll Out the Top Crust: On a lightly floured surface, roll out the second dough disk into a 12-inch circle.
- Cut Vents (Optional): Use a sharp knife or a pie crust cutter to cut vents in the top crust. This will allow steam to escape during baking, preventing the crust from becoming soggy. You can get creative with the vent designs!
- Place Top Crust Over Filling: Carefully place the top crust over the raspberry filling.
- Trim and Crimp the Edges: Trim any excess dough from the top crust, leaving about a 1-inch overhang. Crimp the edges of the crust together to seal the pie. You can use a fork to press the edges together, or you can use your fingers to create a decorative crimped edge.
- Egg Wash and Sugar: Brush the top crust with the beaten egg. This will give the crust a beautiful golden-brown color. Sprinkle the top crust with turbinado sugar, if desired. This adds a nice crunch and sweetness.
- Bake the Pie: Place the pie on the preheated baking sheet in the oven. Bake for 45-55 minutes, or until the crust is golden brown and the filling is bubbling. If the crust starts to brown too quickly, you can cover the edges with aluminum foil.
- Cool Completely: Remove the pie from the oven and let it cool completely on a wire rack before slicing and serving. This is crucial! The filling needs time to set up, or it will be too runny. I know it’s tempting to dig in right away, but trust me, it’s worth the wait. Cooling can take 3-4 hours.
Tips for Success:
- Keep everything cold! Cold butter and shortening are essential for a flaky crust.
- Don’t overwork the dough. Overworking the dough will develop the gluten, resulting in a tough crust.
- Chill the dough. Chilling the dough allows the gluten to relax and the butter to firm up, which will result in a flaky crust.
- Use fresh, ripe raspberries. The best raspberries will give you the best flavor.
- Let the pie cool completely before slicing. This allows the filling to set up, preventing it from being too runny.
Variations:
- Add other berries: You can add other berries to the filling, such as blueberries, blackberries, or strawberries.
- Use a lattice crust: Instead of a full top crust, you can create a lattice crust.
- Add a crumble topping: Instead of a top crust, you can add a crumble topping made from flour, butter, and sugar.
- Serve with ice cream or whipped cream: A scoop of vanilla ice cream or a dollop of whipped cream is the perfect complement to a slice of warm raspberry pie.
Conclusion:
This isn’t just another dessert recipe; it’s an invitation to experience pure, unadulterated joy in every bite. This raspberry pie is a symphony of flavors and textures, from the buttery, flaky crust to the vibrant, tangy-sweet filling bursting with fresh raspberries. Trust me, once you’ve tasted this homemade masterpiece, you’ll never look at store-bought pies the same way again. It’s truly a must-try!
But what makes this recipe so special? It’s the perfect balance of simplicity and sophistication. The ingredients are readily available, the steps are straightforward, and the result is simply stunning. It’s the kind of dessert that will impress your guests, delight your family, and leave you feeling like a baking superstar. Plus, the aroma that fills your kitchen while it bakes is an experience in itself a warm, inviting scent that promises deliciousness to come.
And the best part? This recipe is incredibly versatile! While it’s absolutely divine served warm with a scoop of vanilla ice cream or a dollop of freshly whipped cream, there are so many other ways to enjoy it. For a touch of elegance, try dusting it with powdered sugar before serving. Or, if you’re feeling adventurous, consider adding a crumble topping made with oats, brown sugar, and butter for an extra layer of texture and flavor.
Looking for variations? You can easily adapt this recipe to use other berries, such as blueberries, blackberries, or even a mixed berry combination. Just be sure to adjust the sugar level to your liking, depending on the sweetness of the berries you choose. Another fun twist is to add a hint of citrus zest to the filling lemon or orange zest pairs beautifully with raspberries and adds a bright, refreshing note.
For a truly decadent experience, try serving this raspberry pie with a homemade raspberry sauce. Simply simmer fresh raspberries with a little sugar and lemon juice until thickened, then drizzle it over each slice. It’s the perfect complement to the pie’s already incredible flavor. Alternatively, a simple vanilla bean sauce would also be amazing.
Don’t be intimidated by the thought of making a pie from scratch. This recipe is designed to be foolproof, even for beginner bakers. Just follow the instructions carefully, and you’ll be rewarded with a pie that’s worthy of a blue ribbon. And remember, even if your pie isn’t perfect the first time, it will still taste amazing! Baking is all about practice and experimentation, so don’t be afraid to get creative and have fun.
I truly believe that this raspberry pie recipe is a game-changer. It’s the perfect dessert for any occasion, from casual family dinners to elegant dinner parties. It’s a crowd-pleaser that’s guaranteed to impress, and it’s a recipe that you’ll want to make again and again.
So, what are you waiting for? Grab your ingredients, preheat your oven, and get ready to bake the best raspberry pie you’ve ever tasted. I’m confident that you’ll love it as much as I do.
And finally, I’d love to hear about your experience! Once you’ve tried this recipe, please come back and share your thoughts in the comments below. Did you make any variations? What did your family and friends think? I can’t wait to see your creations and hear your stories. Happy baking!
Raspberry Pie: The Ultimate Guide to Baking Perfection
A delicious homemade raspberry pie with a flaky, buttery crust and a sweet-tart fresh raspberry filling.
Ingredients
- 2 ½ cups all-purpose flour
- 1 teaspoon salt
- 1 cup (2 sticks) unsalted butter, very cold and cut into cubes
- ½ cup vegetable shortening, very cold
- 6-8 tablespoons ice water
- 6 cups fresh raspberries (about 3 pints)
- ¾ cup granulated sugar (adjust to taste depending on raspberry sweetness)
- ¼ cup cornstarch
- 2 tablespoons lemon juice
- 1 tablespoon unsalted butter, cut into small pieces
- Pinch of salt
- 1 large egg, beaten (for egg wash)
- Turbinado sugar, for sprinkling (optional)
Instructions
- In a large bowl, whisk together the flour and salt.
- Add the cold, cubed butter and shortening to the flour mixture. Cut the fat into the flour using a pastry blender, fingertips (working quickly), or a food processor until the mixture resembles coarse crumbs (pea-sized).
- Gradually add the ice water, one tablespoon at a time, mixing gently after each addition until the dough just comes together.
- Divide the dough in half and form each half into a flat disk. Wrap each disk tightly in plastic wrap.
- Refrigerate the dough for at least 2 hours, or preferably overnight.
- Gently rinse the raspberries and pick out any stems or bruised berries.
- In a large bowl, combine the raspberries, sugar, cornstarch, lemon juice, and salt. Gently toss everything together.
- Let the raspberry mixture sit for about 15-20 minutes.
- Preheat oven to 400°F (200°C). Place a baking sheet on the lower rack of the oven.
- On a lightly floured surface, roll out one of the dough disks into a 12-inch circle.
- Carefully transfer the rolled-out dough to a 9-inch pie plate. Gently press the dough into the bottom and up the sides of the plate. Trim any excess dough, leaving about a 1-inch overhang.
- Pour the raspberry filling into the prepared pie crust. Dot the top of the filling with the small pieces of butter.
- On a lightly floured surface, roll out the second dough disk into a 12-inch circle.
- Cut vents in the top crust using a sharp knife or pie crust cutter.
- Carefully place the top crust over the raspberry filling.
- Trim any excess dough from the top crust, leaving about a 1-inch overhang. Crimp the edges of the crust together to seal the pie.
- Brush the top crust with the beaten egg. Sprinkle the top crust with turbinado sugar, if desired.
- Place the pie on the preheated baking sheet in the oven. Bake for 45-55 minutes, or until the crust is golden brown and the filling is bubbling. If the crust starts to brown too quickly, cover the edges with aluminum foil.
- Remove the pie from the oven and let it cool completely on a wire rack before slicing and serving (3-4 hours).
Notes
- Keep all ingredients cold, especially the butter and shortening.
- Don’t overwork the dough to avoid a tough crust.
- Chilling the dough is crucial for a flaky crust.
- Use fresh, ripe raspberries for the best flavor.
- Let the pie cool completely before slicing to allow the filling to set.

Leave a Comment