

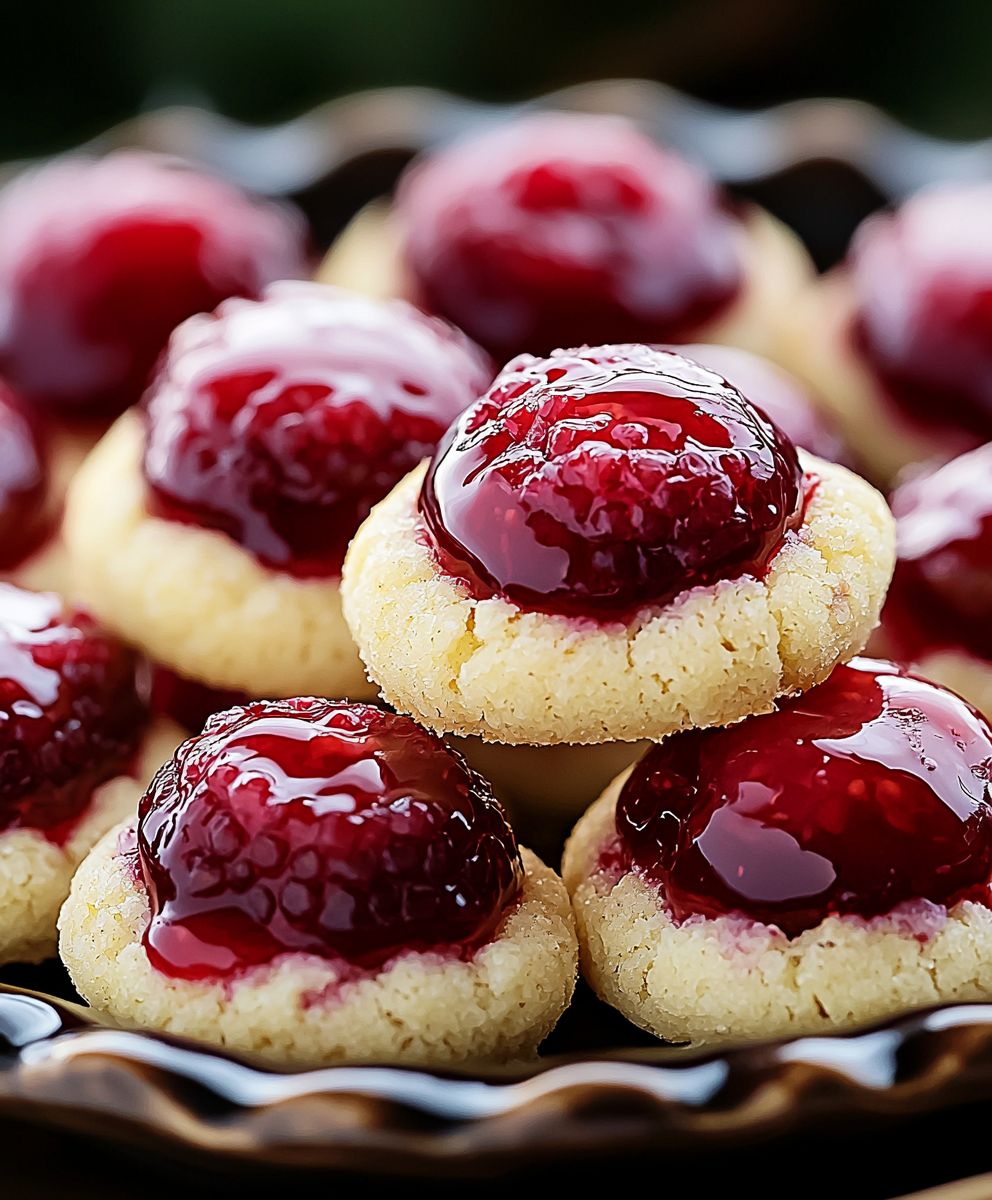
Raspberry cheesecake thumbprint cookies: Prepare to be utterly captivated by these delightful little bites of heaven! Imagine a buttery, melt-in-your-mouth cookie base, cradling a creamy, tangy cheesecake filling, all crowned with a burst of sweet-tart raspberry jam. It’s a symphony of flavors and textures that will leave you craving more.
Thumbprint cookies, in general, have a charming history, often associated with festive occasions and passed-down family recipes. While their exact origins are debated, many believe they originated in Sweden or Germany, where they were known as “Hildabrötchen” or “Hallongrotta” (raspberry cave). These cookies represent warmth, tradition, and the joy of sharing homemade treats with loved ones.
What makes these raspberry cheesecake thumbprint cookies so irresistible? It’s the perfect balance of sweet and tangy, the satisfyingly soft cookie, and the creamy, decadent cheesecake filling. They’re also incredibly convenient to make, requiring minimal ingredients and effort. Whether you’re baking for a holiday gathering, a special occasion, or simply a cozy afternoon treat, these cookies are guaranteed to be a crowd-pleaser. Get ready to experience a truly unforgettable cookie!

Ingredients:
- For the Cookie Dough:
- 1 cup (2 sticks) unsalted butter, softened
- 1 cup granulated sugar
- 1 large egg
- 1 teaspoon vanilla extract
- 2 1/2 cups all-purpose flour
- 1/4 teaspoon salt
- For the Raspberry Cheesecake Filling:
- 4 ounces cream cheese, softened
- 1/4 cup granulated sugar
- 1/2 teaspoon vanilla extract
- 1/4 cup raspberry jam (seedless preferred)
- 1 tablespoon cornstarch
- Optional Garnish:
- Powdered sugar, for dusting
- Fresh raspberries, for decoration
Preparing the Cookie Dough:
- Cream the Butter and Sugar: In a large bowl (or the bowl of your stand mixer), cream together the softened butter and granulated sugar until light and fluffy. This usually takes about 3-5 minutes. Make sure to scrape down the sides of the bowl occasionally to ensure everything is evenly mixed. You want a nice, pale, and airy mixture.
- Add the Egg and Vanilla: Beat in the egg and vanilla extract until well combined. Again, scrape down the sides of the bowl to make sure everything is incorporated. The mixture should be smooth and creamy.
- Combine Dry Ingredients: In a separate medium bowl, whisk together the all-purpose flour and salt. This helps to evenly distribute the salt throughout the flour, which is important for the flavor of the cookies.
- Gradually Add Dry Ingredients to Wet Ingredients: Gradually add the dry ingredients to the wet ingredients, mixing on low speed until just combined. Be careful not to overmix the dough, as this can result in tough cookies. Mix until the flour is just incorporated, and then stop. A few streaks of flour are okay at this point.
- Form the Dough into a Disc and Chill: Turn the dough out onto a lightly floured surface and gently form it into a disc. Wrap the disc tightly in plastic wrap and chill in the refrigerator for at least 30 minutes, or up to 2 hours. This chilling time is crucial because it allows the gluten in the flour to relax, which will prevent the cookies from spreading too much in the oven. It also makes the dough easier to handle.
Preparing the Raspberry Cheesecake Filling:
- Cream the Cream Cheese and Sugar: In a medium bowl, beat together the softened cream cheese and granulated sugar until smooth and creamy. Make sure the cream cheese is truly softened, or you’ll end up with lumps in your filling.
- Add Vanilla and Raspberry Jam: Beat in the vanilla extract and raspberry jam until well combined. The mixture should be a beautiful pink color and smell amazing!
- Add Cornstarch: Stir in the cornstarch until it is fully incorporated. The cornstarch helps to thicken the filling and prevent it from becoming too runny during baking.
- Refrigerate the Filling: Cover the bowl with plastic wrap and refrigerate the filling while you prepare the cookie dough. This will help the filling to firm up slightly, making it easier to work with.
Assembling and Baking the Cookies:
- Preheat Oven and Prepare Baking Sheets: Preheat your oven to 350°F (175°C). Line two baking sheets with parchment paper. Parchment paper is essential for preventing the cookies from sticking to the baking sheets and makes cleanup a breeze.
- Roll and Shape the Dough: Remove the chilled cookie dough from the refrigerator. On a lightly floured surface, roll the dough out to about 1/4 inch thickness. If the dough is too cold and hard to roll, let it sit at room temperature for a few minutes to soften slightly.
- Cut Out Cookie Shapes: Use a 2-inch round cookie cutter to cut out circles from the dough. Re-roll any scraps of dough to cut out more cookies.
- Transfer Cookies to Baking Sheets: Carefully transfer the cookie circles to the prepared baking sheets, leaving about 1 inch of space between each cookie.
- Make Thumbprints: Use your thumb (or the back of a small spoon) to gently press an indentation into the center of each cookie. Be careful not to press all the way through the dough. You want to create a well for the filling.
- Fill the Thumbprints: Spoon about 1/2 teaspoon of the raspberry cheesecake filling into each thumbprint. Don’t overfill the thumbprints, or the filling will spill over during baking.
- Bake the Cookies: Bake the cookies for 10-12 minutes, or until the edges are lightly golden brown and the filling is set. Keep a close eye on them, as baking times can vary depending on your oven.
- Cool the Cookies: Remove the baking sheets from the oven and let the cookies cool on the baking sheets for a few minutes before transferring them to a wire rack to cool completely.
- Garnish (Optional): Once the cookies are completely cool, dust them with powdered sugar and garnish with fresh raspberries, if desired.
Tips for Perfect Raspberry Cheesecake Thumbprint Cookies:
- Use Softened Butter and Cream Cheese: This is crucial for achieving a smooth and creamy texture in both the dough and the filling. Make sure your butter and cream cheese are at room temperature before you start baking.
- Don’t Overmix the Dough: Overmixing the dough can result in tough cookies. Mix the dry ingredients into the wet ingredients until just combined.
- Chill the Dough: Chilling the dough is essential for preventing the cookies from spreading too much in the oven. It also makes the dough easier to handle.
- Use Seedless Raspberry Jam: Seedless raspberry jam will give you a smoother and more refined filling. If you only have jam with seeds, you can strain it through a fine-mesh sieve to remove the seeds.
- Don’t Overfill the Thumbprints: Overfilling the thumbprints can cause the filling to spill over during baking. Use about 1/2 teaspoon of filling per cookie.
- Bake Until Lightly Golden Brown: Bake the cookies until the edges are lightly golden brown and the filling is set. Keep a close eye on them, as baking times can vary depending on your oven.
- Cool Completely Before Garnish: Make sure the cookies are completely cool before dusting them with powdered sugar or garnishing with fresh raspberries.
Storage Instructions:
Store the cooled cookies in an airtight container at room temperature for up to 3 days. You can also freeze the cookies for up to 2 months. To freeze, place the cookies in a single layer on a baking sheet and freeze until solid. Then, transfer the frozen cookies to an airtight container or freezer bag. Thaw the cookies at room temperature before serving.
Variations:
- Different Jam Flavors: Experiment with different jam flavors, such as strawberry, blueberry, or apricot.
- Lemon Zest: Add 1 teaspoon of lemon zest to the cookie dough for a bright and citrusy flavor.
- Almond Extract: Add 1/4 teaspoon of almond extract to the cookie dough for a nutty flavor.
- Chocolate Chips: Add 1/2 cup of mini chocolate chips to the cookie dough for a chocolatey twist.
- Cream Cheese Frosting: Instead of the raspberry cheesecake filling, top the cookies with a simple cream cheese frosting after they have cooled.
Troubleshooting:
- Cookies Spreading Too Much: If your cookies are spreading too much, make sure you are using softened (but not melted) butter and that you have chilled the dough for at least 30 minutes. You can also try adding a tablespoon or two of flour to the dough.
- Filling Cracking: If your filling is cracking, it may be overbaked. Try reducing the baking time by a minute or two.
- Cookies Too Dry: If your cookies are too dry, make sure you are not overbaking them. You can also try adding a tablespoon of milk or sour cream to the cookie dough.
- Filling Too Runny: If your filling is too runny, make sure you are using enough cornstarch. You can also try chilling the filling for a longer period of time.
Nutritional Information (Approximate, per cookie):
(Note: Nutritional information is an estimate and may vary based on specific ingredients and portion sizes.)
- Calories: 120
- Fat: 7g
- Saturated Fat: 4g
- Total Time: 60 minutes
- Yield: 24 cookies 1x
- 1 cup (2 sticks) unsalted butter, softened
- 1 cup granulated sugar
- 1 large egg
- 1 teaspoon vanilla extract
- 2 1/2 cups all-purpose flour
- 1/4 teaspoon salt
- 4 ounces cream cheese, softened
- 1/4 cup granulated sugar
- 1/2 teaspoon vanilla extract
- 1/4 cup raspberry jam (seedless preferred)
- 1 tablespoon cornstarch
- Powdered sugar, for dusting
- Fresh raspberries, for decoration
- Cream the Butter and Sugar: In a large bowl (or the bowl of your stand mixer), cream together the softened butter and granulated sugar until light and fluffy. This usually takes about 3-5 minutes. Make sure to scrape down the sides of the bowl occasionally to ensure everything is evenly mixed. You want a nice, pale, and airy mixture.
- Add the Egg and Vanilla: Beat in the egg and vanilla extract until well combined. Again, scrape down the sides of the bowl to make sure everything is incorporated. The mixture should be smooth and creamy.
- Combine Dry Ingredients: In a separate medium bowl, whisk together the all-purpose flour and salt. This helps to evenly distribute the salt throughout the flour, which is important for the flavor of the cookies.
- Gradually Add Dry Ingredients to Wet Ingredients: Gradually add the dry ingredients to the wet ingredients, mixing on low speed until just combined. Be careful not to overmix the dough, as this can result in tough cookies. Mix until the flour is just incorporated, and then stop. A few streaks of flour are okay at this point.
- Form the Dough into a Disc and Chill: Turn the dough out onto a lightly floured surface and gently form it into a disc. Wrap the disc tightly in plastic wrap and chill in the refrigerator for at least 30 minutes, or up to 2 hours. This chilling time is crucial because it allows the gluten in the flour to relax, which will prevent the cookies from spreading too much in the oven. It also makes the dough easier to handle.
- Cream the Cream Cheese and Sugar: In a medium bowl, beat together the softened cream cheese and granulated sugar until smooth and creamy. Make sure the cream cheese is truly softened, or you’ll end up with lumps in your filling.
- Add Vanilla and Raspberry Jam: Beat in the vanilla extract and raspberry jam until well combined. The mixture should be a beautiful pink color and smell amazing!
- Add Cornstarch: Stir in the cornstarch until it is fully incorporated. The cornstarch helps to thicken the filling and prevent it from becoming too runny during baking.
- Refrigerate the Filling: Cover the bowl with plastic wrap and refrigerate the filling while you prepare the cookie dough. This will help the filling to firm up slightly, making it easier to work with.
- Preheat Oven and Prepare Baking Sheets: Preheat your oven to 350°F (175°C). Line two baking sheets with parchment paper. Parchment paper is essential for preventing the cookies from sticking to the baking sheets and makes cleanup a breeze.
- Roll and Shape the Dough: Remove the chilled cookie dough from the refrigerator. On a lightly floured surface, roll the dough out to about 1/4 inch thickness. If the dough is too cold and hard to roll, let it sit at room temperature for a few minutes to soften slightly.
- Cut Out Cookie Shapes: Use a 2-inch round cookie cutter to cut out circles from the dough. Re-roll any scraps of dough to cut out more cookies.
- Transfer Cookies to Baking Sheets: Carefully transfer the cookie circles to the prepared baking sheets, leaving about 1 inch of space between each cookie.
- Make Thumbprints: Use your thumb (or the back of a small spoon) to gently press an indentation into the center of each cookie. Be careful not to press all the way through the dough. You want to create a well for the filling.
- Fill the Thumbprints: Spoon about 1/2 teaspoon of the raspberry cheesecake filling into each thumbprint. Don’t overfill the thumbprints, or the filling will spill over during baking.
- Bake the Cookies: Bake the cookies for 10-12 minutes, or until the edges are lightly golden brown and the filling is set. Keep a close eye on them, as baking times can vary depending on your oven.
- Cool the Cookies: Remove the baking sheets from the oven and let the cookies cool on the baking sheets for a few minutes before transferring them to a wire rack to cool completely.
- Garnish (Optional): Once the cookies are completely cool, dust them with powdered sugar and garnish with fresh raspberries, if desired.
- Use softened butter and cream cheese for a smooth texture.
- Don’t overmix the dough.
- Chilling the dough is essential.
- Use seedless raspberry jam for a smoother filling.
- Don’t overfill the thumbprints.
- Bake until lightly golden brown.
- Cool completely before garnishing.
- Store in an airtight container at room temperature for up to 3 days or freeze for up to 2 months.
- Prep Time: 30 minutes
- Cook Time: 10 minutes
Conclusion:
This isn’t just another cookie recipe; it’s a tiny burst of joy in every bite! The combination of the buttery, melt-in-your-mouth cookie base with the tangy, creamy cheesecake filling and the sweet-tart raspberry jam is simply irresistible. I truly believe these raspberry cheesecake thumbprint cookies are a must-try for anyone who loves a little bit of elegance and a whole lot of flavor in their treats. They’re surprisingly easy to make, and the results are guaranteed to impress. Think of these cookies as the perfect addition to your next afternoon tea, a delightful treat to bring to a potluck, or even a special homemade gift for a loved one. They’re versatile and adaptable, making them a winner in any situation. But the fun doesn’t stop there! Feel free to experiment with different variations to make these cookies your own. Instead of raspberry jam, try using other fruit preserves like strawberry, blackberry, or even apricot. For a richer, more decadent flavor, consider adding a touch of almond extract to the cookie dough or a hint of lemon zest to the cheesecake filling. You could even drizzle melted white chocolate over the finished cookies for an extra touch of sweetness and visual appeal. For serving suggestions, these cookies are wonderful on their own, but they also pair beautifully with a glass of cold milk, a cup of hot coffee, or a scoop of vanilla ice cream. Imagine serving them alongside a selection of other desserts at a holiday gathering they’re sure to be a crowd-pleaser! If you’re feeling fancy, arrange them on a tiered serving platter for an elegant presentation. I’ve poured my heart into perfecting this recipe, and I’m confident that you’ll love it as much as I do. The slight tang of the cheesecake filling perfectly complements the sweetness of the raspberry, creating a symphony of flavors that will dance on your taste buds. The buttery cookie base provides the perfect foundation for all of this deliciousness, ensuring that each bite is a truly satisfying experience. Don’t be intimidated by the “cheesecake” element it’s incredibly simple to whip up and adds a luxurious touch to these humble thumbprint cookies. The entire process is straightforward and rewarding, and I promise you’ll be amazed at how easily these little gems come together. So, what are you waiting for? Gather your ingredients, preheat your oven, and get ready to bake a batch of these delightful raspberry cheesecake thumbprint cookies. I’m absolutely certain that you’ll be hooked from the very first bite. I’m so excited for you to try this recipe! Once you’ve had a chance to bake these cookies, I would absolutely love to hear about your experience. Did you make any variations? What did your friends and family think? Share your photos and stories in the comments below. Your feedback is invaluable, and I can’t wait to see your creations! Happy baking! Print
Raspberry Cheesecake Thumbprint Cookies: The Ultimate Recipe
Description
Buttery and tender thumbprint cookies filled with a creamy, tangy raspberry cheesecake filling. A delightful treat perfect for any occasion!

Leave a Comment