

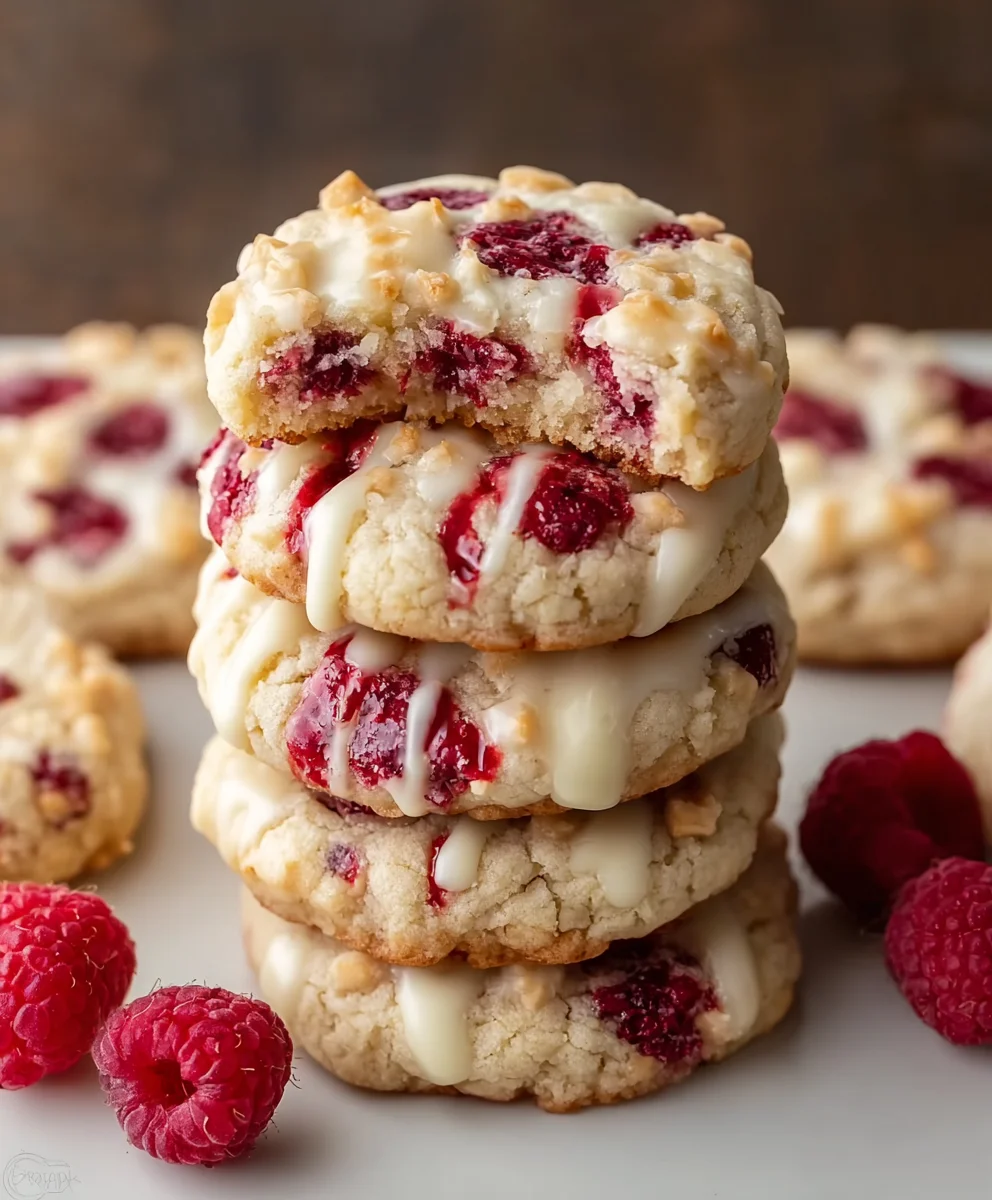
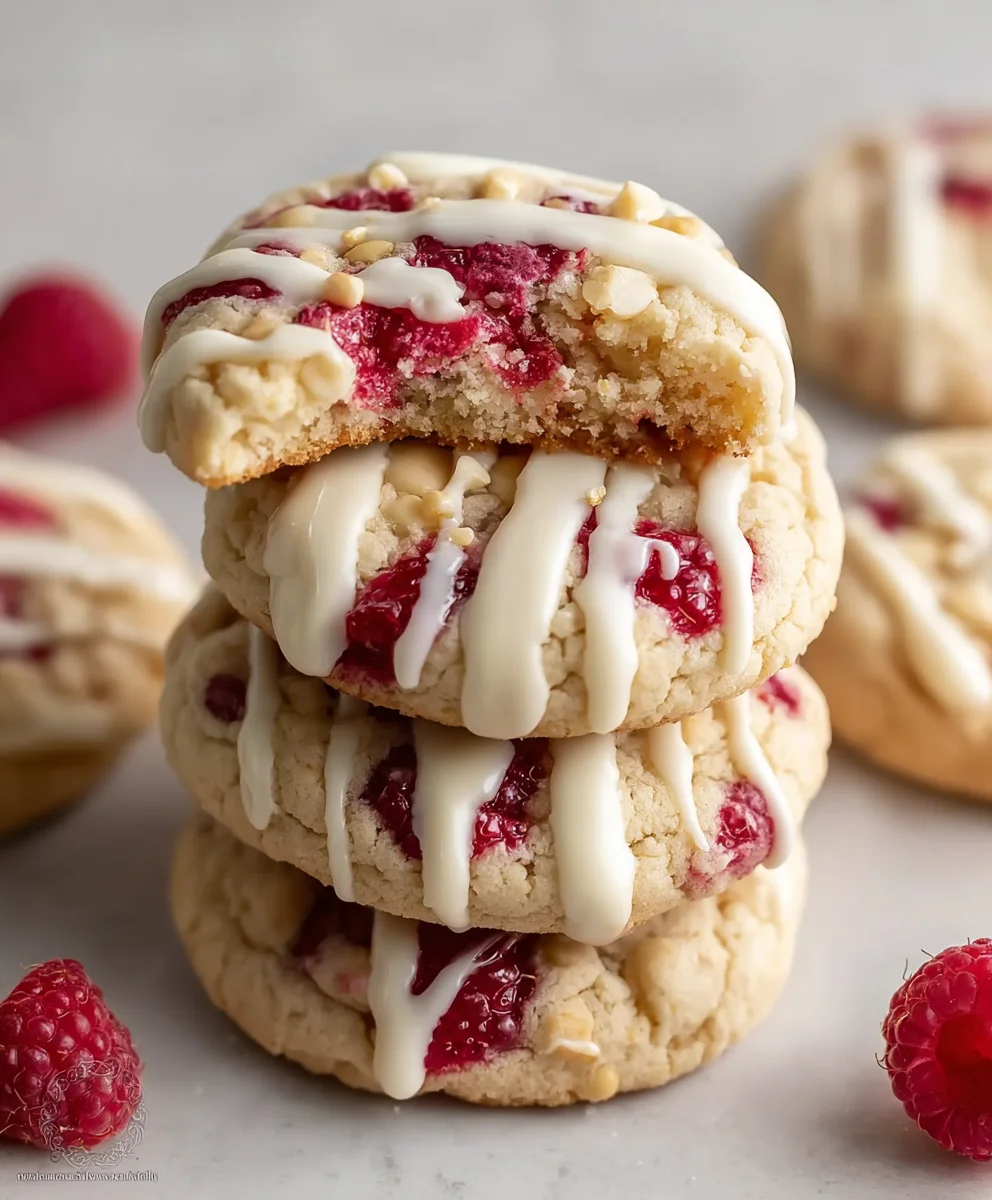
Raspberry Cheesecake Cookies are a culinary marvel, inviting you to experience the best of two beloved dessert worlds in one irresistible bite. Imagine the comforting chewiness of your favorite cookie, perfectly paired with the creamy, tangy allure of classic cheesecake, all brought to life with the vibrant burst of fresh raspberries. It’s a harmonious blend that transcends the ordinary, offering an unparalleled indulgence.
A Modern Twist on Classic Comfort
While the history of cheesecake dates back to ancient Greece, and cookies have been a staple for centuries, the ingenious fusion seen in these delightful creations is a testament to modern baking innovation. This particular adaptation brings the iconic rich, creamy texture and zesty fruitiness of a raspberry cheesecake into a convenient, handheld form, making it accessible for any occasion. People adore this dish not only for its incredible flavor profile – a sublime balance of sweet cookie, tart raspberry, and smooth cheesecake – but also for its fascinating interplay of textures. The soft, chewy cookie cradles a luscious, velvety filling, ensuring every mouthful is an exquisite journey of taste. I am truly thrilled to share how simple it is to bring these extraordinary Raspberry Cheesecake Cookies to your own kitchen, promising a treat that will impress and delight everyone who tries them.

Ingredients:
- For the Cookie Dough:
- 1 cup (2 sticks or 226g) unsalted butter, softened to room temperature
- 3/4 cup (150g) granulated sugar
- 1 large egg yolk, room temperature
- 1 teaspoon pure vanilla extract
- 2 1/2 cups (300g) all-purpose flour, sifted
- 1/2 teaspoon baking powder
- 1/4 teaspoon salt
- For the Cheesecake Filling:
- 8 ounces (226g) cream cheese, full-fat, softened to room temperature
- 1/4 cup (50g) granulated sugar
- 1 large egg yolk, room temperature
- 1 teaspoon pure vanilla extract
- For the Raspberry Swirl:
- 1/2 cup (120g) seedless raspberry jam or preserves
- 1 tablespoon water (optional, to thin if needed)
Preparing the Cookie Dough
- Bring Ingredients to Room Temperature: Before you even think about mixing, make sure your butter, egg yolk, and cream cheese are at proper room temperature. This is absolutely crucial for a smooth, homogenous dough and filling. I usually take them out of the fridge at least an hour, sometimes two, before I plan to start baking. Softened butter should yield slightly when pressed but still hold its shape; it should not be greasy or melted.
- Cream Butter and Sugar: In a large mixing bowl, using an electric mixer fitted with the paddle attachment, or by hand with a sturdy whisk, cream together the softened butter and granulated sugar. Beat on medium speed for about 3-5 minutes until the mixture is light in color, truly fluffy, and significantly increased in volume. This step is key for incorporating air, which contributes to the soft texture of our Raspberry Cheesecake Cookies. Scrape down the sides of the bowl frequently to ensure everything is thoroughly combined.
- Add Egg Yolk and Vanilla: Reduce the mixer speed to low, then add the egg yolk and vanilla extract. Mix until just combined, being careful not to overmix. The mixture might look a little curdled at this point, but don’t worry, it will come together once the dry ingredients are added. We’re using just an egg yolk here to keep the cookies tender and rich without making them too cake-like.
- Combine Dry Ingredients: In a separate medium bowl, whisk together the sifted all-purpose flour, baking powder, and salt. Sifting the flour helps to remove any lumps and aerates it, ensuring an even distribution throughout the dough and a lighter cookie.
- Gradually Add Dry to Wet: With the mixer on low speed, gradually add the dry ingredient mixture to the wet ingredients, a third at a time. Mix only until just combined and no streaks of flour remain. It’s very important not to overmix the dough once the flour is added, as this can develop the gluten too much, resulting in tough cookies. The dough will be soft but shouldn’t be sticky.
-
Chill the Dough: Gather the dough into a ball, flatten it slightly into a disc, wrap it tightly in plastic wrap, and refrigerate for at least 30 minutes. I often find an hour is ideal, and sometimes even longer if I’m prepping ahead. Chilling the dough helps to firm up the butter, making the dough easier to handle and preventing the cookies from spreading too much in the oven. It also allows the flavors to meld beautifully.
The Importance of Chilling Time
Do not skip this step! A properly chilled dough is the secret to perfectly shaped cookies. If you try to bake unchilled dough, especially one with a good amount of butter, your beautiful cookie cups might collapse and spread into flat discs, making it difficult to hold that lovely cheesecake filling. Plus, the slight firmness helps create those satisfying crisp edges.
Crafting the Raspberry Cheesecake Filling
- Prepare the Cream Cheese: In a medium bowl, beat the softened cream cheese with an electric mixer on medium speed for 2-3 minutes until it is completely smooth and free of any lumps. It’s vital that your cream cheese is truly at room temperature, otherwise, you’ll end up with a lumpy filling, no matter how much you beat it. Scrape down the bowl a few times to ensure uniformity.
- Add Sugar and Vanilla: Add the granulated sugar and vanilla extract to the cream cheese. Beat on low speed until just combined, then increase to medium speed and beat for another minute or two, until the mixture is light and fluffy. The sugar will dissolve into the cream cheese, giving it that classic smooth cheesecake texture.
- Incorporate Egg Yolk: Finally, add the remaining large egg yolk to the cream cheese mixture. Beat on low speed until just incorporated. The egg yolk helps to stabilize the filling and gives it a richer, more custard-like consistency when baked. Again, be careful not to overmix, as too much air can cause the filling to puff up too much and then crack.
- Prepare the Raspberry Swirl: In a small microwave-safe bowl, combine the seedless raspberry jam or preserves with 1 tablespoon of water, if using. Microwave for 15-20 seconds on high, or gently heat on the stovetop, just until the jam is slightly warmed and becomes a bit more fluid. This makes it much easier to swirl into the cheesecake filling later. If your jam is already quite fluid, you might not need the extra water. I always taste it here to make sure it’s just right – a little tartness is great to cut through the richness of the cookie and cheesecake.
Assembling and Baking the Raspberry Cheesecake Cookies
- Preheat Oven and Prepare Baking Sheets: Preheat your oven to 350°F (175°C). Line two baking sheets with parchment paper or silicone baking mats. This prevents sticking and makes for easy cleanup.
- Scoop the Cookie Dough: Remove the chilled cookie dough from the refrigerator. Using a 1.5-tablespoon cookie scoop (or just about 1.5 tablespoons of dough per cookie), scoop mounds of dough onto the prepared baking sheets, spacing them about 2 inches apart. You should get approximately 20-24 cookies.
-
Create the Indentation: This is a fun and crucial step! Using your thumb, the back of a rounded teaspoon, or a small tart tamper, gently press an indentation into the center of each cookie dough ball. You want to create a nice, deep well for the cheesecake filling, but be careful not to press all the way through the dough to the baking sheet. Aim for a border of about 1/4 to 1/2 inch around the edge. If the edges crack, gently press them back together.
Achieving the Perfect Well
I find that a well-chilled dough is much less prone to cracking during this step. If your dough feels too hard, let it sit at room temperature for just 5 minutes to soften slightly, but not so much that it becomes sticky. A slightly floured thumb or tool can also help prevent sticking.
- Fill with Cheesecake Mixture: Spoon or pipe the cheesecake filling into each indentation. I usually use a small spoon, filling each well until it’s almost level with the top edge of the cookie dough. Don’t overfill, as the cheesecake will expand slightly during baking. If you have a piping bag, it can make this step very neat and easy.
- Add the Raspberry Swirl: Drizzle or dollop about 1/4 teaspoon of the warmed raspberry jam mixture over the top of the cheesecake filling in each cookie. Using a toothpick, a small skewer, or the tip of a knife, gently swirl the jam into the cheesecake filling to create that beautiful marbled effect. Try not to drag the jam all the way to the cookie dough edge, keep the swirl mostly within the cheesecake.
- Bake the Raspberry Cheesecake Cookies: Place the baking sheets in the preheated oven. Bake for 12-15 minutes, or until the edges of the cookies are lightly golden brown and the cheesecake filling is set and just slightly puffed in the center. The cheesecake might still have a very slight jiggle when you gently shake the pan, but it should not be liquid. Keep an eye on them, as oven temperatures can vary!
- Cool Completely: Once baked, remove the baking sheets from the oven. Let the Raspberry Cheesecake Cookies cool on the baking sheets for 5-10 minutes before carefully transferring them to a wire rack to cool completely. The cheesecake filling needs time to fully set as it cools, otherwise, it might be too soft and messy. Patience is key here! Trying to move them too soon might result in the filling collapsing or the cookies breaking apart. Once fully cooled, the filling will be firm and creamy, and the cookies will be perfectly tender.
Tips for Perfect Raspberry Cheesecake Cookies
- Storage: These delightful Raspberry Cheesecake Cookies are best enjoyed fresh, but they store beautifully. Because of the cream cheese filling, they should be stored in an airtight container in the refrigerator for up to 3-4 days. For optimal flavor and texture, I like to let them come to room temperature for about 15-20 minutes before serving. You can also freeze them for up to 1 month; simply thaw overnight in the refrigerator.
- Varying the Jam: While raspberry is my absolute favorite, feel free to experiment with other fruit jams! Strawberry, blueberry, or even cherry preserves would be absolutely delicious in these cookies. Just make sure it’s a seedless variety for the smoothest texture.
- Garnish Options: For an extra touch of elegance, you can sprinkle a little bit of powdered sugar over the cooled cookies, or even add a fresh raspberry on top of the cheesecake swirl just before serving. A tiny sprig of fresh mint can also add a beautiful pop of color.
- Don’t Overbake: Overbaking will lead to dry cookies and a rubbery cheesecake filling. The moment the edges are lightly golden and the filling looks set, they’re ready to come out. Remember, they continue to cook slightly from residual heat once removed from the oven.
- Uniform Scooping: Using a cookie scoop helps ensure that all your cookies are the same size, which means they’ll bake evenly. This is a small detail that makes a big difference in presentation and consistency.
Conclusion:
So there you have it, my friends! We’ve journeyed through the creation of what I truly believe are some of the most delightful treats you’ll ever bake. These aren’t just any cookies; they are an experience, a symphony of flavors that dance on your palate with every single bite. I’m talking about that perfect balance of soft, chewy cookie surrounding a luscious, tangy cheesecake filling, all brightened by the burst of fresh, tart raspberries. It’s an indulgence that feels sophisticated yet utterly comforting, making them an absolute must-try for any baking enthusiast or anyone simply craving something truly special. The magic lies in how each component — the tender cookie base, the rich cream cheese swirl, and the vibrant fruit — comes together to create a harmonious and unforgettable dessert. Trust me when I say that once you bite into one of these, you’re going to understand exactly why I’m so enthusiastic about them. They encapsulate everything wonderful about a classic dessert, reimagined into a portable, delightful cookie.
Now, let’s talk about enjoying these beauties. While they are undeniably perfect straight out of the oven, perhaps with a gentle dusting of powdered sugar, their versatility is one of their most charming attributes. Imagine sinking your teeth into one of these Raspberry Cheesecake Cookies alongside a steaming mug of your favorite coffee or a delicate cup of herbal tea for an elevated afternoon treat. They make an exquisite ending to any meal, perhaps served slightly warmed with a scoop of vanilla bean ice cream for an extra layer of decadence. For special occasions or gifting, arranging them elegantly on a platter or boxing them up with a pretty ribbon makes for a truly impressive presentation that friends and family will adore.
But the fun doesn’t stop there! Don’t be afraid to get creative and make this recipe truly your own. For a different berry experience, consider swapping out the raspberries for fresh blueberries or chopped strawberries; the burst of sweet-tart flavor will be equally delightful. If you’re a chocolate lover, a swirl of melted white chocolate or a sprinkle of mini dark chocolate chips into the cookie dough or even on top of the cheesecake filling before baking would be divine. A hint of lemon zest folded into the cookie dough could amplify the bright notes of the raspberries, creating an even more vibrant flavor profile. You could also experiment with a different kind of glaze post-baking, perhaps a simple lemon glaze drizzled over the top instead of powdered sugar for an extra zing. Or, for those who love nuts, a light sprinkling of finely chopped pistachios or toasted almonds on top before baking would add a wonderful textural contrast and an elegant touch. The possibilities are truly endless, limited only by your imagination, so feel free to experiment and discover your next favorite combination!
I genuinely hope you feel inspired to roll up your sleeves and bring these incredible cookies to life in your own kitchen. There’s something so immensely satisfying about the process of baking, especially when the reward is as utterly delicious as these. It’s an act of love, whether you’re baking for yourself, your family, or to share with friends. Don’t be intimidated; the steps are straightforward, and the result is profoundly rewarding. I promise you, the aroma alone as they bake will fill your home with an irresistible warmth and joy! You’ll find yourself looking for excuses to bake another batch, and your loved ones will certainly be grateful.
Once you’ve had the chance to bake and taste these glorious creations, I would absolutely love to hear about your experience. Did you stick to the original recipe, or did you venture into some delicious variations? What did your family and friends think? Please, share your stories, your photos, and any tips or tricks you discovered along the way in the comments below. Your feedback and creativity not only inspire me but also our entire community of fellow bakers. Let’s celebrate the joy of homemade treats together and build a collection of shared culinary successes!
Thank you for joining me on this culinary adventure. Happy baking, and I can’t wait to see what wonderful memories you create with every batch of these amazing cookies!
Recipe
A delicious recipe
Ingredients
Instructions
Important Information
Nutrition Facts (Per Serving)
It is important to consider this information as approximate and not to use it as definitive health advice.
Allergy Information
Please check ingredients for potential allergens and consult a health professional if in doubt.

Leave a Comment