

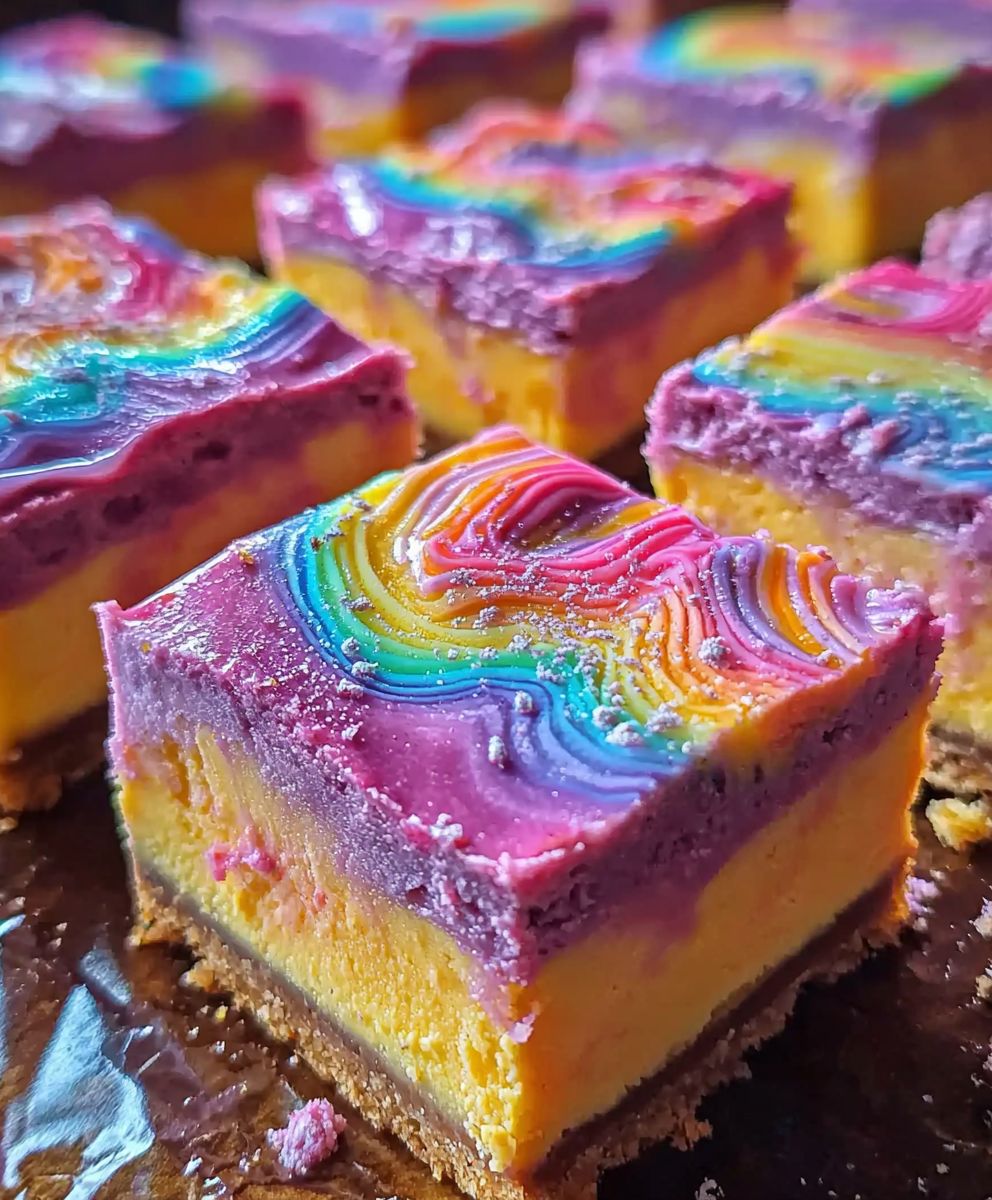
Rainbow Cheesecake Bars: Prepare to be amazed! Imagine sinking your teeth into a creamy, dreamy cheesecake, but with a vibrant, playful twist. These aren’t your average dessert squares; they’re a celebration of color and flavor, guaranteed to brighten any day. I remember the first time I saw these at a local bake sale they were the first thing to sell out!
While the exact origins of rainbow desserts are a bit hazy, the concept of using vibrant colors in food has been around for centuries, often associated with festivals and celebrations. Think of the colorful Holi festival in India, or the vibrant decorations during Carnival. These rainbow cheesecake bars bring that same joyful spirit to your kitchen.
But beyond the visual appeal, what makes these bars so irresistible? It’s the perfect combination of textures the smooth, rich cheesecake filling atop a buttery graham cracker crust. The taste is simply divine, a sweet and tangy symphony that dances on your tongue. Plus, they’re surprisingly easy to make! Forget complicated layer cakes; these bars are a fuss-free way to impress your friends and family. Whether you’re looking for a show-stopping dessert for a party or a fun baking project with the kids, these rainbow cheesecake bars are sure to be a hit. So, let’s get baking and add a splash of color to your day!

Ingredients:
- For the Crust:
- 1 ½ cups graham cracker crumbs
- 5 tablespoons unsalted butter, melted
- ¼ cup granulated sugar
- For the Cheesecake Filling:
- 32 ounces cream cheese, softened to room temperature
- 1 ½ cups granulated sugar
- 4 large eggs
- 1 teaspoon vanilla extract
- ¼ cup sour cream
- For the Rainbow Colors:
- Red gel food coloring
- Orange gel food coloring
- Yellow gel food coloring
- Green gel food coloring
- Blue gel food coloring
- Purple gel food coloring
Preparing the Graham Cracker Crust
Okay, let’s get started with the foundation of our rainbow cheesecake bars the graham cracker crust! This is super easy and gives a nice, sturdy base for all that creamy, colorful goodness.
- Combine the Ingredients: In a medium bowl, whisk together the graham cracker crumbs, melted butter, and granulated sugar. Make sure everything is evenly distributed so you don’t end up with pockets of dry crumbs. I like to use a fork to really get in there and mix it all up.
- Press into the Pan: Press the mixture firmly into the bottom of a 9×13 inch baking pan. I find that using the bottom of a measuring cup or a flat-bottomed glass helps to create an even and compact crust. You want it nice and packed so it doesn’t crumble apart when you cut the bars later.
- Pre-bake the Crust: Bake the crust in a preheated oven at 350°F (175°C) for about 8-10 minutes. This helps to set the crust and prevent it from becoming soggy. Keep an eye on it you want it to be lightly golden brown around the edges.
- Cool the Crust: Remove the crust from the oven and let it cool completely while you prepare the cheesecake filling. This is important! You don’t want to pour the filling onto a hot crust.
Making the Cheesecake Filling
Now for the star of the show the creamy, dreamy cheesecake filling! This is where the magic happens, and we’ll be dividing it up to create our rainbow masterpiece.
- Cream the Cream Cheese and Sugar: In a large bowl (or the bowl of your stand mixer), beat the softened cream cheese and granulated sugar together until smooth and creamy. This is crucial! Make sure your cream cheese is truly softened, or you’ll end up with lumps in your filling. I usually let mine sit out for at least an hour, sometimes longer, depending on the temperature of my kitchen.
- Add the Eggs: Beat in the eggs one at a time, mixing well after each addition. Be careful not to overmix at this stage, as overmixing can incorporate too much air into the batter, which can cause the cheesecake to crack during baking. Just mix until the eggs are fully incorporated.
- Stir in Vanilla and Sour Cream: Stir in the vanilla extract and sour cream until just combined. The sour cream adds a lovely tang and helps to keep the cheesecake moist. Again, don’t overmix!
Creating the Rainbow Layers
This is the fun part! Get ready to unleash your inner artist and create those vibrant rainbow layers. Don’t worry if it’s not perfect that’s part of the charm!
- Divide the Filling: Divide the cheesecake filling evenly into six separate bowls. I like to use a kitchen scale to ensure that each bowl has the same amount of filling, but you can also eyeball it.
- Color the Filling: Add a few drops of red gel food coloring to one bowl, orange to another, yellow to another, green to another, blue to another, and purple to the last bowl. Stir each bowl until the color is evenly distributed. Start with just a few drops of coloring and add more until you achieve your desired shade. Remember, gel food coloring is much more concentrated than liquid food coloring, so a little goes a long way!
- Layer the Colors: Carefully spoon or pour each colored filling into the prepared graham cracker crust, one color at a time. I usually start with purple, then blue, green, yellow, orange, and red. You can create a smooth, even layer of each color, or you can swirl them together slightly for a more marbled effect. If you want distinct layers, gently spread each color to the edges of the pan before adding the next.
Baking the Rainbow Cheesecake Bars
Almost there! Now it’s time to bake our masterpiece and let those flavors meld together.
- Bake in a Water Bath (Optional but Recommended): For the best results, bake the cheesecake bars in a water bath. This helps to prevent cracking and ensures that the cheesecake bakes evenly. To create a water bath, wrap the bottom of the baking pan tightly with aluminum foil (to prevent water from seeping in). Place the wrapped pan inside a larger baking pan and pour hot water into the larger pan until it reaches about halfway up the sides of the cheesecake pan.
- Bake the Cheesecake: Bake in a preheated oven at 325°F (160°C) for 45-55 minutes, or until the center of the cheesecake is just slightly jiggly. The edges should be set, but the center should still have a little wobble.
- Cool Gradually: Turn off the oven and let the cheesecake sit in the oven with the door slightly ajar for about an hour. This helps to prevent cracking. Then, remove the cheesecake from the oven and let it cool completely at room temperature.
- Chill the Cheesecake: Once the cheesecake has cooled to room temperature, cover it with plastic wrap and refrigerate for at least 4 hours, or preferably overnight. This allows the cheesecake to set completely and the flavors to meld together even more.
Cutting and Serving
Finally, the moment we’ve all been waiting for cutting into those beautiful rainbow layers and enjoying our delicious cheesecake bars!
- Cut into Bars: Use a sharp knife to cut the cheesecake into bars. For clean cuts, run the knife under hot water and wipe it clean between each cut.
- Serve and Enjoy: Serve the rainbow cheesecake bars chilled. They’re perfect for parties, potlucks, or just a fun and colorful treat! You can garnish them with whipped cream, fresh berries, or sprinkles, if you like.
Conclusion:
And there you have it! These Rainbow Cheesecake Bars are more than just a dessert; they’re a vibrant celebration on a plate, guaranteed to brighten any day. From the satisfyingly crunchy graham cracker crust to the creamy, dreamy cheesecake filling, and of course, those dazzling layers of color, every element works in perfect harmony. I truly believe this recipe is a must-try for anyone looking to add a touch of magic to their baking repertoire. Why is it a must-try, you ask? Well, beyond the obvious visual appeal, these bars are surprisingly easy to make. Don’t let the multiple layers intimidate you! The process is straightforward, and the results are absolutely worth the minimal effort. Plus, the recipe is incredibly versatile. You can easily adapt the colors to match a specific holiday, party theme, or even just your personal preferences. Imagine pastel hues for Easter, spooky oranges and purples for Halloween, or even just your favorite shades of the rainbow! But the fun doesn’t stop there! Let’s talk serving suggestions and variations. These bars are fantastic served chilled, straight from the refrigerator. For an extra touch of indulgence, try topping them with a dollop of whipped cream and a sprinkle of colorful sprinkles. Or, if you’re feeling adventurous, drizzle them with a homemade fruit sauce that complements the colors you’ve chosen. A raspberry sauce would be divine with pink and red layers, while a mango sauce would perfectly enhance yellow and orange hues. For variations, consider experimenting with different flavor extracts in the cheesecake filling. A touch of lemon extract would add a zesty brightness, while almond extract would create a subtle, nutty flavor. You could even incorporate a hint of vanilla bean paste for a more sophisticated taste. And if you’re a chocolate lover, try adding a layer of melted chocolate to the graham cracker crust before baking. The possibilities are truly endless! Another fun variation is to create mini Rainbow Cheesecake Bars using a muffin tin. This is a great option for parties or when you want individual servings. Simply press the graham cracker crust into the bottom of each muffin cup, layer the colored cheesecake filling, and bake as directed. I’m so excited for you to try this recipe and experience the joy of creating these beautiful and delicious Rainbow Cheesecake Bars. I know you’ll love them as much as I do! So, what are you waiting for? Gather your ingredients, preheat your oven, and get ready to embark on a baking adventure. I promise you won’t be disappointed. And most importantly, I want to hear about your experience! Did you try any variations? Did you encounter any challenges? What were your favorite colors to use? Please share your photos and stories in the comments below. I can’t wait to see your creations and learn from your experiences. Happy baking! Let’s spread some rainbow cheer, one cheesecake bar at a time! I am confident that this recipe for Rainbow Cheesecake Bars will become a family favorite. Print
Rainbow Cheesecake Bars: A Colorful & Delicious Dessert Recipe
- Total Time: 300 minutes
- Yield: 24 bars 1x
Description
Creamy cheesecake bars with a graham cracker crust, layered with vibrant rainbow colors. Perfect for parties and celebrations!
Ingredients
- 1 ½ cups graham cracker crumbs
- 5 tablespoons unsalted butter, melted
- ¼ cup granulated sugar
- 32 ounces cream cheese, softened to room temperature
- 1 ½ cups granulated sugar
- 4 large eggs
- 1 teaspoon vanilla extract
- ¼ cup sour cream
- Red gel food coloring
- Orange gel food coloring
- Yellow gel food coloring
- Green gel food coloring
- Blue gel food coloring
- Purple gel food coloring
Instructions
- Prepare the Graham Cracker Crust: In a medium bowl, whisk together the graham cracker crumbs, melted butter, and granulated sugar.
- Press the mixture firmly into the bottom of a 9×13 inch baking pan.
- Bake the crust in a preheated oven at 350°F (175°C) for 8-10 minutes, or until lightly golden brown.
- Cool the crust completely.
- Make the Cheesecake Filling: In a large bowl, beat the softened cream cheese and granulated sugar together until smooth and creamy.
- Beat in the eggs one at a time, mixing well after each addition.
- Stir in the vanilla extract and sour cream until just combined.
- Create the Rainbow Layers: Divide the cheesecake filling evenly into six separate bowls.
- Add a few drops of red gel food coloring to one bowl, orange to another, yellow to another, green to another, blue to another, and purple to the last bowl. Stir each bowl until the color is evenly distributed.
- Carefully spoon or pour each colored filling into the prepared graham cracker crust, one color at a time.
- Bake the Rainbow Cheesecake Bars: Wrap the bottom of the baking pan tightly with aluminum foil. Place the wrapped pan inside a larger baking pan and pour hot water into the larger pan until it reaches about halfway up the sides of the cheesecake pan.
- Bake in a preheated oven at 325°F (160°C) for 45-55 minutes, or until the center of the cheesecake is just slightly jiggly.
- Turn off the oven and let the cheesecake sit in the oven with the door slightly ajar for about an hour.
- Remove the cheesecake from the oven and let it cool completely at room temperature.
- Chill the Cheesecake: Once the cheesecake has cooled to room temperature, cover it with plastic wrap and refrigerate for at least 4 hours, or preferably overnight.
- Cut and Serve: Use a sharp knife to cut the cheesecake into bars. For clean cuts, run the knife under hot water and wipe it clean between each cut. Serve chilled.
Notes
- Make sure your cream cheese is fully softened to avoid lumps in the filling.
- Don’t overmix the cheesecake batter after adding the eggs, as this can cause cracking.
- Gel food coloring is recommended for vibrant colors. Start with a few drops and add more until you achieve the desired shade.
- Baking in a water bath is highly recommended to prevent cracking and ensure even baking.
- Cooling the cheesecake gradually in the oven helps to prevent cracking.
- Chilling the cheesecake completely is essential for it to set properly and for the flavors to meld.
- For clean cuts, run the knife under hot water and wipe it clean between each cut.
- Prep Time: 30 minutes
- Cook Time: 55 minutes

Leave a Comment