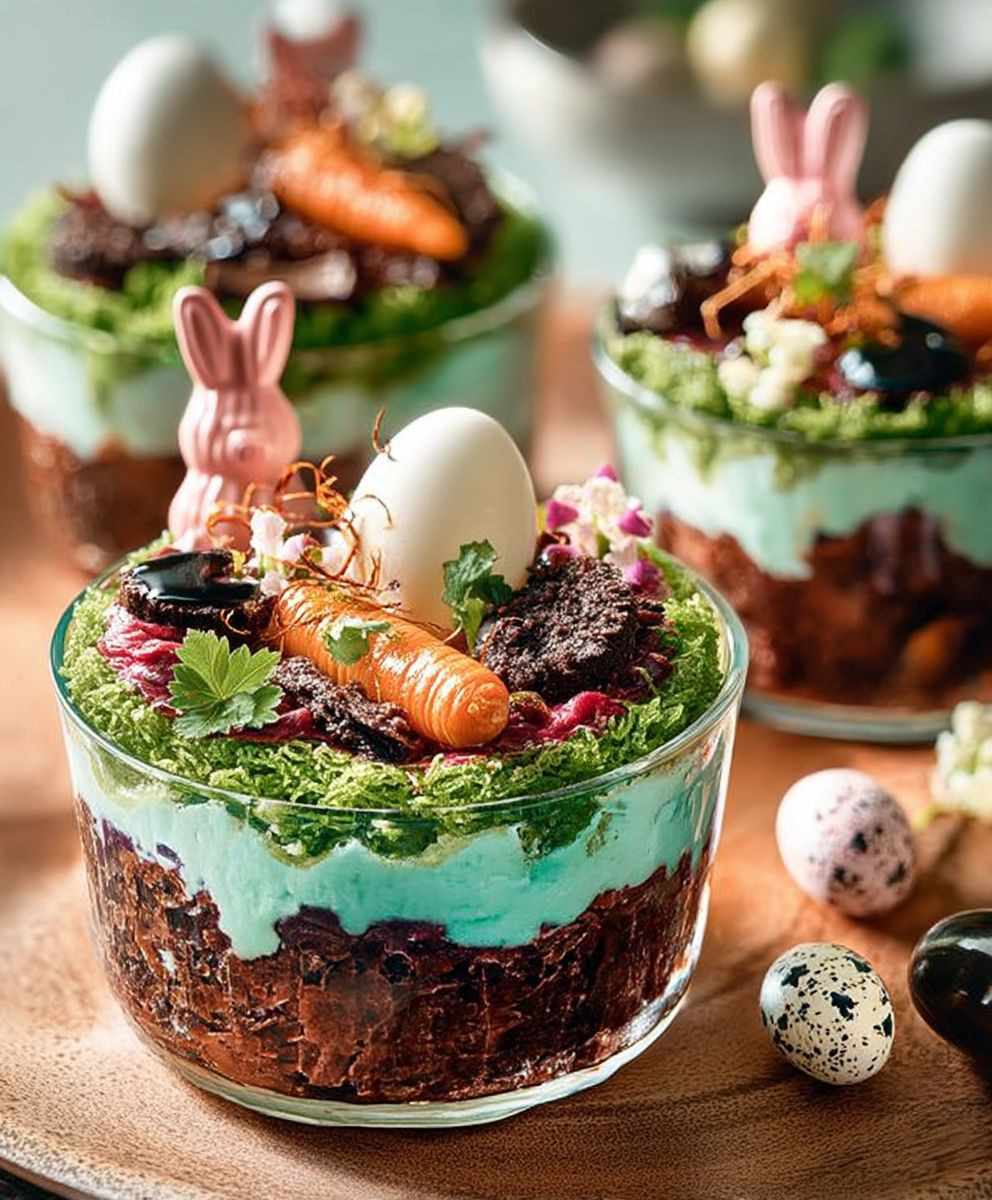
Rabbit burrow pots, those adorable and whimsical desserts that look like miniature rabbit homes nestled in edible soil, are taking the baking world by storm! Have you ever seen a dessert so charming that you almost didn’t want to eat it? Almost. These delightful treats are as delicious as they are visually stunning, making them the perfect centerpiece for Easter celebrations, garden parties, or simply a fun weekend baking project.
While the exact origins of rabbit burrow pots are a bit murky, their playful design draws inspiration from the classic dirt cup dessert, a childhood favorite for many. The concept has been elevated with a touch of sophistication and artistry, transforming a simple treat into a miniature edible landscape. The beauty of these pots lies in their versatility. You can customize the “soil” with crushed Oreo cookies, chocolate shavings, or even graham cracker crumbs. The “burrow” itself can be filled with layers of mousse, pudding, or even a decadent chocolate ganache.
People adore rabbit burrow pots for several reasons. First, their undeniable cuteness makes them incredibly appealing to both children and adults. Second, they offer a delightful combination of textures and flavors, from the crunchy “soil” to the creamy filling. Finally, they are surprisingly easy to make, even for novice bakers. So, gather your ingredients, unleash your creativity, and let’s create some magical rabbit burrow pots that will impress your friends and family!
Ingredients:
- For the Chocolate Cake:
- 2 cups all-purpose flour
- 2 cups granulated sugar
- ¾ cup unsweetened cocoa powder
- 1 ½ teaspoons baking powder
- 1 ½ teaspoons baking soda
- 1 teaspoon salt
- 1 cup buttermilk
- ½ cup vegetable oil
- 2 large eggs
- 2 teaspoons vanilla extract
- 1 cup boiling water
- For the Chocolate Buttercream Frosting:
- 1 cup (2 sticks) unsalted butter, softened
- 3 cups powdered sugar
- ¾ cup unsweetened cocoa powder
- ½ cup heavy cream
- 1 teaspoon vanilla extract
- Pinch of salt
- For the “Dirt” Topping:
- 1 package (14.3 ounces) chocolate sandwich cookies (like Oreos), finely crushed
- For the “Rabbit Burrow” Decorations:
- Green tinted coconut flakes (see instructions below)
- Small candy carrots
- Chocolate rocks or pebbles
- Optional: Gummy worms
- For the Green Tinted Coconut Flakes:
- 1 cup shredded coconut
- 2-3 drops green food coloring
- 1 teaspoon water
Preparing the Chocolate Cake:
Okay, let’s get started with the foundation of our rabbit burrow pots the chocolate cake! This recipe is super moist and chocolatey, perfect for mimicking the rich soil where our little bunnies might dig their homes.
- Preheat and Prep: Preheat your oven to 350°F (175°C). Grease and flour two 9-inch round cake pans. I like to use baking spray with flour already in it; it makes life so much easier! Make sure you get into all the nooks and crannies of the pan to prevent sticking.
- Combine Dry Ingredients: In a large bowl, whisk together the flour, sugar, cocoa powder, baking powder, baking soda, and salt. Whisking is key here to ensure everything is evenly distributed. Nobody wants a bite of pure baking soda!
- Add Wet Ingredients: In a separate bowl, combine the buttermilk, vegetable oil, eggs, and vanilla extract. Whisk until well combined. The buttermilk adds a lovely tang and helps keep the cake moist.
- Combine Wet and Dry: Gradually add the wet ingredients to the dry ingredients, mixing on low speed until just combined. Be careful not to overmix! Overmixing develops the gluten in the flour, which can lead to a tough cake.
- Add Boiling Water: Carefully pour in the boiling water and mix until the batter is smooth. The batter will be thin, but don’t worry, that’s normal! The hot water helps to bloom the cocoa powder and intensifies the chocolate flavor.
- Divide and Bake: Divide the batter evenly between the prepared cake pans. Bake for 30-35 minutes, or until a toothpick inserted into the center comes out clean. Keep an eye on them; oven temperatures can vary.
- Cool Completely: Let the cakes cool in the pans for 10 minutes before inverting them onto a wire rack to cool completely. This prevents them from sticking and breaking. Patience is key here! Don’t try to frost them while they’re still warm.
Making the Chocolate Buttercream Frosting:
Now for the delicious chocolate buttercream! This frosting is rich, creamy, and the perfect complement to the chocolate cake. It’s also what will hold our “dirt” in place.
- Cream the Butter: In a large bowl (or the bowl of a stand mixer), beat the softened butter until light and fluffy. This usually takes about 3-5 minutes. Make sure your butter is truly softened, but not melted.
- Add Powdered Sugar and Cocoa: Gradually add the powdered sugar and cocoa powder, beating on low speed until combined. Start slow to avoid a powdered sugar cloud!
- Add Heavy Cream and Vanilla: Add the heavy cream, vanilla extract, and salt. Beat on medium speed until light and fluffy. You may need to add a little more heavy cream if the frosting is too thick, or a little more powdered sugar if it’s too thin.
- Taste and Adjust: Taste the frosting and adjust the sweetness or chocolate intensity as needed. This is your chance to make it perfect!
Assembling the Rabbit Burrow Pots:
This is where the fun really begins! We’re going to transform our cake and frosting into adorable little rabbit burrows.
- Level the Cakes: If your cakes are domed, use a serrated knife to level them. This will make them easier to stack and frost.
- Frost the First Layer: Place one cake layer on a serving plate or cake stand. Spread a generous layer of chocolate buttercream frosting over the top.
- Add the Second Layer: Carefully place the second cake layer on top of the frosting.
- Frost the Entire Cake: Frost the entire cake with the remaining chocolate buttercream frosting. Don’t worry about being perfect; we’re going to cover it with “dirt” anyway!
- Apply the “Dirt”: Generously sprinkle the crushed chocolate sandwich cookies (our “dirt”) all over the frosted cake. Gently press the crumbs into the frosting to help them adhere. Make sure to cover the entire cake, top and sides.
Creating the Rabbit Burrow Details:
Now for the finishing touches! This is where we’ll add the details that make these cakes look like actual rabbit burrows.
- Prepare the Green Tinted Coconut: In a small bowl, combine the shredded coconut, green food coloring, and water. Mix well until the coconut is evenly tinted green. Add more food coloring if you want a deeper green. Let it dry slightly on a plate before using.
- Create the “Grass”: Sprinkle the green tinted coconut around the base of the cake to create a “grassy” area. You can also add some to the top of the cake for extra detail.
- Add the Candy Carrots: Arrange the candy carrots around the cake, as if they’re growing in the “dirt”. You can even bury some of them slightly to make them look more realistic.
- Add the Chocolate Rocks: Scatter the chocolate rocks or pebbles around the cake to add some texture and visual interest.
- Optional: Add Gummy Worms: If you want to add a little extra whimsy, you can add some gummy worms crawling around the cake.
- Create the Burrow Entrance: Use your finger or a small spoon to create a small indentation on the side of the cake, near the base. This will be our rabbit burrow entrance. You can even add a few crushed cookie crumbs around the entrance to make it look like the rabbit has been digging.
Tips and Variations:
Here are a few extra tips and ideas to make your rabbit burrow pots even more special:
- Use Different Cake Flavors: While chocolate cake is classic, you can use any cake flavor you like! Vanilla, carrot cake, or even red velvet would all be delicious.
- Add a Filling: For an extra layer of flavor, add a filling between the cake layers. Raspberry jam, chocolate ganache, or even a simple cream cheese frosting would be great.
- Make Individual Pots: Instead of making a large cake, you can make individual rabbit burrow pots using small flower pots or ramekins. Simply layer the cake, frosting, and “dirt” in the pots, and then decorate as desired.
- Use Real Flowers: For a more natural look, you can use real edible flowers to decorate your rabbit burrow pots. Pansies, violets, and nasturtiums are all beautiful and edible options.
- Add a Rabbit Figurine: For an extra touch of cuteness, add a small rabbit figurine to the top of the cake.
- Make it Gluten-Free: Substitute the all-purpose flour with a gluten-free all-purpose flour blend to make this recipe gluten-free.
- Make it Vegan: Substitute the buttermilk with a plant-based milk mixed with a tablespoon of lemon juice or vinegar. Use a vegan butter substitute for the frosting, and replace the eggs with applesauce or a commercial egg replacer.
Storing Your Rabbit Burrow Pots:
Conclusion:
So there you have it! I truly believe these Rabbit Burrow Pots are more than just a cute dessert; they’re an experience. The combination of the rich, decadent chocolate mousse, the crunchy Oreo “dirt,” and the adorable gummy bunnies creates a delightful treat that’s guaranteed to bring a smile to anyone’s face, young or old. It’s a playful, whimsical dessert that’s perfect for Easter, spring celebrations, or simply when you need a little bit of joy in your day.
Why is this a must-try? Because it’s easy to make, incredibly delicious, and undeniably charming. The recipe is straightforward, using readily available ingredients, and the assembly is a fun activity you can even involve the kids in. But beyond the ease and the fun, it’s the taste that truly seals the deal. The creamy mousse is perfectly balanced by the slightly salty, crumbly Oreo topping, and the gummy bunnies add a touch of sweetness and a playful texture. It’s a symphony of flavors and textures that will leave you wanting more.
But the best part? You can totally customize these Rabbit Burrow Pots to your liking! Feeling adventurous? Try using different flavors of Oreos for the “dirt.” Chocolate, golden, or even mint Oreos would all add a unique twist. You could also experiment with different types of mousse. A white chocolate mousse would be a beautiful contrast to the dark Oreo crumbs, or a peanut butter mousse would add a rich, nutty flavor.
Serving Suggestions and Variations:
* For a more sophisticated presentation, serve the mousse in individual glass ramekins instead of plastic cups.
* Add a layer of crushed chocolate cookies at the bottom of the pot for an extra layer of chocolatey goodness.
* Top with fresh berries like raspberries or strawberries for a burst of freshness and color.
* Use different types of gummy candies to create a more diverse “burrow” environment. Think gummy worms, butterflies, or even edible flowers!
* For a vegan version, use a vegan chocolate mousse recipe and vegan Oreo cookies.
* Consider adding a sprinkle of edible glitter for an extra touch of magic.
* If you’re making these for adults, you could even add a splash of liqueur to the mousse for an extra kick. A little bit of Kahlua or Baileys would be delicious!
I’m confident that once you try this recipe, it will become a new favorite. It’s the perfect dessert to impress your friends and family, and it’s guaranteed to be a hit at any gathering. The visual appeal alone is enough to make everyone want to try it, and the taste will keep them coming back for more.
So, what are you waiting for? Gather your ingredients, put on your apron, and get ready to create some adorable and delicious Rabbit Burrow Pots! I promise you won’t regret it.
And most importantly, I want to hear about your experience! Did you try the recipe? Did you make any variations? What did your friends and family think? Share your photos and stories in the comments below. I can’t wait to see your creations and hear all about your adventures in the kitchen. Happy baking, and happy burrowing! I hope you enjoy creating this fun and delicious treat as much as I do. Remember, the key to a great dessert is not just the ingredients, but the love and care you put into making it. So go ahead, pour your heart into these Rabbit Burrow Pots and create something truly special.
Rabbit Burrow Pots: The Ultimate Guide to Safe & Stylish Habitats
Moist chocolate cake layered with creamy chocolate buttercream, topped with crushed Oreo "dirt," green coconut "grass," candy carrots, and chocolate rocks. A fun and whimsical dessert perfect for Easter or any spring celebration!
Ingredients
- 2 cups all-purpose flour
- 2 cups granulated sugar
- ¾ cup unsweetened cocoa powder
- 1 ½ teaspoons baking powder
- 1 ½ teaspoons baking soda
- 1 teaspoon salt
- 1 cup buttermilk
- ½ cup vegetable oil
- 2 large eggs
- 2 teaspoons vanilla extract
- 1 cup boiling water
- 1 cup (2 sticks) unsalted butter, softened
- 3 cups powdered sugar
- ¾ cup unsweetened cocoa powder
- ½ cup heavy cream
- 1 teaspoon vanilla extract
- Pinch of salt
- 1 package (14.3 ounces) chocolate sandwich cookies (like Oreos), finely crushed
- Green tinted coconut flakes (see instructions below)
- Small candy carrots
- Chocolate rocks or pebbles
- Optional: Gummy worms
- 1 cup shredded coconut
- 2-3 drops green food coloring
- 1 teaspoon water
Instructions
- Prepare the Chocolate Cake:
- Preheat oven to 350°F (175°C). Grease and flour two 9-inch round cake pans.
- In a large bowl, whisk together flour, sugar, cocoa powder, baking powder, baking soda, and salt.
- In a separate bowl, combine buttermilk, vegetable oil, eggs, and vanilla extract. Whisk until well combined.
- Gradually add the wet ingredients to the dry ingredients, mixing on low speed until just combined.
- Carefully pour in the boiling water and mix until the batter is smooth.
- Divide the batter evenly between the prepared cake pans. Bake for 30-35 minutes, or until a toothpick inserted into the center comes out clean.
- Let the cakes cool in the pans for 10 minutes before inverting them onto a wire rack to cool completely.
- Make the Chocolate Buttercream Frosting:
- In a large bowl (or the bowl of a stand mixer), beat the softened butter until light and fluffy (3-5 minutes).
- Gradually add the powdered sugar and cocoa powder, beating on low speed until combined.
- Add the heavy cream, vanilla extract, and salt. Beat on medium speed until light and fluffy. Adjust cream/sugar for consistency.
- Taste and adjust the sweetness or chocolate intensity as needed.
- Assemble the Rabbit Burrow Pots:
- Level the cakes if domed.
- Place one cake layer on a serving plate or cake stand. Spread a generous layer of chocolate buttercream frosting over the top.
- Carefully place the second cake layer on top of the frosting.
- Frost the entire cake with the remaining chocolate buttercream frosting.
- Generously sprinkle the crushed chocolate sandwich cookies (our “dirt”) all over the frosted cake. Gently press the crumbs into the frosting to help them adhere.
- Create the Rabbit Burrow Details:
- Prepare the Green Tinted Coconut: In a small bowl, combine the shredded coconut, green food coloring, and water. Mix well until the coconut is evenly tinted green. Let it dry slightly on a plate before using.
- Sprinkle the green tinted coconut around the base of the cake to create a “grassy” area. You can also add some to the top of the cake for extra detail.
- Arrange the candy carrots around the cake.
- Scatter the chocolate rocks or pebbles around the cake.
- Optional: Add gummy worms.
- Use your finger or a small spoon to create a small indentation on the side of the cake, near the base, for the burrow entrance.
Notes
- Cake Moisture: Buttermilk and boiling water are key to a moist chocolate cake.
- Frosting Consistency: Adjust the amount of heavy cream or powdered sugar in the frosting to achieve your desired consistency.
- Crushed Cookies: Use a food processor or place the cookies in a zip-top bag and crush with a rolling pin.
- Variations:
- Use different cake flavors (vanilla, carrot cake, red velvet).
- Add a filling between the cake layers (raspberry jam, chocolate ganache, cream cheese frosting).
- Make individual pots using small flower pots or ramekins.
- Use real edible flowers.
- Add a rabbit figurine.
- Make it gluten-free by using a gluten-free all-purpose flour blend.
- Make it vegan by using plant-based milk, vegan butter, and applesauce or a commercial egg replacer.
- Storage: Store the assembled cake in the refrigerator. It’s best enjoyed within 2-3 days.


Leave a Comment