

Freezer Breakfast Sandwiches offer a revolutionary solution to the perennial morning dilemma: how to enjoy a satisfying, homemade breakfast without the time-consuming effort. Imagine waking up to the enticing aroma of a warm, perfectly crafted meal, ready in mere minutes, even on the busiest weekdays. For many of us, the morning rush often means sacrificing the most important meal of the day, leading to hurried compromises or skipped nourishment.
That’s precisely why I am so thrilled to guide you through the effortless art of preparing these incredible make-ahead delights.
These beloved creations aren’t just about speed; they represent a harmonious blend of convenience, cost-effectiveness, and complete customization. You get to control every delicious ingredient, from fluffy eggs and savory sausage to melty cheese and fresh vegetables, ensuring a meal that perfectly suits your taste and dietary preferences. While the concept of batch-prepped meals has been a lifesaver for generations, the modern iteration of Freezer Breakfast Sandwiches brings this efficiency directly to your breakfast table, transforming chaotic mornings into moments of delicious tranquility. They empower you to fuel your body with wholesome goodness, proving that a delicious and fulfilling breakfast is always within reach. Let’s make your mornings brighter and tastier!

Ingredients:
- For the Buns:
- 12-16 English muffins, croissants, bagels, or brioche buns (I love using English muffins for that classic feel, but choose what makes your heart sing!).
- For the Eggs:
- 12 large eggs (or more if you like them extra fluffy in your “Freezer Breakfast Sandwiches”).
- 1/4 cup milk or cream (this really helps create a tender, uniform egg patty, in my experience).
- 1/2 teaspoon salt (or to taste).
- 1/4 teaspoon black pepper (freshly ground is always best!).
- 1 tablespoon unsalted butter or a neutral oil for greasing the pan.
- For the Protein:
- 12-16 pre-cooked sausage patties (store-bought or homemade, about 2-3 inches in diameter). Alternatively, 12-16 slices of Canadian bacon, or 1/2 pound bacon, cooked crispy and broken into halves. For a leaner option, you could even use turkey sausage patties!
- For the Cheese:
- 12-16 slices of cheese (cheddar, American, provolone, or Swiss work wonderfully. I find American cheese melts beautifully for “Freezer Breakfast Sandwiches” and holds up well to freezing and reheating).
- Optional Add-ins:
- Sautéed spinach or kale (squeeze out excess water).
- Caramelized onions.
- Roasted red peppers.
- Hot sauce or a smear of sriracha mayo before serving.
- For Wrapping and Storage:
- Plastic wrap or parchment paper squares (I prefer parchment for less stickiness).
- Aluminum foil squares.
- Freezer-safe bags or containers.
Preparing the Egg Patties for Your Freezer Breakfast Sandwiches:
- Preheat Oven and Prepare Pan: My secret to making perfect egg patties for a large batch of “Freezer Breakfast Sandwiches” is using a sheet pan! Preheat your oven to 350°F (175°C). Line a large rimmed baking sheet (approximately 13×18 inches) with parchment paper. This is crucial for easy removal and cleanup. Then, lightly grease the parchment paper with butter or a neutral oil. This ensures your eggs don’t stick and slide right off.
- Whisk the Eggs: In a large mixing bowl, crack all 12 large eggs. Add the milk or cream, salt, and black pepper. Whisk vigorously until the yolks and whites are fully combined and the mixture is slightly frothy. You want a uniform yellow color, indicating everything is well-integrated. This liquid addition makes the eggs extra tender and ensures they don’t dry out when baked.
- Pour and Bake: Carefully pour the whisked egg mixture evenly over the prepared baking sheet. Gently tilt the pan to ensure the eggs spread out into a thin, uniform layer. Pop it into the preheated oven and bake for 12-15 minutes, or until the eggs are set and slightly puffed. The edges might be slightly golden, but the center should be firm to the touch and no longer jiggly. Avoid overbaking, as this can lead to dry eggs, which we definitely don’t want in our delicious “Freezer Breakfast Sandwiches”.
- Cool and Cut: Once baked, remove the sheet pan from the oven and let the egg slab cool completely on a wire rack. Cooling is very important before cutting, as it prevents the eggs from tearing. Once cool, you can use a large round cookie cutter (approximately 3-3.5 inches in diameter, similar to the size of your English muffins) to cut out individual egg patties. If you don’t have a cookie cutter, a knife works just as well – simply cut the large egg slab into squares or rectangles that fit your chosen buns. I usually aim for 12-16 patties, depending on the size of the eggs and buns. Leftover egg scraps are great for a quick snack or added to another meal, so nothing goes to waste!
Cooking the Protein for Your Freezer Breakfast Sandwiches:
- Prepare Sausage Patties: If you’re using pre-cooked sausage patties, you’re in luck – they just need to be warmed up according to package directions. If you’re making your own from raw sausage meat, form them into patties slightly larger than your buns (they’ll shrink a bit during cooking). Cook them in a skillet over medium heat until browned on both sides and cooked through. Make sure they are thoroughly cooked before assembly to ensure food safety for your “Freezer Breakfast Sandwiches”.
- Cook Bacon: For bacon, I prefer baking it in the oven. Lay the bacon strips in a single layer on a foil-lined baking sheet and bake at 400°F (200°C) for 15-20 minutes, or until desired crispiness is achieved. Drain on paper towels. Once cooled, you can break each slice in half or into smaller pieces to fit neatly onto your English muffins.
- Prepare Canadian Bacon or Ham: If opting for Canadian bacon or sliced ham, simply pan-fry or warm them gently in a skillet for a minute or two per side until lightly browned and heated through. This adds a nice touch of flavor and texture.
- Cool Completely: Regardless of your protein choice, it is absolutely essential that all cooked meats cool completely before assembly. Adding warm ingredients to your “Freezer Breakfast Sandwiches” can create condensation, which leads to soggy buns and promotes freezer burn. Patience here pays off in the long run!
Assembling Your Freezer Breakfast Sandwiches:
- Prepare the Buns: Slice your English muffins, croissants, or bagels in half. If you prefer a slightly toasted bun, you can lightly toast them now, but it’s not strictly necessary as they will warm up when reheated. I personally skip the initial toasting for my “Freezer Breakfast Sandwiches” because the texture holds up better to freezing and reheating.
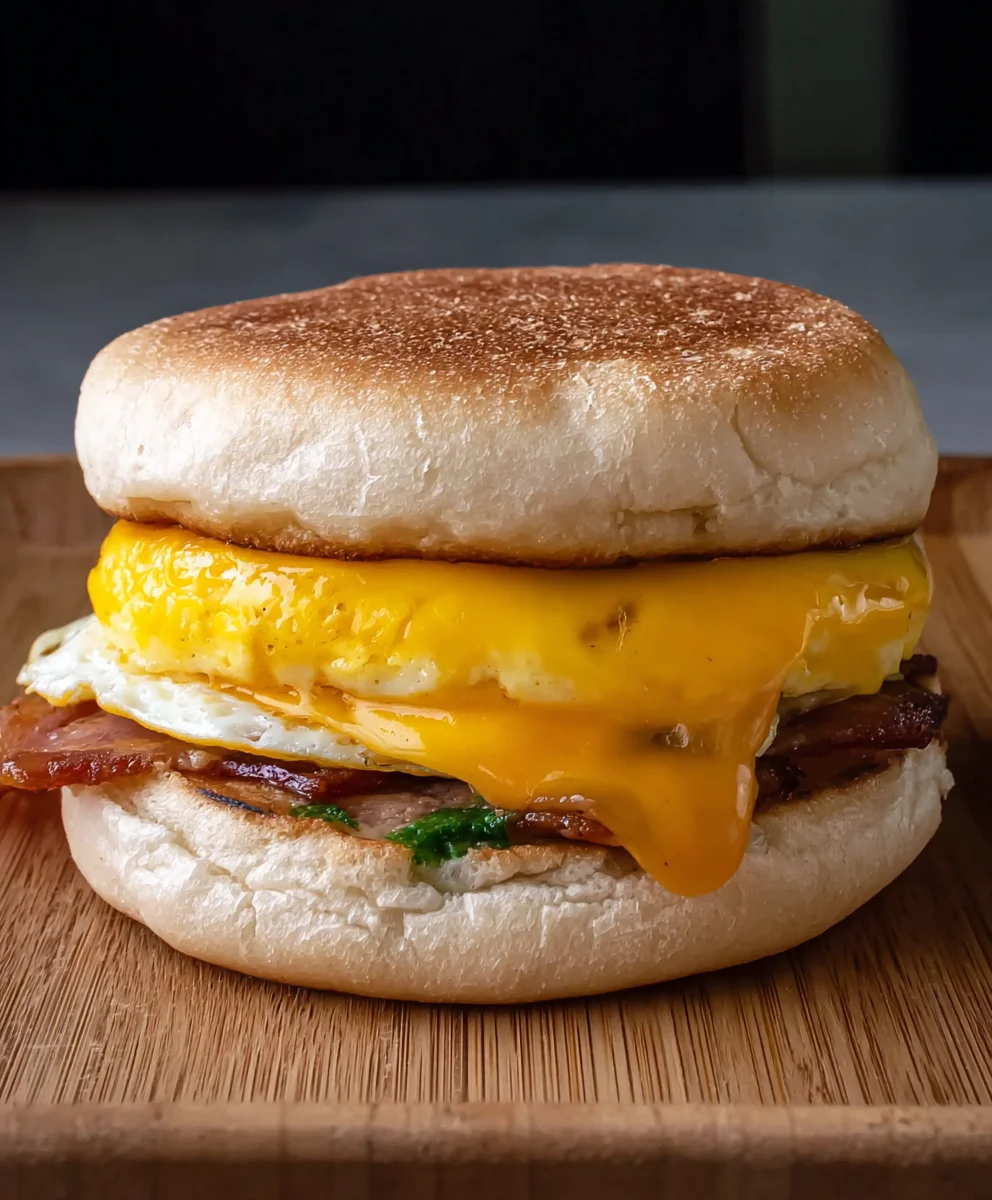
- Layering the Ingredients: This is where your “Freezer Breakfast Sandwiches” really come to life! On the bottom half of each bun, place a slice of cheese. Placing the cheese directly on the bun can act as a barrier to prevent the bun from getting soggy from the other ingredients. Next, add a cooked egg patty. Then, place your chosen protein (sausage patty, bacon, or Canadian bacon). If you’re adding any optional veggies like sautéed spinach, place them on top of the egg or protein, ensuring they are thoroughly drained of any moisture. Finally, top with the other half of the bun.
- Individual Wrapping: This step is critical for preventing freezer burn and maintaining freshness. Once each sandwich is assembled, individually wrap it tightly. I always start by wrapping each sandwich in a square of plastic wrap, making sure to cover it completely and press out as much air as possible. Alternatively, you can use parchment paper squares, which I find even better as they prevent sticking and are easier to unwrap later. The goal is to create an airtight seal around each “Freezer Breakfast Sandwich”.
- Secondary Wrapping for Protection: For an extra layer of protection against freezer burn, which is the nemesis of any frozen food, I then wrap each plastic-wrapped sandwich in a square of aluminum foil. This dual layer of wrapping truly helps to preserve the quality, flavor, and texture of your “Freezer Breakfast Sandwiches” during their time in the freezer. It’s a small extra step that makes a huge difference in the long run.
Freezing and Reheating for Perfect Freezer Breakfast Sandwiches:
- Freezing Your Sandwiches: After your “Freezer Breakfast Sandwiches” are individually wrapped, arrange them in a single layer in a large freezer-safe bag or an airtight container. If you’re stacking them, place a piece of parchment paper between layers to prevent them from sticking together. Label the bag or container with the date. Your delicious “Freezer Breakfast Sandwiches” can be stored in the freezer for up to 1-3 months. Beyond that, while still safe to eat, their quality might start to decline slightly.
-
Reheating from Frozen (Microwave Method – My Go-To!):
- Remove one wrapped “Freezer Breakfast Sandwich” from the freezer.
- Unwrap it from the aluminum foil, but keep the plastic wrap or parchment paper on. This helps keep the moisture in.
- Place the sandwich on a microwave-safe plate.
- Microwave on high for 1 minute to 1 minute 30 seconds. The exact time will vary depending on your microwave’s wattage.
- Carefully unwrap the sandwich. Be cautious, as steam will be released.
- If the bun is still a bit cold or tough, you can microwave it for another 15-30 seconds without the wrap, or for a crispier bun, you can briefly toast it in a toaster oven or air fryer after unwrapping. The cheese should be melty and the ingredients heated through.
- Pro Tip: If your bun feels a little tough or chewy after microwaving, a quick 30 seconds in a toaster oven or under the broiler (unwrapped, of course!) can really crisp it up and make it feel freshly made.
-
Reheating from Frozen (Oven/Toaster Oven Method – For the Crispiest Finish):
- Preheat your oven or toaster oven to 350°F (175°C).
- Remove one wrapped “Freezer Breakfast Sandwich” from the freezer and unwrap it completely from both the foil and plastic/parchment.
- Place the unwrapped sandwich directly on a baking sheet or a piece of foil.
- Bake for 25-30 minutes, or until heated through and the cheese is bubbly and melted. The bun will become beautifully toasted and slightly crispy with this method, which is perfect if you have a little extra time. This is my preferred method for a weekend brunch feel, even from a frozen state!
-
Reheating from Frozen (Air Fryer Method – Quick & Crispy!):
- Preheat your air fryer to 300°F (150°C).
- Remove one “Freezer Breakfast Sandwich” from the freezer and unwrap it completely.
- Place the sandwich in the air fryer basket.
- Cook for 12-15 minutes, flipping halfway through, or until the sandwich is heated through and the bun is nicely toasted. Keep an eye on it to prevent burning.
Tips and Variations for Your Freezer Breakfast Sandwiches:
- Customize Your Proteins: Don’t limit yourself to just sausage or bacon! Experiment with sliced deli ham, thinly sliced grilled chicken breast for a healthier option, or even a vegetarian sausage patty. My family loves variety, so I often make a batch with different proteins.
- Spice It Up: Before freezing, you can add a pinch of red pepper flakes to your egg mixture, or a dash of hot sauce to the bottom bun. For those who like a kick, a slice of pepper jack cheese can also add a delightful warmth to your “Freezer Breakfast Sandwiches”.
- Veggie Boost: To sneak in some extra nutrients, consider adding sautéed mushrooms, diced bell peppers (cooked and drained), or a thin slice of tomato (though tomatoes can sometimes get watery when frozen and reheated, so drain well). Just make sure any added vegetables are cooked and as dry as possible to avoid sogginess.
- Cheese Options: While American and cheddar are classics, don’t hesitate to try provolone, muenster, or even a slice of smoked Gouda for a gourmet touch. The cheese is one of the best parts, in my opinion, as it helps bind everything together and adds richness.
- Bun Alternatives: Beyond English muffins, consider using mini bagels, whole wheat buns for added fiber, or even gluten-free bread options. The key is to find a bun that holds up well to freezing and reheating, providing a sturdy foundation for your “Freezer Breakfast Sandwiches”.
- Sauce It Up (Post-Reheat): To avoid a soggy sandwich, it’s best to add any sauces like ketchup, mustard, sriracha mayo, or avocado slices after reheating. This preserves the texture and prevents any weird freezing effects. A fresh condiment can really elevate your grab-and-go meal!
- Batch Cooking Efficiency: When making a large batch of “Freezer Breakfast Sandwiches”, set up an assembly line! Have your buns, cheese, eggs, and protein all laid out. This makes the process much quicker and more enjoyable. I often put on some music and make it a fun family activity.
- Preventing Freezer Burn: Remember, tight wrapping is your best friend! The less air that touches your food, the less likely it is to suffer from freezer burn. The double-wrapping method (plastic/parchment then foil) is truly a game-changer for preserving the quality of these wonderful “Freezer Breakfast Sandwiches”.
- Serving Suggestions: While they are a complete meal on their own, you can pair your reheated “Freezer Breakfast Sandwiches” with a side of fresh fruit, a glass of juice, or a cup of coffee for a perfect start to your day. They are truly versatile and a lifesaver on busy mornings!
Conclusion:
My culinary journey has led me to many wonderful discoveries, but few have been as genuinely transformative for my daily routine as the art of mastering homemade Freezer Breakfast Sandwiches. If you’ve ever found yourself staring into the fridge on a hectic weekday morning, debating between skipping breakfast or grabbing something less-than-ideal on the go, then this recipe is truly for you. It’s not just about making a meal; it’s about reclaiming your mornings, infusing them with a sense of calm, and ensuring you start your day fueled, satisfied, and without compromise on taste or quality. This recipe is an absolute must-try because it elegantly solves the perennial breakfast dilemma, offering a delicious, nutritious, and incredibly convenient solution that truly stands the test of time and taste buds.
The beauty of these sandwiches lies in their unparalleled versatility and the sheer joy of customization. Imagine waking up to a ready-made, warm breakfast that you crafted with your favorite ingredients. No more rushing, no more compromise. For the base, while I absolutely adore a classic toasted English muffin, don’t hesitate to experiment with whole wheat bagels, croissants (for a more indulgent treat), brioche buns, or even hearty slices of sourdough. Each bread type offers a unique texture and flavor profile when reheated. As for the protein, the possibilities are endless! Think savory turkey sausage patties, crispy bacon, thinly sliced ham, or even a plant-based sausage for a vegetarian-friendly option. I’ve also had great success with Canadian bacon and even a smear of herbed cream cheese with smoked salmon (just add the salmon fresh after reheating for the best texture). For the eggs, you can whip up fluffy scrambled eggs, bake egg patties in a muffin tin for perfect rounds, or even fry them gently for a more traditional sunny-side-up feel (though a firmer yolk is better for freezing). Cheeses like sharp cheddar, creamy provolone, zesty pepper jack, or even a sophisticated gruyere can elevate your sandwich from good to gourmet. And please, don’t shy away from adding vegetables! Sautéed spinach, finely diced bell peppers, caramelized onions, or even a few sun-dried tomatoes can add incredible flavor and a boost of nutrients. Just make sure they are thoroughly cooked and cooled to prevent excess moisture when freezing.
When it comes to serving these magnificent creations, a simple side of fresh fruit, like berries or sliced oranges, makes for a perfectly balanced meal. A glass of freshly squeezed orange juice or your favorite hot coffee or tea completes the experience. You can also get creative with sauces: a dash of your favorite hot sauce, a dollop of pesto (added after reheating), or a smear of sriracha mayo can add an extra layer of flavor. For a more sophisticated brunch at home, pair your reheated sandwich with a small side salad or a cup of yogurt with granola. The joy of these sandwiches extends beyond just breakfast; they make fantastic quick lunches or even a light dinner when you’re short on time. They are the ultimate meal prep hack, providing peace of mind knowing that a wholesome, satisfying meal is always just minutes away.
I genuinely encourage you, with all my heart, to set aside an hour or two this weekend to whip up a batch of these life-changing sandwiches. It’s an investment in your well-being and sanity that pays dividends every single morning. The feeling of pulling a perfectly assembled, homemade breakfast out of the freezer and having it ready in minutes is incredibly empowering. Don’t just take my word for it; experience the difference yourself. I am so excited for you to try this recipe, and I would absolutely love to hear about your experience. What combinations did you try? Did you discover a new favorite ingredient? Did it truly revolutionize your mornings as it did mine? Please share your creations, your tips, and your favorite variations. Let’s build a community of happy, well-fed morning people, one delicious sandwich at a time!
Frequently Asked Questions About Freezer Breakfast Sandwiches
How long do these Freezer Breakfast Sandwiches last in the freezer?
When properly assembled and wrapped, your homemade freezer breakfast sandwiches will maintain their best quality for about 1 to 2 months. You can safely keep them for up to 3 months, but after that, the texture and flavor might start to diminish slightly.
What’s the best way to reheat a frozen breakfast sandwich?
The reheating method depends on how much time you have and your desired texture:
- Microwave (Quickest): Remove the sandwich from any plastic wrap. Wrap it loosely in a paper towel. Microwave for 1.5 to 2 minutes, flipping halfway through, or until heated through.
- Oven/Toaster Oven (Crispiest): Remove all wrapping. Preheat oven to 350°F (175°C). Place the frozen sandwich directly on the oven rack or on a baking sheet. Bake for 20-30 minutes, or until thoroughly heated and the bread is crispy.
- Air Fryer (Crispy & Fast): Remove all wrapping. Air fry at 300-325°F (150-160°C) for 10-15 minutes, flipping halfway, until heated through and golden.
How can I prevent my Freezer Breakfast Sandwiches from getting soggy?
Several tips can help prevent sogginess: lightly toast your bread before assembly, ensure all ingredients (especially eggs and any vegetables) are thoroughly cooled before building the sandwiches, and avoid overly watery ingredients like fresh tomatoes inside before freezing. Once assembled, wrap each sandwich tightly in parchment paper, then foil, or use a freezer-safe bag to prevent freezer burn and moisture transfer.
Can I customize these sandwiches for different dietary needs?
Absolutely! This recipe is incredibly adaptable. For a gluten-free option, simply use your favorite gluten-free bread or English muffins. Vegetarians can opt for plant-based sausage patties, extra vegetables like spinach and mushrooms, or even a robust portobello mushroom slice instead of meat. To make them lighter, use egg whites, lean turkey sausage, and whole-wheat bread.
Are Freezer Breakfast Sandwiches a healthy option?
Yes, they can be a very healthy option, especially compared to many store-bought or fast-food alternatives. Because you control all the ingredients, you can choose whole-grain breads, lean proteins, reduce sodium, and pack them with nutrient-rich vegetables. It’s a fantastic way to ensure you’re starting your day with a balanced and satisfying meal without added preservatives or excessive unhealthy fats.

Quick Freezer Breakfast Sandwiches: Beef, Egg, Cheese Muffins
These make-ahead Freezer Breakfast Sandwiches offer a revolutionary solution for busy mornings. Enjoy a satisfying, homemade breakfast in minutes, customized to your taste. They blend convenience, cost-effectiveness, and deliciousness, transforming chaotic mornings into moments of delicious tranquility.
Ingredients
-
12-16 English muffins, croissants, bagels, or brioche buns
-
12 large eggs
-
1/4 cup milk or cream
-
1/2 teaspoon salt
-
1/4 teaspoon black pepper
-
1 tablespoon unsalted butter or neutral oil
-
12-16 pre-cooked beef sausage patties (2-3 inches), OR
-
12-16 slices beef ham (e.g., Canadian beef bacon), OR
-
1/2 pound beef bacon, cooked crispy
-
12-16 slices cheese (cheddar, American, provolone, or Swiss)
-
Optional: Sautéed spinach/kale (drained), Caramelized onions, Roasted red peppers
-
Plastic wrap or parchment paper squares
-
Aluminum foil squares
-
Freezer-safe bags or containers
Instructions
-
Step 1
Preheat oven to 350°F (175°C). Line a 13×18 inch baking sheet with greased parchment paper. Whisk 12 large eggs with 1/4 cup milk/cream, 1/2 tsp salt, and 1/4 tsp black pepper. Pour onto the prepared sheet and bake for 12-15 minutes until set. Let cool completely, then cut into 12-16 patties (3-3.5 inch round cutter or knife). -
Step 2
Cook chosen protein: Cook beef sausage patties until browned and done, or bake beef bacon at 400°F (200°C) for 15-20 minutes until crispy. Warm beef ham slices. Ensure all cooked proteins cool completely before assembly to prevent sogginess. -
Step 3
Slice buns. On the bottom half, layer a slice of cheese, an egg patty, and your chosen cooked protein (and optional cooked, drained veggies). Top with the other bun half. -
Step 4
Individually wrap each sandwich tightly first in plastic wrap or parchment paper, then in aluminum foil, ensuring an airtight seal. Store in a freezer-safe bag/container for up to 1-3 months. -
Step 5
Remove from freezer. Unwrap foil, keep plastic/parchment. Microwave 1-1.5 minutes on high. Remove wrap, continue heating 15-30 seconds if needed, or toast bun for crispiness. -
Step 6
Preheat to 350°F (175°C). Unwrap completely. Place on a baking sheet and bake for 25-30 minutes until heated through and cheese is melted. -
Step 7
Preheat air fryer to 300°F (150°C). Unwrap completely. Cook for 12-15 minutes, flipping halfway, until heated through and toasted.
Important Information
Nutrition Facts (Per Serving)
It is important to consider this information as approximate and not to use it as definitive health advice.
Allergy Information
Please check ingredients for potential allergens and consult a health professional if in doubt.


Leave a Comment