

Peppermint Red Velvet Cookies: Prepare to be enchanted! Imagine biting into a soft, chewy cookie, the rich, cocoa notes of red velvet dancing on your tongue, followed by a refreshing burst of peppermint that tingles with holiday cheer. These aren’t just cookies; they’re a festive experience, a delightful collision of flavors that will leave you craving more.
Red velvet, with its intriguing history, has long been associated with elegance and indulgence. Some believe it originated during the Victorian era, a time when bakers experimented with cocoa powder to create a smoother, more velvety texture in cakes. The addition of buttermilk and vinegar further enhanced the cake’s tenderness and gave it its signature tang. Over time, red food coloring became a staple, transforming this already special treat into a visually stunning dessert. Now, we’re taking that classic red velvet experience and infusing it with the invigorating coolness of peppermint.
What makes Peppermint Red Velvet Cookies so irresistible? It’s the perfect balance of flavors and textures. The slight tang of the red velvet, the deep chocolate notes, and the creamy sweetness are all beautifully complemented by the crisp, clean taste of peppermint. These cookies are soft and chewy, not cakey, making them the perfect treat to enjoy with a cup of hot cocoa on a cold winter’s night. Plus, they’re surprisingly easy to make, making them a fantastic option for holiday baking or a simple weeknight dessert. Get ready to bake up a batch of these festive delights your taste buds will thank you!

Ingredients:
- For the Cookies:
- 2 1/2 cups all-purpose flour
- 1 teaspoon baking soda
- 1 teaspoon salt
- 1 cup (2 sticks) unsalted butter, softened
- 1 1/2 cups granulated sugar
- 1/2 cup packed light brown sugar
- 2 large eggs
- 1 teaspoon vanilla extract
- 1 teaspoon peppermint extract
- 1 ounce (2 tablespoons) red food coloring
- 1 cup buttermilk
- 2 tablespoons unsweetened cocoa powder
- For the Cream Cheese Frosting:
- 8 ounces cream cheese, softened
- 1/2 cup (1 stick) unsalted butter, softened
- 4 cups powdered sugar
- 1 teaspoon vanilla extract
- 1/2 teaspoon peppermint extract
- 2-4 tablespoons milk or heavy cream (for desired consistency)
- For Decoration (Optional):
- Crushed peppermint candies
- Red and white sprinkles
Preparing the Red Velvet Cookie Dough
- Combine Dry Ingredients: In a medium bowl, whisk together the flour, baking soda, and salt. This ensures that the baking soda and salt are evenly distributed throughout the flour, which is crucial for proper leavening and flavor. Set this bowl aside for later.
- Cream Butter and Sugars: In a large bowl (or the bowl of a stand mixer), cream together the softened butter, granulated sugar, and brown sugar until light and fluffy. This process usually takes about 3-5 minutes. The mixture should be noticeably lighter in color and have a smoother texture. Scraping down the sides of the bowl occasionally will help ensure everything is evenly incorporated. This step is important because it incorporates air into the butter and sugar, which contributes to the cookies’ soft and chewy texture.
- Add Eggs and Extracts: Beat in the eggs one at a time, mixing well after each addition. Then, stir in the vanilla extract and peppermint extract. Make sure to scrape down the sides of the bowl after each addition to ensure everything is evenly mixed. The peppermint extract adds that wonderful holiday flavor, so don’t skip it!
- Incorporate Red Food Coloring: Add the red food coloring to the batter and mix until evenly combined. The amount of food coloring can be adjusted slightly to achieve your desired shade of red. Keep in mind that the color will deepen slightly as the cookies bake.
- Combine Cocoa Powder and Buttermilk: In a small bowl, whisk together the cocoa powder and buttermilk until smooth. This creates a slurry that will easily incorporate into the batter without clumping. The cocoa powder adds a subtle chocolate flavor that complements the red velvet and peppermint.
- Alternate Wet and Dry Ingredients: Gradually add the dry ingredients to the wet ingredients, alternating with the buttermilk mixture, beginning and ending with the dry ingredients. Mix until just combined. Be careful not to overmix the dough, as this can result in tough cookies. Overmixing develops the gluten in the flour, which can make the cookies dense and chewy in a bad way. Mix until you see no more streaks of flour.
- Chill the Dough: Cover the bowl with plastic wrap and refrigerate the dough for at least 1 hour, or preferably 2-3 hours. Chilling the dough allows the gluten to relax, which results in softer cookies. It also prevents the cookies from spreading too much during baking. If you’re short on time, you can chill the dough for as little as 30 minutes, but the longer the better!
Baking the Cookies
- Preheat Oven: Preheat your oven to 350°F (175°C). Line baking sheets with parchment paper or silicone baking mats. Parchment paper prevents the cookies from sticking and makes cleanup a breeze. Silicone mats provide even heat distribution and prevent the bottoms of the cookies from browning too quickly.
- Scoop and Arrange Dough: Use a cookie scoop or spoon to drop rounded tablespoons of dough onto the prepared baking sheets, leaving about 2 inches between each cookie. This allows the cookies to spread without running into each other.
- Bake: Bake for 9-11 minutes, or until the edges are set and the centers are slightly soft. The baking time may vary depending on your oven, so keep a close eye on the cookies. They should be lightly golden brown around the edges.
- Cool: Remove the baking sheets from the oven and let the cookies cool on the baking sheets for a few minutes before transferring them to a wire rack to cool completely. This prevents the cookies from breaking apart while they are still warm and soft.
Preparing the Cream Cheese Frosting
- Cream Cheese and Butter: In a large bowl (or the bowl of a stand mixer), beat together the softened cream cheese and butter until smooth and creamy. It’s crucial that both the cream cheese and butter are softened to room temperature to prevent lumps in the frosting.
- Add Powdered Sugar: Gradually add the powdered sugar, one cup at a time, beating well after each addition. Start on low speed to prevent the powdered sugar from flying everywhere.
- Add Extracts: Stir in the vanilla extract and peppermint extract. Again, the peppermint extract is key to that festive flavor!
- Adjust Consistency: Add milk or heavy cream, one tablespoon at a time, until the frosting reaches your desired consistency. You want it to be smooth and spreadable, but not too thin.
Assembling and Decorating the Cookies
- Frost the Cookies: Once the cookies are completely cool, frost them with the cream cheese frosting. You can use a knife, spatula, or piping bag to apply the frosting.
- Decorate (Optional): If desired, decorate the frosted cookies with crushed peppermint candies and/or red and white sprinkles. Get creative and have fun with it!
- Chill (Optional): For best results, chill the frosted cookies in the refrigerator for at least 30 minutes before serving. This will help the frosting set and prevent it from smearing.
- Serve and Enjoy: Serve the peppermint red velvet cookies and enjoy! These cookies are perfect for holiday parties, gift-giving, or simply enjoying with a cup of hot cocoa.
Tips for Success:
- Use Room Temperature Ingredients: Make sure your butter, cream cheese, and eggs are at room temperature for the best results. This will help them incorporate more easily and create a smoother batter and frosting.
- Don’t Overmix: Overmixing the cookie dough can result in tough cookies. Mix until just combined.
- Chill the Dough: Chilling the dough is essential for preventing the cookies from spreading too much during baking.
- Adjust Peppermint Extract: If you prefer a stronger peppermint flavor, you can add a little more peppermint extract to both the cookie dough and the frosting. However, be careful not to add too much, as it can be overpowering.
- Storage: Store the frosted cookies in an airtight container in the refrigerator for up to 3 days.
Variations:
- Chocolate Chips: Add 1 cup of chocolate chips to the cookie dough for a chocolatey twist.
- White Chocolate: Use white chocolate chips instead of regular chocolate chips for a sweeter flavor.
- Nuts: Add 1/2 cup of chopped pecans or walnuts to the cookie dough for added texture and flavor.
- Different Extracts: Experiment with different extracts, such as almond extract or maple extract, to create unique flavor combinations.
- Different Food Coloring: Use a different color of food coloring to create cookies for other holidays or occasions.

Conclusion:
And there you have it! These Peppermint Red Velvet Cookies are truly a must-try this holiday season, and honestly, any time you’re craving a little festive cheer. The combination of the classic red velvet flavor, that subtle tang from the buttermilk and cocoa, with the refreshing burst of peppermint is simply divine. They’re soft, chewy, and oh-so-satisfying, making them the perfect treat to bake and share (or keep all to yourself I won’t judge!). But why are these cookies so special? It’s more than just the taste. It’s the vibrant color, the comforting aroma that fills your kitchen as they bake, and the sheer joy of biting into something so delicious and festive. They’re a guaranteed crowd-pleaser, perfect for holiday parties, cookie exchanges, or even just a cozy night in with a mug of hot cocoa. Plus, they’re surprisingly easy to make, even for beginner bakers. The recipe is straightforward, and the results are consistently amazing. Now, let’s talk serving suggestions and variations! While these cookies are fantastic on their own, there are plenty of ways to elevate them even further. For a truly decadent experience, try sandwiching two cookies together with a creamy peppermint buttercream frosting. You can also drizzle them with melted white chocolate and sprinkle with crushed peppermint candies for an extra touch of holiday magic. Another fun variation is to add a handful of white chocolate chips to the dough for an even richer, sweeter flavor. If you’re feeling adventurous, you could even experiment with different extracts, like vanilla or almond, to create your own unique twist on this classic recipe. Think about serving these beauties warm, straight from the oven, with a scoop of vanilla ice cream. The contrast between the warm cookie and the cold ice cream is simply heavenly. Or, package them up in festive tins and give them as gifts to friends and family. They’re sure to appreciate the homemade touch and the delicious flavor. You could even include the recipe card with the cookies, so they can recreate the magic themselves! Don’t be afraid to get creative and experiment with different variations to find your perfect Peppermint Red Velvet Cookies. The possibilities are endless! I truly believe that these cookies will become a new holiday tradition in your home. They’re the perfect combination of classic flavors and festive cheer, and they’re guaranteed to bring a smile to everyone’s face. So, what are you waiting for? Preheat your oven, gather your ingredients, and get baking! I’m so excited for you to try this recipe and experience the joy of these delicious cookies for yourself. And please, don’t forget to share your creations with me! I’d love to see your photos and hear about your experiences. Tag me on social media and let me know what you think. Happy baking, and happy holidays! I can’t wait to see your amazing Peppermint Red Velvet Cookies! Let me know if you added any fun variations! Print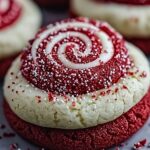
Peppermint Red Velvet Cookies: The Ultimate Holiday Recipe
- Total Time: 100 minutes
- Yield: 24 cookies 1x
Description
Soft, chewy red velvet cookies with peppermint, topped with cream cheese frosting and festive sprinkles. Perfect for the holidays!
Ingredients
- 2 1/2 cups all-purpose flour
- 1 teaspoon baking soda
- 1 teaspoon salt
- 1 cup (2 sticks) unsalted butter, softened
- 1 1/2 cups granulated sugar
- 1/2 cup packed light brown sugar
- 2 large eggs
- 1 teaspoon vanilla extract
- 1 teaspoon peppermint extract
- 1 ounce (2 tablespoons) red food coloring
- 1 cup buttermilk
- 2 tablespoons unsweetened cocoa powder
- 8 ounces cream cheese, softened
- 1/2 cup (1 stick) unsalted butter, softened
- 4 cups powdered sugar
- 1 teaspoon vanilla extract
- 1/2 teaspoon peppermint extract
- 2–4 tablespoons milk or heavy cream (for desired consistency)
- Crushed peppermint candies
- Red and white sprinkles
Instructions
- In a medium bowl, whisk together the flour, baking soda, and salt. Set aside.
- In a large bowl (or the bowl of a stand mixer), cream together the softened butter, granulated sugar, and brown sugar until light and fluffy (3-5 minutes). Scrape down the sides of the bowl occasionally.
- Beat in the eggs one at a time, mixing well after each addition. Then, stir in the vanilla extract and peppermint extract. Scrape down the sides of the bowl after each addition.
- Add the red food coloring to the batter and mix until evenly combined. Adjust the amount to achieve your desired shade of red.
- In a small bowl, whisk together the cocoa powder and buttermilk until smooth.
- Gradually add the dry ingredients to the wet ingredients, alternating with the buttermilk mixture, beginning and ending with the dry ingredients. Mix until just combined. Be careful not to overmix the dough.
- Cover the bowl with plastic wrap and refrigerate the dough for at least 1 hour, or preferably 2-3 hours.
- Preheat your oven to 350°F (175°C). Line baking sheets with parchment paper or silicone baking mats.
- Use a cookie scoop or spoon to drop rounded tablespoons of dough onto the prepared baking sheets, leaving about 2 inches between each cookie.
- Bake for 9-11 minutes, or until the edges are set and the centers are slightly soft.
- Remove the baking sheets from the oven and let the cookies cool on the baking sheets for a few minutes before transferring them to a wire rack to cool completely.
- In a large bowl (or the bowl of a stand mixer), beat together the softened cream cheese and butter until smooth and creamy.
- Gradually add the powdered sugar, one cup at a time, beating well after each addition. Start on low speed to prevent the powdered sugar from flying everywhere.
- Stir in the vanilla extract and peppermint extract.
- Add milk or heavy cream, one tablespoon at a time, until the frosting reaches your desired consistency.
- Once the cookies are completely cool, frost them with the cream cheese frosting.
- If desired, decorate the frosted cookies with crushed peppermint candies and/or red and white sprinkles.
- For best results, chill the frosted cookies in the refrigerator for at least 30 minutes before serving.
- Serve the peppermint red velvet cookies and enjoy!
Notes
- Use room temperature ingredients for best results.
- Don’t overmix the cookie dough.
- Chilling the dough is essential for preventing the cookies from spreading too much during baking.
- Adjust peppermint extract to taste.
- Store the frosted cookies in an airtight container in the refrigerator for up to 3 days.
- Prep Time: 30 minutes
- Cook Time: 9 minutes


Leave a Comment