

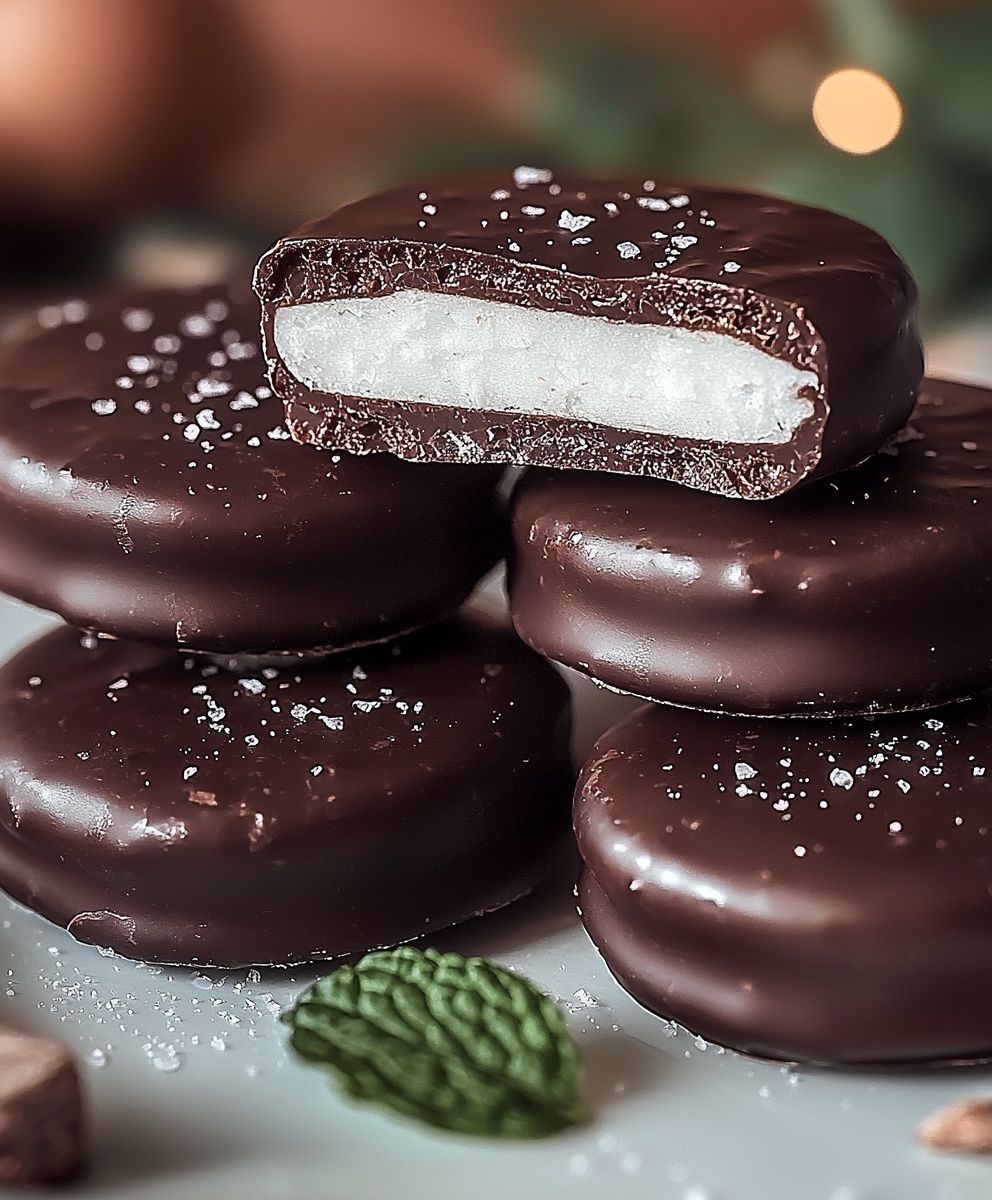
Peppermint patties homemade just the thought conjures up images of cool, refreshing bliss! Have you ever bitten into a perfectly crafted peppermint patty, the dark chocolate shell cracking to reveal a creamy, minty center that melts in your mouth? Its an experience thats hard to beat, and now, you can recreate that magic in your own kitchen.
While the exact origins of the commercially produced peppermint patty are debated, the combination of chocolate and mint has a long and delicious history. Mint has been used for centuries for its digestive properties and refreshing flavor, while chocolate, revered by ancient civilizations, eventually found its perfect partner in mint. This pairing has evolved into countless delectable treats, with the peppermint patty standing out as a classic.
What makes these little delights so irresistible? It’s the harmonious blend of textures and flavors. The crisp snap of the dark chocolate gives way to a smooth, cool, and intensely minty filling. They’re the perfect after-dinner treat, a delightful afternoon pick-me-up, or a thoughtful homemade gift. Plus, making peppermint patties homemade is surprisingly simple and rewarding. Forget the store-bought versions with this recipe, you’ll be enjoying fresh, flavorful patties that are far superior in taste and quality. Let’s get started!

Ingredients:
- For the Filling:
- 4 cups powdered sugar, sifted
- 1/2 cup (1 stick) unsalted butter, softened
- 1/4 cup heavy cream
- 2 tablespoons corn syrup
- 1 teaspoon peppermint extract (or more, to taste)
- 1/4 teaspoon salt
- For the Chocolate Coating:
- 12 ounces semi-sweet chocolate, finely chopped (good quality is key!)
- 1 tablespoon coconut oil (or vegetable shortening)
Preparing the Peppermint Filling:
Alright, let’s get started with the heart of our peppermint patties the creamy, minty filling! This part is super easy, but a little patience goes a long way to getting the perfect texture.
- Cream the Butter: In a large bowl (or the bowl of your stand mixer), cream the softened butter until it’s light and fluffy. This usually takes about 2-3 minutes with an electric mixer. Make sure your butter is truly softened, but not melted, for the best results.
- Add the Wet Ingredients: Gradually add the heavy cream and corn syrup to the butter, mixing until well combined. The mixture might look a little separated at first, but don’t worry, it will come together.
- Incorporate the Powdered Sugar: This is where the sifting comes in handy! Gradually add the sifted powdered sugar to the wet ingredients, about 1 cup at a time, mixing on low speed. Sifting prevents lumps and ensures a smooth filling. Mix until just combined after each addition. Be careful not to overmix, as this can make the filling tough.
- Add the Peppermint Extract and Salt: Stir in the peppermint extract and salt. Start with 1 teaspoon of peppermint extract and taste. If you want a stronger peppermint flavor, add a little more, a few drops at a time, until you reach your desired intensity. The salt helps to balance the sweetness and enhance the peppermint flavor.
- Adjust the Consistency: The filling should be firm enough to hold its shape but still soft and pliable. If it’s too dry, add a teaspoon of heavy cream at a time until you reach the desired consistency. If it’s too wet, add a tablespoon of powdered sugar at a time.
- Chill the Filling: This is a crucial step! Cover the bowl with plastic wrap, pressing it directly onto the surface of the filling to prevent a skin from forming. Refrigerate for at least 30 minutes, or even better, an hour. This chilling time will make the filling much easier to work with.
Shaping the Peppermint Patties:
Now for the fun part shaping our peppermint patties! There are a few different ways you can do this, so choose the method that works best for you.
- Prepare Your Work Surface: Line a baking sheet with parchment paper or a silicone baking mat. This will prevent the patties from sticking.
- Roll Out the Filling (Option 1): Lightly dust your work surface with powdered sugar. Take the chilled filling and roll it out to about 1/4-inch thickness. Use cookie cutters (round ones are classic!) to cut out the patties. Place the cut-out patties onto the prepared baking sheet.
- Roll into Balls and Flatten (Option 2): Roll the chilled filling into small balls, about 1 inch in diameter. Place the balls onto the prepared baking sheet and gently flatten them with the palm of your hand or the bottom of a glass.
- Use a Piping Bag (Option 3): If you want perfectly uniform patties, you can use a piping bag fitted with a large round tip. Fill the piping bag with the chilled filling and pipe circles onto the prepared baking sheet.
- Refrigerate Again: Once you’ve shaped all the patties, place the baking sheet back in the refrigerator for another 15-20 minutes. This will help them firm up even more before we dip them in chocolate.
Melting the Chocolate:
Time to get that luscious chocolate coating ready! The key here is to melt the chocolate slowly and gently to prevent it from seizing up.
- Choose Your Melting Method: You can melt the chocolate using a double boiler or in the microwave. I prefer the double boiler method for more control, but the microwave works just fine if you’re careful.
- Double Boiler Method: Fill a saucepan with about an inch of water and bring it to a simmer. Place a heatproof bowl on top of the saucepan, making sure the bottom of the bowl doesn’t touch the water. Add the chopped chocolate and coconut oil (or shortening) to the bowl. Stir occasionally until the chocolate is completely melted and smooth.
- Microwave Method: Place the chopped chocolate and coconut oil (or shortening) in a microwave-safe bowl. Microwave in 30-second intervals, stirring after each interval, until the chocolate is almost melted. Continue stirring until the remaining chocolate melts and the mixture is smooth. Be very careful not to overheat the chocolate, as it can burn easily.
- Keep the Chocolate Warm: Once the chocolate is melted, keep it warm over the double boiler (if using that method) or in the microwave on a very low setting. This will prevent it from hardening while you’re dipping the patties.
Dipping and Finishing:
Almost there! This is the final step dipping those peppermint patties in chocolate and letting them set.
- Prepare Your Dipping Station: Have your melted chocolate ready, along with the baking sheet lined with parchment paper or a silicone baking mat. You’ll also need a fork or dipping tools.
- Dip the Patties: Take a chilled peppermint patty and carefully dip it into the melted chocolate, making sure it’s completely coated. Use a fork or dipping tools to lift the patty out of the chocolate, allowing any excess chocolate to drip back into the bowl.
- Place on Baking Sheet: Place the chocolate-covered patty onto the prepared baking sheet.
- Repeat: Repeat the dipping process with the remaining peppermint patties.
- Optional Decorations: If you want to add some extra flair, you can sprinkle the chocolate-covered patties with crushed peppermint candies, sprinkles, or a dusting of cocoa powder while the chocolate is still wet.
- Chill to Set: Place the baking sheet in the refrigerator for at least 30 minutes, or until the chocolate is completely set.
Storage:
Once the chocolate is set, your homemade peppermint patties are ready to enjoy! Store them in an airtight container in the refrigerator for up to a week. They’re also great frozen just wrap them individually in plastic wrap and then place them in a freezer bag. They’ll keep in the freezer for up to 2 months.
Tips for Success:
- Use good quality chocolate: The better the chocolate, the better the flavor of your peppermint patties.
- Don’t overheat the chocolate: Overheated chocolate can become grainy and difficult to work with.
- Chill the filling and patties: Chilling helps the filling hold its shape and makes the patties easier to dip.
- Adjust the peppermint extract to your liking: Start with a small amount and add more until you reach your desired intensity.
- Have fun! Making homemade peppermint patties is a fun and rewarding experience. Don’t be afraid to experiment and make them your own.
Conclusion:
So, there you have it! My take on homemade peppermint patties, and honestly, I think you’ll agree they’re a game-changer. Forget store-bought these are fresher, more flavorful, and you get the satisfaction of knowing exactly what went into them. But why is this recipe a must-try? It’s simple: the perfect balance of creamy, melt-in-your-mouth peppermint filling and that satisfying snap of dark chocolate. It’s a classic treat elevated to a whole new level of deliciousness, and it’s surprisingly easy to make. Trust me, once you’ve tasted these, you won’t go back to the pre-packaged kind.
But the fun doesn’t stop there! Think of this recipe as a springboard for your own peppermint patty creations. Want to add a little extra zing? Try a pinch of sea salt to the chocolate coating. Feeling adventurous? Infuse the cream with a hint of vanilla or even a touch of espresso for a mocha twist. For a festive touch, sprinkle crushed candy canes on top while the chocolate is still wet. And of course, these homemade peppermint patties are perfect for gifting! Wrap them in cellophane bags tied with a ribbon for a thoughtful and delicious present that everyone will appreciate.
Serving suggestions are endless. Enjoy them straight from the fridge for a refreshing treat, or let them come to room temperature for a softer, more intense peppermint flavor. They’re fantastic with a cup of hot cocoa on a chilly evening, or as a palate cleanser after a rich meal. You can even crumble them over ice cream or use them as a topping for brownies. And if you’re feeling particularly decadent, try dipping them in melted white chocolate for a contrasting flavor and visual appeal. The possibilities are truly limitless!
I’ve poured my heart into perfecting this recipe, and I’m confident that you’ll love it as much as I do. It’s a labor of love, yes, but the reward is well worth the effort. Imagine the look on your friends’ and family’s faces when you present them with these homemade delights. They’ll be amazed by your culinary skills, and you’ll feel a sense of pride knowing that you created something truly special. So, what are you waiting for? Gather your ingredients, put on your apron, and get ready to embark on a peppermint patty adventure!
I’m so excited for you to try this recipe and experience the joy of homemade peppermint patties for yourself. Once you do, I’d absolutely love to hear about your experience! Did you make any variations? What did your friends and family think? Share your photos and stories in the comments below. Your feedback is invaluable, and it helps me continue to improve and create even more delicious recipes for you to enjoy. Happy baking, and may your peppermint patties be perfectly creamy and chocolatey!
Don’t forget to rate the recipe and share it with your friends! Let’s spread the peppermint patty love far and wide. And if you’re looking for more delicious homemade treats, be sure to check out my other recipes. I’m always adding new and exciting creations, so there’s sure to be something that catches your eye. Thanks for reading, and I can’t wait to hear from you!
Print
Peppermint Patties Homemade: The Ultimate Recipe Guide
- Total Time: 75 minutes
- Yield: 24–30 patties 1x
Description
Creamy, minty peppermint patties coated in rich, dark chocolate. Perfect homemade treat for the holidays or any sweet craving.
Ingredients
- 4 cups powdered sugar, sifted
- 1/2 cup (1 stick) unsalted butter, softened
- 1/4 cup heavy cream
- 2 tablespoons corn syrup
- 1 teaspoon peppermint extract (or more, to taste)
- 1/4 teaspoon salt
- 12 ounces semi-sweet chocolate, finely chopped (good quality is key!)
- 1 tablespoon coconut oil (or vegetable shortening)
Instructions
- In a large bowl, cream the softened butter until light and fluffy (2-3 minutes).
- Gradually add heavy cream and corn syrup, mixing until combined.
- Gradually add sifted powdered sugar, 1 cup at a time, mixing on low speed until just combined after each addition.
- Stir in peppermint extract and salt. Adjust peppermint extract to taste.
- Adjust consistency: If too dry, add heavy cream (1 tsp at a time). If too wet, add powdered sugar (1 tbsp at a time).
- Cover and refrigerate filling for at least 30 minutes (or up to 1 hour).
- Line a baking sheet with parchment paper.
- *Option 1 (Roll & Cut):* Dust surface with powdered sugar. Roll filling to 1/4-inch thickness. Cut out patties with cookie cutters.
- *Option 2 (Roll & Flatten):* Roll filling into 1-inch balls. Flatten with palm or glass bottom.
- *Option 3 (Piping Bag):* Pipe circles onto the prepared baking sheet.
- Refrigerate shaped patties for 15-20 minutes.
- *Double Boiler:* Simmer water in a saucepan. Place heatproof bowl on top (bowl shouldn’t touch water). Add chocolate and coconut oil. Stir until melted and smooth.
- *Microwave:* Microwave chocolate and coconut oil in 30-second intervals, stirring after each, until almost melted. Stir until smooth. Be careful not to overheat.
- Keep chocolate warm.
- Have melted chocolate and lined baking sheet ready.
- Dip each chilled patty into the melted chocolate, ensuring it’s fully coated. Use a fork to lift and let excess drip off.
- Place on the prepared baking sheet.
- Repeat with remaining patties.
- Optional: Sprinkle with crushed peppermint, sprinkles, or cocoa powder while chocolate is wet.
- Chill in the refrigerator for at least 30 minutes, or until chocolate is set.
- Store in an airtight container in the refrigerator for up to a week. For longer storage, wrap individually and freeze for up to 2 months.
Notes
- Use good quality chocolate for the best flavor.
- Don’t overheat the chocolate, as it can become grainy.
- Chilling the filling and patties is crucial for easy handling and dipping.
- Adjust the peppermint extract to your preferred intensity.
- Have fun and experiment!
- Prep Time: 30 minutes
- Cook Time: 15 minutes


Leave a Comment