

Peep Bars are more than just a delightful dessert; they are a vibrant celebration of one of America’s most iconic springtime treats. I know for many, the sight of those colorful, sugar-coated marshmallow chicks and bunnies evokes a special kind of nostalgic joy, particularly around the Easter season. While often enjoyed straight from the package, transforming these beloved candies into a spectacular bar creates an entirely new, incredibly addictive experience. This modern tradition of repurposing holiday sweets into a shareable treat has quickly become a cherished ritual.
Why These Gooey Treats Will Win Your Heart
Imagine a dessert that captures all the sweet, airy essence of a classic Peep, but elevated into a chewy, gooey, and utterly irresistible square. That’s precisely what you get with these incredible Peep Bars. People adore this dish not only for its eye-catching, festive appearance but also for its unique texture – soft and marshmallowy with a satisfying chew, often nestled on a crunchy, buttery crust. They are remarkably simple to make, frequently requiring no baking, making them the perfect stress-free option for gatherings or a fun project with the kids. I promise, once you experience the magic of these colorful creations, you’ll understand why they’ve become such a beloved confection.

Ingredients:
- For the Graham Cracker Crust:
- 1 ½ cups (about 10-12 full sheets) graham cracker crumbs
- ½ cup (1 stick or 113g) unsalted butter, melted
- ¼ cup granulated sugar
- Pinch of salt
- For the Velvety Chocolate Fudge Layer:
- 1 (14-ounce) can sweetened condensed milk
- 1 ½ cups (about 9 ounces) semi-sweet chocolate chips
- ½ cup milk chocolate chips (or use all semi-sweet if preferred)
- 2 tablespoons unsalted butter
- 1 teaspoon pure vanilla extract
- Pinch of salt
- For the Toasted Peep Topping:
- 1-2 (10-count) packages assorted color Peeps marshmallows (enough to cover your pan in a single layer)
- Optional: Colorful sprinkles, for an extra festive touch
Preparing the Golden Graham Cracker Crust
Creating the perfect foundation for our Gooey Peep Bars is the first, crucial step. This graham cracker crust offers a delightful crunch and a buttery base that perfectly complements the soft, sweet layers to come. It’s surprisingly simple to make, but pays huge dividends in flavor and texture.
- Preheat Your Oven and Prepare Your Pan: First things first, let’s get that oven ready. I always preheat my oven to 350°F (175°C). While the oven is warming up, grab a 9×13 inch baking pan. For easy removal of your Peep Bars later, I highly recommend lining the pan with parchment paper, leaving an overhang on the sides. This creates convenient “handles” to lift the entire batch out once cooled. If you don’t have parchment, a good greasing with butter or non-stick spray will do, but the parchment truly makes life easier, especially with sticky treats like these!
- Crush Those Graham Crackers: Now, for the star of our crust – the graham crackers. You’ll need about 1 ½ cups of fine crumbs. My favorite way to achieve this is by placing the graham cracker sheets in a large, sturdy zip-top bag and crushing them with a rolling pin or the bottom of a heavy glass. You want them to be quite fine, almost like sand, to ensure a cohesive crust. Alternatively, a food processor makes quick work of this task, pulsing until fine crumbs form. Just be careful not to over-process and turn them into a paste.
- Melt the Butter: In a small, microwave-safe bowl, melt your ½ cup of unsalted butter. You can do this in the microwave in 30-second intervals, stirring in between, or gently melt it in a small saucepan on the stovetop over low heat. We want it fully melted but not browned.
- Combine Ingredients for the Crust: In a medium-sized mixing bowl, combine the graham cracker crumbs, ¼ cup of granulated sugar, and the pinch of salt. Give them a good stir with a fork or whisk to ensure everything is evenly distributed. The sugar adds a touch more sweetness and helps with the binding, while the salt balances the flavors beautifully.
- Add Melted Butter and Mix: Pour the melted butter over the dry crumb mixture. Using a fork or your hands (which I find works best for really getting in there), mix until all the crumbs are thoroughly moistened. The mixture should resemble wet sand and hold together when you press it between your fingers. This is a critical step for a sturdy crust; if it’s too dry, your crust might crumble when cut.
- Press into the Pan: Transfer the moistened graham cracker mixture into your prepared 9×13 inch baking pan. Using the bottom of a flat glass or a measuring cup, firmly press the mixture evenly into the bottom of the pan. You want a compact, even layer from edge to edge. Firm pressing is key to a crust that doesn’t fall apart.
- Bake the Crust: Pop the pan into your preheated oven and bake for 8-10 minutes. We’re looking for it to be lightly golden brown around the edges and fragrant. This baking step helps set the crust and gives it that lovely crisp texture.
- Cool Slightly: Once baked, remove the pan from the oven and set it aside to cool slightly on a wire rack while you prepare the next layer. It doesn’t need to be completely cold, just cool enough to handle.
Crafting the Velvety Chocolate Fudge Layer
Now comes the rich, gooey heart of our Peep Bars! This chocolate fudge layer is incredibly decadent, perfectly balancing the crispness of the crust and the eventual lightness of the toasted Peeps. It’s simple to bring together and forms a luxurious, chewy foundation.
- Gather Your Chocolate Goodies: In a medium-sized, heavy-bottomed saucepan, combine the 1 (14-ounce) can of sweetened condensed milk, the 1 ½ cups of semi-sweet chocolate chips, the ½ cup of milk chocolate chips (or all semi-sweet if that’s your preference!), the 2 tablespoons of unsalted butter, and the pinch of salt. Using a good quality chocolate will truly elevate the flavor of these Peep Bars, so I always reach for my favorites here.
- Melt and Stir to Perfection: Place the saucepan over medium-low heat. Stir constantly with a heat-proof spatula or wooden spoon. This constant stirring is vital to prevent the chocolate from scorching on the bottom, which can happen very quickly. Continue stirring until all the chocolate chips are melted and the butter is fully incorporated, creating a smooth, glossy, and thick mixture. This process usually takes about 5-7 minutes. Do not rush this step; patience here yields a perfectly smooth fudge.
- Remove from Heat and Add Vanilla: Once the mixture is completely smooth and homogeneous, remove the saucepan from the heat. Stir in the 1 teaspoon of pure vanilla extract. Vanilla adds a wonderful depth of flavor that really enhances the chocolate.
- Spread the Chocolate Layer: Immediately pour the warm chocolate fudge mixture over the slightly cooled graham cracker crust in your prepared baking pan. Use your spatula or the back of a spoon to spread it evenly from edge to edge. Try to work relatively quickly here, as the fudge will start to set as it cools.
- Chill for Setting: Place the pan in the refrigerator for at least 30 minutes, or until the chocolate fudge layer has set enough that it’s no longer sticky to the touch. This step is important to ensure the Peeps don’t sink too much into the fudge and create a distinct, firm layer beneath them. Trust me, the waiting is worth it for beautifully layered Peep Bars.
Arranging the Iconic Peeps and Toasting to Perfection
This is where the magic truly happens, transforming simple ingredients into eye-catching, festive Peep Bars! The visual appeal alone is enough to bring a smile to anyone’s face, and the warm, gooey marshmallow topping is simply irresistible.
- Preheat Your Broiler (or Oven): After the chocolate layer has chilled and set, remove the pan from the refrigerator. Now, this next step requires a bit of attention! You have two options for toasting the Peeps: the broiler or a conventional oven.
- Broiler Method (Faster, Requires Constant Supervision): If you’re confident with your broiler, turn it on to high. Make sure the oven rack is positioned about 6-8 inches from the heating element. This method toasts very quickly, so do not walk away from the oven for even a second!
- Oven Method (Slower, More Forgiving): If you prefer a slightly gentler approach, preheat your oven to 350°F (175°C). This will melt and lightly toast the Peeps, but it takes a bit longer.
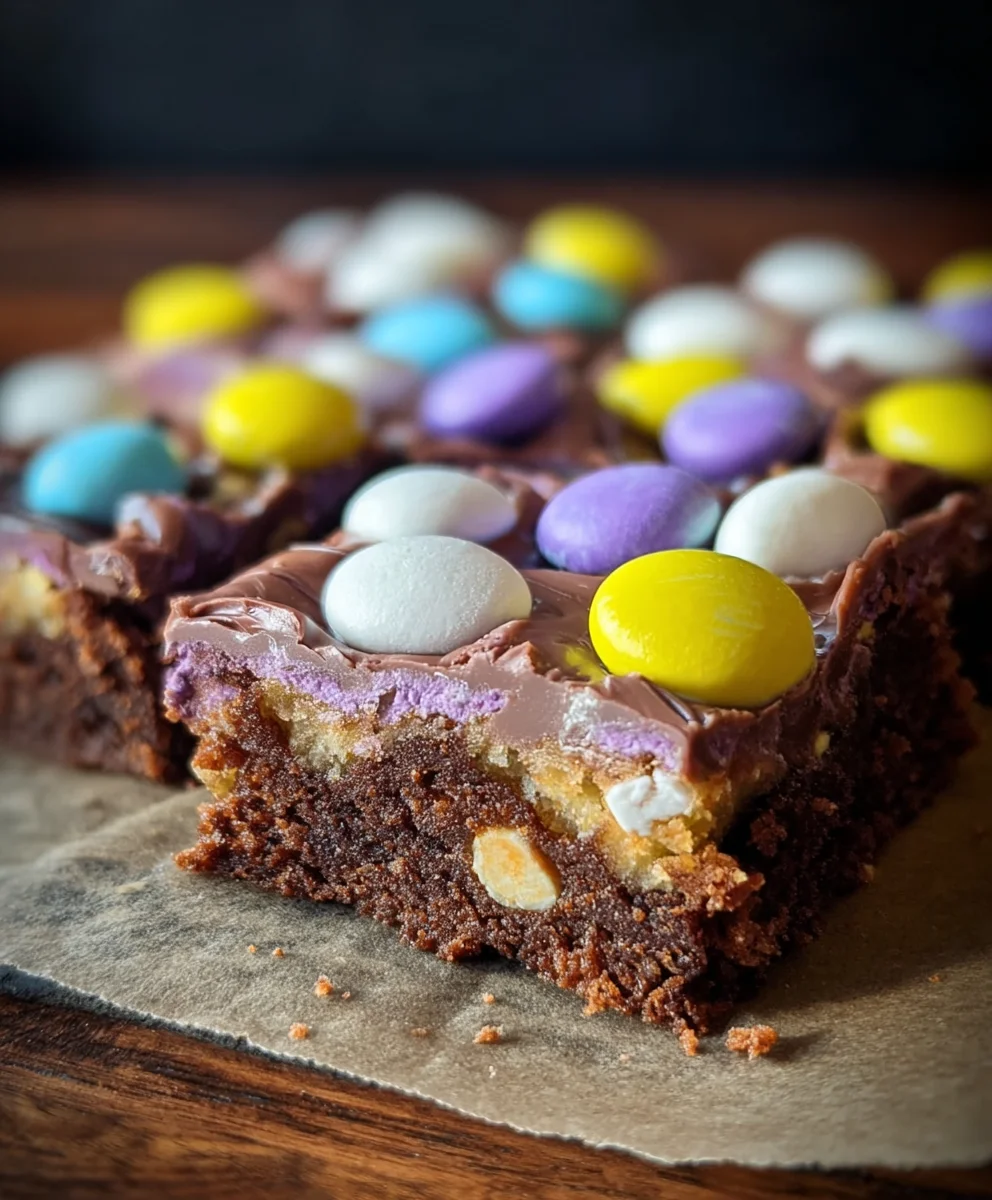
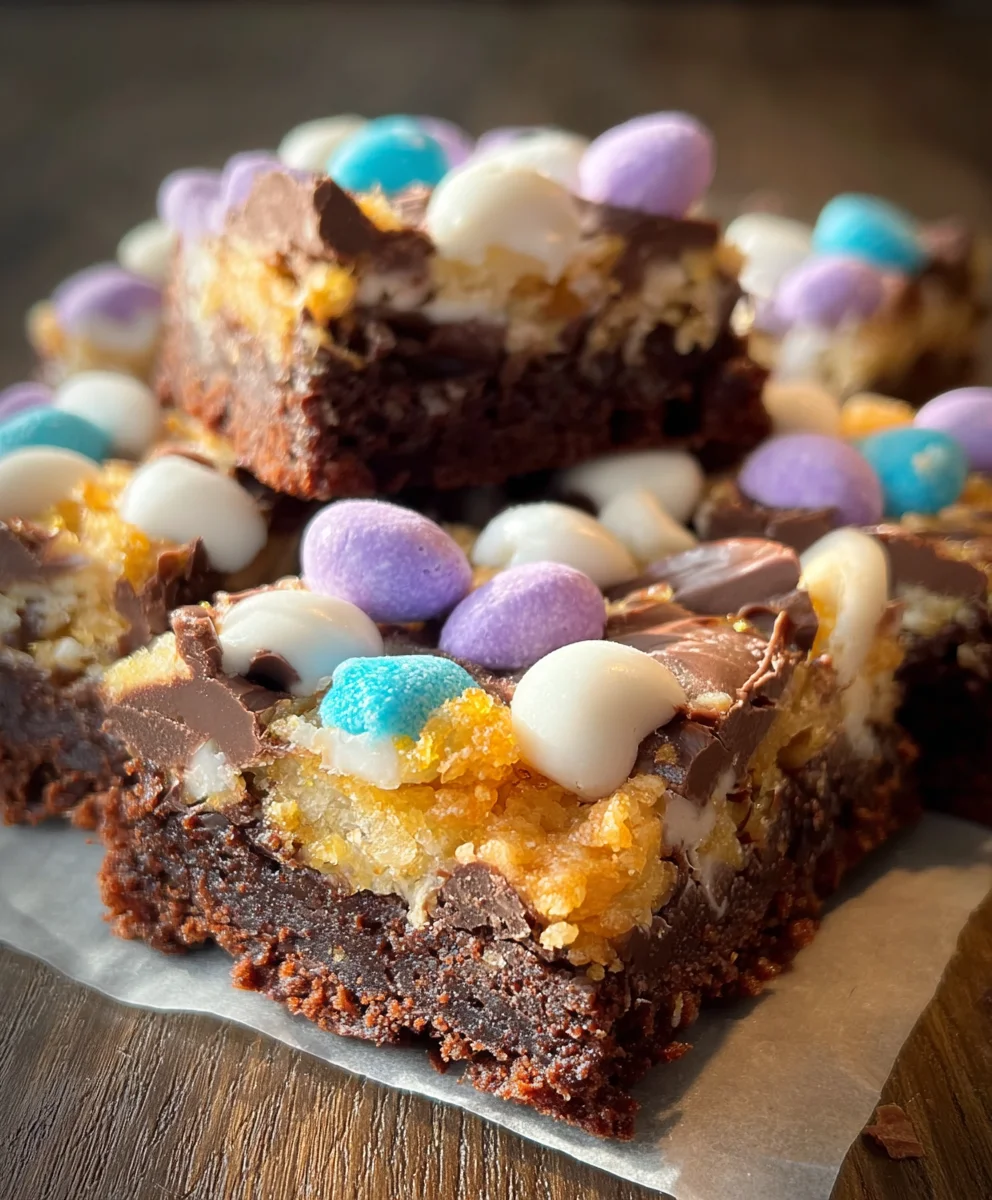
- Arrange Your Peeps: Unwrap your beloved Peeps marshmallows. Arrange them in a single, snug layer over the set chocolate fudge layer. You can mix and match colors for a vibrant display, or stick to a single color scheme – totally up to your festive spirit! Make sure they are packed closely together to cover the entire surface, as they will expand and melt into each other. I find that a mix of colors makes these Peep Bars especially cheerful.
- Toast the Peeps:
- Broiler Method: Carefully place the baking pan under the preheated broiler. Keep the oven door slightly ajar so you can watch them continuously. The Peeps will puff up, turn golden, and begin to brown in a matter of seconds (literally 30-90 seconds!). As soon as they reach your desired level of toastiness – from lightly golden to a deeper golden brown – immediately remove the pan from the oven. They can go from perfect to burnt in a blink!
- Oven Method: Place the baking pan in the preheated 350°F (175°C) oven. Bake for 5-7 minutes, or until the Peeps are puffed up, soft, and lightly golden brown. Keep a close eye on them, especially after 4 minutes, as ovens vary.
- Add Sprinkles (Optional): If you’re using sprinkles, sprinkle them over the warm, toasted Peeps immediately after removing the pan from the oven. The warmth of the marshmallow will help them adhere. This adds an extra layer of festive fun to your homemade Peep Bars!
Cooling, Slicing, and Enjoying Your Magical Peep Bars
The final, and perhaps most challenging, step: waiting! Proper cooling is essential for neat, clean slices and to allow all the layers to fully set, ensuring each bite of your Peep Bars is a perfect blend of texture and flavor.
- Allow to Cool Completely: This is arguably the most important step for beautifully set Peep Bars. Once you remove the pan from the oven, place it on a wire rack and let it cool completely at room temperature. This will take at least 1-2 hours, but for the cleanest cuts, I often let them cool for longer, or even pop them into the refrigerator for another hour after they’ve reached room temperature. Resist the urge to cut them warm! The chocolate layer will be too soft, and the marshmallow will be extremely sticky, resulting in a messy (though still delicious) experience.
- Lift and Slice: Once the bars are completely cooled and firm, use the parchment paper overhangs to carefully lift the entire slab of Peep Bars out of the baking pan and transfer it to a large cutting board. This is where that parchment paper truly shines!
- Slice with Care: Using a large, sharp knife, carefully slice the bars into your desired size. I usually go for 12-16 squares. For the cleanest cuts, I find it helpful to run the knife under hot water and wipe it dry between each slice. The warm, clean knife helps glide through the sticky marshmallow and dense fudge without dragging. You might need to gently clean any marshmallow residue off the knife after every couple of cuts.
- Serve and Enjoy Your Peep Bars: Arrange your beautiful, vibrant Peep Bars on a platter and serve them to delighted friends and family. These are absolutely perfect for spring gatherings, Easter celebrations, or simply as a fun, whimsical treat anytime you need a little burst of joy. The combination of the crisp graham cracker, the chewy chocolate, and the toasted marshmallow is truly a unique and satisfying experience.
- Storing Leftovers: If by some miracle you have any Peep Bars left over, store them in an airtight container at room temperature for up to 3-4 days. While they are best enjoyed within a day or two, they will remain wonderfully chewy and delicious. I find that separating layers with parchment paper can prevent them from sticking together too much in storage.
There you have it! Your very own batch of irresistible Gooey Peep Bars, ready to be devoured. These are always a huge hit, and I promise you, the effort is well worth the incredible result!
Conclusion:
And there you have it! We’ve journeyed through the simple steps to create a truly unforgettable treat. What makes this recipe an absolute must-try, I hear you ask? It’s the sheer alchemy of transforming a childhood favorite into something that feels both nostalgic and utterly gourmet. These Peep Bars are a masterclass in texture and taste, combining the satisfying crunch of a buttery graham cracker base with a thick, luxurious layer of gooey, toasted marshmallow, all crowned with rich, melted chocolate. It’s a symphony of sweet, salty, crispy, and chewy in every single bite. I truly believe that once you experience the ease of preparation and the incredible payoff in flavor, these will become a regular in your baking repertoire, whether for a spontaneous sweet craving or a festive gathering. There’s a certain magic in watching those colorful marshmallows puff up and caramelize under the broiler, creating that signature golden-brown top that promises pure bliss.
But the beauty of these delightful bars doesn’t stop at their inherent deliciousness; it also lies in their incredible versatility. While absolutely perfect on their own, straight from the pan, I encourage you to think about how you might elevate or customize your Peep Bars experience. For a truly indulgent dessert, try serving them ever-so-slightly warm; a quick 10-15 second zap in the microwave will bring back that glorious gooey marshmallow texture, making them ideal alongside a scoop of premium vanilla bean ice cream or a dollop of fresh whipped cream. For those who prefer a firmer, chewier bite, chilling them in the refrigerator for an hour or two before slicing is a fantastic option, giving the chocolate a satisfying snap. Consider sprinkling a pinch of flaky sea salt over the top of the melted chocolate layer before it sets; that hint of salt truly amplifies the sweetness and adds another dimension of flavor. You could also experiment with different chocolate varieties – a dark chocolate for a less sweet, more intense flavor, or even a white chocolate for a creamy, delicate contrast.
Looking to get creative with variations? The possibilities are endless! Imagine a fall-themed version with a sprinkle of pumpkin spice in the graham cracker base, or a festive holiday edition using peppermint extract in the chocolate layer and crushed candy canes on top. For a burst of citrus, try adding a little orange zest to your chocolate. If you’re a nut butter fan, a thin layer of peanut butter or almond butter spread over the graham cracker crust before adding the marshmallows would be an incredible addition. You could even press some chopped nuts, like pecans or walnuts, into the chocolate layer for added texture and richness. Don’t limit yourself to just the classic yellow Peeps either; using a mix of colors for various holidays can make them even more visually appealing – think pastel Peeps for Easter, green Peeps for St. Patrick’s Day, or red and green for Christmas. These Peep Bars are a blank canvas for your culinary imagination!
So, now it’s your turn! I genuinely hope that I’ve inspired you to roll up your sleeves and give this recipe a try. I promise you, the joy of creating something so delicious and seeing the smiles it brings to faces is incredibly rewarding. Whether you’re a seasoned baker or just starting out, this recipe is incredibly forgiving and guarantees fantastic results. Don’t be afraid to experiment with the serving suggestions or put your own unique twist on it. I absolutely adore hearing about your culinary adventures, so please, once you’ve whipped up your batch of these incredible bars, come back and tell me all about it! Share your photos, your triumphs, and any clever variations you came up with. Your feedback and creativity not only inspire me but also help build our wonderful community of home bakers. Happy baking, my friends!
Peep Bars: Easy & Fun No-Bake Easter Treat
Peep Bars are a vibrant, easy-to-make, no-bake Easter treat featuring a crunchy graham cracker crust, a rich, velvety chocolate fudge layer, and a colorful, toasted marshmallow Peep topping. Perfect for spring gatherings, they offer a delightful combination of sweet, chewy, and crunchy textures.
Ingredients
-
1 ½ cups graham cracker crumbs
-
½ cup unsalted butter, melted
-
¼ cup granulated sugar
-
Pinch of salt
-
1 (14-ounce) can sweetened condensed milk
-
1 ½ cups semi-sweet chocolate chips
-
½ cup milk chocolate chips (or all semi-sweet)
-
2 tablespoons unsalted butter
-
1 teaspoon pure vanilla extract
-
Pinch of salt
-
1-2 (10-count) packages assorted color Peeps marshmallows
-
Optional: Colorful sprinkles
Instructions
-
Step 1
Preheat oven to 350°F (175°C). Line a 9×13 inch baking pan with parchment paper. Combine 1 ½ cups graham cracker crumbs, ¼ cup sugar, and pinch of salt. Mix in ½ cup melted butter until moistened. Press firmly into pan. Bake for 8-10 minutes until lightly golden. Cool slightly. -
Step 2
In a heavy-bottomed saucepan, combine 1 can sweetened condensed milk, 1 ½ cups semi-sweet chocolate chips, ½ cup milk chocolate chips, 2 tablespoons unsalted butter, and pinch of salt. Melt over medium-low heat, stirring constantly, until smooth and glossy (5-7 minutes). Remove from heat, stir in 1 teaspoon pure vanilla extract. Pour and spread fudge evenly over the cooled graham cracker crust. Chill in the refrigerator for at least 30 minutes until set. -
Step 3
Remove pan from refrigerator. Preheat broiler (rack 6-8 inches from heat) or oven to 350°F (175°C). Arrange 1-2 packages assorted Peeps marshmallows in a single, snug layer over the set chocolate fudge. If using broiler, toast for 30-90 seconds, watching constantly, until golden. If using oven, bake for 5-7 minutes until puffed and lightly golden. Immediately remove from heat. Optional: Sprinkle with colorful sprinkles while warm. -
Step 4
Cool completely on a wire rack at room temperature (1-2 hours), or chill further for cleaner cuts. Use parchment paper overhangs to lift slab from pan to a cutting board. Using a large, sharp knife (wiping clean between slices), cut into 12-16 squares. Serve and enjoy. Store leftovers in an airtight container at room temperature for 3-4 days.
Important Information
Nutrition Facts (Per Serving)
It is important to consider this information as approximate and not to use it as definitive health advice.
Allergy Information
Please check ingredients for potential allergens and consult a health professional if in doubt.

Leave a Comment