

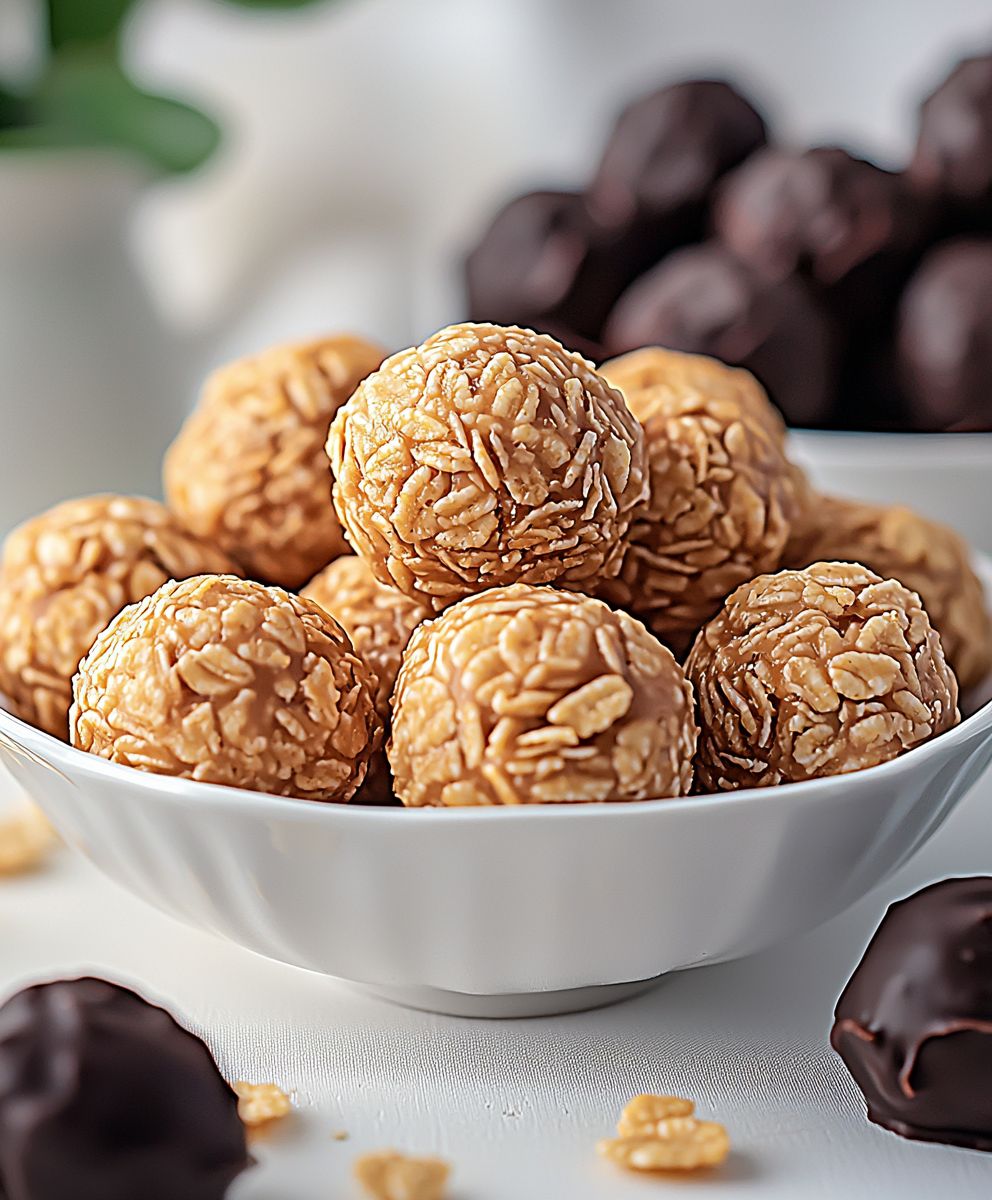
Peanut Butter Balls: Prepare to be amazed by these decadent, no-bake treats that are guaranteed to vanish in minutes! I’m thrilled to share this incredibly easy and satisfying recipe with you. These aren’t just any dessert; they’re a delightful combination of creamy peanut butter, sweet goodness, and a touch of magic, all rolled into one perfect bite.
While the exact origins of peanut butter balls are a bit hazy, their popularity exploded in home kitchens across America, becoming a staple during holiday seasons and potlucks. They represent a time when simple, homemade treats reigned supreme, and sharing delicious food was a way to connect with loved ones. Think of them as a sweet symbol of comfort and nostalgia.
What makes these little spheres of joy so irresistible? It’s the perfect balance of flavors and textures. The rich, nutty flavor of peanut butter is beautifully complemented by the sweetness of powdered sugar and the satisfying crunch of optional coatings like chocolate or chopped nuts. Plus, the no-bake aspect makes them incredibly convenient perfect for those times when you need a quick and impressive dessert without spending hours in the kitchen. Whether you’re a seasoned baker or a kitchen novice, these peanut butter balls are a guaranteed crowd-pleaser that you’ll want to make again and again!

Ingredients:
- 1 cup (2 sticks) unsalted butter, softened
- 1 cup creamy peanut butter
- 3 cups powdered sugar, plus more for dusting
- 1 teaspoon vanilla extract
- 1/2 teaspoon salt
- 12 ounces semi-sweet chocolate chips
- 1 tablespoon vegetable shortening (or coconut oil)
- Optional: Sprinkles, chopped nuts, or sea salt for topping
Making the Peanut Butter Mixture
Okay, let’s get started! First, we’re going to create the heart of these delicious treats the peanut butter filling. This part is super easy, and you can even get the kids involved!
- Cream the Butter and Peanut Butter: In a large bowl, using an electric mixer (either a stand mixer or a hand mixer), cream together the softened butter and peanut butter until they are light and fluffy. This usually takes about 2-3 minutes. Make sure your butter is truly softened; otherwise, you’ll end up with lumps. Nobody wants lumpy peanut butter balls! Scrape down the sides of the bowl occasionally to ensure everything is evenly mixed.
- Add the Powdered Sugar: Gradually add the powdered sugar, one cup at a time, to the butter and peanut butter mixture. Mix on low speed to prevent a powdered sugar explosion! After each addition, make sure the sugar is fully incorporated before adding more. This step is crucial for achieving the right consistency. If you add the sugar too quickly, it can become difficult to mix and might leave you with a dry, crumbly mixture.
- Incorporate Vanilla and Salt: Add the vanilla extract and salt to the mixture. Mix until everything is well combined. The vanilla enhances the peanut butter flavor, and the salt balances the sweetness. Don’t skip the salt; it really makes a difference!
- Check the Consistency: The mixture should be firm enough to hold its shape when rolled into balls. If it’s too soft, add a little more powdered sugar, one tablespoon at a time, until you reach the desired consistency. If it’s too dry, add a tiny bit of softened butter or peanut butter. Remember, you can always add more, but you can’t take it away!
Forming the Peanut Butter Balls
Now comes the fun part rolling the peanut butter mixture into balls! This is where you get to use your hands and create those perfect little spheres of peanut butter goodness.
- Prepare Your Workspace: Line a baking sheet with parchment paper or wax paper. This will prevent the peanut butter balls from sticking.
- Roll the Balls: Using a small cookie scoop or a spoon, scoop out about 1 tablespoon of the peanut butter mixture. Roll it between your palms to form a smooth ball. Aim for consistent sizes so they look uniform and bake evenly (if you were to bake them, which we aren’t!).
- Place on Baking Sheet: Place the rolled peanut butter ball onto the prepared baking sheet. Repeat with the remaining mixture, spacing the balls evenly apart.
- Chill the Balls: This is a very important step! Place the baking sheet with the peanut butter balls in the refrigerator for at least 30 minutes, or even better, for an hour. Chilling them will help them firm up and prevent them from melting when you dip them in the chocolate. Trust me, you don’t want melty, misshapen peanut butter balls!
Melting the Chocolate
Time to get that chocolate nice and melty! There are a couple of ways to do this, and I’ll walk you through both. Choose the method that works best for you and your kitchen setup.
- Choose Your Melting Method: You can melt the chocolate using either a double boiler or the microwave. I personally prefer the double boiler method for more control, but the microwave is definitely faster.
- Double Boiler Method: Fill a saucepan with about an inch or two of water. Bring the water to a simmer over medium heat. Place a heatproof bowl (glass or stainless steel) on top of the saucepan, making sure the bottom of the bowl doesn’t touch the water. Add the chocolate chips and vegetable shortening (or coconut oil) to the bowl. Stir occasionally until the chocolate is completely melted and smooth. The shortening helps to thin the chocolate and gives it a nice shine.
- Microwave Method: Place the chocolate chips and vegetable shortening (or coconut oil) in a microwave-safe bowl. Microwave in 30-second intervals, stirring after each interval, until the chocolate is melted and smooth. Be very careful not to overheat the chocolate, as it can burn easily. If you see any signs of burning, stop immediately and stir vigorously.
- Maintain the Chocolate’s Temperature: Once the chocolate is melted, keep it warm over the double boiler (if using that method) or in the microwave (on a very low power setting, if necessary). You want to keep the chocolate fluid so it’s easy to dip the peanut butter balls.
Dipping and Decorating
The final step! This is where your peanut butter balls transform from simple treats into chocolate-covered masterpieces. Get creative with your decorations and have fun!
- Prepare Your Dipping Station: Have your melted chocolate ready in a bowl. Have your chilled peanut butter balls ready on the baking sheet. Prepare a clean baking sheet lined with parchment paper or wax paper for the dipped balls. Also, have your toppings (sprinkles, chopped nuts, sea salt, etc.) ready to go.
- Dip the Peanut Butter Balls: Using a fork or dipping tools, carefully dip each chilled peanut butter ball into the melted chocolate, making sure it’s completely coated. Gently tap off any excess chocolate.
- Place on Baking Sheet: Place the chocolate-covered peanut butter ball onto the prepared baking sheet.
- Decorate (Optional): While the chocolate is still wet, sprinkle with your desired toppings. Sprinkles, chopped nuts, and a sprinkle of sea salt are all great options. You can also drizzle with white chocolate or create other decorative patterns.
- Repeat: Repeat the dipping and decorating process with the remaining peanut butter balls.
- Chill Again: Place the baking sheet with the dipped and decorated peanut butter balls back in the refrigerator for at least 30 minutes, or until the chocolate is set. This will help the chocolate harden and prevent it from melting when you handle them.
Serving and Storing
Congratulations! You’ve made your own delicious peanut butter balls. Now it’s time to enjoy them (and maybe share them, if you’re feeling generous!).
- Serving: Serve the peanut butter balls chilled or at room temperature. They’re perfect for parties, holidays, or just a sweet treat any time of day.
- Storing: Store the peanut butter balls in an airtight container in the refrigerator for up to a week. You can also freeze them for longer storage. To freeze, place the peanut butter balls in a single layer on a baking sheet and freeze until solid. Then, transfer them to a freezer-safe bag or container. They can be frozen for up to 2-3 months. Let them thaw in the refrigerator before serving.
- Dusting (Optional): If you find that the peanut butter balls become a little sticky after being stored, you can dust them with a little extra powdered sugar before serving. This will give them a nice, finished look.
Conclusion:
Okay, friends, let’s be honest: you’ve made it this far, and that means you’re seriously considering making these Peanut Butter Balls. And trust me, you absolutely should! They’re not just another dessert; they’re a little bite of pure, unadulterated joy. The creamy peanut butter center, the satisfying crunch of the chocolate coating it’s a textural and flavor explosion that will have everyone begging for more. I know, I know, I sound like I’m exaggerating, but I promise you, once you try them, you’ll understand. They are seriously addictive!
What makes these peanut butter balls a must-try? It’s the simplicity, really. We’re talking about minimal ingredients, a straightforward process, and maximum deliciousness. You don’t need to be a master baker to whip these up. Even if you’re a complete beginner in the kitchen, you can totally nail this recipe. And the best part? They’re perfect for any occasion. Need a quick and easy dessert for a potluck? Peanut Butter Balls to the rescue! Want a sweet treat to satisfy your afternoon cravings? These little guys are the answer. Looking for a homemade gift that will truly impress? Look no further!
But the fun doesn’t stop there! Feel free to get creative with your serving suggestions and variations. For a festive touch, sprinkle the chocolate-covered balls with chopped nuts, sea salt, or even colorful sprinkles. Want to add a little extra flavor? Try using different types of chocolate, like dark chocolate for a richer taste or white chocolate for a sweeter option. You could even add a dash of cinnamon or a pinch of cayenne pepper to the peanut butter mixture for a little kick. And if you’re feeling adventurous, try rolling the peanut butter balls in crushed pretzels or chopped toffee bits before coating them in chocolate. The possibilities are endless!
Here are a few of my favorite serving suggestions:
- Serve them chilled straight from the refrigerator for a refreshing treat.
- Arrange them on a pretty platter for a party or gathering.
- Package them in a decorative box or bag for a thoughtful homemade gift.
- Pair them with a glass of cold milk or a cup of hot coffee for the ultimate indulgence.
- Crumble them over ice cream for a decadent dessert topping.
So, what are you waiting for? Gather your ingredients, put on your apron, and get ready to experience the magic of homemade Peanut Butter Balls. I’m confident that you’ll love them as much as I do. And once you’ve made them, I’d love to hear about your experience! Did you try any fun variations? Did you serve them at a special occasion? Share your photos and stories in the comments below. I can’t wait to see what you create! Happy baking (or should I say, happy ball-making)!
Don’t forget to rate the recipe and let me know what you think. Your feedback helps me create even more delicious and easy-to-follow recipes for you to enjoy. And if you’re looking for more sweet treats, be sure to check out my other recipes. Until then, happy snacking!
Print
Peanut Butter Balls: The Ultimate No-Bake Recipe
- Total Time: 60 minutes
- Yield: 36 peanut butter balls 1x
Description
Easy no-bake peanut butter balls dipped in rich chocolate. A perfect sweet treat for any occasion!
Ingredients
- 1 cup (2 sticks) unsalted butter, softened
- 1 cup creamy peanut butter
- 3 cups powdered sugar, plus more for dusting
- 1 teaspoon vanilla extract
- 1/2 teaspoon salt
- 12 ounces semi-sweet chocolate chips
- 1 tablespoon vegetable shortening (or coconut oil)
- Optional: Sprinkles, chopped nuts, or sea salt for topping
Instructions
- Cream the Butter and Peanut Butter: In a large bowl, using an electric mixer, cream together the softened butter and peanut butter until light and fluffy (2-3 minutes). Scrape down the sides of the bowl.
- Add Powdered Sugar: Gradually add the powdered sugar, one cup at a time, to the butter and peanut butter mixture. Mix on low speed after each addition until fully incorporated.
- Incorporate Vanilla and Salt: Add the vanilla extract and salt to the mixture. Mix until well combined.
- Check Consistency: The mixture should be firm enough to hold its shape. If too soft, add more powdered sugar (1 tbsp at a time). If too dry, add a tiny bit of softened butter or peanut butter.
- Prepare Workspace: Line a baking sheet with parchment paper or wax paper.
- Roll the Balls: Using a small cookie scoop or spoon, scoop out about 1 tablespoon of the peanut butter mixture. Roll between your palms to form a smooth ball.
- Place on Baking Sheet: Place the rolled peanut butter ball onto the prepared baking sheet, spacing evenly apart.
- Chill the Balls: Place the baking sheet in the refrigerator for at least 30 minutes (or up to an hour) to firm up.
- Choose Melting Method: Melt the chocolate using either a double boiler or the microwave.
- Double Boiler Method: Fill a saucepan with about an inch or two of water. Bring the water to a simmer over medium heat. Place a heatproof bowl (glass or stainless steel) on top of the saucepan, making sure the bottom of the bowl doesn’t touch the water. Add the chocolate chips and vegetable shortening (or coconut oil) to the bowl. Stir occasionally until the chocolate is completely melted and smooth. The shortening helps to thin the chocolate and gives it a nice shine.
- Microwave Method: Place the chocolate chips and vegetable shortening (or coconut oil) in a microwave-safe bowl. Microwave in 30-second intervals, stirring after each interval, until the chocolate is melted and smooth. Be very careful not to overheat the chocolate, as it can burn easily. If you see any signs of burning, stop immediately and stir vigorously.
- Maintain Chocolate Temperature: Keep the melted chocolate warm over the double boiler or in the microwave (on a very low power setting).
- Prepare Dipping Station: Have melted chocolate, chilled peanut butter balls, a clean baking sheet lined with parchment paper, and toppings ready.
- Dip the Peanut Butter Balls: Using a fork or dipping tools, carefully dip each chilled peanut butter ball into the melted chocolate, ensuring it’s completely coated. Gently tap off excess chocolate.
- Place on Baking Sheet: Place the chocolate-covered peanut butter ball onto the prepared baking sheet.
- Decorate (Optional): While the chocolate is still wet, sprinkle with desired toppings.
- Repeat: Repeat the dipping and decorating process with the remaining peanut butter balls.
- Chill Again: Place the baking sheet back in the refrigerator for at least 30 minutes, or until the chocolate is set.
- Serving: Serve chilled or at room temperature.
- Storing: Store in an airtight container in the refrigerator for up to a week. For longer storage, freeze in a single layer on a baking sheet until solid, then transfer to a freezer-safe bag for up to 2-3 months. Thaw in the refrigerator before serving.
- Dusting (Optional): If the peanut butter balls become sticky after storing, dust with powdered sugar before serving.
Notes
- Make sure the butter is properly softened for a smooth peanut butter mixture.
- Add powdered sugar gradually to prevent a “sugar explosion.”
- Chilling the peanut butter balls before dipping is crucial to prevent melting.
- Be careful not to overheat the chocolate when melting.
- Get creative with your toppings!
- If you don’t have shortening, coconut oil works as a substitute.
- Prep Time: 20 minutes
- Cook Time: 10 minutes
Leave a Comment