

No Bake Apple Pie Cheesecake. Imagine sinking your fork into a dessert that perfectly marries the comforting, spiced sweetness of a classic apple pie with the velvety, rich tang of a cheesecake, all while requiring absolutely no time in the oven. This extraordinary creation isn’t a dream; it’s a delightful reality designed for ultimate ease and unparalleled indulgence.
For generations, both apple pie and cheesecake have held cherished places at our tables, evolving from ancient Roman honey cakes to colonial American staples. Our innovative take on these timeless favorites offers the ultimate convenience without compromising on flavor or texture.
It’s the perfect solution for busy schedules or those warm days when turning on the oven feels like a monumental task.
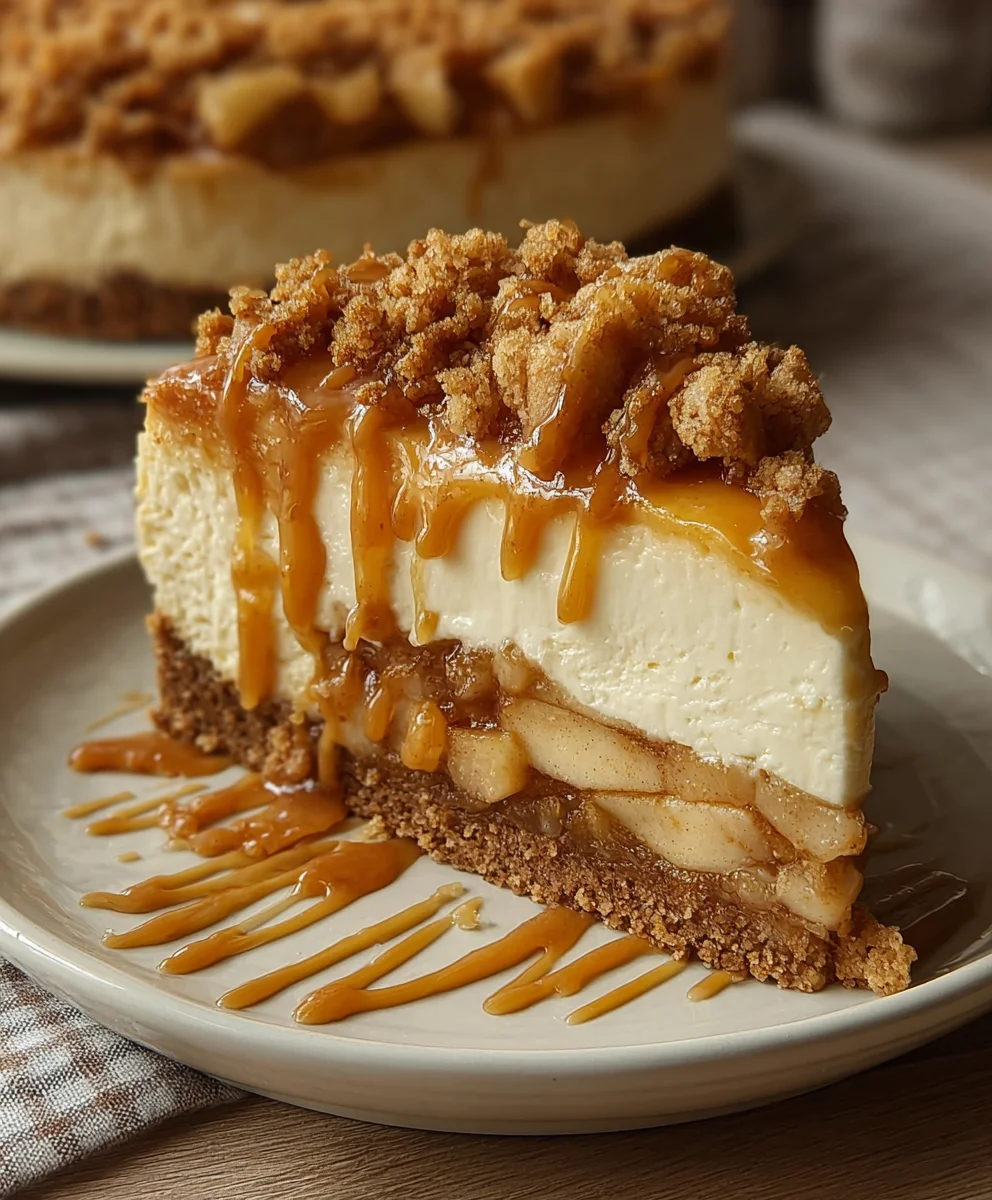
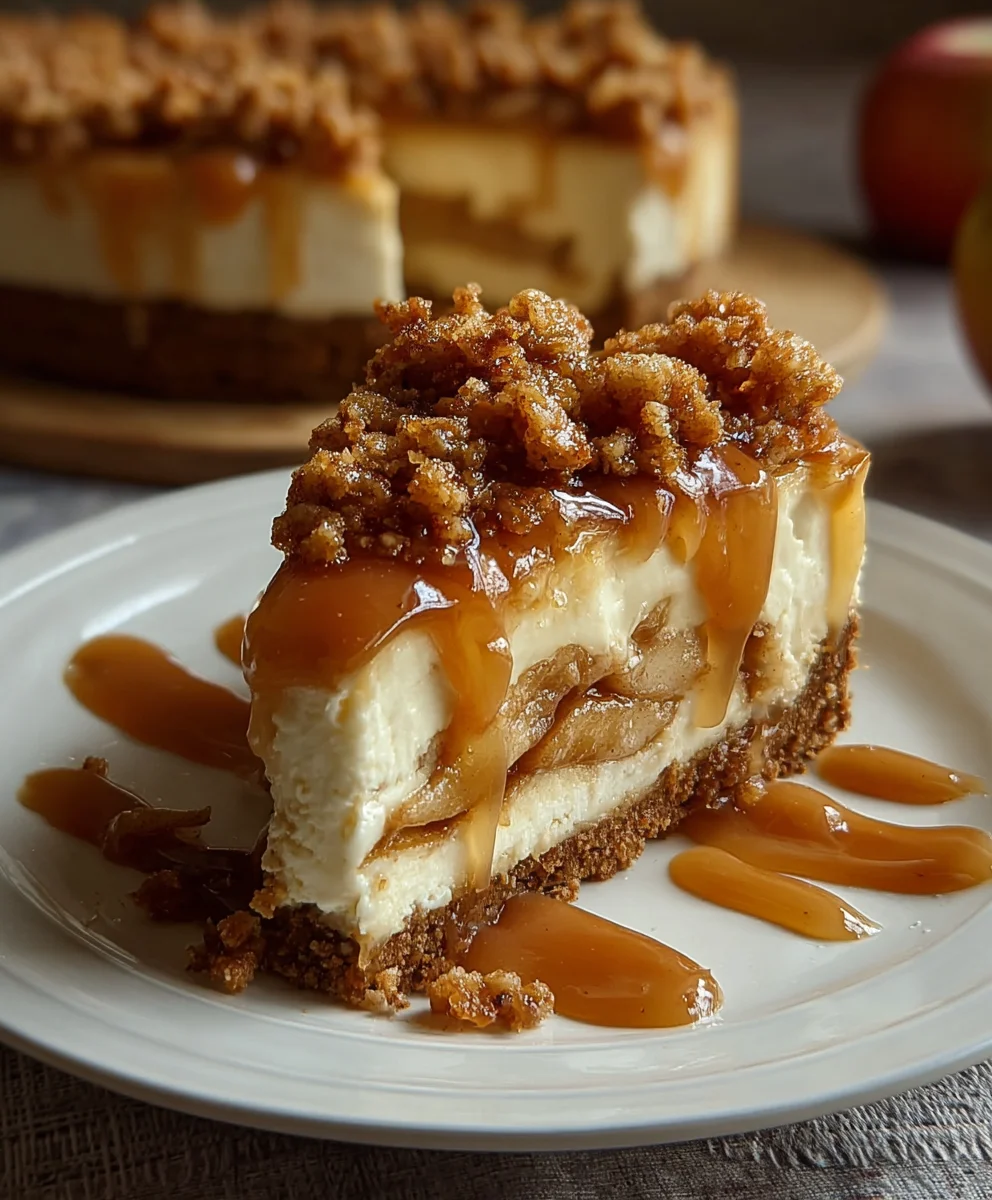
You’ll adore the buttery graham cracker crust, the luscious, smooth cream cheese filling, and the tender, cinnamon-spiced apple topping that crowns this spectacular dessert. Every bite of this No Bake Apple Pie Cheesecake delivers a symphony of familiar, comforting flavors, elevated by the creamy coolness that only a perfectly chilled cheesecake can provide. It’s a dessert that consistently wows crowds, offering a sophisticated yet incredibly simple path to culinary bliss.

Ingredients:
- For the Graham Cracker Crust:
- 1 ½ cups (about 180g) graham cracker crumbs (from approximately 10-12 full graham cracker sheets)
- ¼ cup (50g) granulated sugar
- ½ teaspoon ground cinnamon (optional, but I love the warmth it adds!)
- 6 tablespoons (85g) unsalted butter, melted
- For the No Bake Cheesecake Filling:
- 2 (8-ounce) packages (450g total) full-fat cream cheese, softened to room temperature
- 1 cup (200g) granulated sugar
- 1 teaspoon pure vanilla extract
- ¼ teaspoon lemon zest (optional, but brightens the flavor beautifully)
- 2 cups (480ml) cold heavy cream (also known as whipping cream)
- ½ cup (120ml) milk (any kind, but I prefer whole milk for richness)
- 1 (3.4-ounce) package instant vanilla pudding mix (not cooked pudding)
- For the Homemade Apple Pie Topping:
- 3 medium-sized apples (about 1 lb or 450g), such as Granny Smith, Honeycrisp, or Fuji, peeled, cored, and finely diced
- 2 tablespoons unsalted butter
- ¼ cup (50g) packed light brown sugar
- ½ teaspoon ground cinnamon
- ¼ teaspoon ground nutmeg
- Pinch of ground cloves (optional, for extra depth)
- 1 tablespoon lemon juice
- 2 tablespoons water
- 1 tablespoon cornstarch
- Optional Garnishes:
- Whipped cream
- Extra cinnamon dust
- A few thin apple slices
Preparing the Graham Cracker Crust
Creating the perfect foundation for our glorious No Bake Apple Pie Cheesecake is crucial, and it all starts with a sturdy, flavorful graham cracker crust. This process is simple but requires attention to detail to ensure your crust holds up beautifully.
- First things first, let’s get those graham crackers into fine crumbs. You have a couple of options here. My preferred method for consistency is a food processor. Just toss your graham cracker sheets in and pulse until you have a fine, sandy texture. If you don’t have a food processor, no worries! Place the crackers in a large Ziploc bag, seal it well, and use a rolling pin or the bottom of a heavy pan to crush them. The finer the crumbs, the better your crust will bind together, so really go for it!
- Once you have your 1 ½ cups of fine graham cracker crumbs, transfer them to a medium-sized mixing bowl. Add the ¼ cup of granulated sugar and the ½ teaspoon of ground cinnamon (if you’re using it, and I highly recommend it for that extra warm, comforting note). Give these dry ingredients a good stir with a spoon or whisk to ensure they’re thoroughly combined. This even distribution of sugar and cinnamon is key to a flavorful crust in every bite of your No Bake Apple Pie Cheesecake.
- Now, let’s get that butter melted. Place 6 tablespoons of unsalted butter in a microwave-safe bowl and heat it in 15-20 second increments until it’s completely melted. Be careful not to overheat it, as butter can burn quickly.
- Pour the melted butter over your graham cracker mixture. Using a fork or your hands, mix everything together until the crumbs are evenly moistened. They should resemble wet sand – every crumb should look coated in butter. This is the magic that will bind your crust together and give it that wonderful crispness once chilled.
- Prepare your pan. For this No Bake Apple Pie Cheesecake, an 8 or 9-inch springform pan is ideal. Lightly grease the bottom and sides of the pan, or line the bottom with parchment paper for easier removal, especially if you plan to transfer the cheesecake to a serving plate.
- Transfer the moistened graham cracker mixture into the prepared springform pan. Now for the important part: pressing it down firmly. I like to start by spreading the crumbs evenly across the bottom. Then, use the bottom of a flat-bottomed measuring cup, a clean glass, or your knuckles to press the crumbs down very firmly and evenly across the bottom of the pan. If you like, you can also press some crumbs slightly up the sides of the pan for a more traditional crust edge. The key here is firmness; a well-pressed crust won’t crumble when you slice into your cheesecake.
- Pop the pan into the refrigerator for at least 30 minutes to an hour. This chilling time is essential. It allows the butter to solidify and sets the crust, creating a stable base that will easily hold the creamy filling and luscious apple topping of our No Bake Apple Pie Cheesecake.
Making the Creamy No Bake Cheesecake Filling
This is where the magic happens, turning simple ingredients into a rich, velvety filling that is the heart of our No Bake Apple Pie Cheesecake. The “no bake” aspect makes it incredibly easy, but a few steps are critical for achieving that perfect creamy texture.
- Ensure your cream cheese is at room temperature. This is perhaps the most important tip for a lump-free, super smooth cheesecake filling. If your cream cheese is too cold, it won’t beat properly and you’ll end up with lumps, no matter how long you mix. If you forget to take it out ahead of time, you can unwrap the cream cheese and place it on a microwave-safe plate, microwaving it on 50% power for 15-20 seconds until slightly softened. Just be careful not to melt it!
- In a large mixing bowl, using an electric mixer (either a stand mixer with a paddle attachment or a hand mixer), beat the softened cream cheese on medium speed until it’s incredibly smooth and fluffy. This should take about 2-3 minutes. Scrape down the sides of the bowl occasionally to ensure everything is evenly incorporated.
- Gradually add the 1 cup of granulated sugar to the cream cheese, continuing to beat on medium speed. Mix for another 2-3 minutes until the sugar is fully dissolved and the mixture is light and creamy. Taste it – it should be sweet and smooth.
- Stir in the 1 teaspoon of pure vanilla extract and the ¼ teaspoon of lemon zest (if using). The lemon zest is a secret ingredient that won’t make your cheesecake taste like lemon, but rather brightens and enhances the flavor of the cream cheese, making it taste even fresher.
- In a separate, very cold bowl (I like to chill my mixing bowl and whisk attachment in the freezer for 10-15 minutes beforehand), pour in the 2 cups of cold heavy cream. Beat the heavy cream on high speed until it forms stiff peaks. This means when you lift the beaters, the cream stands up straight. Be careful not to overbeat, or it can turn grainy.
- Now, in a third bowl, whisk together the ½ cup of milk and the 1 (3.4-ounce) package of instant vanilla pudding mix until smooth. This mixture will thicken quickly, so work relatively fast.
- Add the pudding mixture directly to the cream cheese mixture. Beat on low speed until just combined, about 30 seconds. Do not overmix.
- Finally, gently fold the whipped cream into the cream cheese and pudding mixture. Do this in two additions. Use a spatula and a gentle, upward motion, being careful not to deflate the air you’ve just whipped into the cream. The goal is to keep the filling light and airy. Continue folding until no streaks of whipped cream remain and the mixture is uniformly smooth and fluffy. This beautiful, airy texture is what makes a perfect No Bake Apple Pie Cheesecake filling!
Crafting the Homemade Apple Pie Topping
While you could certainly use a can of pie filling, taking the time to make this homemade apple pie topping truly elevates our No Bake Apple Pie Cheesecake. The aroma alone is worth the effort, and the fresh, tender apples with warm spices are absolutely divine.
- Start by preparing your apples. Peel, core, and finely dice your three medium-sized apples. I recommend a mix of sweet and tart, like Honeycrisp and Granny Smith, for the best balance of flavor and texture. Aim for small, consistent dice, about ¼ to ½ inch, so they cook evenly and are easy to scoop onto the cheesecake.
- In a medium saucepan or skillet, melt 2 tablespoons of unsalted butter over medium heat. Once the butter is shimmering, add the diced apples. Sauté for 5-7 minutes, stirring occasionally, until the apples start to soften slightly but still have a bit of a bite. We don’t want them mushy at this stage.
- Now, let’s infuse those wonderful apple pie flavors! Add the ¼ cup of packed light brown sugar, ½ teaspoon of ground cinnamon, ¼ teaspoon of ground nutmeg, and the optional pinch of ground cloves to the saucepan. Stir well to coat the apples evenly. Continue to cook for another 2-3 minutes, stirring constantly, until the sugar has dissolved and the spices are fragrant. The apples will release some of their juices, creating a lovely syrup.
- In a small bowl, whisk together 1 tablespoon of lemon juice and 2 tablespoons of water with 1 tablespoon of cornstarch until no lumps remain. This is our cornstarch slurry, which will thicken our apple topping. The lemon juice also helps prevent the apples from browning and adds a bright note.
- Pour the cornstarch slurry into the apple mixture in the saucepan, stirring continuously. Bring the mixture to a gentle simmer, and cook for 1-2 minutes, stirring, until the sauce has thickened to your desired consistency. It should be glossy and coat the back of a spoon. Remember, it will thicken a bit more as it cools.
- Remove the apple topping from the heat and transfer it to a separate bowl or shallow dish. This next step is absolutely crucial for your No Bake Apple Pie Cheesecake: you must allow the apple pie topping to cool completely to room temperature before adding it to the cheesecake. If you put warm apples on top of your creamy filling, it will melt the delicate cheesecake and make a mess. You can speed up the cooling process by placing it in the refrigerator for about 30-60 minutes, stirring occasionally. Just make sure it’s fully cool to the touch.
Assembling Your No Bake Apple Pie Cheesecake
We’re in the home stretch! This is where all your hard work comes together to create a show-stopping No Bake Apple Pie Cheesecake. Assembly is straightforward, but patience with chilling is key for success.
- Retrieve your chilled graham cracker crust from the refrigerator. It should be firm and ready to hold our delicious filling.
- Carefully spoon the prepared no bake cheesecake filling onto the chilled crust. Use an offset spatula or the back of a spoon to gently spread the filling evenly across the entire surface of the crust. Take your time to create a smooth, level layer. This forms the beautiful white base of your No Bake Apple Pie Cheesecake.
- Once the cheesecake filling is smooth, it’s time for our star topping. Take your completely cooled homemade apple pie topping and spoon it gently over the cheesecake filling. Start from the center and work your way out, trying to distribute the apples and their glorious sauce evenly. Be gentle so you don’t disturb or mix the apple topping with the cheesecake layer below. You want distinct, beautiful layers.
- Now comes the hardest part: waiting! Cover the springform pan loosely with plastic wrap. Place the cheesecake in the refrigerator to chill for at least 6-8 hours, but ideally, overnight is best. This extended chilling time is vital for the No Bake Apple Pie Cheesecake to fully set, allowing the flavors to meld beautifully and ensuring that perfect sliceable consistency. Don’t rush this step, I promise it’s worth the wait!
Chilling and Serving Your No Bake Apple Pie Cheesecake
After all that anticipation, it’s finally time to enjoy the fruits of your labor! Serving your perfectly chilled No Bake Apple Pie Cheesecake is the grand finale.
- Once your No Bake Apple Pie Cheesecake has thoroughly chilled and set (you’ll know it’s ready when the filling is firm to the touch), it’s time to remove it from the springform pan. Carefully run a thin knife around the edge of the cheesecake, between the filling and the pan, to ensure it doesn’t stick. Then, unclip and gently lift the sides of the springform pan away.
- If you want to transfer the cheesecake to a serving platter, gently slide it off the pan base using a large spatula or two. If you lined the bottom with parchment paper, this step is even easier. You can also simply serve it directly on the springform base.
- For beautifully clean slices of your No Bake Apple Pie Cheesecake, a little trick I always use is to run your knife under hot water for a few seconds, wipe it dry, and then make your cut. Clean the knife between each slice for the neatest presentation.
- Serve your magnificent No Bake Apple Pie Cheesecake as is, or enhance it with optional garnishes. A dollop of freshly whipped cream, a sprinkle of extra cinnamon, or a few delicate apple slices add a lovely finishing touch and enhance the visual appeal.
- Any leftover No Bake Apple Pie Cheesecake should be stored in an airtight container in the refrigerator. It will keep well for 3-4 days, though I doubt it will last that long once everyone tastes it!
Enjoy the delightful combination of crisp graham cracker, creamy no-bake cheesecake, and warmly spiced apple pie topping in every single bite! This dessert is truly a crowd-pleaser and a perfect treat for any occasion.
Conclusion:
Well, my friends, if there’s one recipe I’m absolutely certain will bring a wave of joy and sighs of contentment to your kitchen, it’s this one. We’ve journeyed through the simple steps, the delightful ingredients, and now, it’s time to truly appreciate what makes this dessert an undeniable showstopper. Imagine a dessert that captures all the comforting, warm spices of a classic apple pie, but then elevates it with the cool, creamy, tangy perfection of a rich cheesecake. That’s precisely what you get here. This isn’t just another dessert; it’s an experience. It’s the kind of treat that looks incredibly impressive, tasting as though you’ve spent hours slaving away, yet in reality, it comes together with such remarkable ease. No fussy baking, no cracks to worry about, just pure, unadulterated deliciousness waiting to be devoured. It’s truly a dessert designed for everyone, from novice bakers to seasoned pros looking for an effortless win. I honestly believe that once you try it, you’ll understand why I’m so passionate about this particular creation. It’s that perfect balance of comfort, elegance, and incredible flavor that truly sets it apart.
But the magic doesn’t have to stop at the first slice! One of the things I absolutely adore about this recipe is its incredible versatility. When it comes to serving, you can keep it beautifully simple, allowing the rich flavors of the No Bake Apple Pie Cheesecake to shine on their own, or you can elevate it with just a few thoughtful additions. My personal go-to is a generous dollop of freshly whipped cream, perhaps lightly sweetened with a hint of vanilla, and then a delicate dusting of ground cinnamon or nutmeg. For an extra touch of indulgence, a drizzle of warm caramel sauce over each slice transforms it into an even more decadent treat, making it absolutely irresistible for special occasions or just a cozy night in. A scoop of premium vanilla bean ice cream also makes a fantastic accompaniment, creating a delightful contrast in temperature and texture that will make your taste buds sing.
And if you’re feeling adventurous, don’t hesitate to explore some delightful variations. You could experiment with different fruit fillings in place of the apple – perhaps a luscious cherry pie filling or a vibrant blueberry one for a completely different yet equally delicious twist. For the crust, while the graham cracker crust is a classic for a reason, imagine the delightful spice of a crushed gingersnap cookie crust, or the buttery elegance of a shortbread cookie crust. Both would add unique layers of flavor and texture. If you love nuts, a handful of finely chopped pecans or walnuts sprinkled over the top before chilling, or even mixed into the crust, would add a lovely crunch. You can also play with the spices in the apple layer, adding a pinch of allspice or ground cloves for an even deeper, more complex autumnal flavor profile. For individual portions, try preparing this delight in small ramekins or even mini pie dishes; they look absolutely adorable and are perfect for entertaining. The beauty is that this recipe is incredibly forgiving and open to your creative whims, making it a joy to customize and make your very own signature dessert. You can even make it a day or two ahead, which means less stress on event day!
So, there you have it, my friends. I’ve shared all my secrets and all my passion for what I truly believe is one of the most delightful and surprisingly simple desserts you’ll ever make. This isn’t just a recipe; it’s an invitation to create something truly special without the usual stress. I can confidently say that the moment you take that first bite, you’ll understand exactly why I’m so enthusiastic about it. The creamy texture, the spiced apple filling, the crunchy crust – it’s a symphony of flavors and textures that simply can’t be beaten. So please, don’t just read about it, go into your kitchen, gather those ingredients, and experience the pure joy of creating this incredible treat for yourself, your family, or your lucky guests. I am genuinely excited for you to try it. And once you do, I would absolutely love to hear all about your experience! Did you stick to the original, or did you put your own spin on it with one of the variations? What did your family and friends think? Share your successes, your photos, and your feedback in the comments section below or tag us on social media. Your culinary adventures inspire us all, and I can’t wait to see your amazing creations. Happy baking (or rather, no-baking)!
No Bake Apple Pie Cheesecake
A delightful No Bake Apple Pie Cheesecake combining a buttery graham cracker crust, a luscious, smooth cream cheese filling, and a tender, cinnamon-spiced apple topping. Perfect for easy, oven-free indulgence, this dessert marries classic apple pie comfort with creamy cheesecake richness.
Ingredients
-
1 ½ cups graham cracker crumbs
-
¼ cup granulated sugar
-
½ tsp ground cinnamon (optional, for crust)
-
6 tbsp unsalted butter, melted
-
2 (8 oz) packages full-fat cream cheese, softened
-
1 cup granulated sugar (for filling)
-
1 tsp pure vanilla extract
-
¼ tsp lemon zest (optional)
-
2 cups cold heavy cream
-
½ cup milk
-
1 (3.4 oz) package instant vanilla pudding mix
-
3 medium apples, peeled, cored, finely diced
-
2 tbsp unsalted butter (for topping)
-
¼ cup packed light brown sugar
-
½ tsp ground cinnamon (for topping)
-
¼ tsp ground nutmeg
-
Pinch of ground cloves (optional)
-
1 tbsp lemon juice
-
2 tbsp water
-
1 tbsp cornstarch
-
Whipped cream (optional, for garnish)
-
Extra cinnamon dust (optional, for garnish)
-
Thin apple slices (optional, for garnish)
Instructions
-
Step 1
Pulse graham crackers into fine crumbs in a food processor or crush in a bag. Combine crumbs with ¼ cup granulated sugar and ½ tsp cinnamon (if using). Pour melted butter over mixture and stir until moistened. Press firmly and evenly into the bottom of a greased 8 or 9-inch springform pan. Chill for 30-60 minutes. -
Step 2
In a large bowl, beat softened cream cheese until smooth (2-3 min). Gradually add 1 cup granulated sugar, beating until creamy (2-3 min). Stir in vanilla extract and lemon zest. In a separate cold bowl, beat heavy cream until stiff peaks form. In a third bowl, whisk milk and instant vanilla pudding mix until smooth. Add pudding mixture to cream cheese, beating on low until just combined. Gently fold in whipped cream in two additions until no streaks remain. -
Step 3
Melt 2 tbsp butter in a saucepan over medium heat. Add diced apples and sauté 5-7 minutes until slightly softened. Stir in brown sugar, ½ tsp cinnamon, nutmeg, and cloves; cook 2-3 minutes until fragrant. Whisk lemon juice, water, and cornstarch in a small bowl; add to apples. Bring to a simmer, stirring, and cook 1-2 minutes until thickened. Transfer to a separate dish and cool completely to room temperature before assembling (chill 30-60 min to speed up cooling). -
Step 4
Spoon cheesecake filling onto the chilled crust and spread evenly. Gently spoon the completely cooled apple pie topping over the cheesecake filling, distributing evenly. Cover loosely with plastic wrap. -
Step 5
Refrigerate for at least 6-8 hours, or ideally overnight, for the cheesecake to fully set. To serve, run a thin knife around the edge of the pan before unclipping the springform. Use a hot, clean knife to slice. Garnish with whipped cream, cinnamon dust, or thin apple slices if desired. Store leftovers in an airtight container in the refrigerator for 3-4 days.
Important Information
Nutrition Facts (Per Serving)
It is important to consider this information as approximate and not to use it as definitive health advice.
Allergy Information
Please check ingredients for potential allergens and consult a health professional if in doubt.


Leave a Comment