

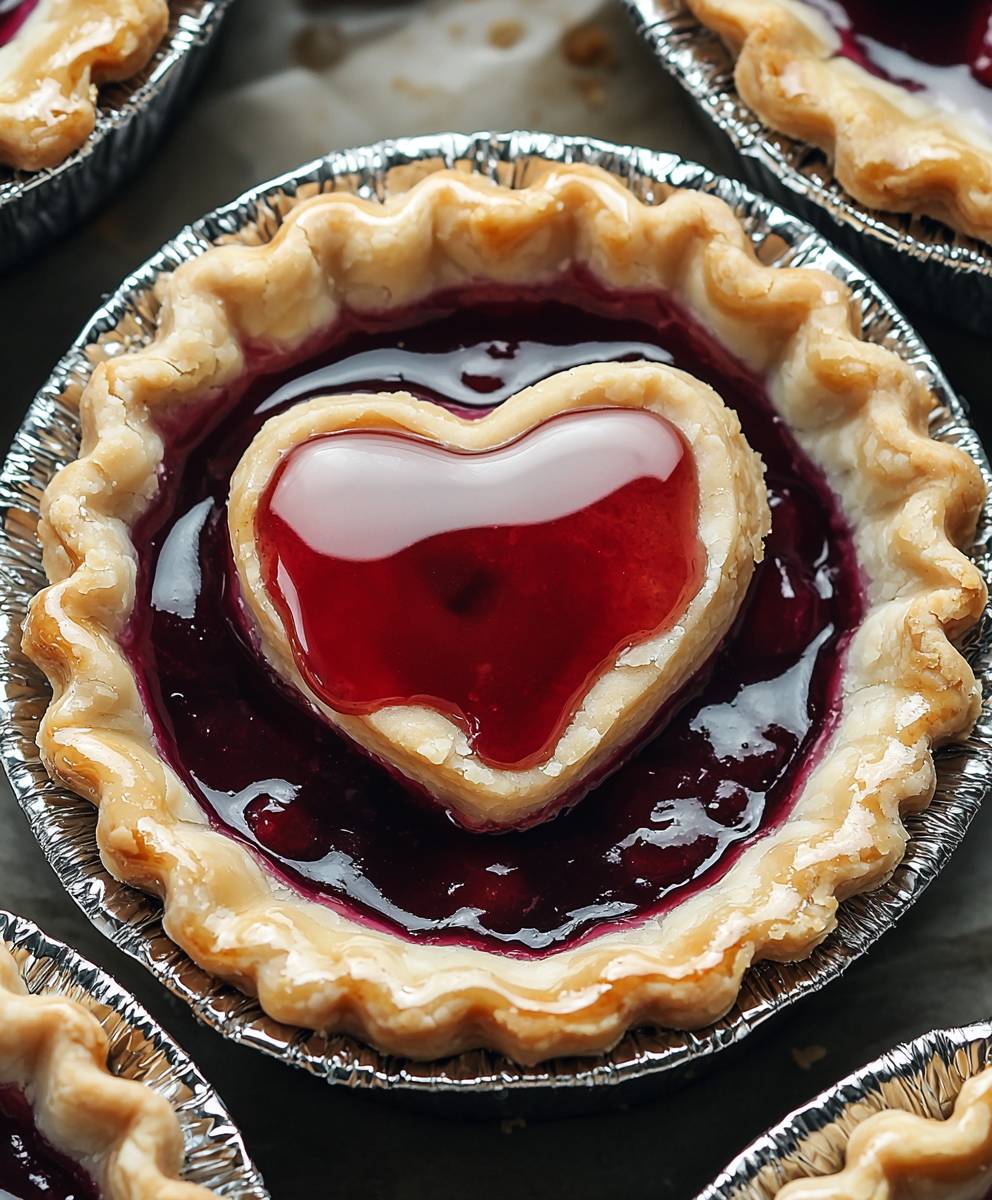
Mini Cherry Pie, those two little words conjure up images of warm, flaky crusts bursting with sweet and tart cherry goodness, don’t they? I know they do for me! There’s something undeniably charming and utterly irresistible about these individual-sized delights. Forget slicing and serving; with these, everyone gets their own perfect portion of cherry pie heaven.
The history of cherry pie itself stretches back centuries, with variations appearing across Europe and eventually making their way to America. Cherries, prized for their vibrant color and unique flavor profile, have long been a symbol of abundance and good fortune. Baking them into a pie? Well, that’s just pure genius!
But what is it about mini cherry pie that makes them so universally loved? Is it the perfect balance of sweet and tart? The satisfying crunch of the crust against the soft, juicy filling? Or perhaps it’s the sheer convenience and adorable presentation? I think it’s a combination of all three! These little pies are perfect for parties, potlucks, or even just a cozy night in. They’re easy to eat, require no utensils, and are guaranteed to bring a smile to anyone’s face. So, let’s get baking and create some miniature masterpieces that will have everyone begging for more!

Ingredients:
- For the Crust:
- 2 ½ cups all-purpose flour, plus more for dusting
- 1 teaspoon salt
- 1 cup (2 sticks) unsalted butter, very cold and cut into cubes
- ½ cup vegetable shortening, very cold
- 6-8 tablespoons ice water
- For the Cherry Filling:
- 4 cups fresh or frozen pitted cherries (if frozen, thaw and drain well)
- ¾ cup granulated sugar
- ¼ cup cornstarch
- 2 tablespoons lemon juice
- 1 teaspoon almond extract
- Pinch of salt
- For the Egg Wash (Optional):
- 1 large egg
- 1 tablespoon milk or water
- For Sprinkling (Optional):
- Turbinado sugar or granulated sugar
Preparing the Pie Crust:
- Combine Dry Ingredients: In a large bowl, whisk together the flour and salt. This ensures the salt is evenly distributed throughout the dough, which is crucial for flavor.
- Cut in the Fat: Add the cold butter and shortening to the flour mixture. Using a pastry blender or your fingertips (work quickly to keep the fat cold!), cut the fat into the flour until the mixture resembles coarse crumbs. You should still see some small pieces of butter and shortening these are what create flaky layers. The size of the pieces should be about pea-sized.
- Add Ice Water: Gradually add the ice water, one tablespoon at a time, mixing gently after each addition. Be careful not to overmix. You want just enough water to bring the dough together. The amount of water needed can vary depending on the humidity. Stop adding water when the dough just starts to clump together.
- Form Dough Disks: Divide the dough in half. Gently flatten each half into a disk about 1 inch thick. Wrap each disk tightly in plastic wrap.
- Chill the Dough: Refrigerate the dough for at least 2 hours, or preferably overnight. This allows the gluten to relax, which will make the crust more tender and easier to roll out. Chilling also helps the fat solidify, which is essential for creating flaky layers.
Making the Cherry Filling:
- Combine Filling Ingredients: In a medium saucepan, combine the cherries, sugar, cornstarch, lemon juice, almond extract, and salt.
- Cook the Filling: Cook over medium heat, stirring constantly, until the mixture comes to a simmer and thickens. This usually takes about 5-7 minutes. The cornstarch needs to be fully cooked to avoid a starchy taste. The filling should be thick enough to coat the back of a spoon.
- Cool the Filling: Remove the saucepan from the heat and let the cherry filling cool completely. Cooling the filling prevents it from melting the crust when you assemble the pies. You can speed up the cooling process by transferring the filling to a shallow dish.
Assembling the Mini Cherry Pies:
- Preheat Oven: Preheat your oven to 375°F (190°C). Line a baking sheet with parchment paper. This will prevent the pies from sticking and make cleanup easier.
- Roll Out the Dough: On a lightly floured surface, roll out one disk of dough to about 1/8 inch thickness. Use a 3-4 inch round cookie cutter or a sharp knife to cut out circles. You’ll need two circles for each mini pie one for the bottom crust and one for the top crust.
- Place Dough in Muffin Tin: Gently press each dough circle into the cups of a muffin tin. Make sure the dough comes up the sides of the muffin tin. If the dough tears, simply patch it with extra dough.
- Fill the Pies: Spoon the cooled cherry filling into each pie crust, filling them almost to the top. Don’t overfill, or the filling will spill over during baking.
- Top with Crusts: Roll out the second disk of dough and cut out circles as before. Place a dough circle on top of each filled pie.
- Seal and Decorate: Crimp the edges of the top and bottom crusts together to seal the pies. You can use a fork to press the edges together or use your fingers to create a decorative crimped edge. Cut a few slits in the top crust of each pie to allow steam to escape during baking. This will prevent the crust from puffing up too much and cracking.
- Egg Wash (Optional): In a small bowl, whisk together the egg and milk or water. Brush the tops of the pies with the egg wash. This will give them a golden brown and shiny finish.
- Sprinkle with Sugar (Optional): Sprinkle the tops of the pies with turbinado sugar or granulated sugar. This adds a touch of sweetness and sparkle.
Baking the Mini Cherry Pies:
- Bake: Bake in the preheated oven for 20-25 minutes, or until the crusts are golden brown and the filling is bubbly. Keep an eye on the pies during baking and if the crust starts to brown too quickly, tent them with foil.
- Cool: Remove the pies from the oven and let them cool in the muffin tin for a few minutes before transferring them to a wire rack to cool completely. This will prevent the filling from running out when you remove them from the tin.
- Serve: Serve the mini cherry pies warm or at room temperature. They are delicious on their own or with a scoop of vanilla ice cream or a dollop of whipped cream.
Tips for Success:
- Keep Ingredients Cold: The key to a flaky pie crust is to keep the butter and shortening as cold as possible. This prevents the fat from melting into the flour, which would result in a tough crust.
- Don’t Overmix the Dough: Overmixing the dough develops the gluten, which will make the crust tough. Mix just until the dough comes together.
- Chill the Dough: Chilling the dough allows the gluten to relax and the fat to solidify, which is essential for a tender and flaky crust.
- Use a Pastry Blender: A pastry blender is the best tool for cutting the fat into the flour. If you don’t have a pastry blender, you can use your fingertips, but work quickly to keep the fat cold.
- Adjust Sweetness: Adjust the amount of sugar in the filling to your liking, depending on the sweetness of the cherries.
- Thaw Frozen Cherries Properly: If using frozen cherries, make sure to thaw them completely and drain them well. Excess moisture in the filling can make the crust soggy.
- Prevent Soggy Bottom Crust: To prevent a soggy bottom crust, you can blind bake the crusts for a few minutes before adding the filling. To blind bake, line the pie crusts with parchment paper and fill with pie weights or dried beans. Bake for 10 minutes, then remove the parchment paper and weights and bake for another 5 minutes.
- Store Properly: Store leftover mini cherry pies in an airtight container at room temperature for up to 2 days or in the refrigerator for up to 5 days.
Variations:
- Different Fruits: You can use this recipe to make mini pies with other fruits, such as blueberries, raspberries, or apples.
- Crumb Topping: Instead of a top crust, you can top the pies with a crumb topping made from flour, butter, and sugar.
- Lattice Top: For a more decorative look, you can create a lattice top for the pies.
- Add Spices: Add a pinch of cinnamon or nutmeg to the filling for extra flavor.
- Use Different Extracts: Experiment with different extracts, such as vanilla extract or rum extract, in the filling.
Conclusion:
And there you have it! These Mini Cherry Pies are truly a must-try recipe, and I’m confident they’ll become a new favorite in your household, just as they have in mine. The combination of the buttery, flaky crust and the sweet-tart cherry filling is simply irresistible. They’re the perfect size for a satisfying individual dessert, a delightful addition to a brunch spread, or even a charming treat to bring to a potluck.
But why are these mini pies so special? It’s more than just the delicious flavor. It’s the ease of preparation. Forget about struggling with a full-sized pie crust; these little beauties come together quickly and easily, making them perfect for even the busiest of bakers. Plus, the individual portions mean no more fighting over who gets the bigger slice! Everyone gets their own perfectly portioned pie, ensuring smiles all around.
Beyond their simplicity and perfect size, these Mini Cherry Pies offer incredible versatility. While I’ve shared my go-to recipe, feel free to experiment with different variations to suit your own taste. For a richer flavor, try adding a tablespoon of almond extract to the cherry filling. Or, if you prefer a more rustic look, skip the lattice top and simply crimp the edges of the crust.
Serving suggestions are endless! A scoop of vanilla ice cream or a dollop of whipped cream is always a classic pairing. For a more sophisticated touch, try serving them with a drizzle of balsamic glaze or a sprinkle of chopped pistachios. They’re also fantastic served warm with a cup of coffee or tea.
Looking for even more ways to customize these mini pies? Consider using different types of fruit. Blueberry, apple, or even peach filling would be equally delicious. You could also experiment with different crust flavors by adding spices like cinnamon or nutmeg to the dough. And for a truly decadent treat, try brushing the crust with melted butter and sprinkling it with sugar before baking.
I truly believe that baking should be a joyful experience, and these Mini Cherry Pies are designed to bring just that. They’re simple enough for beginner bakers to master, yet impressive enough to wow even the most discerning palates. The aroma that fills your kitchen as they bake is simply heavenly, and the first bite is pure bliss.
So, what are you waiting for? Gather your ingredients, preheat your oven, and get ready to create some magic in the kitchen. I’m absolutely certain you’ll love these Mini Cherry Pies as much as I do. They’re the perfect way to satisfy your sweet tooth, impress your friends and family, and create lasting memories.
I can’t wait to hear about your baking adventures! Once you’ve tried this recipe, please come back and share your experience in the comments below. Let me know what variations you tried, what serving suggestions you loved, and any tips or tricks you discovered along the way. Your feedback is invaluable, and it helps me to continue creating recipes that you’ll love. Happy baking! Don’t forget to snap a picture of your beautiful mini pies and share them on social media using #MiniCherryPieMagic I’d love to see your creations!
Mini Cherry Pie: The Perfect Bite-Sized Dessert Recipe
Sweet and tart cherry filling baked in flaky, homemade mini pie crusts. Perfect as individual desserts!
Ingredients
- 2 ½ cups all-purpose flour, plus more for dusting
- 1 teaspoon salt
- 1 cup (2 sticks) unsalted butter, very cold and cut into cubes
- ½ cup vegetable shortening, very cold
- 6-8 tablespoons ice water
- 4 cups fresh or frozen pitted cherries (if frozen, thaw and drain well)
- ¾ cup granulated sugar
- ¼ cup cornstarch
- 2 tablespoons lemon juice
- 1 teaspoon almond extract
- Pinch of salt
- 1 large egg
- 1 tablespoon milk or water
- Turbinado sugar or granulated sugar
Instructions
- Combine Dry Ingredients: In a large bowl, whisk together the flour and salt.
- Cut in the Fat: Add the cold butter and shortening to the flour mixture. Using a pastry blender or your fingertips (work quickly to keep the fat cold!), cut the fat into the flour until the mixture resembles coarse crumbs. You should still see some small pieces of butter and shortening these are what create flaky layers. The size of the pieces should be about pea-sized.
- Add Ice Water: Gradually add the ice water, one tablespoon at a time, mixing gently after each addition. Be careful not to overmix. You want just enough water to bring the dough together. The amount of water needed can vary depending on the humidity. Stop adding water when the dough just starts to clump together.
- Form Dough Disks: Divide the dough in half. Gently flatten each half into a disk about 1 inch thick. Wrap each disk tightly in plastic wrap.
- Chill the Dough: Refrigerate the dough for at least 2 hours, or preferably overnight.
- Combine Filling Ingredients: In a medium saucepan, combine the cherries, sugar, cornstarch, lemon juice, almond extract, and salt.
- Cook the Filling: Cook over medium heat, stirring constantly, until the mixture comes to a simmer and thickens. This usually takes about 5-7 minutes.
- Cool the Filling: Remove the saucepan from the heat and let the cherry filling cool completely.
- Preheat Oven: Preheat your oven to 375°F (190°C). Line a baking sheet with parchment paper.
- Roll Out the Dough: On a lightly floured surface, roll out one disk of dough to about 1/8 inch thickness. Use a 3-4 inch round cookie cutter or a sharp knife to cut out circles. You’ll need two circles for each mini pie one for the bottom crust and one for the top crust.
- Place Dough in Muffin Tin: Gently press each dough circle into the cups of a muffin tin. Make sure the dough comes up the sides of the muffin tin.
- Fill the Pies: Spoon the cooled cherry filling into each pie crust, filling them almost to the top.
- Top with Crusts: Roll out the second disk of dough and cut out circles as before. Place a dough circle on top of each filled pie.
- Seal and Decorate: Crimp the edges of the top and bottom crusts together to seal the pies. Cut a few slits in the top crust of each pie to allow steam to escape during baking.
- Egg Wash (Optional): In a small bowl, whisk together the egg and milk or water. Brush the tops of the pies with the egg wash.
- Sprinkle with Sugar (Optional): Sprinkle the tops of the pies with turbinado sugar or granulated sugar.
- Bake: Bake in the preheated oven for 20-25 minutes, or until the crusts are golden brown and the filling is bubbly.
- Cool: Remove the pies from the oven and let them cool in the muffin tin for a few minutes before transferring them to a wire rack to cool completely.
- Serve: Serve the mini cherry pies warm or at room temperature.
Notes
- Keep all ingredients, especially butter and shortening, very cold for a flaky crust.
- Don’t overmix the dough to avoid a tough crust.
- Chilling the dough is crucial for a tender and flaky crust.
- Adjust the amount of sugar in the filling to your liking.
- If using frozen cherries, thaw and drain them well.
- To prevent a soggy bottom crust, you can blind bake the crusts for a few minutes before adding the filling.
- Store leftover mini cherry pies in an airtight container at room temperature for up to 2 days or in the refrigerator for up to 5 days.
Leave a Comment