

Melting moments cookies. Just the name itself evokes a sense of pure, buttery bliss, doesn’t it? Imagine sinking your teeth into a delicate, crumbly cookie that practically dissolves on your tongue, leaving behind a sweet, comforting flavor. That’s precisely what we’re making today, and trust me, you’re in for a treat!
These delightful little morsels, also known as butter cookies or cornstarch cookies in some regions, have a history that’s as charming as their taste. While their exact origins are debated, similar shortbread-style cookies have been enjoyed for centuries across Europe, often associated with celebrations and special occasions. Their delicate texture and rich flavor made them a favorite amongst royalty and commoners alike.
But what is it about melting moments cookies that makes them so irresistible? It’s the perfect combination of textures a satisfyingly crumbly exterior that gives way to an almost melt-in-your-mouth interior. The subtle sweetness, often enhanced with a touch of vanilla or citrus zest, is never overpowering, making them the ideal accompaniment to a cup of tea or coffee. Plus, they’re surprisingly easy to make, requiring just a handful of simple ingredients that you likely already have in your pantry. So, let’s get baking and create some edible moments of pure joy!

Ingredients:
- 125g (1/2 cup) unsalted butter, softened
- 55g (1/4 cup) icing sugar, plus extra for dusting
- 125g (1 cup) plain flour, sifted
- 55g (1/2 cup) cornflour, sifted
- 1/2 teaspoon vanilla extract
- Pinch of salt
- For the filling: 60g (1/4 cup) unsalted butter, softened
- 125g (1 cup) icing sugar, sifted
- 1/2 teaspoon vanilla extract
- 1 tablespoon milk
Making the Cookie Dough:
- Cream the butter and icing sugar: In a large bowl, or in the bowl of your stand mixer, beat the softened butter and icing sugar together until light and fluffy. This usually takes about 3-5 minutes. Make sure to scrape down the sides of the bowl occasionally to ensure everything is evenly mixed. The mixture should be pale and creamy.
- Add the vanilla extract: Stir in the vanilla extract until it’s well combined. The vanilla adds a lovely warmth to the cookies.
- Sift in the dry ingredients: In a separate bowl, sift together the plain flour, cornflour, and salt. Sifting is important to ensure there are no lumps and that the cookies have a delicate texture.
- Combine wet and dry ingredients: Gradually add the sifted dry ingredients to the butter mixture, mixing on low speed until just combined. Be careful not to overmix, as this can develop the gluten in the flour and result in tough cookies. The dough should come together easily and be soft and pliable. If it seems too dry, you can add a tiny splash of milk, but be very careful not to add too much.
- Shape the dough: There are a couple of ways you can shape the dough. You can either roll it into small balls (about 1 inch in diameter) or pipe it using a piping bag fitted with a star nozzle.
- For rolled cookies: Roll the dough into small balls and place them on a baking sheet lined with parchment paper. Gently flatten each ball slightly with a fork.
- For piped cookies: Transfer the dough to a piping bag fitted with a star nozzle. Pipe small rosettes onto a baking sheet lined with parchment paper, leaving some space between each cookie.
- Chill the dough: Cover the baking sheet with plastic wrap and chill the cookies in the refrigerator for at least 30 minutes. This helps the cookies hold their shape during baking and prevents them from spreading too much. You can chill them for longer, even overnight, if you prefer.
Baking the Cookies:
- Preheat the oven: Preheat your oven to 150°C (300°F). Make sure your oven rack is in the center position.
- Bake the cookies: Bake the chilled cookies for 15-20 minutes, or until they are lightly golden around the edges. The cookies should still be pale in the center. Be careful not to overbake them, as they will become dry and crumbly.
- Cool the cookies: Remove the baking sheet from the oven and let the cookies cool on the baking sheet for a few minutes before transferring them to a wire rack to cool completely. This prevents them from breaking while they are still warm and delicate.
Making the Buttercream Filling:
- Cream the butter: In a clean bowl, beat the softened butter until light and fluffy. This usually takes about 2-3 minutes.
- Add the icing sugar: Gradually add the sifted icing sugar to the butter, beating on low speed until combined. Be sure to sift the icing sugar to avoid any lumps in your buttercream.
- Add vanilla and milk: Stir in the vanilla extract and milk until the buttercream is smooth and creamy. If the buttercream is too thick, add a little more milk, one teaspoon at a time, until you reach the desired consistency. If it’s too thin, add a little more icing sugar.
Assembling the Melting Moments:
- Pair the cookies: Once the cookies are completely cool, pair them up according to size and shape. This will ensure that each melting moment looks uniform.
- Pipe or spread the buttercream: Transfer the buttercream to a piping bag fitted with a round nozzle (or you can just use a spoon). Pipe or spread a generous amount of buttercream onto the flat side of one cookie.
- Sandwich the cookies: Gently sandwich the buttercream-covered cookie with another cookie, pressing down lightly to secure the filling. Be careful not to press too hard, as the cookies are delicate and can break easily.
- Dust with icing sugar: Dust the assembled melting moments with icing sugar for a pretty finishing touch. This also adds a touch of extra sweetness.
- Chill (optional): You can chill the assembled melting moments in the refrigerator for about 30 minutes to help the buttercream set. This will make them easier to handle.
Tips for Perfect Melting Moments:
- Use softened butter: Make sure your butter is softened to room temperature before you start. This will make it easier to cream and will result in a smoother dough and buttercream.
- Don’t overmix the dough: Overmixing the dough can develop the gluten in the flour, resulting in tough cookies. Mix until just combined.
- Chill the dough: Chilling the dough is essential for preventing the cookies from spreading too much during baking.
- Bake at a low temperature: Baking the cookies at a low temperature ensures that they bake evenly and stay pale and delicate.
- Cool completely before assembling: Make sure the cookies are completely cool before assembling them with the buttercream filling. This will prevent the buttercream from melting.
- Sift the icing sugar: Sifting the icing sugar is important to ensure that your buttercream is smooth and lump-free.
- Adjust the buttercream consistency: Adjust the amount of milk in the buttercream to achieve the desired consistency. It should be smooth and creamy, but not too runny.
- Store properly: Store the assembled melting moments in an airtight container at room temperature for up to 3 days, or in the refrigerator for up to 5 days.
Variations:
- Lemon Melting Moments: Add 1 teaspoon of lemon zest to the cookie dough and 1 teaspoon of lemon juice to the buttercream filling for a zesty twist.
- Chocolate Melting Moments: Add 2 tablespoons of cocoa powder to the cookie dough for chocolate melting moments. You can also add a tablespoon of cocoa powder to the buttercream for a double chocolate treat.
- Coffee Melting Moments: Add 1 teaspoon of instant coffee powder dissolved in 1 teaspoon of hot water to the buttercream filling for a coffee-flavored treat.
- Peppermint Melting Moments: Add 1/4 teaspoon of peppermint extract to the buttercream filling for a refreshing peppermint flavor.
- Colored Buttercream: Add a few drops of food coloring to the buttercream to create colorful melting moments. This is perfect for special occasions or holidays.
Troubleshooting:
- Cookies spreading too much: If your cookies are spreading too much during baking, make sure you have chilled the dough for long enough. You can also try adding a little more flour to the dough.
- Cookies are too dry: If your cookies are too dry, make sure you haven’t overbaked them. Bake them until they are just lightly golden around the edges.
- Buttercream is too runny: If your buttercream is too runny, add a little more icing sugar, one tablespoon at a time, until you reach the desired consistency.
- Buttercream is too thick: If your buttercream is too thick, add a little more milk, one teaspoon at a time, until you reach the desired consistency.
Conclusion:
And there you have it! These melting moments cookies are truly a must-try for any baking enthusiast, or anyone who simply appreciates a delightful treat. The delicate, buttery texture that practically dissolves in your mouth, combined with the sweet, creamy filling, creates an unforgettable experience. I promise, once you’ve tasted one, you’ll understand why they’re called “melting moments”!
But why are these cookies so special? It’s more than just the taste. It’s the simplicity of the recipe, the satisfaction of creating something beautiful and delicious from scratch, and the joy of sharing them with loved ones. They’re perfect for afternoon tea, a special occasion, or simply a little indulgence on a cozy evening. Plus, the recipe is surprisingly forgiving, making it a great option for bakers of all skill levels.
Think of these cookies as a blank canvas for your creativity! While the classic recipe is divine, there are so many ways to personalize them. For a citrusy twist, add a teaspoon of lemon or orange zest to the dough. If you’re a chocolate lover, try incorporating a tablespoon of cocoa powder for a richer, deeper flavor. You could even experiment with different extracts, like almond or vanilla bean paste, to create unique flavor profiles.
As for serving suggestions, the possibilities are endless! These melting moments cookies are wonderful on their own, but they also pair beautifully with a cup of tea or coffee. For a more decadent treat, try serving them with a scoop of vanilla ice cream or a dollop of whipped cream. They also make a lovely addition to a dessert platter or a homemade gift basket. Imagine presenting a beautifully wrapped box of these cookies to a friend or family member it’s a gesture that’s sure to be appreciated.
And don’t forget about variations! While I’ve focused on the classic vanilla filling, you can easily adapt it to suit your preferences. Try using a chocolate buttercream, a raspberry jam, or even a lemon curd for a tangy twist. You could also experiment with different decorations, such as sprinkles, edible glitter, or a dusting of powdered sugar. Get creative and have fun with it!
I truly believe that these cookies are a little bit of magic in every bite. They’re simple to make, incredibly delicious, and endlessly versatile. So, what are you waiting for? Gather your ingredients, preheat your oven, and get ready to experience the joy of baking these delightful treats.
I’m so excited for you to try this recipe! Once you’ve made your own batch of melting moments cookies, I’d love to hear about your experience. Did you make any variations? What did you think of the taste and texture? Share your photos and stories in the comments below I can’t wait to see what you create! Happy baking!
Melting Moments Cookies: The Ultimate Guide to Baking Perfection
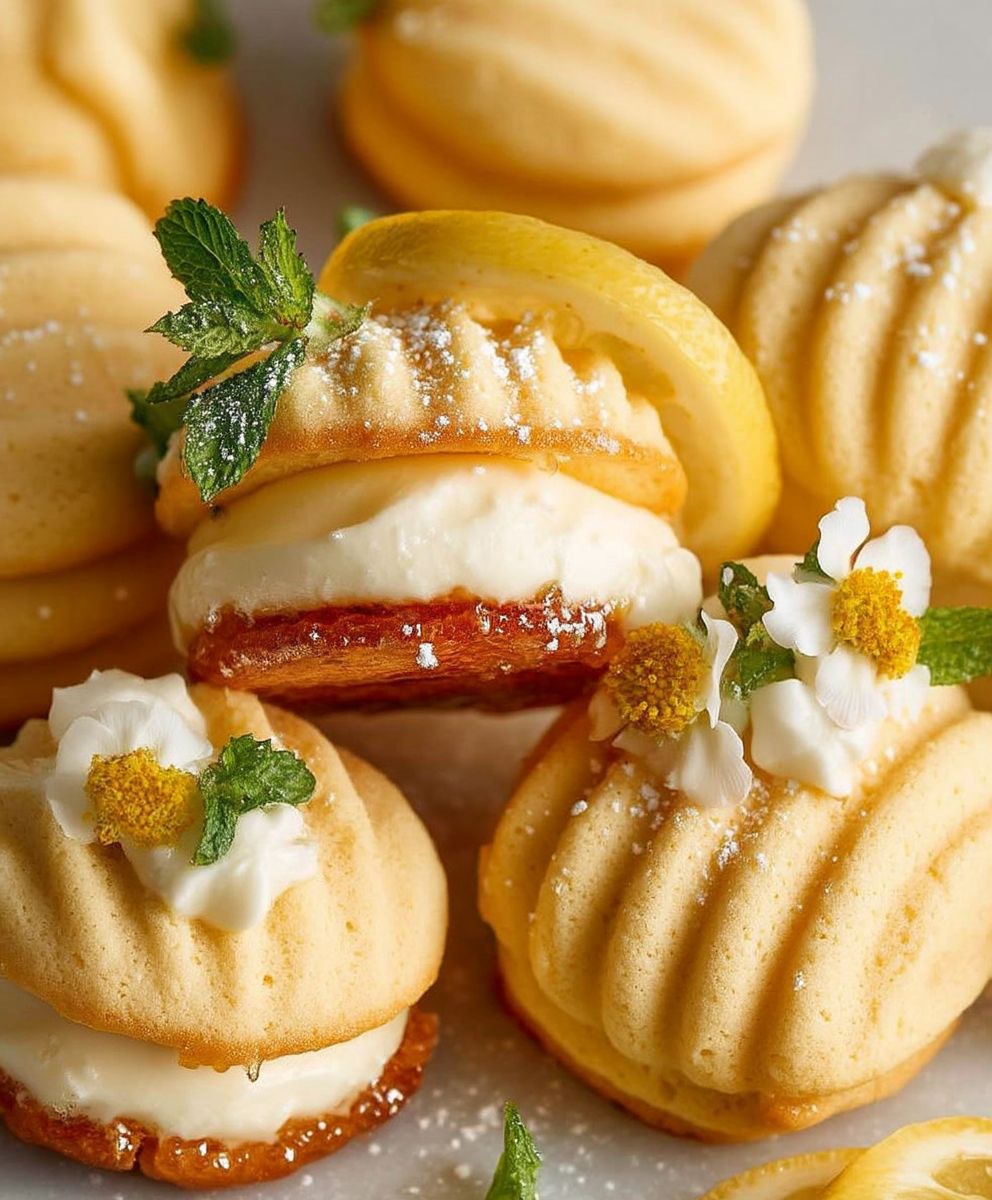
Delicate and melt-in-your-mouth Melting Moments cookies, sandwiched with a creamy vanilla buttercream filling and dusted with icing sugar. A classic treat that's surprisingly easy to make!
Ingredients
- 125g (1/2 cup) unsalted butter, softened
- 55g (1/4 cup) icing sugar, plus extra for dusting
- 125g (1 cup) plain flour, sifted
- 55g (1/2 cup) cornflour, sifted
- 1/2 teaspoon vanilla extract
- Pinch of salt
- 60g (1/4 cup) unsalted butter, softened
- 125g (1 cup) icing sugar, sifted
- 1/2 teaspoon vanilla extract
- 1 tablespoon milk
Instructions
- Cream the butter and icing sugar: In a large bowl, or in the bowl of your stand mixer, beat the softened butter and icing sugar together until light and fluffy. This usually takes about 3-5 minutes. Make sure to scrape down the sides of the bowl occasionally to ensure everything is evenly mixed. The mixture should be pale and creamy.
- Add the vanilla extract: Stir in the vanilla extract until it’s well combined. The vanilla adds a lovely warmth to the cookies.
- Sift in the dry ingredients: In a separate bowl, sift together the plain flour, cornflour, and salt. Sifting is important to ensure there are no lumps and that the cookies have a delicate texture.
- Combine wet and dry ingredients: Gradually add the sifted dry ingredients to the butter mixture, mixing on low speed until just combined. Be careful not to overmix, as this can develop the gluten in the flour and result in tough cookies. The dough should come together easily and be soft and pliable. If it seems too dry, you can add a tiny splash of milk, but be very careful not to add too much.
- Shape the dough: There are a couple of ways you can shape the dough. You can either roll it into small balls (about 1 inch in diameter) or pipe it using a piping bag fitted with a star nozzle.
- For rolled cookies: Roll the dough into small balls and place them on a baking sheet lined with parchment paper. Gently flatten each ball slightly with a fork.
- For piped cookies: Transfer the dough to a piping bag fitted with a star nozzle. Pipe small rosettes onto a baking sheet lined with parchment paper, leaving some space between each cookie.
- Chill the dough: Cover the baking sheet with plastic wrap and chill the cookies in the refrigerator for at least 30 minutes. This helps the cookies hold their shape during baking and prevents them from spreading too much. You can chill them for longer, even overnight, if you prefer.
- Preheat the oven: Preheat your oven to 150°C (300°F). Make sure your oven rack is in the center position.
- Bake the cookies: Bake the chilled cookies for 15-20 minutes, or until they are lightly golden around the edges. The cookies should still be pale in the center. Be careful not to overbake them, as they will become dry and crumbly.
- Cool the cookies: Remove the baking sheet from the oven and let the cookies cool on the baking sheet for a few minutes before transferring them to a wire rack to cool completely. This prevents them from breaking while they are still warm and delicate.
- Cream the butter: In a clean bowl, beat the softened butter until light and fluffy. This usually takes about 2-3 minutes.
- Add the icing sugar: Gradually add the sifted icing sugar to the butter, beating on low speed until combined. Be sure to sift the icing sugar to avoid any lumps in your buttercream.
- Add vanilla and milk: Stir in the vanilla extract and milk until the buttercream is smooth and creamy. If the buttercream is too thick, add a little more milk, one teaspoon at a time, until you reach the desired consistency. If it’s too thin, add a little more icing sugar.
- Pair the cookies: Once the cookies are completely cool, pair them up according to size and shape. This will ensure that each melting moment looks uniform.
- Pipe or spread the buttercream: Transfer the buttercream to a piping bag fitted with a round nozzle (or you can just use a spoon). Pipe or spread a generous amount of buttercream onto the flat side of one cookie.
- Sandwich the cookies: Gently sandwich the buttercream-covered cookie with another cookie, pressing down lightly to secure the filling. Be careful not to press too hard, as the cookies are delicate and can break easily.
- Dust with icing sugar: Dust the assembled melting moments with icing sugar for a pretty finishing touch. This also adds a touch of extra sweetness.
- Chill (optional): You can chill the assembled melting moments in the refrigerator for about 30 minutes to help the buttercream set. This will make them easier to handle.
Notes
- Use softened butter: Make sure your butter is softened to room temperature before you start. This will make it easier to cream and will result in a smoother dough and buttercream.
- Don’t overmix the dough: Overmixing the dough can develop the gluten in the flour, resulting in tough cookies. Mix until just combined.
- Chill the dough: Chilling the dough is essential for preventing the cookies from spreading too much during baking.
- Bake at a low temperature: Baking the cookies at a low temperature ensures that they bake evenly and stay pale and delicate.
- Cool completely before assembling: Make sure the cookies are completely cool before assembling them with the buttercream filling. This will prevent the buttercream from melting.
- Sift the icing sugar: Sifting the icing sugar is important to ensure that your buttercream is smooth and lump-free.
- Adjust the buttercream consistency: Adjust the amount of milk in the buttercream to achieve the desired consistency. It should be smooth and creamy, but not too runny.
- Store properly: Store the assembled melting moments in an airtight container at room temperature for up to 3 days, or in the refrigerator for up to 5 days.


Leave a Comment