

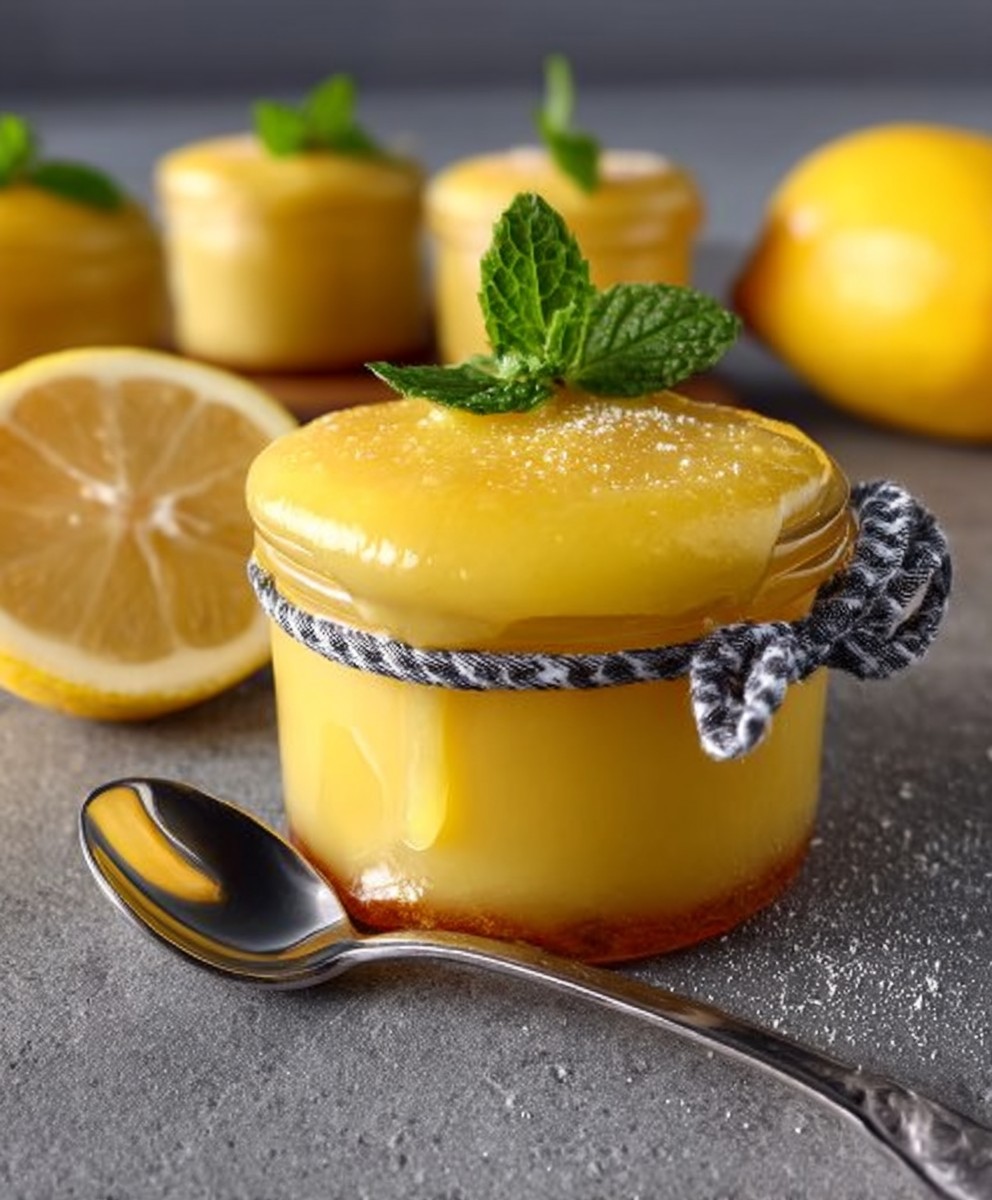
Lemon curd, that sunshine-yellow spread of tangy sweetness, is more than just a topping; it’s a culinary experience. Imagine a spoonful of pure citrus bliss, melting on your tongue with a velvety smoothness that’s both decadent and refreshing. Have you ever wondered how something so simple could be so utterly irresistible?
The history of lemon curd is a bit of a delicious mystery, with roots tracing back to 19th-century England. Originally, it was served as a preserve, a way to enjoy the bright flavors of lemons long after the harvest. While its exact origins are debated, one thing is certain: it quickly became a beloved staple in British cuisine, finding its way into tarts, cakes, and scones.
But what makes lemon curd so universally adored? It’s the perfect balance of sweet and tart, a flavor profile that awakens the senses. The creamy texture, achieved through careful cooking and the magic of emulsification, is simply divine. Plus, it’s incredibly versatile! Spread it on toast for a bright start to your day, use it as a filling for pastries, or swirl it into yogurt for a delightful dessert. Its vibrant flavor and luxurious texture make it a guaranteed crowd-pleaser, and I can’t wait to share my foolproof recipe with you!

Ingredients:
- 1 cup (2 sticks) unsalted butter, cut into cubes
- 1 ½ cups granulated sugar
- ½ cup freshly squeezed lemon juice (from about 4-6 lemons)
- Zest of 3 lemons
- 6 large eggs
- Pinch of salt
Preparing the Lemon Curd Base:
- First, let’s get our ingredients prepped and ready to go. This is crucial for a smooth and efficient process. Cube your butter and set it aside to soften slightly. This will help it melt evenly later on.
- Next, juice your lemons. I always recommend using fresh lemon juice for the best flavor. Bottled juice just doesn’t have the same zing! Aim for ½ cup of juice. You might need more or fewer lemons depending on their size and juiciness.
- Now, zest those lemons! Before you juice them, use a microplane or fine grater to zest the lemons. Be careful to only zest the yellow part of the peel, avoiding the white pith underneath, which is bitter. We want all that lovely lemon flavor without any bitterness. Zest 3 lemons to get a good amount of zest.
- In a medium-sized, heavy-bottomed saucepan, combine the cubed butter, granulated sugar, lemon juice, lemon zest, and salt. The heavy-bottomed saucepan is important because it will help distribute the heat evenly and prevent the curd from scorching.
- Place the saucepan over medium-low heat. We want to melt the butter and sugar slowly and gently. Stir constantly with a whisk or wooden spoon until the butter is completely melted and the sugar is dissolved. You should no longer feel any sugar granules when you rub a little of the mixture between your fingers. This step is crucial for a smooth curd.
Incorporating the Eggs:
- While the butter and sugar are melting, crack the eggs into a separate bowl. Whisk them together well until they are light and frothy. This will help them incorporate smoothly into the hot mixture and prevent them from scrambling.
- Now, this is where things get a little tricky, but don’t worry, I’ll guide you through it. We need to temper the eggs to prevent them from cooking too quickly and curdling. Slowly drizzle a small amount of the hot butter and sugar mixture into the whisked eggs, whisking constantly and vigorously. This will gradually raise the temperature of the eggs and prevent them from shocking when they are added to the rest of the hot mixture.
- Continue adding the hot mixture to the eggs in a slow and steady stream, whisking constantly, until you have added about half of the hot mixture. At this point, the eggs should be warm and tempered.
- Pour the tempered egg mixture back into the saucepan with the remaining butter and sugar mixture.
- Increase the heat to medium-low and continue to cook, stirring constantly with a whisk or wooden spoon. It’s important to stir constantly to prevent the eggs from sticking to the bottom of the pan and curdling.
Cooking the Lemon Curd:
- Continue cooking the lemon curd, stirring constantly, until it thickens enough to coat the back of a spoon. This will take about 10-15 minutes. You’ll know it’s ready when you can dip a spoon into the curd, run your finger across the back of the spoon, and the line holds its shape without the curd running back together.
- Be patient! It might seem like it’s taking forever, but trust me, it will thicken eventually. Don’t be tempted to increase the heat, as this will increase the risk of curdling.
- The curd will continue to thicken as it cools, so don’t worry if it seems a little thin at first.
- If you’re concerned about lumps, you can strain the curd through a fine-mesh sieve into a clean bowl. This will remove any cooked egg particles and ensure a perfectly smooth curd. I usually do this just to be on the safe side.
Cooling and Storing the Lemon Curd:
- Once the lemon curd has thickened, remove it from the heat and pour it into a clean jar or container.
- Press a piece of plastic wrap directly onto the surface of the curd to prevent a skin from forming. This is important, as a skin can make the curd lumpy.
- Let the lemon curd cool completely at room temperature before refrigerating.
- Once cooled, store the lemon curd in the refrigerator for up to 2 weeks.
- Enjoy your homemade lemon curd! It’s delicious on toast, scones, muffins, or as a filling for cakes and tarts. You can even eat it straight from the jar with a spoon (I won’t judge!).
Troubleshooting Tips:
My lemon curd is too thin:
If your lemon curd is too thin, it likely hasn’t been cooked long enough. Return it to the saucepan and continue cooking over low heat, stirring constantly, until it thickens to the desired consistency. Remember, it will thicken more as it cools.
My lemon curd is curdled:
If your lemon curd curdled, it means the eggs cooked too quickly. Unfortunately, there’s no way to completely fix curdled curd. However, you can try straining it through a fine-mesh sieve to remove the larger lumps. The resulting curd will still be flavorful, but the texture might not be perfectly smooth. Next time, be sure to temper the eggs properly and cook the curd over low heat, stirring constantly.
My lemon curd is too tart:
If your lemon curd is too tart, you can add a little more sugar to taste. Start with a tablespoon at a time and stir it in well until the desired sweetness is achieved.
My lemon curd is too sweet:
If your lemon curd is too sweet, there’s not much you can do to reduce the sweetness. However, you can try adding a little more lemon juice to balance the flavors. Start with a teaspoon at a time and stir it in well until the desired tartness is achieved.
My lemon curd has a skin on top:
To prevent a skin from forming on top of your lemon curd, press a piece of plastic wrap directly onto the surface of the curd while it’s cooling. This will create an airtight seal and prevent the curd from drying out.
Variations:
Lime Curd:
Substitute lime juice and lime zest for the lemon juice and lemon zest for a delicious lime curd.
Orange Curd:
Substitute orange juice and orange zest for the lemon juice and lemon zest for a bright and citrusy orange curd.
Grapefruit Curd:
Substitute grapefruit juice and grapefruit zest for the lemon juice and lemon zest for a slightly bitter and tangy grapefruit curd.
Passion Fruit Curd:
Add ¼ cup of passion fruit pulp to the lemon curd mixture while cooking for a tropical twist.
Serving Suggestions:
- Spread on toast, scones, or muffins
- Use as a filling for cakes, tarts, and pies
- Top yogurt or granola
- Serve with fresh berries
- Use as a glaze for donuts or cupcakes
- Eat it straight from the jar with a spoon!
Tips for Success:
- Use fresh, high-quality ingredients for the best flavor.
- Zest the lemons before juicing them.
- Use a heavy-bottomed saucepan to prevent scorching.
- Temper the eggs properly to prevent curdling.
- Cook the curd over low heat, stirring constantly.
- Strain the curd through a fine-mesh sieve for a perfectly smooth texture.
- Press plastic wrap directly onto the surface of the curd to prevent a skin from forming.
- Store the curd in the refrigerator for up to 2 weeks.
Why This Recipe Works:
This recipe is a classic for a reason. It uses a simple ratio of ingredients that consistently produces a smooth, creamy, and intensely flavored lemon curd. The key to success lies in the technique: melting the butter and sugar gently, tempering the eggs carefully, and cooking the curd slowly and patiently. By following these steps, you’ll be rewarded with a homemade lemon curd that is far superior to anything you can buy in the store.
Nutritional Information (approximate, per tablespoon):
- Calories: 70
- Fat: 6g
- Saturated Fat: 4g
- Cholesterol: 30mg
- Sodium: 5mg
- Carbohydrates: 5g
- Sugar: 5g
- Protein:
Conclusion:
This lemon curd recipe isn’t just another recipe; it’s a gateway to sunshine in a jar! From its vibrant color to its intensely lemony flavor and silky smooth texture, its a guaranteed crowd-pleaser. I truly believe that once you’ve tasted homemade lemon curd, you’ll never go back to the store-bought version. It’s that good! The bright, tangy flavor is simply irresistible, and the satisfaction of creating something so delicious from scratch is incredibly rewarding.
But why is this particular recipe a must-try? Well, beyond the incredible taste, it’s surprisingly simple to make. I’ve streamlined the process to ensure that even beginner cooks can achieve perfect results every time. No complicated techniques or fancy equipment are required just a few basic ingredients and a little bit of patience. Plus, the versatility of this lemon curd is unmatched.
Think beyond just spreading it on toast (although, let’s be honest, that’s a pretty fantastic option!). Imagine swirling it into your morning yogurt or oatmeal for a burst of citrusy goodness. Use it as a filling for tarts, cakes, and pastries the possibilities are endless! I personally love using it as a topping for scones with a dollop of whipped cream. It elevates a simple scone into a truly decadent treat.
And speaking of variations, feel free to experiment! Want a richer, more decadent curd? Use all egg yolks instead of whole eggs. Looking for a slightly different flavor profile? Add a touch of lime or grapefruit zest along with the lemon. You could even infuse the cream with vanilla bean or a sprig of rosemary for a more complex and sophisticated flavor. For a vegan version, you can substitute the butter with coconut oil and the eggs with a cornstarch slurry. The key is to have fun and make it your own!
Serving suggestions? Oh, where do I even begin? As I mentioned, it’s divine on toast, scones, and muffins. But don’t stop there! Try using it as a filling for macarons, a topping for pavlova, or even as a dip for fresh fruit. It’s also a wonderful addition to cheesecakes and trifles. And for a truly indulgent treat, try layering it with crumbled cookies and whipped cream in a parfait.
I’m so confident that you’ll love this recipe that I urge you to give it a try. Don’t be intimidated by the thought of making your own lemon curd it’s much easier than you think! And the results are well worth the effort.
Once you’ve made your own batch of this sunshine-in-a-jar, I’d love to hear about your experience. Did you try any variations? What did you serve it with? Share your photos and stories in the comments below! I’m always eager to see how you’re using my recipes and to learn from your creative ideas. So, go ahead, grab those lemons, and get ready to experience the joy of homemade lemon curd. Happy cooking! I can’t wait to hear all about your lemony adventures!
Lemon Curd: The Ultimate Guide to Making and Using It
Tangy and bright homemade lemon curd, perfect for spreading on toast, filling tarts, or enjoying by the spoonful!
Ingredients
- 1 cup (2 sticks) unsalted butter, cut into cubes
- 1 ½ cups granulated sugar
- ½ cup freshly squeezed lemon juice (from about 4-6 lemons)
- Zest of 3 lemons
- 6 large eggs
- Pinch of salt
Instructions
- Prepare Ingredients: Cube butter and set aside to soften slightly. Juice lemons to get ½ cup of juice. Zest lemons, avoiding the white pith.
- Combine Initial Ingredients: In a medium-sized, heavy-bottomed saucepan, combine cubed butter, granulated sugar, lemon juice, lemon zest, and salt.
- Melt and Dissolve: Place the saucepan over medium-low heat. Stir constantly until the butter is completely melted and the sugar is dissolved.
- Whisk Eggs: In a separate bowl, whisk the eggs together well until light and frothy.
- Temper Eggs: Slowly drizzle a small amount of the hot butter and sugar mixture into the whisked eggs, whisking constantly. Continue adding the hot mixture to the eggs in a slow and steady stream, whisking constantly, until you have added about half of the hot mixture.
- Combine Mixtures: Pour the tempered egg mixture back into the saucepan with the remaining butter and sugar mixture.
- Cook the Curd: Increase the heat to medium-low and continue to cook, stirring constantly, until it thickens enough to coat the back of a spoon (about 10-15 minutes).
- Strain (Optional): If concerned about lumps, strain the curd through a fine-mesh sieve into a clean bowl.
- Cool and Store: Pour the lemon curd into a clean jar or container. Press a piece of plastic wrap directly onto the surface of the curd. Let cool completely at room temperature before refrigerating. Store in the refrigerator for up to 2 weeks.
Notes
- Use fresh, high-quality ingredients for the best flavor.
- A heavy-bottomed saucepan is important to prevent scorching.
- Tempering the eggs properly is crucial to prevent curdling.
- Stir constantly while cooking to prevent sticking and curdling.
- The curd will continue to thicken as it cools.
- Press plastic wrap directly onto the surface of the curd to prevent a skin from forming.

Leave a Comment