

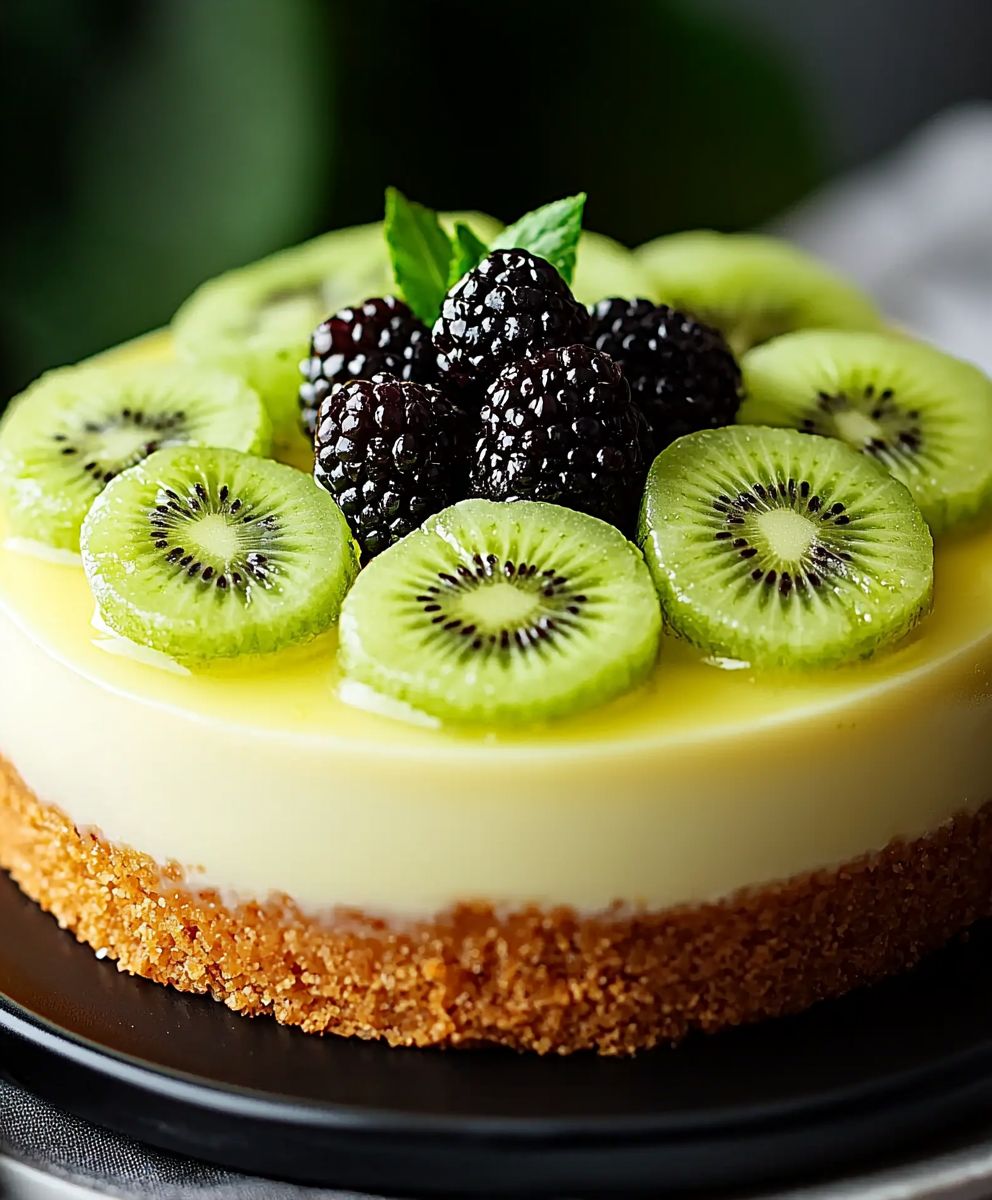
Kiwi Cheesecake: Prepare to be transported to a tropical paradise with every single bite of this vibrant and luscious dessert! Imagine the creamy, dreamy texture of a classic cheesecake, perfectly balanced by the tangy sweetness of fresh kiwi. It’s a flavor explosion that will leave you craving more.
While cheesecake itself boasts a rich history dating back to ancient Greece, the addition of kiwi is a more modern and innovative twist. New Zealand, the world’s largest producer of kiwifruit, has embraced the fruit in countless culinary creations. This Kiwi Cheesecake recipe is a delightful example of how this unique fruit can elevate a beloved dessert to new heights.
What makes this dessert so irresistible? It’s the perfect combination of textures the smooth, velvety cheesecake filling against the slightly tart and refreshing kiwi topping. The bright green color of the kiwi also adds a visual appeal that’s simply stunning. Beyond its delicious taste and beautiful presentation, this cheesecake is surprisingly easy to make, making it a perfect choice for both experienced bakers and those just starting out. Whether you’re looking for a show-stopping dessert for a special occasion or simply want to treat yourself to something extraordinary, this Kiwi Cheesecake is guaranteed to impress.

Ingredients:
- For the Crust:
- 1 ½ cups graham cracker crumbs
- 5 tablespoons unsalted butter, melted
- ¼ cup granulated sugar
- Pinch of salt
- For the Cheesecake Filling:
- 24 ounces cream cheese, softened to room temperature
- 1 ¼ cups granulated sugar
- 2 large eggs
- ½ cup sour cream
- 2 tablespoons heavy cream
- 1 teaspoon vanilla extract
- 1 tablespoon lemon juice
- For the Kiwi Topping:
- 6-8 ripe kiwis, peeled and sliced
- ½ cup water
- ¼ cup granulated sugar
- 1 tablespoon cornstarch
- 1 tablespoon lemon juice
Preparing the Graham Cracker Crust
Okay, let’s start with the foundation of our delicious Kiwi Cheesecake the graham cracker crust! This part is super easy and sets the stage for the creamy goodness to come.
- Combine the Dry Ingredients: In a medium-sized bowl, whisk together the graham cracker crumbs, granulated sugar, and a pinch of salt. Make sure everything is evenly distributed. This ensures a consistent flavor and texture throughout the crust.
- Add the Melted Butter: Pour the melted butter into the bowl with the dry ingredients. Use a fork or your hands to mix everything together until the crumbs are evenly moistened. The mixture should resemble wet sand. This is crucial for the crust to hold its shape.
- Press into the Pan: Transfer the graham cracker mixture into a 9-inch springform pan. Press the crumbs firmly and evenly onto the bottom of the pan. You can use the bottom of a measuring cup or a flat-bottomed glass to help you achieve a smooth and compact crust. Don’t forget to press the crumbs slightly up the sides of the pan for a nice, defined edge.
- Pre-bake the Crust: Bake the crust in a preheated oven at 350°F (175°C) for about 8-10 minutes. This helps to set the crust and prevent it from becoming soggy later on. Keep a close eye on it to prevent burning. The crust should be lightly golden brown around the edges.
- Cool Completely: Remove the crust from the oven and let it cool completely on a wire rack before adding the cheesecake filling. This is important because adding the filling to a hot crust can affect the texture of the cheesecake.
Making the Creamy Cheesecake Filling
Now for the star of the show the cheesecake filling! This is where the magic happens, and we create that rich, decadent flavor that everyone loves. Remember, room temperature ingredients are key for a smooth and lump-free filling.
- Cream the Cream Cheese: In a large mixing bowl, beat the softened cream cheese with an electric mixer until it’s smooth and creamy. This usually takes about 3-5 minutes. Make sure there are no lumps! Lumps in your cream cheese will translate to lumps in your cheesecake, and nobody wants that.
- Add the Sugar: Gradually add the granulated sugar to the creamed cheese, beating until well combined. Scrape down the sides of the bowl as needed to ensure everything is incorporated evenly. Over-mixing at this stage can incorporate too much air, which can cause the cheesecake to crack during baking.
- Incorporate the Eggs: Add the eggs one at a time, beating well after each addition. Again, scrape down the sides of the bowl to ensure everything is evenly mixed. Be careful not to over-mix after adding the eggs, as this can also lead to cracking.
- Add the Sour Cream and Heavy Cream: Stir in the sour cream and heavy cream until just combined. These ingredients add moisture and richness to the cheesecake, contributing to its creamy texture.
- Add the Flavorings: Stir in the vanilla extract and lemon juice. The vanilla extract enhances the overall flavor, while the lemon juice adds a touch of brightness and helps to balance the sweetness.
- Pour into the Crust: Pour the cheesecake filling into the cooled graham cracker crust, spreading it evenly. Gently tap the pan on the counter a few times to release any air bubbles.
Baking the Cheesecake
Baking the cheesecake is a delicate process, but don’t worry, I’ll guide you through it! A water bath is highly recommended to ensure even baking and prevent cracking. If you’re short on time, you can skip the water bath, but be prepared for potential cracks.
- Prepare the Water Bath (Optional but Recommended): Wrap the bottom of the springform pan tightly with heavy-duty aluminum foil. This will prevent water from seeping into the crust. Place the wrapped pan inside a larger roasting pan.
- Pour in Hot Water: Carefully pour hot water into the roasting pan, filling it about halfway up the sides of the springform pan. The water bath creates a humid environment that helps the cheesecake bake evenly and prevents it from drying out and cracking.
- Bake the Cheesecake: Bake in a preheated oven at 325°F (160°C) for 60-75 minutes, or until the edges are set but the center still has a slight jiggle. The jiggle is important! It means the cheesecake is perfectly cooked and will set up beautifully as it cools.
- Turn Off the Oven and Let Cool: Turn off the oven and let the cheesecake cool inside the oven with the door slightly ajar for about 1 hour. This gradual cooling process helps to prevent cracking.
- Refrigerate: Remove the cheesecake from the oven and water bath (if used). Let it cool completely on a wire rack before refrigerating for at least 4 hours, or preferably overnight. This allows the cheesecake to fully set and develop its flavor.
Preparing the Kiwi Topping
Finally, let’s add the vibrant and tangy kiwi topping! This topping not only adds a beautiful visual appeal but also complements the richness of the cheesecake perfectly.
- Prepare the Kiwi Slices: Peel and slice the kiwis into thin, even slices. Arrange the kiwi slices on top of the chilled cheesecake in a decorative pattern. You can create a simple circular pattern or get creative with your design.
- Make the Glaze: In a small saucepan, whisk together the water, granulated sugar, and cornstarch. Cook over medium heat, stirring constantly, until the mixture comes to a simmer and thickens. This usually takes about 2-3 minutes.
- Add Lemon Juice: Remove the saucepan from the heat and stir in the lemon juice. The lemon juice adds a touch of brightness and helps to preserve the color of the kiwis.
- Glaze the Kiwis: Carefully brush the glaze over the kiwi slices, ensuring they are evenly coated. This will give them a beautiful shine and help to prevent them from drying out.
- Chill Again: Refrigerate the cheesecake for another 30 minutes to allow the glaze to set. This will also help the kiwi slices adhere to the cheesecake.
Serving and Storage
Now that your Kiwi Cheesecake is ready, it’s time to enjoy! Here are a few tips for serving and storing your masterpiece.
- Remove from Springform Pan: Carefully remove the cheesecake from the springform pan. Run a thin knife around the edges of the cheesecake to loosen it from the pan before releasing the latch.
- Slice and Serve: Slice the cheesecake with a sharp knife and serve chilled. You can garnish each slice with a few extra kiwi slices or a dollop of whipped cream, if desired.
- Storage: Store any leftover cheesecake in an airtight container in the refrigerator for up to 3-4 days. The kiwi topping may become slightly soggy over time, but the cheesecake will still taste delicious.
Conclusion:
This Kiwi Cheesecake isn’t just another dessert; it’s a vibrant, tangy, and utterly irresistible experience that deserves a spot on your baking repertoire. From the creamy, dreamy filling to the burst of fresh kiwi flavor, every bite is a celebration of textures and tastes. I truly believe this recipe is a must-try for anyone looking to impress their friends and family, or simply treat themselves to something special. It’s the kind of dessert that sparks conversation and leaves everyone wanting more. But why is it a must-try? Beyond the delightful taste, it’s surprisingly easy to make. The recipe is straightforward, with clear instructions that even novice bakers can follow with confidence. Plus, the vibrant green hue of the kiwi topping makes it a visually stunning centerpiece for any occasion. Imagine presenting this beauty at your next dinner party the gasps of admiration will be worth every minute spent in the kitchen! Now, let’s talk serving suggestions and variations. While I personally adore it chilled straight from the fridge, you could also serve it with a dollop of whipped cream or a scoop of vanilla ice cream for an extra touch of indulgence. For a more sophisticated presentation, consider drizzling a white chocolate ganache over the top. If you’re feeling adventurous, there are plenty of ways to customize this Kiwi Cheesecake to your liking. You could try adding a layer of crushed pineapple to the filling for a tropical twist. Or, for a richer flavor, use a combination of cream cheese and mascarpone. If you’re not a fan of graham cracker crusts, feel free to substitute with a shortbread or even an Oreo crust. The possibilities are endless! For a vegan option, you can substitute the cream cheese with a plant-based alternative and use a vegan butter substitute for the crust. Agar-agar can be used as a substitute for gelatin to ensure the cheesecake sets properly. Another fun variation is to make mini kiwi cheesecakes in individual ramekins. This is perfect for parties or for portion control! Simply adjust the baking time accordingly. I’m so excited for you to try this recipe and discover the magic of Kiwi Cheesecake for yourself. I’ve poured my heart into perfecting this recipe, and I’m confident that you’ll love it as much as I do. So, what are you waiting for? Gather your ingredients, preheat your oven, and get ready to create a dessert masterpiece. Don’t be afraid to experiment with different variations and make it your own. And most importantly, I want to hear about your experience! Did you make any modifications? Did you serve it at a special occasion? What did your friends and family think? Please share your photos and stories in the comments below. I can’t wait to see your creations and hear all about your Kiwi Cheesecake adventures. Happy baking! Print
Kiwi Cheesecake: A Delicious and Easy Recipe
- Total Time: 300 minutes
- Yield: 12 servings 1x
Description
A creamy, decadent cheesecake with a tangy and vibrant kiwi topping. Perfect for any occasion!
Ingredients
- 1 ½ cups graham cracker crumbs
- 5 tablespoons unsalted butter, melted
- ¼ cup granulated sugar
- Pinch of salt
- 24 ounces cream cheese, softened to room temperature
- 1 ¼ cups granulated sugar
- 2 large eggs
- ½ cup sour cream
- 2 tablespoons heavy cream
- 1 teaspoon vanilla extract
- 1 tablespoon lemon juice
- 6–8 ripe kiwis, peeled and sliced
- ½ cup water
- ¼ cup granulated sugar
- 1 tablespoon cornstarch
- 1 tablespoon lemon juice
Instructions
- In a medium bowl, whisk together graham cracker crumbs, sugar, and salt.
- Add melted butter and mix until the crumbs are moistened.
- Press the mixture into a 9-inch springform pan, pressing firmly on the bottom and slightly up the sides.
- Pre-bake the crust at 350°F (175°C) for 8-10 minutes, until lightly golden brown.
- Cool completely on a wire rack.
- In a large mixing bowl, beat the softened cream cheese until smooth and creamy.
- Gradually add sugar, beating until well combined. Scrape down the sides of the bowl as needed.
- Add eggs one at a time, beating well after each addition.
- Stir in sour cream and heavy cream until just combined.
- Stir in vanilla extract and lemon juice.
- Pour the filling into the cooled crust, spreading evenly. Gently tap the pan to release air bubbles.
- Wrap the bottom of the springform pan tightly with heavy-duty aluminum foil. Place the wrapped pan inside a larger roasting pan. Pour hot water into the roasting pan, filling it halfway up the sides of the springform pan.
- Bake at 325°F (160°C) for 60-75 minutes, or until the edges are set but the center still has a slight jiggle.
- Turn off the oven and let the cheesecake cool inside with the door slightly ajar for 1 hour.
- Remove from the oven and water bath (if used). Let it cool completely on a wire rack before refrigerating for at least 4 hours, or preferably overnight.
- Peel and slice the kiwis into thin, even slices. Arrange the kiwi slices on top of the chilled cheesecake in a decorative pattern.
- In a small saucepan, whisk together water, sugar, and cornstarch. Cook over medium heat, stirring constantly, until the mixture comes to a simmer and thickens.
- Remove from heat and stir in lemon juice.
- Carefully brush the glaze over the kiwi slices, ensuring they are evenly coated.
- Refrigerate the cheesecake for another 30 minutes to allow the glaze to set.
- Carefully remove the cheesecake from the springform pan.
- Slice and serve chilled.
- Store any leftover cheesecake in an airtight container in the refrigerator for up to 3-4 days.
Notes
- Using room temperature cream cheese is crucial for a smooth filling.
- A water bath is highly recommended to prevent cracking during baking.
- Don’t over-mix the filling after adding the eggs.
- Let the cheesecake cool gradually to prevent cracking.
- Refrigerate for at least 4 hours, or preferably overnight, to allow the cheesecake to fully set.
- Prep Time: 45 minutes
- Cook Time: 75 minutes

Leave a Comment