

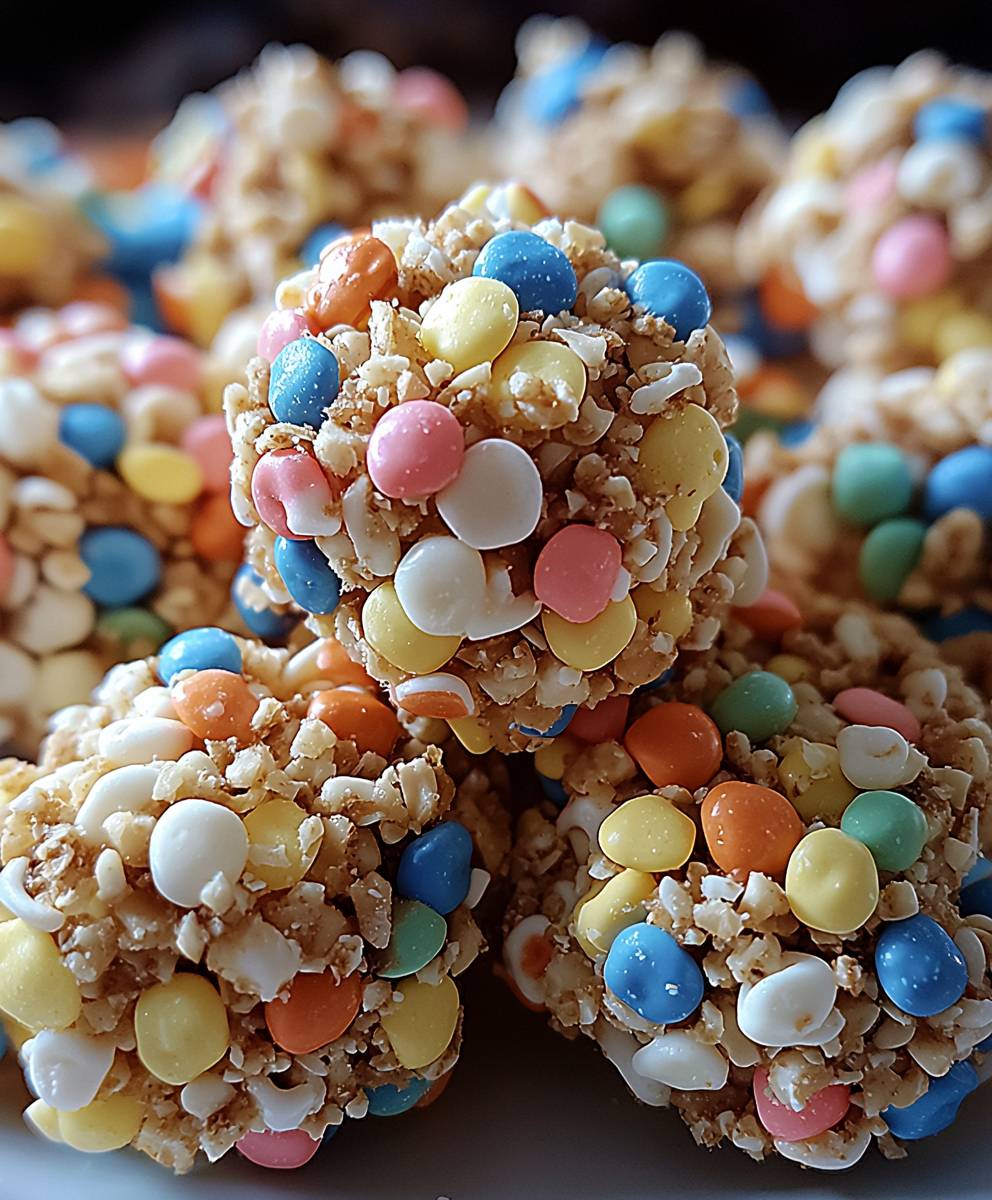
Kid Friendly No Bake Clusters are the answer to your sweet treat cravings when you need something quick, easy, and utterly delicious! Forget turning on the oven; these delightful clusters come together in minutes with minimal effort, making them the perfect activity to get the kids involved in the kitchen.
No-bake treats have a long and cherished history, often born out of necessity during times when ovens were a luxury or simply to beat the summer heat. These clusters are a modern take on that tradition, offering a customizable and fun way to enjoy a sweet snack. They’re reminiscent of classic chocolate bark but with a playful twist that appeals to all ages.
What makes these Kid Friendly No Bake Clusters so irresistible? It’s the perfect combination of textures and flavors! The satisfying crunch of the cereal, the creamy sweetness of the chocolate, and the delightful pops of flavor from your favorite mix-ins create a symphony of deliciousness in every bite. Plus, they’re incredibly convenient. Whether you need a last-minute dessert for a party, a fun activity for a rainy day, or simply a sweet treat to brighten your afternoon, these clusters are always a winner. I know my family loves them, and I’m sure yours will too!

Ingredients:
- 12 ounces semi-sweet chocolate chips
- 10 ounces milk chocolate chips
- 1 cup creamy peanut butter
- 5 cups mini marshmallows
- 4 cups chow mein noodles
- 1 cup salted peanuts, roughly chopped
- Optional: 1/2 cup sprinkles, for decoration
Melting the Chocolate
Okay, let’s get started! The first thing we need to do is melt our chocolate. This is a crucial step, so pay close attention. We want a smooth, glossy chocolate that will coat all our goodies perfectly.
- Combine the Chocolate Chips and Peanut Butter: In a large, microwave-safe bowl, combine the semi-sweet chocolate chips, milk chocolate chips, and peanut butter. Make sure your bowl is large enough to hold all the ingredients later on. Trust me, you don’t want to be scrambling for a bigger bowl halfway through!
- Microwave in Intervals: Microwave the mixture in 30-second intervals, stirring well after each interval. This is super important! If you microwave it for too long at once, the chocolate can burn, and nobody wants burnt chocolate. Burnt chocolate is sad chocolate.
Keep microwaving and stirring until the chocolate is almost completely melted. You might still see a few small pieces of chocolate, and that’s okay. The residual heat will melt them.
- Stir Until Smooth: Now, stir the mixture continuously until all the chocolate is melted and the mixture is smooth and glossy. This might take a minute or two, but be patient. The stirring is key to getting that perfect, silky texture. If you find that the chocolate isn’t melting completely, you can microwave it for another 10 seconds, but be very careful not to overdo it.
Combining the Ingredients
Alright, chocolate’s melted! Now comes the fun part mixing everything together. This is where the magic happens, and our clusters start to take shape.
- Add the Marshmallows: Gently fold in the mini marshmallows. Be careful not to crush them too much. We want them to stay nice and fluffy. If you’re using larger marshmallows, you might want to cut them into smaller pieces first.
- Add the Chow Mein Noodles: Now, add the chow mein noodles. These give the clusters a fantastic crunch and a unique texture. Again, fold them in gently so they don’t break into tiny pieces. We want those long, crispy noodles!
- Add the Peanuts: Finally, add the chopped peanuts. The saltiness of the peanuts complements the sweetness of the chocolate and marshmallows perfectly. If you’re not a fan of peanuts, you can substitute them with other nuts like almonds, walnuts, or pecans. Just make sure they’re roughly chopped.
- Mix Everything Together: Gently mix all the ingredients together until everything is evenly coated in the chocolate mixture. Make sure you get all those marshmallows and noodles covered! This might take a little bit of effort, but it’s worth it.
Forming the Clusters
We’re almost there! Now it’s time to form our clusters. This is where you get to decide how big or small you want them. I like to make mine about the size of golf balls, but you can make them any size you like.
- Drop by Spoonfuls: Drop spoonfuls of the mixture onto a parchment-lined baking sheet. Parchment paper is your best friend here! It prevents the clusters from sticking to the baking sheet and makes cleanup a breeze. If you don’t have parchment paper, you can use wax paper, but parchment paper is definitely preferred.
- Shape the Clusters (Optional): If you want your clusters to be perfectly round, you can gently shape them with your fingers. But honestly, I think they look more rustic and charming if you just leave them as they are. It’s up to you!
- Add Sprinkles (Optional): If you’re using sprinkles, now’s the time to add them. Sprinkle them generously over the clusters while the chocolate is still wet so they stick properly. Sprinkles add a fun pop of color and make the clusters even more appealing, especially for kids!
Setting the Clusters
The final step is to let the clusters set. This is the hardest part because you have to resist the urge to eat them right away! But trust me, they’re worth the wait.
- Refrigerate: Place the baking sheet in the refrigerator and let the clusters set for at least 30 minutes, or until the chocolate is firm. The colder they are, the easier they will be to handle.
- Enjoy!: Once the clusters are set, remove them from the refrigerator and enjoy! These are best stored in an airtight container in the refrigerator to keep them from getting too soft.
Tips and Variations
Want to customize your clusters? Here are a few ideas:
- Different Chocolate: Experiment with different types of chocolate. Try using dark chocolate, white chocolate, or even a combination of all three!
- Different Nuts: As I mentioned earlier, you can substitute the peanuts with other nuts like almonds, walnuts, or pecans. You can also use a mixture of different nuts.
- Dried Fruit: Add some dried fruit like cranberries, raisins, or chopped apricots for a chewy texture and a burst of flavor.
- Pretzels: Substitute some of the chow mein noodles with broken pretzels for a salty and crunchy twist.
- Candy: Add some chopped candy bars like Snickers, Reese’s Peanut Butter Cups, or M&Ms for an extra-indulgent treat.
- Spice it up: Add a pinch of cinnamon or cayenne pepper to the chocolate mixture for a warm and spicy kick.
Troubleshooting
Chocolate Seizing: If your chocolate seizes (becomes thick and grainy), don’t panic! This usually happens when a small amount of water gets into the chocolate. Try adding a teaspoon of vegetable oil or shortening and stirring vigorously. This can sometimes help to smooth it out. If that doesn’t work, unfortunately, you might have to start over with fresh chocolate.
Clusters Not Setting: If your clusters aren’t setting properly, it could be because the chocolate wasn’t melted properly or because the refrigerator isn’t cold enough. Make sure the chocolate is completely melted and smooth before adding the other ingredients. You can also try placing the clusters in the freezer for a few minutes to speed up the setting process.
Clusters Too Soft: If your clusters are too soft, it could be because they’re not cold enough. Store them in the refrigerator to keep them firm. You can also try adding a little bit of cornstarch to the chocolate mixture to help it set up more firmly.
Serving Suggestions
These no-bake clusters are perfect for:
- Parties: They’re a crowd-pleaser and are easy to make in large batches.
- Holidays: They make a great addition to any holiday dessert table.
- Gifts: Package them in a cute box or bag and give them as a homemade gift.
- Snacks: They’re a delicious and satisfying snack any time of day.
Nutritional Information (Approximate)
Please note that the nutritional information is approximate and will vary depending on the specific ingredients you use.
- Calories: Approximately 200-250 per cluster
- Fat: Approximately 12-15 grams per cluster
- Carbohydrates: Approximately 20-25 grams per cluster
- Protein: Approximately 3-5 grams per cluster
Enjoy your delicious and easy no-bake clusters! I hope you and your family love them as much as we do!
Conclusion:
And there you have it! These Kid Friendly No Bake Clusters are truly a must-try for anyone looking for a quick, easy, and utterly delicious treat. I know I’ve made them countless times, and they’re always a hit, whether it’s for a last-minute dessert, a fun activity with the kids, or just a little something sweet to brighten the day.
What makes these clusters so special? Well, first and foremost, the simplicity. No oven required! That’s a huge win in my book, especially during those hot summer months when the thought of turning on the oven makes me want to run screaming. Plus, the ingredient list is short and sweet, using pantry staples that you probably already have on hand. But beyond the convenience, it’s the taste that really seals the deal. The combination of crunchy cereal, creamy peanut butter (or your favorite nut butter alternative!), and sweet chocolate is simply irresistible. And the best part? You can customize them to your heart’s content!
Speaking of customization, let’s talk serving suggestions and variations. While these clusters are fantastic on their own, there are so many ways to elevate them. For a festive touch, sprinkle them with colorful sprinkles or edible glitter. If you’re a fan of nuts, add chopped pecans, walnuts, or almonds for extra crunch and flavor. Craving something a little more decadent? Drizzle melted white chocolate or caramel over the finished clusters. For a healthier twist, use dark chocolate and add dried cranberries or chopped dates. You can even experiment with different types of cereal try using rice cereal for a lighter texture, or corn flakes for a more robust flavor.
Another fun variation is to add a touch of spice. A pinch of cinnamon or nutmeg can add a warm, comforting flavor to the clusters. Or, for a more adventurous twist, try adding a dash of cayenne pepper for a subtle kick. Just be careful not to overdo it, especially if you’re making these for kids!
When it comes to serving, these clusters are incredibly versatile. They’re perfect for snacking, dessert, or even as a fun addition to a party platter. You can also package them up in cute little bags and give them as gifts. They’re sure to be a hit with everyone! I personally love to serve them with a scoop of vanilla ice cream or a glass of cold milk. They’re also great for packing in lunchboxes or taking on road trips.
But honestly, the best way to enjoy these Kid Friendly No Bake Clusters is to make them with your loved ones. Get the kids involved in measuring ingredients, mixing everything together, and shaping the clusters. It’s a fun and rewarding activity that everyone can enjoy. And who knows, you might even create some lasting memories in the process!
So, what are you waiting for? Gather your ingredients, put on some music, and get ready to have some fun in the kitchen. I promise you won’t be disappointed. Once you try these clusters, you’ll be hooked!
I’m so excited for you to try this recipe. I really think you’ll love it as much as my family and I do. And I would absolutely love to hear about your experience. Did you try any of the variations I suggested? Did you add any of your own special touches? What did your family and friends think? Please, share your thoughts and photos in the comments below. I can’t wait to see what you create! Happy baking (or rather, no-baking!) and enjoy!
Kid Friendly No Bake Clusters: Easy Recipe for Delicious Treats
Easy no-bake clusters with chocolate, peanut butter, marshmallows, chow mein noodles, and peanuts. A sweet and salty treat for parties, holidays, or a quick snack!
Ingredients
- 12 ounces semi-sweet chocolate chips
- 10 ounces milk chocolate chips
- 1 cup creamy peanut butter
- 5 cups mini marshmallows
- 4 cups chow mein noodles
- 1 cup salted peanuts, roughly chopped
- Optional: 1/2 cup sprinkles, for decoration
Instructions
- Combine the Chocolate Chips and Peanut Butter: In a large, microwave-safe bowl, combine the semi-sweet chocolate chips, milk chocolate chips, and peanut butter.
- Microwave in Intervals: Microwave the mixture in 30-second intervals, stirring well after each interval. Continue until almost completely melted.
- Stir Until Smooth: Stir continuously until all the chocolate is melted and the mixture is smooth and glossy.
- Add the Marshmallows: Gently fold in the mini marshmallows.
- Add the Chow Mein Noodles: Add the chow mein noodles and gently fold them in.
- Add the Peanuts: Add the chopped peanuts.
- Mix Everything Together: Gently mix all the ingredients together until everything is evenly coated in the chocolate mixture.
- Drop by Spoonfuls: Drop spoonfuls of the mixture onto a parchment-lined baking sheet.
- Shape the Clusters (Optional): Gently shape them with your fingers.
- Add Sprinkles (Optional): Sprinkle them generously over the clusters while the chocolate is still wet.
- Refrigerate: Place the baking sheet in the refrigerator and let the clusters set for at least 30 minutes, or until the chocolate is firm.
- Enjoy!: Remove them from the refrigerator and enjoy! Store in an airtight container in the refrigerator.
Notes
- Variations: Experiment with different types of chocolate (dark, white), nuts (almonds, walnuts, pecans), dried fruit, pretzels, candy bars, or spices.
- Chocolate Seizing: If chocolate seizes, try adding a teaspoon of vegetable oil or shortening and stirring vigorously.
- Clusters Not Setting: Ensure chocolate is fully melted and refrigerator is cold enough. Freeze briefly to speed setting.
- Clusters Too Soft: Store in the refrigerator. Add a little cornstarch to the chocolate mixture.


Leave a Comment