

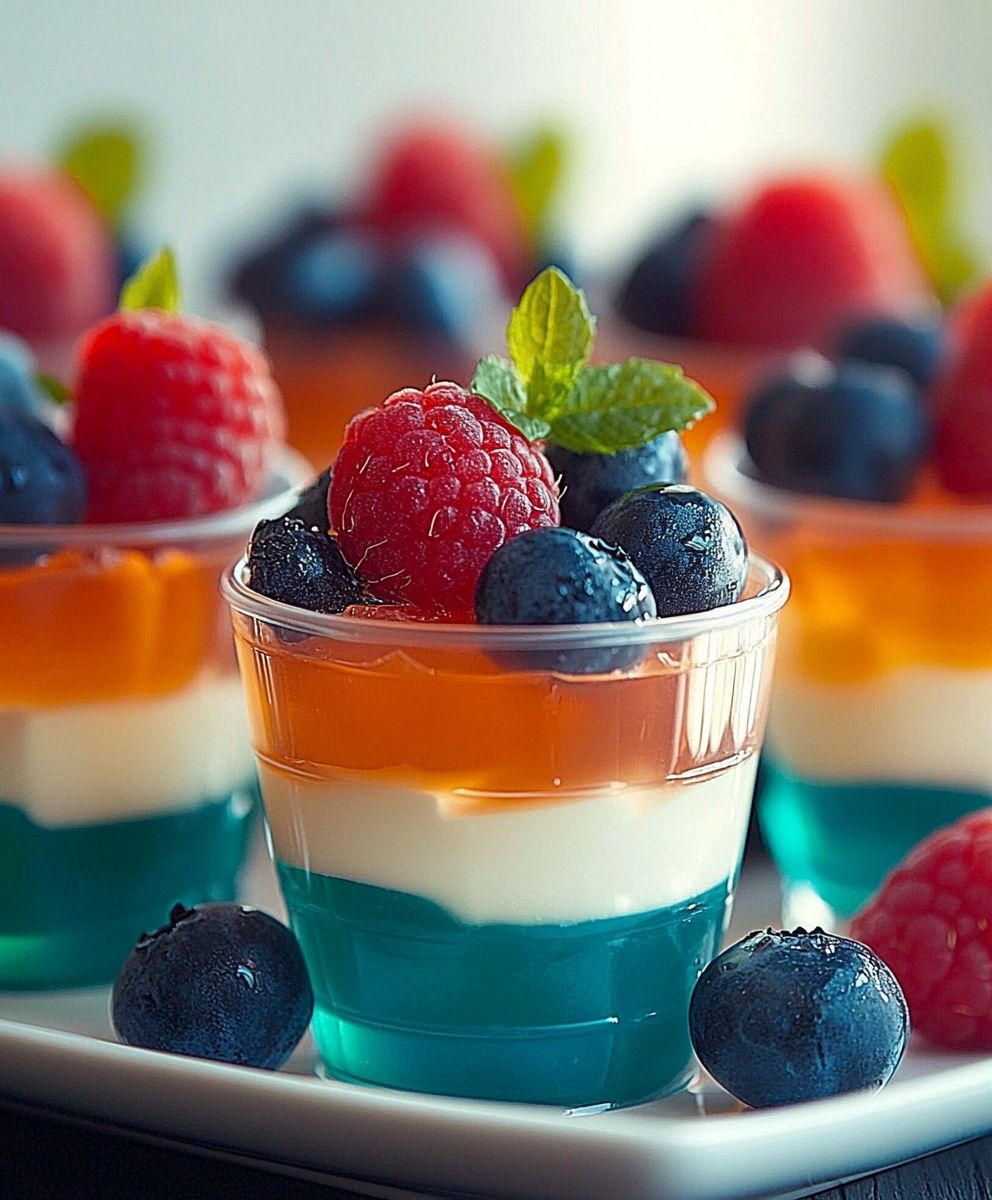
July Fruit Jello Cups are the quintessential summer treat, bursting with refreshing flavors and vibrant colors that perfectly capture the essence of the season. Imagine sinking your spoon into a cool, jiggly cup filled with juicy berries, sweet melon, and tangy citrus, all suspended in a shimmering, fruity jello. It’s a delightful experience that evokes childhood memories and brings a smile to everyone’s face.
While the exact origins of jello are debated, its popularity soared in the early 20th century, becoming a staple at potlucks, picnics, and family gatherings. The ease of preparation and the endless possibilities for customization made it a beloved dessert across generations. These July Fruit Jello Cups are a modern take on a classic, celebrating the abundance of fresh, seasonal fruits available during this time of year.
What makes these jello cups so irresistible? It’s the combination of textures the smooth, wobbly jello contrasting with the soft, juicy fruit. The taste is a symphony of sweetness and tartness, a refreshing escape from the summer heat. Plus, they are incredibly convenient to make ahead of time, making them perfect for parties or a quick and easy dessert. Get ready to create a batch of these delightful treats and experience the joy of summer in every bite!

Ingredients:
- 1 (3 ounce) package of raspberry flavored gelatin
- 1 cup boiling water
- 1/2 cup cold water
- 1/2 cup raspberry flavored vodka (optional, can substitute with cold water)
- 1 cup fresh raspberries, divided
- 1 (3 ounce) package of lime flavored gelatin
- 1 cup boiling water
- 1/2 cup cold water
- 1/2 cup lime flavored rum (optional, can substitute with cold water)
- 1 cup fresh blueberries, divided
- 1 (3 ounce) package of orange flavored gelatin
- 1 cup boiling water
- 1/2 cup cold water
- 1/2 cup orange flavored liqueur (optional, can substitute with cold water)
- 1 cup fresh mandarin orange segments, divided
- Whipped cream, for topping (optional)
- Fresh mint leaves, for garnish (optional)
Preparing the Raspberry Layer:
- Dissolve the Gelatin: In a medium bowl, carefully pour 1 cup of boiling water over the raspberry flavored gelatin powder. Stir continuously until the gelatin is completely dissolved. This usually takes about 2-3 minutes. Make sure there are no granules remaining. Undissolved gelatin will result in a grainy texture, which we definitely want to avoid!
- Add Cold Liquids: Once the gelatin is fully dissolved, add 1/2 cup of cold water and 1/2 cup of raspberry flavored vodka (or another 1/2 cup of cold water if you prefer a non-alcoholic version). Stir well to combine. The cold liquids help to cool down the mixture and start the setting process.
- Incorporate the Raspberries: Gently fold in 1/2 cup of fresh raspberries. Distribute them evenly throughout the gelatin mixture. Be careful not to crush the raspberries too much, as this can make the gelatin cloudy. We want those beautiful berries to shine!
- Pour into Cups: Divide the raspberry gelatin mixture evenly among 6-8 clear cups or small glasses. You want the raspberry layer to be about 1/3 of the total height of the cup. This will allow room for the other layers.
- Chill the Raspberry Layer: Carefully place the cups in the refrigerator and chill for at least 2 hours, or until the raspberry layer is firm enough to support the next layer. You can test the firmness by gently touching the surface of the gelatin. It should be set but still slightly jiggly.
Preparing the Lime Layer:
- Dissolve the Gelatin: In a separate medium bowl, repeat the process with the lime flavored gelatin. Pour 1 cup of boiling water over the gelatin powder and stir until completely dissolved. Again, ensure no granules remain.
- Add Cold Liquids: Add 1/2 cup of cold water and 1/2 cup of lime flavored rum (or another 1/2 cup of cold water for a non-alcoholic version). Stir well to combine.
- Incorporate the Blueberries: Gently fold in 1/2 cup of fresh blueberries. Distribute them evenly throughout the gelatin mixture.
- Pour over Raspberry Layer: Once the raspberry layer is firm, carefully pour the lime gelatin mixture over it, dividing it evenly among the cups. Make sure the raspberry layer is firm enough to prevent the colors from bleeding together.
- Chill the Lime Layer: Return the cups to the refrigerator and chill for another 2 hours, or until the lime layer is firm.
Preparing the Orange Layer:
- Dissolve the Gelatin: In a third medium bowl, repeat the process with the orange flavored gelatin. Pour 1 cup of boiling water over the gelatin powder and stir until completely dissolved.
- Add Cold Liquids: Add 1/2 cup of cold water and 1/2 cup of orange flavored liqueur (or another 1/2 cup of cold water for a non-alcoholic version). Stir well to combine.
- Incorporate the Mandarin Oranges: Gently fold in 1/2 cup of fresh mandarin orange segments. Distribute them evenly throughout the gelatin mixture.
- Pour over Lime Layer: Once the lime layer is firm, carefully pour the orange gelatin mixture over it, dividing it evenly among the cups.
- Final Chill: Return the cups to the refrigerator and chill for at least 2 hours, or preferably overnight, to ensure all layers are completely set.
Serving and Garnishing:
- Check for Firmness: Before serving, make sure all layers are completely firm. The gelatin should hold its shape when gently touched.
- Add Whipped Cream (Optional): If desired, top each jello cup with a dollop of whipped cream just before serving. This adds a creamy texture and a touch of sweetness.
- Garnish with Mint (Optional): For an extra touch of freshness and visual appeal, garnish each cup with a small fresh mint leaf.
- Serve Chilled: Serve the jello cups chilled. They are best enjoyed cold!
Tips and Tricks for Perfect Jello Cups:
- Use High-Quality Gelatin: The quality of the gelatin can affect the texture and clarity of the jello. Opt for a reputable brand for the best results.
- Ensure Complete Dissolution: Make sure the gelatin powder is completely dissolved in the boiling water. Undissolved granules will result in a grainy texture.
- Don’t Overfill the Cups: Leave a little space at the top of each cup to prevent spills and make it easier to add the whipped cream and garnish.
- Chill Each Layer Thoroughly: It’s crucial to chill each layer until it’s firm before adding the next layer. This prevents the colors from bleeding together and ensures a clean, layered look.
- Adjust Sweetness to Taste: If you prefer a sweeter jello, you can add a tablespoon or two of sugar to the gelatin mixture.
- Experiment with Different Fruits: Feel free to experiment with different fruits based on your preferences and what’s in season. Strawberries, grapes, and pineapple are all great options.
- Make it Ahead: These jello cups can be made a day or two in advance, making them a convenient dessert for parties and gatherings.
- For a Vegan Option: Use agar-agar powder instead of gelatin. Follow the package instructions for proper usage. The setting time might vary.
- Layering Technique: For perfectly even layers, use a measuring cup with a spout to carefully pour the gelatin mixture into the cups.
- Preventing Fruit from Sinking: To prevent the fruit from sinking to the bottom of the gelatin, chill the gelatin mixture for a short time until it starts to thicken slightly before adding the fruit. This will help suspend the fruit evenly throughout the layer.
Variations and Adaptations:
- Tropical Jello Cups: Use pineapple flavored gelatin, coconut rum, and diced mango and pineapple for a tropical twist.
- Berry Medley Jello Cups: Combine raspberry, strawberry, and blueberry flavored gelatins with a mix of fresh berries.
- Citrus Burst Jello Cups: Use lemon, lime, and orange flavored gelatins with segments of oranges, lemons, and limes.
- Adults-Only Jello Shots: Increase the amount of vodka, rum, or liqueur for a fun and festive adult treat. Be sure to label them clearly!
- Layered Colors: Get creative with the colors and flavors of the gelatin. Try using different combinations to create a rainbow effect.
- Creamy Jello Cups: Add a layer of sweetened condensed milk or whipped cream between the gelatin layers for a richer, creamier dessert.
- Jello Parfaits: Layer the jello with granola, yogurt, or fruit for a delicious and healthy parfait.
- Individual Molds: Instead of cups, pour the gelatin mixture into individual molds for a more elegant presentation.
- Jello Cake: Create a layered jello cake by pouring the gelatin into a cake pan and chilling until firm.
- Sugar-Free Option: Use sugar-free gelatin and a sugar substitute to create a guilt-free dessert.
Troubleshooting:
- Gelatin Not Setting: Make sure you are using the correct ratio of gelatin to water. Also, ensure that the gelatin is completely dissolved. If the gelatin still doesn’t set, try adding a little more gelatin powder.
- Colors Bleeding Together: This usually happens when the previous layer is not firm enough before adding the next layer. Make sure to chill each layer thoroughly.
-
Conclusion:
Well, there you have it! These July Fruit Jello Cups are truly a must-try, and I’m not just saying that because I created the recipe. The vibrant colors, the refreshing flavors, and the sheer simplicity of putting them together make them a guaranteed crowd-pleaser for any summer gathering. Think about it: a light, fruity dessert that’s both beautiful and delicious, perfect for beating the summer heat. What’s not to love? Why are these Jello Cups a must-try? Because they are incredibly versatile! You can customize them with your favorite fruits, making them a delightful treat for even the pickiest eaters. They’re also a fantastic make-ahead dessert, freeing you up to focus on other things when you’re hosting a party. Plus, let’s be honest, who can resist the nostalgic charm of a good old-fashioned Jello cup, especially when it’s elevated with fresh, seasonal ingredients? But the fun doesn’t stop there! Let’s talk about serving suggestions and variations. For a more sophisticated presentation, try layering the Jello in elegant stemmed glasses instead of individual cups. You could also add a dollop of whipped cream or a sprinkle of toasted coconut on top for an extra touch of indulgence. Looking for variations? How about a tropical twist? Use mango, pineapple, and kiwi for a taste of the islands. Or, for a more patriotic theme (perfect for the Fourth of July!), stick with red, white, and blue fruits like strawberries, blueberries, and raspberries. You could even add a layer of sweetened condensed milk for a creamy, dreamy effect. Another fun idea is to incorporate edible flowers for a truly stunning presentation. Imagine the “oohs” and “aahs” when you bring these beauties to the table! And if you’re feeling adventurous, why not try using different types of Jello? Experiment with different flavors and colors to create your own unique combinations. You could even make a rainbow Jello cup by layering different colors and letting each layer set before adding the next. The possibilities are endless! I truly believe that these July Fruit Jello Cups will become a staple in your summer dessert rotation. They’re easy to make, adaptable to your preferences, and always a hit with both kids and adults. They are the perfect way to celebrate the flavors of summer. So, what are you waiting for? Gather your ingredients, grab your favorite fruits, and get ready to create some Jello magic! I’m confident that you’ll love this recipe as much as I do. Now, for the most important part: I want to hear about your experience! Once you’ve tried this recipe, please share your photos and comments. Let me know what fruits you used, what variations you tried, and how much everyone enjoyed them. Your feedback is invaluable, and it helps me to continue creating recipes that you’ll love. You can tag me on social media or leave a comment on the blog post. I can’t wait to see your creations! Happy Jello-ing! I hope you enjoy this July Fruit Jello Cups recipe as much as I do! Print
July Fruit Jello Cups: A Refreshing Summer Treat
- Total Time: 480 minutes
- Yield: 6–8 servings 1x
Description
Colorful layered Jello cups with raspberry, lime, and orange gelatin, fresh fruit, and optional alcohol. A refreshing and fun dessert!
Ingredients
Scale- 1 (3 ounce) package of raspberry flavored gelatin
- 1 cup boiling water
- 1/2 cup cold water
- 1/2 cup raspberry flavored vodka (optional, can substitute with cold water)
- 1 cup fresh raspberries, divided
- 1 (3 ounce) package of lime flavored gelatin
- 1 cup boiling water
- 1/2 cup cold water
- 1/2 cup lime flavored rum (optional, can substitute with cold water)
- 1 cup fresh blueberries, divided
- 1 (3 ounce) package of orange flavored gelatin
- 1 cup boiling water
- 1/2 cup cold water
- 1/2 cup orange flavored liqueur (optional, can substitute with cold water)
- 1 cup fresh mandarin orange segments, divided
- Whipped cream, for topping (optional)
- Fresh mint leaves, for garnish (optional)
Instructions
- In a medium bowl, carefully pour 1 cup of boiling water over the raspberry flavored gelatin powder. Stir continuously until the gelatin is completely dissolved (2-3 minutes). Ensure no granules remain.
- Once dissolved, add 1/2 cup of cold water and 1/2 cup of raspberry flavored vodka (or another 1/2 cup of cold water). Stir well.
- Gently fold in 1/2 cup of fresh raspberries, distributing evenly.
- Divide the raspberry gelatin mixture evenly among 6-8 clear cups, filling about 1/3 of the cup.
- Refrigerate for at least 2 hours, or until firm enough to support the next layer.
- In a separate medium bowl, pour 1 cup of boiling water over the lime flavored gelatin powder and stir until completely dissolved.
- Add 1/2 cup of cold water and 1/2 cup of lime flavored rum (or another 1/2 cup of cold water). Stir well.
- Gently fold in 1/2 cup of fresh blueberries, distributing evenly.
- Once the raspberry layer is firm, carefully pour the lime gelatin mixture over it, dividing it evenly among the cups.
- Return the cups to the refrigerator and chill for another 2 hours, or until the lime layer is firm.
- In a third medium bowl, pour 1 cup of boiling water over the orange flavored gelatin powder and stir until completely dissolved.
- Add 1/2 cup of cold water and 1/2 cup of orange flavored liqueur (or another 1/2 cup of cold water). Stir well.
- Gently fold in 1/2 cup of fresh mandarin orange segments, distributing evenly.
- Once the lime layer is firm, carefully pour the orange gelatin mixture over it, dividing it evenly among the cups.
- Return the cups to the refrigerator and chill for at least 2 hours, or preferably overnight, to ensure all layers are completely set.
- Before serving, make sure all layers are completely firm.
- If desired, top each jello cup with a dollop of whipped cream just before serving.
- For an extra touch of freshness and visual appeal, garnish each cup with a small fresh mint leaf.
- Serve the jello cups chilled. They are best enjoyed cold!
Notes
- Use high-quality gelatin for best results.
- Ensure gelatin is completely dissolved to avoid a grainy texture.
- Chill each layer thoroughly before adding the next to prevent colors from bleeding.
- Adjust sweetness to taste by adding sugar to the gelatin mixture.
- Experiment with different fruits and flavors.
- Make ahead for convenience.
- For a vegan option, use agar-agar powder.
- To prevent fruit from sinking, chill the gelatin mixture until slightly thickened before adding fruit.
- Prep Time: 30 minutes
- Cook Time: 0 minutes

Leave a Comment