

Korean Cream Cheese Garlic Buns have taken the culinary world by storm, and for good reason! I remember the very first time I tasted one – it was an instant revelation, a symphony of flavors and textures that left an indelible impression. This isn’t just another bread; it’s a truly ingenious creation that masterfully combines a luxuriously soft, brioche-like bun with a rich, tangy cream cheese filling, all enveloped in an incredibly aromatic, savory garlic butter glaze. Originating from the bustling streets and innovative bakeries of South Korea, these delightful pastries quickly soared in popularity, becoming a beloved staple and a must-try street food sensation that perfectly embodies modern Korean culinary creativity.
Why are these buns so irresistible?
People worldwide adore them for their remarkable balance: the subtle sweetness and tang of the cream cheese filling provides a perfect counterpoint to the pungent, herby, and deeply savory garlic butter. Every bite offers an exquisite contrast, from the tender, pillowy interior of the bun to the slightly crisp, golden exterior infused with garlicky goodness. Preparing your own Korean Cream Cheese Garlic Buns at home is an incredibly rewarding experience, bringing a taste of Seoul’s vibrant food scene right into your kitchen. Get ready to embark on a delicious adventure that will impress everyone!

Ingredients:
-
For the Irresistible Brioche Buns:
- 3 ½ cups (420g) all-purpose flour, plus more for dusting
- ¼ cup (50g) granulated sugar
- 2 ¼ teaspoons (7g) active dry yeast (one standard packet)
- 1 teaspoon (6g) fine sea salt
- ¾ cup (180ml) warm milk (about 105-115°F / 40-46°C)
- 2 large eggs, at room temperature, plus 1 egg for egg wash
- 6 tablespoons (85g) unsalted butter, softened and cut into small pieces
-
For the Luscious Cream Cheese Filling:
- 8 ounces (226g) cream cheese, full-fat, softened at room temperature
- ¼ cup (50g) granulated sugar
- 2 tablespoons (30ml) heavy cream
- ½ teaspoon vanilla extract
-
For the Aromatic Garlic Butter Sauce:
- ½ cup (113g) unsalted butter, melted
- 5-6 cloves garlic, very finely minced (about 2 tablespoons)
- ¼ cup (60ml) milk (any kind)
- 1 large egg yolk
- 2 tablespoons (30ml) honey or maple syrup (honey preferred for authentic flavor)
- 1 tablespoon dried parsley flakes
- ½ teaspoon salt, or to taste
- ¼ teaspoon black pepper, freshly ground
-
For Garnish:
- Fresh parsley, finely chopped
- Sesame seeds (optional, for visual appeal)
Preparing the Brioche Buns (The Foundation of Your Korean Cream Cheese Garlic Buns)
My journey to truly great Korean Cream Cheese Garlic Buns always begins with the perfect base, and for me, that’s a tender, slightly sweet brioche bun. While store-bought buns can work in a pinch, making them from scratch elevates this dish beyond imagination. Trust me on this, the effort is incredibly rewarding!
-
Activating the Yeast:
In a small bowl, I like to combine my warm milk with a pinch of the granulated sugar from the main recipe. Then, I sprinkle my active dry yeast over the top. It’s important that the milk isn’t too hot (it could kill the yeast) or too cold (it won’t activate it properly). Aim for bathwater warm, around 105-115°F (40-46°C). I let this sit for about 5-10 minutes until it becomes foamy and bubbly. This tells me my yeast is alive and ready to work its magic. If it doesn’t foam, your yeast might be old, or your milk temperature was off, and it’s best to start again with fresh yeast and properly warmed milk.
-
Mixing the Dough:
In the bowl of a stand mixer fitted with the dough hook attachment, I combine the all-purpose flour, the remaining granulated sugar, and the fine sea salt. Give it a quick whisk to ensure everything is evenly distributed. Then, I pour in the activated yeast mixture and add my two large, room-temperature eggs. I usually start mixing on low speed until a shaggy dough forms, which typically takes about 1-2 minutes. At this point, I gradually add my softened, cubed unsalted butter, a few pieces at a time, allowing each addition to be partially incorporated before adding more. This slow introduction helps the butter evenly distribute throughout the dough.
Once all the butter is in, I increase the mixer speed to medium-low and let it knead for about 8-10 minutes. This is a crucial step for developing the gluten structure that gives brioche its characteristic texture. If you’re kneading by hand, prepare for a good 15-20 minutes of consistent effort. You’re looking for a dough that transforms from sticky and somewhat unruly to smooth, elastic, and slightly tacky to the touch. A good test is the ‘windowpane test’: gently stretch a small piece of dough between your fingers. If you can stretch it thin enough to see light pass through without tearing, your gluten has developed beautifully.
-
First Rise (Bulk Fermentation):
Now, it’s time for the first proof. I lightly grease a large bowl with a little oil or cooking spray, then transfer my beautifully kneaded dough into it. I like to turn the dough once to coat it lightly in oil, preventing it from drying out. Cover the bowl tightly with plastic wrap or a clean kitchen towel. I then place it in a warm, draft-free spot. My go-to is usually a slightly warmed oven (turned off, of course!) or near a sunny window. I let it rise for about 1 ½ to 2 hours, or until it has visibly doubled in size. This slow fermentation is key to flavor development and a light, airy texture for our Korean Cream Cheese Garlic Buns.
-
Shaping the Buns:
Once the dough has doubled, I gently punch it down to release the air. This step is satisfying! I then transfer the dough to a lightly floured surface and divide it into 6 or 8 equal portions, depending on how large I want my buns to be. For a more manageable size, 8 portions usually work well for me. I then take each portion and gently shape it into a tight, smooth ball. The trick here is to create surface tension, which helps the buns hold their shape. Place the shaped buns onto a baking sheet lined with parchment paper, making sure to leave some space between them as they will expand again.
-
Second Rise (Proofing):
Cover the baking sheet loosely with plastic wrap or a light kitchen towel. Again, I place them in a warm, draft-free spot for their second rise, or proofing. This usually takes about 45-60 minutes, or until the buns look noticeably puffed up and feel light. Don’t rush this step! A proper second rise ensures a wonderfully soft and airy interior for your finished Korean Cream Cheese Garlic Buns.
-
Baking the Buns:
Preheat your oven to 375°F (190°C). While the oven is preheating, I quickly whisk the remaining large egg with a tablespoon of water or milk to create an egg wash. Just before baking, I gently brush the tops of the proofed buns with this egg wash. This gives them a beautiful golden-brown color and a lovely sheen. Bake for 12-18 minutes, or until they are deeply golden brown and sound hollow when tapped on the bottom. Every oven is different, so keep an eye on them. Once baked, transfer the buns to a wire rack to cool completely. Cooling is important; we don’t want to add wet fillings to warm buns, as they can get soggy.
Crafting the Irresistible Cream Cheese Filling
The sweet, tangy cream cheese filling is the heart of these amazing Korean Cream Cheese Garlic Buns. It’s surprisingly simple to make, but the balance of flavors is key.
-
Softening the Cream Cheese:
This step is non-negotiable! I always make sure my full-fat cream cheese is completely softened at room temperature. If it’s too cold, you’ll end up with lumps, and nobody wants lumpy cream cheese in their buns. I usually take it out of the fridge at least an hour or two before I plan to use it.
-
Mixing the Filling:
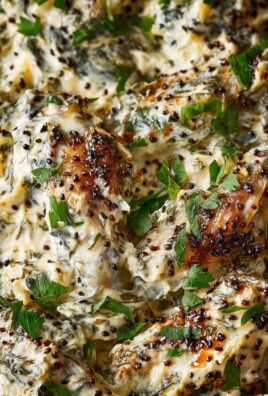
In a medium bowl, I combine the softened cream cheese with the granulated sugar, heavy cream, and vanilla extract. Using an electric hand mixer (or a stand mixer with the paddle attachment), I beat the mixture on medium speed until it’s incredibly smooth, light, and airy. It should be easily pipeable but still hold its shape. Taste it at this point and adjust the sweetness if you like – some prefer it a little tangier, others a bit sweeter. Once ready, I transfer this luscious filling to a piping bag fitted with a round tip (or just snip off the corner of a Ziploc bag).
Whisking Together the Aromatic Garlic Butter Sauce
This garlic butter sauce is where the magic truly happens, transforming simple buns into the crave-worthy Korean Cream Cheese Garlic Buns we all adore. It’s a bold, savory, slightly sweet, and incredibly fragrant glaze that makes these buns unique.
-
Melting the Butter:
In a small saucepan, I gently melt the unsalted butter over low heat. We don’t want to brown it, just get it fully liquid.
-
Infusing the Garlic:
Once the butter is melted, I add my very finely minced garlic. Sometimes, I let it gently warm through in the butter for a minute off the heat to slightly soften and release its potent aroma. Be careful not to cook the garlic until it browns, as this can lead to a bitter taste. We want that fresh, pungent garlic flavor.
-
Combining All Ingredients:
Remove the saucepan from the heat. I then whisk in the milk, the single large egg yolk, honey (or maple syrup), dried parsley flakes, salt, and freshly ground black pepper. I whisk vigorously until the mixture is beautifully emulsified and looks uniform. The egg yolk helps create a richer, shinier sauce and also acts as an emulsifier, while the honey balances the savory notes with a touch of sweetness. The milk ensures a pourable consistency, making it easy to generously coat our buns. Don’t be shy with the garlic here; it’s the star of the show!
Assembling and Baking Your Perfect Korean Cream Cheese Garlic Buns
This is where all our hard work comes together! The assembly is quick and fun, leading to an incredibly satisfying finished product.
-
Preparing the Buns for Filling:
Take your cooled brioche buns. Using a sharp serrated knife, I cut each bun into 6 or 8 equal wedges, depending on the size of the bun. It’s crucial not to cut all the way through the bun; you want the bottom to remain intact, acting as a base. Imagine cutting it like a flower or star shape, creating pockets for the filling. Each cut should go almost to the center, creating deep crevices that will hold both the cream cheese and the garlic butter.
-
Piping the Cream Cheese Filling:
Now, grab your piping bag filled with the cream cheese mixture. I generously pipe the filling into each of the cuts you just made in the buns. Don’t be shy! You want a good amount of that creamy goodness in every bite. I also like to pipe a little dollop right in the center of the bun where all the cuts meet. This ensures every piece has a wonderful cream cheese surprise.
-
Drenching in Garlic Butter:
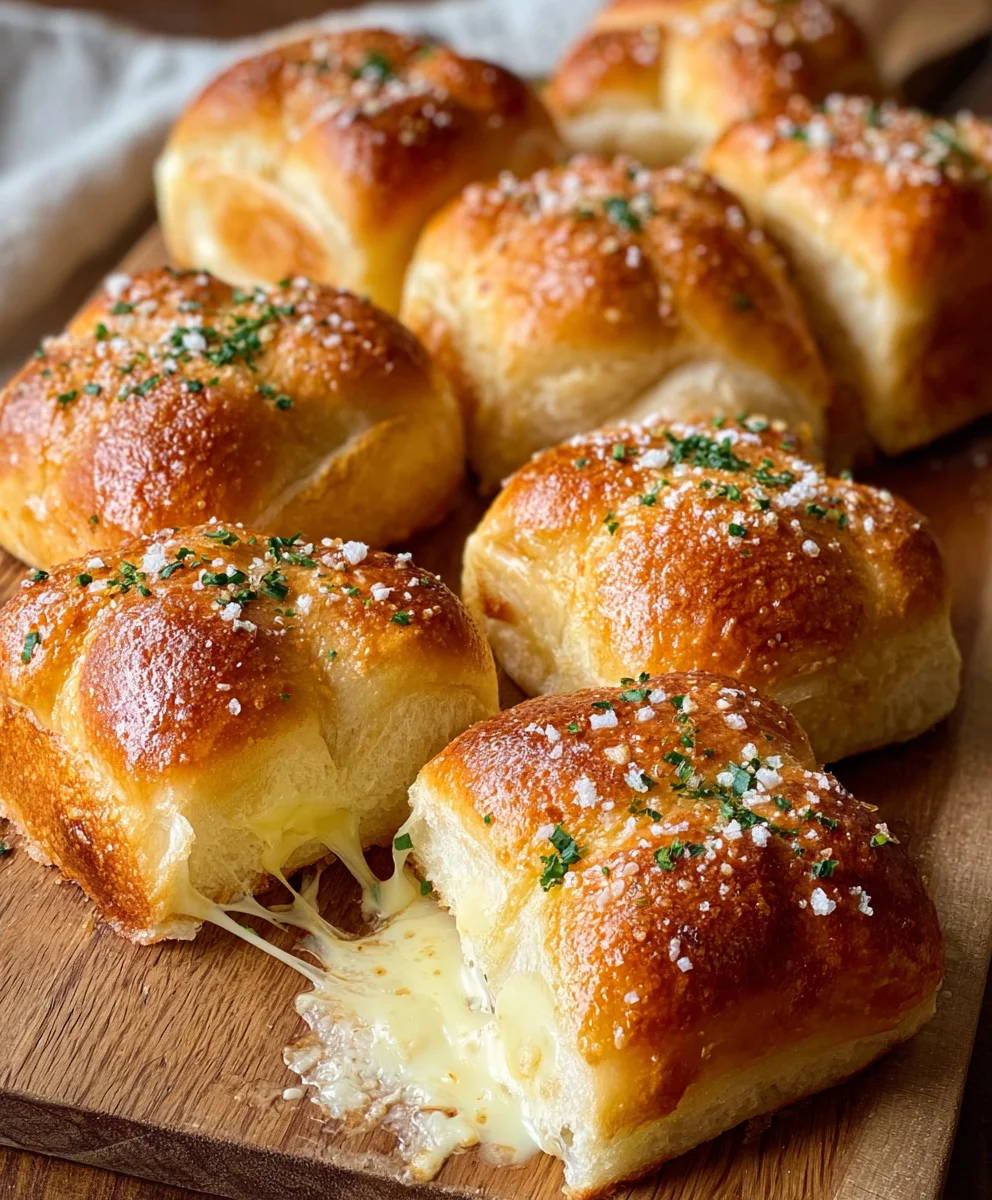
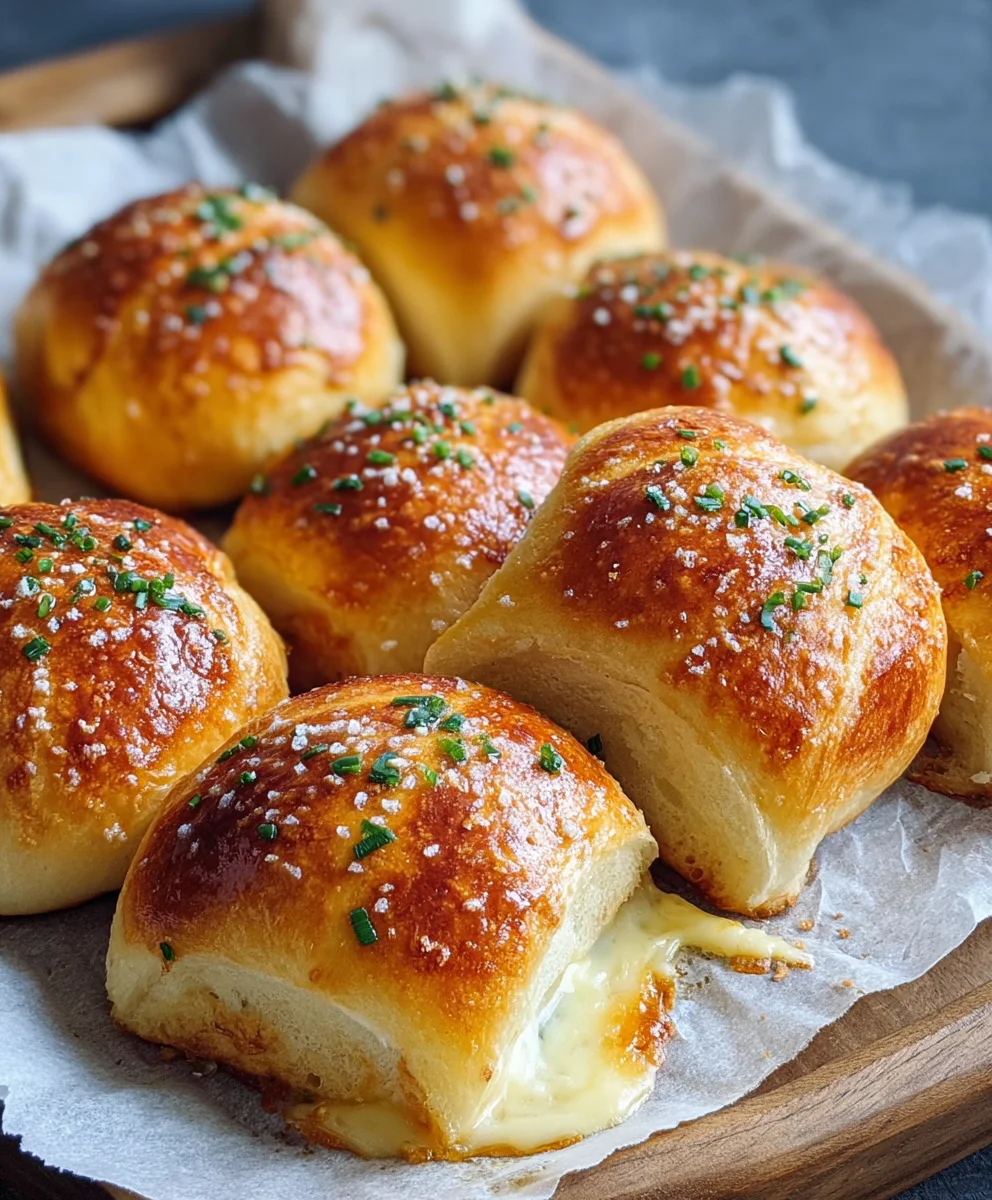
Place your filled buns on a clean baking sheet lined with parchment paper. This is the fun (and slightly messy) part! Take your aromatic garlic butter sauce. You can either dip each bun directly into the sauce, making sure to fully coat all the cut sides and the top, or spoon the sauce very generously over each bun. I prefer to spoon it, making sure to get plenty of the sauce to drip down into the cream cheese-filled crevices. We want every surface drenched in that garlicky goodness. Don’t leave any surface untouched; this is what makes them truly incredible Korean Cream Cheese Garlic Buns.
-
Final Bake:
Preheat your oven to 350°F (175°C). Pop the drenched buns back into the oven for a quick 8-10 minutes. This short bake time serves a few purposes: it warms the buns through, slightly melts the cream cheese, and allows the garlic butter to really soak into the bun and get deliciously fragrant. You’ll know they’re ready when the garlic butter is bubbling slightly and the buns look extra glossy and irresistible.
-
Garnishing and Serving:
Once out of the oven, transfer the hot Korean Cream Cheese Garlic Buns to a wire rack. While they’re still warm, I generously sprinkle them with finely chopped fresh parsley. This not only adds a beautiful pop of color but also a fresh herbaceous counterpoint to the rich flavors. If you like, a sprinkle of sesame seeds can also add a nice textural element. Serve these immediately, while they are warm and the flavors are at their peak. These buns are best enjoyed fresh, though leftovers can be gently reheated in a low oven or air fryer. Get ready for a flavor explosion!
Conclusion:
And there you have it, my dear friends! We’ve reached the culmination of our delicious journey, and I genuinely hope you’re as excited as I am about the prospect of bringing these incredible Korean Cream Cheese Garlic Buns into your kitchen. This isn’t just another bread recipe; it’s an experience, a symphony of textures and flavors that will undoubtedly elevate your home baking game. Imagine biting into a perfectly golden, slightly crispy bun, giving way to an unbelievably soft, fluffy interior. Then, you encounter the generous, tangy-sweet embrace of cream cheese, perfectly balanced by the intensely aromatic, savory garlic butter. It’s a harmonious blend that creates an utterly addictive treat, unlike anything you’ve had before. This recipe is a must-try because it delivers on every single promise: gourmet quality, incredible flavor, and a uniquely satisfying homemade touch that makes it feel extra special.
You’re about to discover your new favorite indulgence.
These buns are incredibly versatile and perfect for so many occasions. While they are phenomenal straight out of the oven, perhaps for a decadent brunch spread alongside a strong cup of coffee or a refreshing iced tea, their charm extends far beyond that. Picture them as an impressive appetizer at your next gathering, guaranteed to disappear faster than you can say “garlic bread.” They make a fantastic side dish for almost any meal, from a simple bowl of soup to a more elaborate weeknight dinner. I’ve even enjoyed them as a satisfying afternoon snack when that sweet and savory craving hits just right. For a truly authentic experience, serve them alongside a classic Korean dish like bulgogi or tteokbokki; the contrast of flavors is simply divine. They also pair wonderfully with a crisp, light salad, offering a delightful counterpoint to fresh greens. Don’t underestimate their power as a thoughtful gift for friends and family; nothing says “I care” quite like homemade baked goods, especially ones this delicious.
Make These Buns Uniquely Yours!
One of the joys of cooking is making a recipe your own, and these buns offer plenty of room for creative twists. Feeling a little adventurous? Try adding some finely chopped fresh chives or dill to your cream cheese filling for an herby kick that adds another layer of freshness. For those who love a bit of heat, a pinch of red pepper flakes in the garlic butter or even mixed into the cream cheese can provide a lovely, subtle warmth. If you want to enhance the sweetness, a drizzle of honey or maple syrup over the top after baking, or even incorporated into the garlic butter, can create a truly indulgent treat. Experiment with different cheeses too! While cream cheese is the star, a small amount of grated mozzarella or Parmesan blended into the filling can add an extra savory depth and a delightful stretchy texture when warm. For a richer, brioche-like bun, you could even try using a different type of enriched dough, or for a quicker alternative, pre-made dinner rolls can be adapted, though they might not achieve the exact signature chewiness of a scratch-made bun. And for my plant-based friends, rest assured that this recipe is easily adaptable with high-quality vegan cream cheese and butter alternatives, ensuring everyone can enjoy this delightful creation.
So, what are you waiting for? I truly believe that once you try this recipe, it will become a cherished favorite in your culinary repertoire. It’s an opportunity to create something truly spectacular in your own kitchen, something that will impress and delight everyone who tastes it, including yourself! The process is incredibly rewarding, and the end result is pure bliss. Please, don’t hesitate to dive in and give these exquisite buns a go. I’d be absolutely thrilled to hear about your baking adventures. Once you’ve made your batch, snap a photo and share your experience. Did you add a unique twist? What did your family and friends think? Your feedback and creative takes inspire me and the entire baking community.
I truly can’t wait to hear about your experience! Happy baking, and enjoy every single delicious bite!
Korean Cream Cheese Garlic Buns
Pillowy sweet rolls stuffed with tangy cream cheese and drenched in garlicky butter create something that’s hard to classify but impossible to stop eating. I stumbled on these last summer when looking through recipes online and thought the combination sounded bizarre enough to try. That first batch disappeared so quickly I barely got one myself! There’s something magical about pulling them from the oven all golden and bubbling, with that cream cheese oozing from the cracks and the whole kitchen smelling like garlic heaven.
Ingredients
-
3 ½ cups (420g) all-purpose flour
-
¼ cup (50g) granulated sugar (for dough)
-
2 ¼ tsp (7g) active dry yeast
-
1 tsp (6g) fine sea salt
-
¾ cup (180ml) warm milk (105-115°F / 40-46°C)
-
2 large eggs (for dough), plus 1 egg for egg wash
-
6 tbsp (85g) unsalted butter, softened, cubed (for dough)
-
8 oz (226g) cream cheese, full-fat, softened
-
¼ cup (50g) granulated sugar (for filling)
-
2 tbsp (30ml) heavy cream
-
½ tsp vanilla extract
-
½ cup (113g) unsalted butter, melted (for sauce)
-
5-6 cloves garlic (approx. 2 tbsp), very finely minced
-
¼ cup (60ml) milk (for sauce)
-
1 large egg yolk
-
2 tbsp (30ml) honey or maple syrup
-
1 tbsp dried parsley flakes
-
½ tsp salt (for sauce)
-
¼ tsp black pepper, freshly ground
-
Fresh parsley, finely chopped (for garnish)
-
Sesame seeds (optional, for garnish)
Instructions
-
Step 1
In a small bowl, combine warm milk, a pinch of sugar, and yeast. Let sit for 5-10 minutes until foamy. -
Step 2
In a stand mixer with a dough hook, combine flour, remaining granulated sugar, and salt. Add activated yeast mixture and 2 eggs. Mix on low until shaggy. Gradually add softened butter, then knead on medium-low for 8-10 minutes until smooth and elastic. -
Step 3
Lightly grease a bowl, place dough in it, turn to coat. Cover and let rise in a warm, draft-free spot for 1.5-2 hours, or until doubled in size. -
Step 4
Punch down dough. Divide into 6-8 equal portions and shape each into a tight ball. Place on a parchment-lined baking sheet, spaced apart. -
Step 5
Cover loosely and let rise for 45-60 minutes, or until puffed. -
Step 6
Preheat oven to 375°F (190°C). Whisk 1 egg with 1 tbsp water/milk for egg wash. Brush buns with egg wash and bake for 12-18 minutes until golden brown. Transfer to a wire rack to cool completely. -
Step 7
Ensure cream cheese is softened. In a bowl, combine softened cream cheese, ¼ cup granulated sugar, heavy cream, and vanilla extract. Beat until smooth, light, and airy. Transfer to a piping bag. -
Step 8
Melt ½ cup unsalted butter in a small saucepan. Add minced garlic and warm gently for a minute (do not brown). Remove from heat and whisk in ¼ cup milk, egg yolk, honey, dried parsley, ½ tsp salt, and black pepper until well combined. -
Step 9
Once buns are cooled, use a serrated knife to cut each bun into 6-8 wedges, leaving the bottom intact. Generously pipe cream cheese filling into each cut and a dollop in the center. -
Step 10
Place filled buns on a parchment-lined baking sheet. Generously spoon or dip each bun into the garlic butter sauce. Preheat oven to 350°F (175°C) and bake for 8-10 minutes until bubbling and glossy. -
Step 11
Transfer to a wire rack. Garnish with fresh chopped parsley and optional sesame seeds. Serve warm.
Important Information
Nutrition Facts (Per Serving)
It is important to consider this information as approximate and not to use it as definitive health advice.
Allergy Information
Please check ingredients for potential allergens and consult a health professional if in doubt.


Leave a Comment