

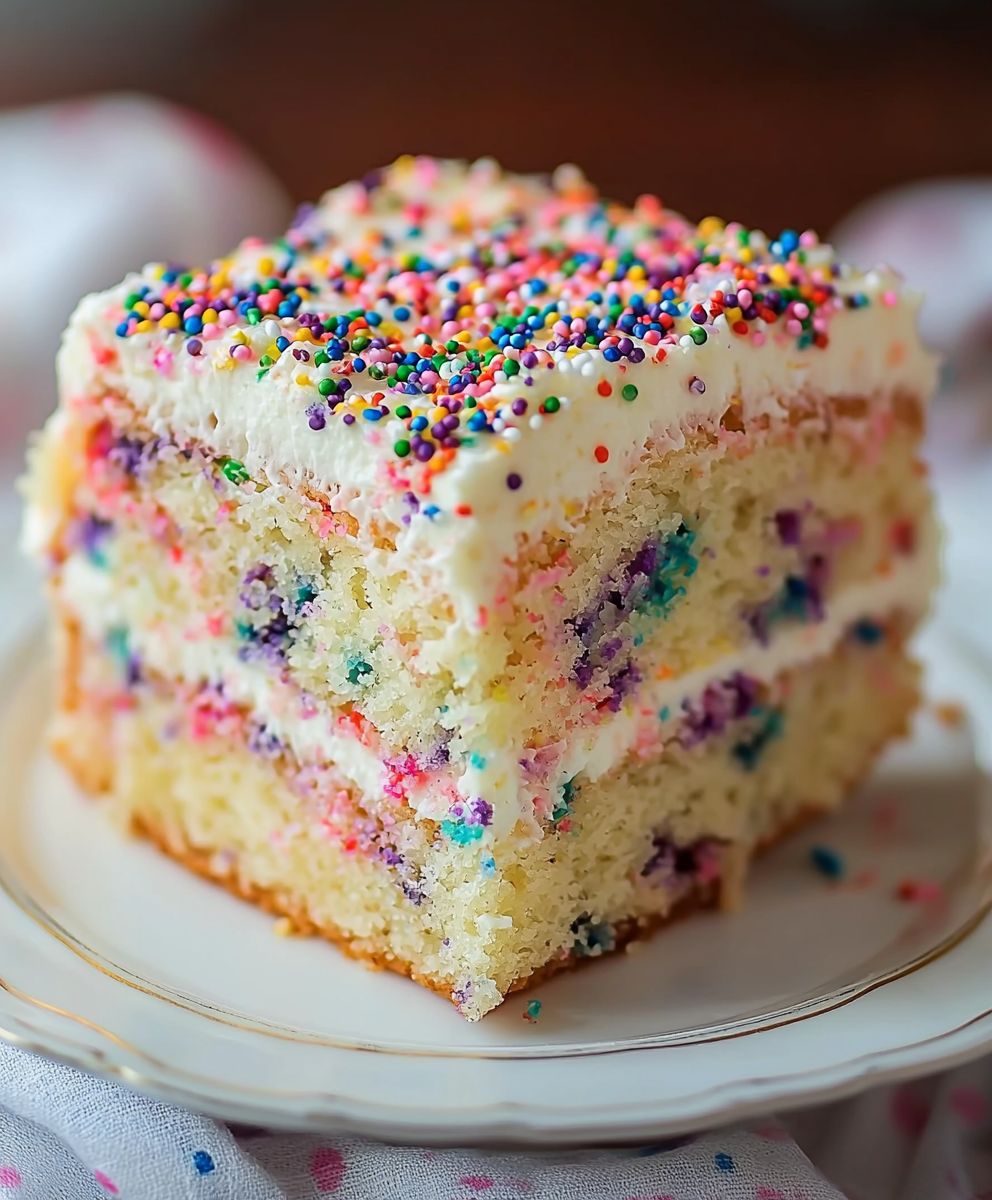
Homemade Funfetti Cake: Just the name conjures up images of birthday parties, childhood joy, and a kaleidoscope of colorful sprinkles! But what if I told you that you could recreate that nostalgic magic in your own kitchen, with a cake that tastes even better than the store-bought version? Forget dry, crumbly cakes we’re talking about a moist, tender, and utterly irresistible treat that will have everyone begging for seconds.
While the exact origins of Funfetti cake are debated, its popularity exploded in the late 1980s, quickly becoming a staple at celebrations. It’s more than just a cake; it’s a symbol of fun and festivity. The simple addition of sprinkles transforms a classic vanilla cake into something truly special, a visual delight that sparks joy with every slice.
People adore Homemade Funfetti Cake for its delightful combination of flavors and textures. The vanilla base provides a comforting sweetness, while the sprinkles add a playful crunch and bursts of color. It’s a cake that appeals to all ages, from the youngest party-goers to the young at heart. Plus, making it from scratch allows you to control the ingredients, ensuring a higher quality and more delicious final product. So, let’s ditch the boxed mix and embark on a baking adventure to create the ultimate Homemade Funfetti Cake!

Ingredients:
- For the Cake:
- 2 ½ cups all-purpose flour
- 1 tablespoon baking powder
- ½ teaspoon baking soda
- ½ teaspoon salt
- 1 cup (2 sticks) unsalted butter, softened
- 1 ¾ cups granulated sugar
- 3 large eggs
- 1 tablespoon vanilla extract
- 1 ¼ cups buttermilk
- ½ cup rainbow sprinkles, plus more for decorating
- For the Vanilla Buttercream Frosting:
- 1 cup (2 sticks) unsalted butter, softened
- 4 cups powdered sugar
- ¼ cup milk, plus more as needed
- 2 teaspoons vanilla extract
- Pinch of salt
Preparing the Cake Batter:
- Preheat and Prep: First things first, preheat your oven to 350°F (175°C). Grease and flour two 9-inch round cake pans. You can also line the bottoms with parchment paper rounds for extra insurance against sticking. I find this really helps!
- Dry Ingredients: In a large bowl, whisk together the flour, baking powder, baking soda, and salt. Whisking is key here to ensure everything is evenly distributed. Nobody wants a pocket of baking soda in their cake!
- Cream Butter and Sugar: In a separate large bowl (or the bowl of your stand mixer), cream together the softened butter and granulated sugar until light and fluffy. This usually takes about 3-5 minutes. Don’t rush this step; it’s crucial for a tender cake. The mixture should be noticeably lighter in color and texture.
- Add Eggs and Vanilla: Beat in the eggs one at a time, making sure each egg is fully incorporated before adding the next. Then, stir in the vanilla extract.
- Alternate Wet and Dry Ingredients: Gradually add the dry ingredients to the wet ingredients, alternating with the buttermilk. Begin and end with the dry ingredients. I usually do it in three additions of dry ingredients and two additions of buttermilk. So, add about a third of the dry ingredients and mix until just combined. Then, add half of the buttermilk and mix until just combined. Repeat with another third of the dry ingredients, the remaining buttermilk, and finish with the last third of the dry ingredients. Be careful not to overmix! Overmixing develops the gluten in the flour, which can lead to a tough cake.
- Fold in Sprinkles: Gently fold in the rainbow sprinkles. Don’t overmix at this point, just enough to distribute the sprinkles evenly throughout the batter.
- Divide and Bake: Divide the batter evenly between the prepared cake pans. Bake for 30-35 minutes, or until a toothpick inserted into the center comes out clean. The tops of the cakes should be lightly golden brown.
- Cool Completely: Let the cakes cool in the pans for 10 minutes before inverting them onto a wire rack to cool completely. Make sure they are completely cool before frosting, or the frosting will melt! This is a crucial step that many people skip, but trust me, it’s worth the wait.
Making the Vanilla Buttercream Frosting:
- Cream Butter: In a large bowl (or the bowl of your stand mixer), beat the softened butter until smooth and creamy. This usually takes about 2-3 minutes.
- Add Powdered Sugar: Gradually add the powdered sugar, one cup at a time, beating on low speed until combined. Be careful not to add it all at once, or you’ll end up with a powdered sugar cloud!
- Add Milk and Vanilla: Add the milk and vanilla extract and beat on medium speed until light and fluffy. If the frosting is too thick, add more milk, one tablespoon at a time, until you reach your desired consistency. If it’s too thin, add more powdered sugar, one tablespoon at a time.
- Add Salt: Stir in a pinch of salt to balance the sweetness.
Assembling and Decorating the Cake:
- Level the Cakes: If the cakes have domed on top, use a serrated knife to level them. This will ensure that your cake is stable and doesn’t wobble.
- First Layer of Frosting: Place one cake layer on a serving plate or cake stand. Spread a generous layer of frosting evenly over the top.
- Second Layer: Carefully place the second cake layer on top of the frosting.
- Crumb Coat: Apply a thin layer of frosting over the entire cake. This is called a crumb coat, and it’s designed to trap any loose crumbs and prevent them from getting into your final layer of frosting. Refrigerate the cake for 15-20 minutes to allow the crumb coat to set.
- Final Frosting: Apply a final, thicker layer of frosting over the entire cake. Smooth the frosting with a spatula or knife. You can create swirls or patterns if you like.
- Decorate: Decorate the cake with extra rainbow sprinkles. You can sprinkle them all over the top and sides, or create a pattern. Get creative!
- Chill (Optional): Refrigerate the cake for at least 30 minutes before serving. This will help the frosting set and make the cake easier to slice.
Tips for Success:
- Room Temperature Ingredients: Using room temperature ingredients, especially butter and eggs, is crucial for a smooth and even batter. Room temperature ingredients emulsify better, resulting in a more tender and moist cake.
- Don’t Overmix: Overmixing the batter develops the gluten in the flour, which can lead to a tough cake. Mix until just combined.
- Accurate Oven Temperature: Make sure your oven is accurately calibrated. An oven thermometer can help with this.
- Cooling Completely: Let the cakes cool completely before frosting. This prevents the frosting from melting and sliding off the cake.
- Crumb Coat is Key: Don’t skip the crumb coat! It’s essential for a smooth and professional-looking finish.
- Adjust Sweetness: If you prefer a less sweet frosting, reduce the amount of powdered sugar.
- Sprinkle Placement: For a more even sprinkle distribution, gently press the sprinkles into the frosting with your hands.
Variations:
- Chocolate Funfetti: Add ¼ cup of cocoa powder to the dry ingredients for a chocolate version.
- Different Sprinkles: Use different types of sprinkles, such as chocolate sprinkles, jimmies, or nonpareils.
- Flavored Frosting: Add different extracts to the frosting, such as almond extract, lemon extract, or peppermint extract.
- Layered Filling: Add a layer of fruit filling, such as raspberry jam or strawberry preserves, between the cake layers.
- Ombre Frosting: Divide the frosting into several bowls and tint each bowl a different shade of the same color. Use the different shades to create an ombre effect on the cake.
Storage Instructions:
- Room Temperature: Store the cake at room temperature in an airtight container for up to 3 days.
- Refrigerator: Store the cake in the refrigerator for up to 5 days.
- Freezer: Freeze the cake for up to 2 months. Wrap the cake tightly in plastic wrap and then in aluminum foil. Thaw in the refrigerator overnight before serving.
This recipe is a classic for a reason! It’s fun, festive, and always a crowd-pleaser. Enjoy baking!
Conclusion:
This Homemade Funfetti Cake isn’t just a dessert; it’s a celebration in every bite! From the vibrant sprinkles dancing throughout the moist, tender crumb to the sweet, creamy frosting, this cake is guaranteed to bring a smile to your face. I truly believe this recipe is a must-try for anyone looking to add a little extra joy to their day, whether it’s a birthday, a holiday, or simply a “just because” occasion.
What makes this cake so special is its simplicity and the sheer delight it evokes. It’s a classic for a reason, and this homemade version elevates it to a whole new level. Forget the boxed mixes the fresh ingredients and from-scratch approach make all the difference. You’ll taste the love and care in every slice, and your family and friends will undoubtedly appreciate the effort.
But the fun doesn’t stop there! This recipe is incredibly versatile, offering endless possibilities for customization. Feeling adventurous? Try swapping out the vanilla extract for almond extract for a subtle, nutty flavor. Or, add a layer of raspberry jam between the cake layers for a burst of fruity sweetness. For a truly decadent experience, consider using a cream cheese frosting instead of the classic buttercream.
Serving suggestions are just as varied. A simple dusting of powdered sugar is always elegant, or you can go all out with extra sprinkles, edible glitter, and even mini marshmallows. Pair a slice with a scoop of vanilla ice cream or a dollop of whipped cream for an extra-special treat. And don’t forget the candles if you’re celebrating a birthday!
Beyond the basic cake, you can adapt this recipe to create cupcakes, cake pops, or even a funfetti-inspired trifle. The possibilities are truly endless! Imagine adorable funfetti cupcakes for a school bake sale or elegant cake pops for a wedding shower. This recipe is a blank canvas for your creativity.
I poured my heart into perfecting this Homemade Funfetti Cake recipe, and I’m confident that you’ll love it as much as I do. It’s a recipe that’s meant to be shared, enjoyed, and celebrated. So, gather your ingredients, preheat your oven, and get ready to bake some magic!
I’m so excited for you to try this recipe and experience the joy of homemade funfetti. Once you’ve had a chance to bake it, please come back and share your experience in the comments below. I’d love to hear about your variations, serving suggestions, and any tips or tricks you discovered along the way. Did you add a special ingredient? Did you try a different frosting? Let me know! Your feedback is invaluable and helps me continue to improve and create even more delicious recipes for you to enjoy. Happy baking, and may your days be filled with sprinkles and smiles! I can’t wait to hear all about your funfetti adventures. Don’t forget to tag me in your photos on social media I’d love to see your creations!
Homemade Funfetti Cake: The Ultimate Recipe for a Perfect Celebration
Moist vanilla cake with rainbow sprinkles and creamy vanilla buttercream frosting. Perfect for celebrations!
Ingredients
- 2 ½ cups all-purpose flour
- 1 tablespoon baking powder
- ½ teaspoon baking soda
- ½ teaspoon salt
- 1 cup (2 sticks) unsalted butter, softened
- 1 ¾ cups granulated sugar
- 3 large eggs
- 1 tablespoon vanilla extract
- 1 ¼ cups buttermilk
- ½ cup rainbow sprinkles, plus more for decorating
- 1 cup (2 sticks) unsalted butter, softened
- 4 cups powdered sugar
- ¼ cup milk, plus more as needed
- 2 teaspoons vanilla extract
- Pinch of salt
Instructions
- Preheat your oven to 350°F (175°C). Grease and flour two 9-inch round cake pans. You can also line the bottoms with parchment paper rounds for extra insurance against sticking.
- In a large bowl, whisk together the flour, baking powder, baking soda, and salt.
- In a separate large bowl (or the bowl of your stand mixer), cream together the softened butter and granulated sugar until light and fluffy (3-5 minutes).
- Beat in the eggs one at a time, making sure each egg is fully incorporated before adding the next. Then, stir in the vanilla extract.
- Gradually add the dry ingredients to the wet ingredients, alternating with the buttermilk. Begin and end with the dry ingredients. Add about a third of the dry ingredients and mix until just combined. Then, add half of the buttermilk and mix until just combined. Repeat with another third of the dry ingredients, the remaining buttermilk, and finish with the last third of the dry ingredients. Be careful not to overmix!
- Gently fold in the rainbow sprinkles. Don’t overmix at this point, just enough to distribute the sprinkles evenly throughout the batter.
- Divide the batter evenly between the prepared cake pans. Bake for 30-35 minutes, or until a toothpick inserted into the center comes out clean.
- Let the cakes cool in the pans for 10 minutes before inverting them onto a wire rack to cool completely. Make sure they are completely cool before frosting, or the frosting will melt!
- In a large bowl (or the bowl of your stand mixer), beat the softened butter until smooth and creamy (2-3 minutes).
- Gradually add the powdered sugar, one cup at a time, beating on low speed until combined.
- Add the milk and vanilla extract and beat on medium speed until light and fluffy. If the frosting is too thick, add more milk, one tablespoon at a time, until you reach your desired consistency. If it’s too thin, add more powdered sugar, one tablespoon at a time.
- Stir in a pinch of salt to balance the sweetness.
- If the cakes have domed on top, use a serrated knife to level them.
- Place one cake layer on a serving plate or cake stand. Spread a generous layer of frosting evenly over the top.
- Carefully place the second cake layer on top of the frosting.
- Apply a thin layer of frosting over the entire cake. Refrigerate the cake for 15-20 minutes to allow the crumb coat to set.
- Apply a final, thicker layer of frosting over the entire cake. Smooth the frosting with a spatula or knife. You can create swirls or patterns if you like.
- Decorate the cake with extra rainbow sprinkles. You can sprinkle them all over the top and sides, or create a pattern. Get creative!
- Refrigerate the cake for at least 30 minutes before serving. This will help the frosting set and make the cake easier to slice.
Notes
- Using room temperature ingredients, especially butter and eggs, is crucial for a smooth and even batter.
- Don’t overmix the batter. Mix until just combined.
- Make sure your oven is accurately calibrated.
- Let the cakes cool completely before frosting.
- Don’t skip the crumb coat!
- If you prefer a less sweet frosting, reduce the amount of powdered sugar.
- For a more even sprinkle distribution, gently press the sprinkles into the frosting with your hands.
Leave a Comment