

Homemade Apple Pie Filling is a delightful way to capture the essence of autumn in a jar. There’s something truly magical about the aroma of cinnamon and baked apples wafting through the kitchen, evoking memories of family gatherings and cozy evenings. This recipe not only brings a taste of nostalgia but also allows you to create a filling that is far superior to anything store-bought. The rich history of apple pie in American culture speaks to its significance as a symbol of comfort and tradition, making it a beloved dish for many. People adore this Homemade Apple Pie Filling for its perfect balance of sweet and tart flavors, its luscious texture, and the convenience it offers for quick desserts. Whether youre preparing a classic pie or using it as a topping for ice cream, this filling is sure to impress!

Ingredients:
- 6 to 8 medium-sized apples (I prefer a mix of Granny Smith and Honeycrisp for the perfect balance of tart and sweet)
- 1 cup granulated sugar (adjust based on the sweetness of your apples)
- 2 tablespoons lemon juice (freshly squeezed for the best flavor)
- 1 teaspoon ground cinnamon (or more if you love that warm spice)
- 1/4 teaspoon ground nutmeg (optional, but it adds a lovely depth)
- 1/4 teaspoon salt (to enhance the flavors)
- 2 tablespoons cornstarch (for thickening the filling)
- 1 tablespoon unsalted butter (to add richness)
- 1 teaspoon vanilla extract (for a hint of sweetness)
Preparing the Apples
- Start by washing the apples thoroughly under cold water to remove any dirt or wax.
- Peel the apples using a vegetable peeler. I find it easier to hold the apple in one hand and peel with the other.
- Once peeled, core the apples using an apple corer or a knife. Cut them into thin slices, about 1/4 inch thick. This ensures they cook evenly.
- As you slice the apples, place them in a large mixing bowl. To prevent browning, drizzle the lemon juice over the sliced apples and toss them gently.
Mixing the Filling
- In a separate bowl, combine the granulated sugar, ground cinnamon, ground nutmeg, salt, and cornstarch. Whisk them together until well blended.
- Sprinkle the sugar mixture over the sliced apples. Gently toss the apples to coat them evenly with the mixture. I like to use my hands for this, as it allows me to feel if all the apples are coated.
- Let the apple mixture sit for about 10-15 minutes. This allows the apples to release some of their juices, which will help create a delicious filling.
Cooking the Filling
- In a large skillet, melt the unsalted butter over medium heat. I love the smell of butter melting; its the start of something delicious!
- Once the butter is melted, add the apple mixture to the skillet. Stir gently to combine the apples with the melted butter.
- Cook the apples for about 5-7 minutes, stirring occasionally. You want them to soften but not become mushy. The goal is to have them tender yet still holding their shape.
- After the apples have softened, remove the skillet from the heat. Stir in the vanilla extract for that extra layer of flavor.
- Let the filling cool for a few minutes before using it in your pie or storing it. This cooling step is crucial if youre planning to use it right away, as it will help prevent a soggy crust.
Assembling the Pie
- If youre using a store-bought pie crust, roll it out according to the package instructions. If youre making your own, roll out the bottom crust and place it in a 9-inch pie dish.
- Pour the cooled apple filling into the pie crust, spreading it evenly. Make sure to include all the delicious juices that have accumulated!
- If youre using a top crust, roll it out and place it over the filling. You can either cut slits for a lattice top or simply cover it with a whole crust. If you opt for a whole crust, make sure to cut a few slits in the top to allow steam to escape.
- Crimp the edges of the pie crust together to seal it. I like to use my fingers to create a decorative edge, but you can also use a fork for a simpler look.
- Brush the top crust with an egg wash (1 egg beaten with a tablespoon of water) for a beautiful golden finish. You can also sprinkle a little sugar on top for added sweetness and crunch.
Baking the Pie
- Preheat your oven to 425°F (220°C). This high temperature helps to create a flaky crust.
- Place the assembled
Conclusion:
In conclusion, this homemade apple pie filling is truly a must-try for anyone who loves the comforting taste of fresh-baked desserts. The combination of sweet, tart apples with warm spices creates a flavor profile that is simply irresistible. Whether youre preparing a classic apple pie, a delicious crisp, or even using it as a topping for pancakes or ice cream, this filling will elevate your dish to new heights. Feel free to get creative with your serving suggestions! You can mix in some cranberries for a tart twist, add a sprinkle of nuts for crunch, or even swap out some of the apples for pears for a unique flavor. The possibilities are endless, and I encourage you to experiment with different variations to find your perfect blend. I cant wait for you to try this homemade apple pie filling! Its a delightful way to bring a taste of fall into your kitchen, no matter the season. Once youve made it, please share your experience and any personal touches you added. Id love to hear how it turned out for you! So grab those apples and get cookingthis recipe is sure to become a cherished favorite in your home. Print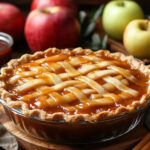
Homemade Apple Pie Filling: The Ultimate Guide to Perfecting Your Recipe
- Total Time: 35 minutes
- Yield: 1 pie (serves 8)
Description
This delicious apple pie filling combines tart Granny Smith apples with sweet Honeycrisp, enhanced by warm spices and a hint of vanilla. It’s perfect for your favorite pie or as a delightful topping for desserts!
Ingredients
- Granny Smith apples
- Honeycrisp apples
- Sugar
- Brown sugar (optional)
- Cinnamon
- Nutmeg
- Vanilla extract
- Lemon juice
Instructions
- Bake the pie in the preheated oven for 45-50 minutes, or until the crust is golden brown and the filling is bubbling.
- Once baked, remove the pie from the oven and let it cool for at least 2 hours before slicing. This allows the filling to set properly.
Notes
- Feel free to adjust the sugar based on the sweetness of your apples.
- For a more complex flavor, consider adding a tablespoon of brown sugar to the filling.
- This filling can also be used for apple crisps or as a topping for pancakes and waffles!
- Prep Time: 20 minutes
- Cook Time: 50 minutes


Leave a Comment