

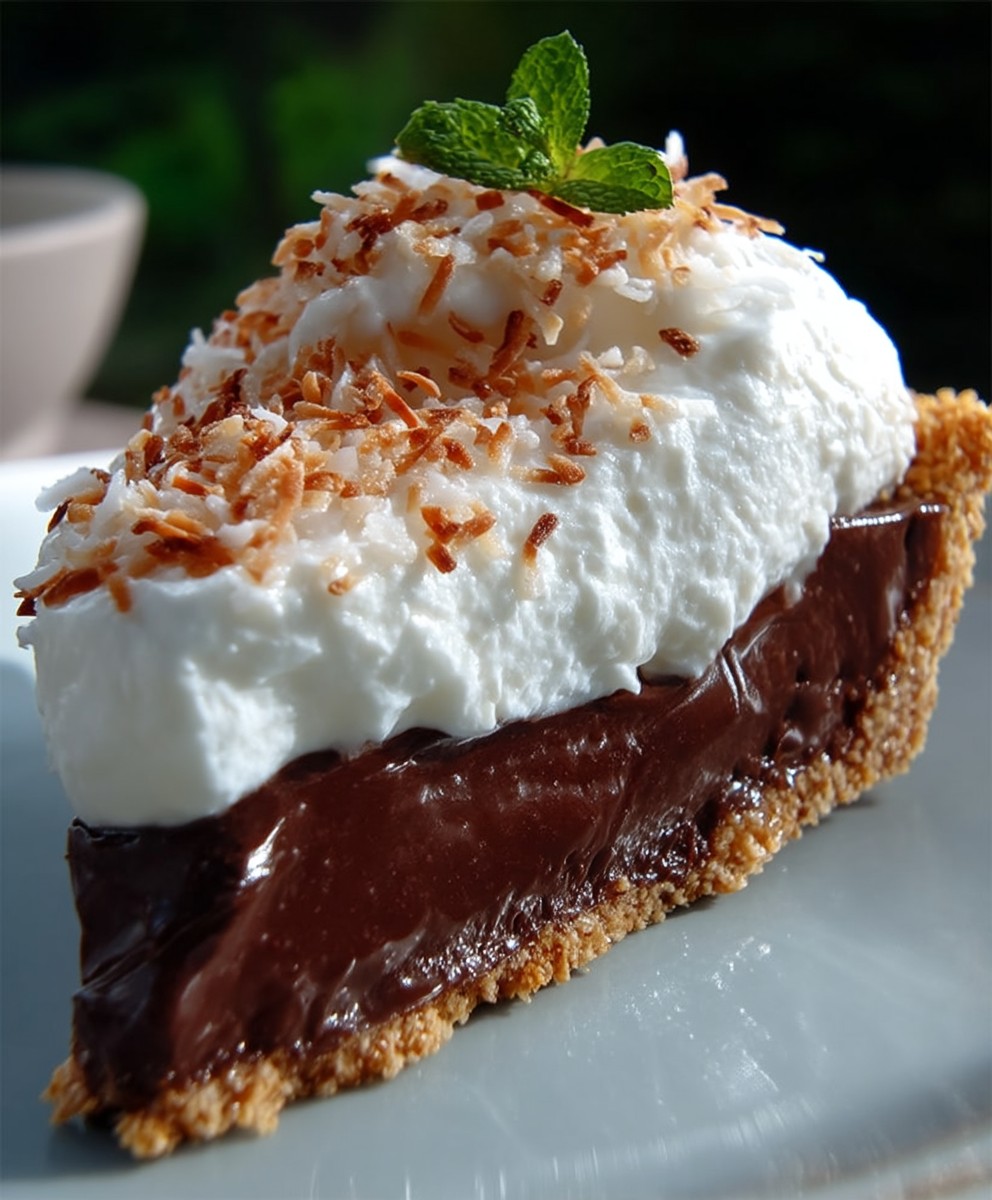
Haupia Chocolate Pie: Prepare to be transported to a tropical paradise with every single bite! Imagine the silkiest, most decadent chocolate filling nestled beneath a layer of creamy, coconutty haupia. This isn’t just dessert; it’s an experience, a mini-vacation for your taste buds.
Haupia, a traditional Hawaiian coconut pudding, has been a beloved part of island culture for generations. Often served at luaus and special occasions, its delicate sweetness and smooth texture are instantly comforting. By combining it with rich chocolate in a pie, we’re creating a fusion of flavors that’s both familiar and exciting.
What makes this Haupia Chocolate Pie so irresistible? It’s the perfect balance of textures the crisp, buttery crust, the smooth chocolate ganache, and the melt-in-your-mouth haupia topping. The contrasting flavors of rich dark chocolate and sweet coconut create a symphony in your mouth. Plus, it’s surprisingly easy to make! While it looks impressive, this pie is a showstopper that anyone can master. Get ready to impress your friends and family with this unforgettable dessert!

Ingredients:
- For the Crust:
- 1 ½ cups all-purpose flour
- ½ teaspoon salt
- ½ cup (1 stick) cold unsalted butter, cut into cubes
- ¼ cup cold vegetable shortening, cut into cubes
- 5-7 tablespoons ice water
- For the Chocolate Filling:
- 4 ounces bittersweet chocolate, finely chopped
- 1 cup heavy cream
- 2 large egg yolks
- ¼ cup granulated sugar
- 1 teaspoon vanilla extract
- Pinch of salt
- For the Haupia Filling:
- 1 (13.5 ounce) can full-fat coconut milk
- ¼ cup granulated sugar
- ¼ cup cornstarch
- Pinch of salt
- For the Garnish (Optional):
- Whipped cream
- Shaved chocolate
- Toasted coconut flakes
Preparing the Crust:
- Combine Dry Ingredients: In a large bowl, whisk together the flour and salt. This ensures the salt is evenly distributed throughout the flour, which is crucial for flavor.
- Cut in the Fat: Add the cold butter and shortening to the flour mixture. Using a pastry blender or your fingertips, cut the fat into the flour until the mixture resembles coarse crumbs. The key here is to work quickly and keep the fat cold. If the butter melts, the crust will be tough. I like to use my fingertips because I can feel the butter and shortening breaking down, but a pastry blender works just as well.
- Add Ice Water: Gradually add the ice water, one tablespoon at a time, mixing gently after each addition. Continue adding water until the dough just comes together. Be careful not to overmix, as this will develop the gluten and make the crust tough. You want a shaggy dough that holds together when you press it.
- Form the Dough: Turn the dough out onto a lightly floured surface and gently form it into a disc. Wrap the disc tightly in plastic wrap and refrigerate for at least 30 minutes, or up to 2 hours. This chilling time allows the gluten to relax, which will result in a more tender crust.
- Roll Out the Dough: On a lightly floured surface, roll out the dough into a 12-inch circle. The dough should be about 1/8 inch thick. If the dough is sticking, add a little more flour to the surface.
- Transfer to Pie Plate: Carefully transfer the dough to a 9-inch pie plate. Gently press the dough into the bottom and up the sides of the pie plate.
- Crimp the Edges: Crimp the edges of the crust using your fingers or a fork. You can get creative with this step! I like to use a simple fork crimp, but you can also do a more elaborate decorative crimp.
- Pre-bake the Crust: Preheat your oven to 375°F (190°C). Line the crust with parchment paper and fill it with pie weights or dried beans. This will prevent the crust from puffing up during baking. Bake for 15 minutes.
- Remove Weights and Bake Further: Remove the parchment paper and pie weights and bake for another 10-15 minutes, or until the crust is golden brown. Watch it carefully to prevent burning. Let the crust cool completely before filling.
Preparing the Chocolate Filling:
- Heat the Cream: In a small saucepan, heat the heavy cream over medium heat until it just begins to simmer. Do not boil.
- Melt the Chocolate: Place the chopped chocolate in a heatproof bowl. Pour the hot cream over the chocolate and let it sit for 1 minute to soften the chocolate.
- Whisk Until Smooth: Whisk the chocolate and cream together until smooth and glossy. Make sure all the chocolate is melted and there are no lumps.
- Whisk in Egg Yolks and Sugar: In a separate bowl, whisk together the egg yolks and sugar until pale and slightly thickened. This step is important for creating a smooth and creamy filling.
- Temper the Egg Yolks: Slowly drizzle a small amount of the hot chocolate mixture into the egg yolk mixture, whisking constantly. This will temper the egg yolks and prevent them from scrambling when added to the hot chocolate.
- Combine Mixtures: Pour the tempered egg yolk mixture into the remaining hot chocolate mixture and whisk until well combined.
- Add Vanilla and Salt: Stir in the vanilla extract and salt.
- Pour into Crust: Pour the chocolate filling into the cooled pie crust.
- Chill: Refrigerate the pie for at least 2 hours, or until the chocolate filling is set. This allows the filling to firm up and develop its flavor.
Preparing the Haupia Filling:
- Combine Ingredients: In a medium saucepan, whisk together the coconut milk, sugar, cornstarch, and salt. Make sure the cornstarch is fully dissolved to prevent lumps in the haupia.
- Cook Over Medium Heat: Cook the mixture over medium heat, stirring constantly, until it thickens and comes to a simmer. This usually takes about 5-7 minutes. It’s important to stir constantly to prevent the haupia from sticking to the bottom of the pan and burning.
- Simmer and Thicken: Continue to simmer for 1 minute, stirring constantly, until the haupia is very thick. The haupia should be thick enough to coat the back of a spoon.
- Cool Slightly: Remove the haupia from the heat and let it cool slightly for about 10-15 minutes. This will prevent the haupia from melting the chocolate filling when you pour it on top.
- Pour Over Chocolate Filling: Gently pour the slightly cooled haupia over the chilled chocolate filling. Spread it evenly over the surface.
- Chill Again: Refrigerate the pie for at least 2 hours, or until the haupia filling is set. This allows the haupia to firm up and adhere to the chocolate filling.
Assembling and Garnishing:
- Chill Thoroughly: Ensure the pie is thoroughly chilled before serving. This will make it easier to slice and prevent the fillings from running.
- Garnish (Optional): Before serving, garnish the pie with whipped cream, shaved chocolate, and toasted coconut flakes, if desired. These garnishes add a touch of elegance and enhance the flavor of the pie.
- Slice and Serve: Slice the pie into wedges and serve chilled. Enjoy!
Conclusion:
This Haupia Chocolate Pie isn’t just a dessert; it’s a tropical escape on a plate, a harmonious blend of rich chocolate and creamy coconut that will transport your taste buds straight to the islands. I truly believe this recipe is a must-try for anyone who loves a good pie, and especially for those who appreciate the unique flavors of Hawaiian cuisine. The combination of the decadent chocolate crust, the smooth chocolate filling, and the light, airy haupia topping is simply irresistible. It’s a showstopper that’s surprisingly easy to make, and I guarantee it will be the star of any gathering.
But don’t just take my word for it! Imagine serving this pie chilled on a warm summer evening, perhaps with a scoop of vanilla ice cream or a dollop of whipped cream. The cool, creamy texture against the rich chocolate is pure bliss. Or, for a more festive occasion, consider garnishing it with toasted coconut flakes or a drizzle of melted white chocolate. The possibilities are endless!
If you’re feeling adventurous, there are also several variations you can try. For a richer chocolate flavor, use dark chocolate in both the crust and the filling. If you prefer a less intense coconut flavor, you can reduce the amount of coconut milk in the haupia topping. You could even add a layer of macadamia nuts between the chocolate filling and the haupia for a delightful crunch. Another fun idea is to make individual mini pies instead of one large pie perfect for parties or portion control!
I’ve poured my heart into perfecting this recipe, and I’m confident that you’ll love it as much as I do. It’s a guaranteed crowd-pleaser, and it’s sure to become a new family favorite. The beauty of this Haupia Chocolate Pie lies in its simplicity and the way it effortlessly combines familiar flavors with a touch of exotic flair. It’s a dessert that’s both comforting and exciting, perfect for any occasion.
So, what are you waiting for? Gather your ingredients, preheat your oven, and get ready to create a little slice of paradise. I’m so excited for you to try this recipe and experience the magic of haupia and chocolate together.
Once you’ve made your own Haupia Chocolate Pie, I would absolutely love to hear about your experience! Did you make any variations? Did you serve it with anything special? What did your friends and family think? Please share your photos and comments I can’t wait to see your creations and hear your feedback. Your insights will not only help other bakers but also inspire me to continue creating and sharing delicious recipes. Happy baking, and enjoy every bite! Don’t forget to tag me in your social media posts so I can see your amazing creations! Let’s spread the haupia chocolate pie love!
Haupia Chocolate Pie: A Delicious Hawaiian Dessert Recipe
Buttery homemade crust filled with rich chocolate and topped with creamy coconut haupia. A decadent taste of the islands!
Ingredients
- 1 ½ cups all-purpose flour
- ½ teaspoon salt
- ½ cup (1 stick) cold unsalted butter, cut into cubes
- ¼ cup cold vegetable shortening, cut into cubes
- 5-7 tablespoons ice water
- 4 ounces bittersweet chocolate, finely chopped
- 1 cup heavy cream
- 2 large egg yolks
- ¼ cup granulated sugar
- 1 teaspoon vanilla extract
- Pinch of salt
- 1 (13.5 ounce) can full-fat coconut milk
- ¼ cup granulated sugar
- ¼ cup cornstarch
- Pinch of salt
- Whipped cream
- Shaved chocolate
- Toasted coconut flakes
Instructions
- Combine Dry Ingredients: In a large bowl, whisk together the flour and salt.
- Cut in the Fat: Add the cold butter and shortening to the flour mixture. Using a pastry blender or your fingertips, cut the fat into the flour until the mixture resembles coarse crumbs.
- Add Ice Water: Gradually add the ice water, one tablespoon at a time, mixing gently after each addition. Continue adding water until the dough just comes together. Be careful not to overmix.
- Form the Dough: Turn the dough out onto a lightly floured surface and gently form it into a disc. Wrap the disc tightly in plastic wrap and refrigerate for at least 30 minutes, or up to 2 hours.
- Roll Out the Dough: On a lightly floured surface, roll out the dough into a 12-inch circle, about 1/8 inch thick.
- Transfer to Pie Plate: Carefully transfer the dough to a 9-inch pie plate. Gently press the dough into the bottom and up the sides of the pie plate.
- Crimp the Edges: Crimp the edges of the crust using your fingers or a fork.
- Pre-bake the Crust: Preheat your oven to 375°F (190°C). Line the crust with parchment paper and fill it with pie weights or dried beans. Bake for 15 minutes.
- Remove Weights and Bake Further: Remove the parchment paper and pie weights and bake for another 10-15 minutes, or until the crust is golden brown. Let the crust cool completely before filling.
- Heat the Cream: In a small saucepan, heat the heavy cream over medium heat until it just begins to simmer. Do not boil.
- Melt the Chocolate: Place the chopped chocolate in a heatproof bowl. Pour the hot cream over the chocolate and let it sit for 1 minute to soften the chocolate.
- Whisk Until Smooth: Whisk the chocolate and cream together until smooth and glossy.
- Whisk in Egg Yolks and Sugar: In a separate bowl, whisk together the egg yolks and sugar until pale and slightly thickened.
- Temper the Egg Yolks: Slowly drizzle a small amount of the hot chocolate mixture into the egg yolk mixture, whisking constantly.
- Combine Mixtures: Pour the tempered egg yolk mixture into the remaining hot chocolate mixture and whisk until well combined.
- Add Vanilla and Salt: Stir in the vanilla extract and salt.
- Pour into Crust: Pour the chocolate filling into the cooled pie crust.
- Chill: Refrigerate the pie for at least 2 hours, or until the chocolate filling is set.
- Combine Ingredients: In a medium saucepan, whisk together the coconut milk, sugar, cornstarch, and salt.
- Cook Over Medium Heat: Cook the mixture over medium heat, stirring constantly, until it thickens and comes to a simmer.
- Simmer and Thicken: Continue to simmer for 1 minute, stirring constantly, until the haupia is very thick.
- Cool Slightly: Remove the haupia from the heat and let it cool slightly for about 10-15 minutes.
- Pour Over Chocolate Filling: Gently pour the slightly cooled haupia over the chilled chocolate filling. Spread it evenly over the surface.
- Chill Again: Refrigerate the pie for at least 2 hours, or until the haupia filling is set.
- Chill Thoroughly: Ensure the pie is thoroughly chilled before serving.
- Garnish (Optional): Before serving, garnish the pie with whipped cream, shaved chocolate, and toasted coconut flakes, if desired.
- Slice and Serve: Slice the pie into wedges and serve chilled. Enjoy!
Notes
- Keep your butter and shortening as cold as possible when making the crust. This will result in a flakier crust.
- Don’t overmix the pie dough, or it will become tough.
- Use pie weights or dried beans when pre-baking the crust to prevent it from puffing up.
- Make sure the cornstarch is fully dissolved in the coconut milk before cooking the haupia to prevent lumps.
- Let the haupia cool slightly before pouring it over the chocolate filling to prevent the chocolate from melting.
- Chill the pie thoroughly before serving for the best flavor and texture.


Leave a Comment