

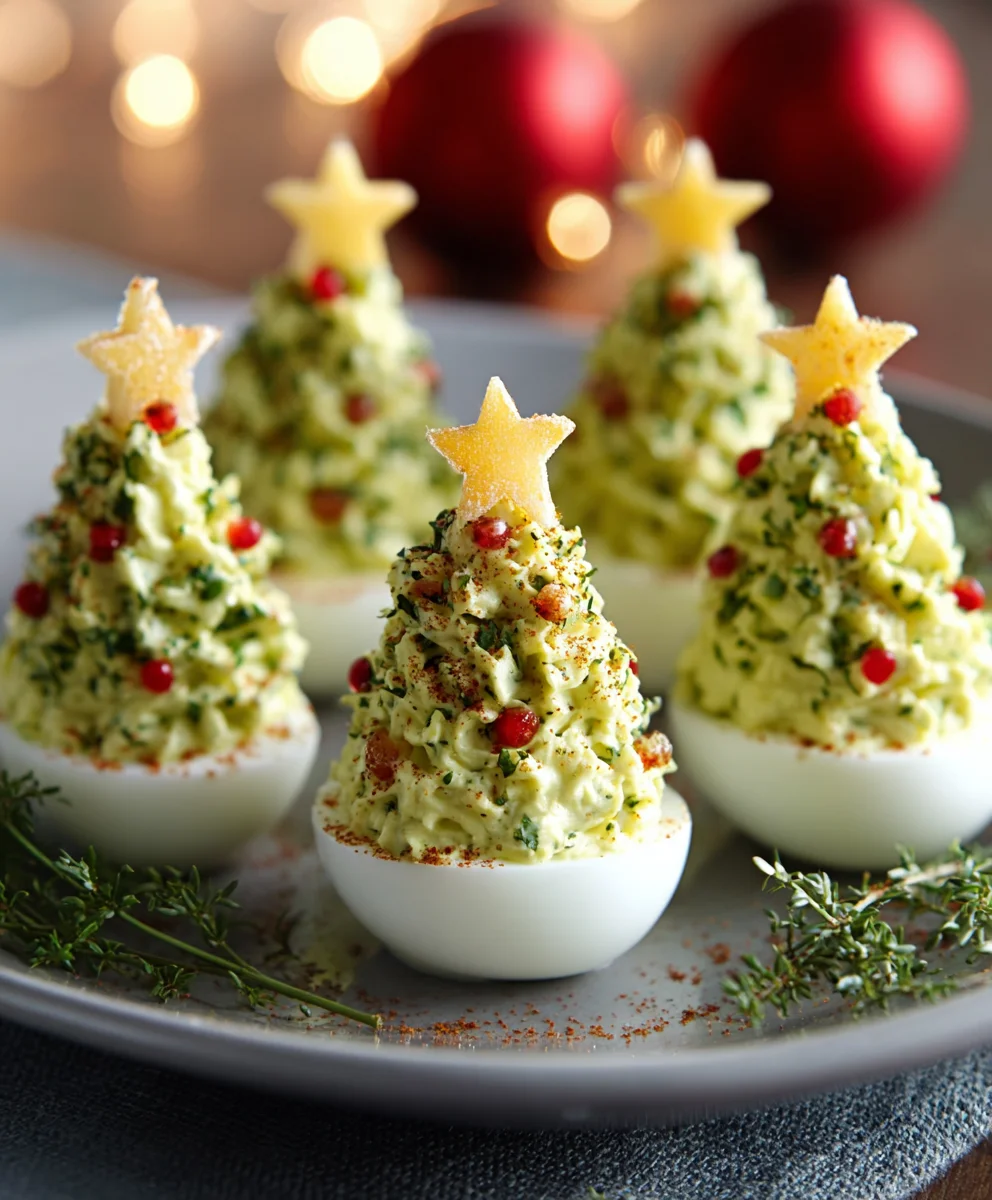
Deviled Egg Christmas Trees are not just an appetizer; they are a delightful centerpiece that brings festive cheer to any holiday gathering. Imagine the smiles when your guests encounter a platter adorned with these charming, edible trees – a playful yet elegant twist on a beloved classic. As we step into the most wonderful time of the year, I find myself drawn to dishes that evoke nostalgia while also offering a touch of celebratory flair.
Deviled eggs themselves boast a rich culinary history, gracing tables from ancient Rome to modern potlucks, always appreciated for their creamy texture and savory appeal. They are a universal comfort food, cherished for their simplicity and satisfying flavor profile. Now, we’re elevating this timeless favorite by transforming it into something truly special for the season.
Why You’ll Love These Deviled Egg Christmas Trees
People adore this dish for so many reasons: the perfectly balanced, tangy-sweet and savory filling, the smooth, melt-in-your-mouth consistency, and, of course, the sheer convenience of a bite-sized treat. But beyond the inherent deliciousness, these delightful Deviled Egg Christmas Trees offer an unparalleled visual charm that captures the spirit of Christmas. They are incredibly easy to prepare, can be made ahead of time, and are guaranteed to be a conversation starter. Whether you’re hosting a grand feast or a casual family get-together, these festive morsels are sure to be a beloved addition to your holiday spread.

Ingredients:
- 12 large eggs: These are the foundation of our delightful Deviled Egg Christmas Trees. I always opt for large eggs for a good, generous bite. Freshness can sometimes make peeling a bit trickier, so if you can find eggs that are a week or so old, they often peel more easily after hard-boiling.
- ½ cup mayonnaise: I prefer a good quality, full-fat mayonnaise for that classic creamy texture and rich flavor. It’s the essential binder that brings our filling together beautifully. You can adjust the amount slightly based on your preferred consistency, but ½ cup is a great starting point for a luscious filling.
- 1 tablespoon Dijon mustard: This adds a lovely, subtle tang and a hint of spice that really elevates the flavor profile of the deviled eggs. If you don’t have Dijon, a good quality yellow mustard can work, but Dijon offers a more sophisticated note.
- 1 teaspoon white vinegar or fresh lemon juice: A touch of acidity brightens up the entire dish, cutting through the richness of the mayonnaise and adding a refreshing zest. Either white vinegar or freshly squeezed lemon juice will do the trick perfectly.
- ¼ teaspoon salt: Crucial for seasoning. Start with this amount and remember you can always add more to taste, but you can’t take it away!
- ⅛ teaspoon black pepper: Freshly ground black pepper makes a noticeable difference, adding a gentle warmth and a more aromatic quality than pre-ground.
- Green food coloring: This is our secret weapon for transforming ordinary deviled eggs into festive Deviled Egg Christmas Trees! I usually use a gel food coloring as it provides a vibrant color without adding too much liquid, but liquid food coloring works too. Start with a few drops and add more until you reach your desired “Christmas tree green.”
- 2 ounces cream cheese, softened (optional but recommended): A little cream cheese adds an extra layer of creaminess and, more importantly, helps stabilize the filling. This makes it much easier to pipe the filling into sturdy, well-defined tree shapes, ensuring our Deviled Egg Christmas Trees hold their form beautifully on the platter. Make sure it’s at room temperature for smooth blending.
- For Decoration:
- Fresh dill, finely chopped: This acts as our “garland” or “pine needles,” providing a wonderful fresh aroma and a beautiful textured green layer.
- Small pimento pieces or finely diced red bell pepper: These are our festive “ornaments,” adding pops of vibrant red color. You can use a tiny star-shaped cutter for the bell pepper for extra flair.
- Tiny star-shaped yellow bell pepper pieces or small cheese stars: To crown our trees! A small cutter is perfect here, or you can carefully cut them freehand.
- Mini pretzel sticks or small cracker pieces: These will form the adorable “trunks” for our Deviled Egg Christmas Trees.
- A sprinkle of paprika (optional): For a final traditional touch on top of the “snow” (the white of the egg).
Phase 1: Preparing the Eggs for Our Deviled Egg Christmas Trees
- Hard-boil the eggs perfectly: This is a crucial first step for any deviled egg recipe, especially when we’re aiming for something as specific as Deviled Egg Christmas Trees. Place your 12 large eggs in a single layer in a large saucepan. I always recommend starting with cold water; cover the eggs with about an inch of cold water. Add a pinch of salt to the water – some believe this helps prevent cracking and makes peeling easier, though it’s mainly for flavor if any cracks do occur.
- Bring to a rolling boil, then remove from heat: Place the saucepan over high heat and bring the water to a full rolling boil. As soon as the water reaches a vigorous boil, immediately remove the pan from the heat. Cover the saucepan with a tight-fitting lid. This gentle cooking method ensures the yolks are fully cooked without developing that unappealing gray-green ring around the edge.
- Let them sit and then cool completely: Allow the covered eggs to sit in the hot water for exactly 10-12 minutes. For large eggs, 10 minutes usually results in a perfectly firm yolk. While they’re resting, prepare an ice bath: fill a large bowl with ice and cold water. After the resting time, use a slotted spoon to transfer the hot eggs directly into the ice bath. This step is incredibly important! The ice bath stops the cooking process immediately, preventing overcooked yolks, and it also helps the egg whites contract, making the eggs much, much easier to peel. Let them chill in the ice bath for at least 15 minutes, or until they are completely cold to the touch.
- Peel the eggs with care: Once thoroughly chilled, it’s time to peel. Gently tap each egg on a hard surface to crack the shell all around. Start peeling under cool running water, or directly in the bowl of ice water. The water helps to get under the membrane, making the shell slide off more easily. I find that starting at the wider end where the air pocket usually forms is often the best approach. Take your time to ensure the whites remain smooth and intact, as these will be the base of our “trees.”
- Halve and separate: Carefully slice each peeled egg in half lengthwise using a sharp knife. Gently scoop out the bright yellow yolks into a medium-sized mixing bowl. Place the pristine white halves, facing up, on a large serving platter or a clean baking sheet. These will be the sturdy foundations onto which we’ll pipe our festive “Deviled Egg Christmas Trees.” Discard any egg whites that might have torn too much during peeling, as we want perfect bases for our decorative endeavors.
Phase 2: Crafting the Festive Deviled Egg Filling
- Mash the yolks to a fine consistency: In the bowl containing your egg yolks, use a fork or a potato masher to mash them until they are completely smooth and free of any large lumps. A smooth filling is key for a beautifully piped Deviled Egg Christmas Tree! I like to mash them really well at this stage, almost to a powdery consistency, as it helps create a consistently creamy filling later on.
- Combine with the creamy components: Add the mayonnaise, Dijon mustard, white vinegar (or lemon juice), salt, and black pepper to the mashed yolks. If you’re using the optional cream cheese, add it now. Make sure the cream cheese is softened to room temperature; this allows it to blend seamlessly into the mixture without creating any lumps.
- Mix until perfectly smooth and creamy: Using a fork or a rubber spatula, mix all the ingredients together thoroughly. I spend a good few minutes on this step, making sure everything is fully incorporated and the mixture is incredibly smooth and velvety. Taste the filling at this point and adjust the seasonings if needed. You might want a little more salt, a dash more mustard, or an extra squeeze of lemon juice to suit your personal preference. Remember, a flavorful filling is the heart of excellent Deviled Egg Christmas Trees.
- Introduce the festive green color: Now for the fun part that transforms our deviled eggs into their holiday form! Add a few drops of green food coloring to the filling. Start with 2-3 drops of gel food coloring or 5-6 drops of liquid food coloring. Mix it in completely, observing the color. You want a vibrant, cheerful green that immediately makes you think of a Christmas tree. If it’s not green enough, add one more drop at a time, mixing thoroughly after each addition, until you achieve the perfect shade. Be careful not to add too much at once, as it’s easier to darken the color than to lighten it.
- Prepare for piping: Once your filling is a gorgeous, smooth green, it’s time to get it ready for shaping. Spoon the entire green filling into a piping bag fitted with a star tip (I usually opt for a medium-sized open or closed star tip, like an Ateco 824 or Wilton 1M). If you don’t have a piping bag, a large resealable plastic bag with one corner snipped off will work in a pinch, though the star tip will give your trees much more definition. Twist the top of the piping bag to seal it, pushing the filling down towards the tip. This makes it easier to handle and prevents air pockets.
Phase 3: Assembling Our Delightful Deviled Egg Christmas Trees
- Pipe the tree shapes onto the egg whites: Take one of your empty egg white halves. Holding the piping bag upright, centered over the egg white, start by piping a small, firm base circle of the green filling. This will be the widest part of your “tree.”
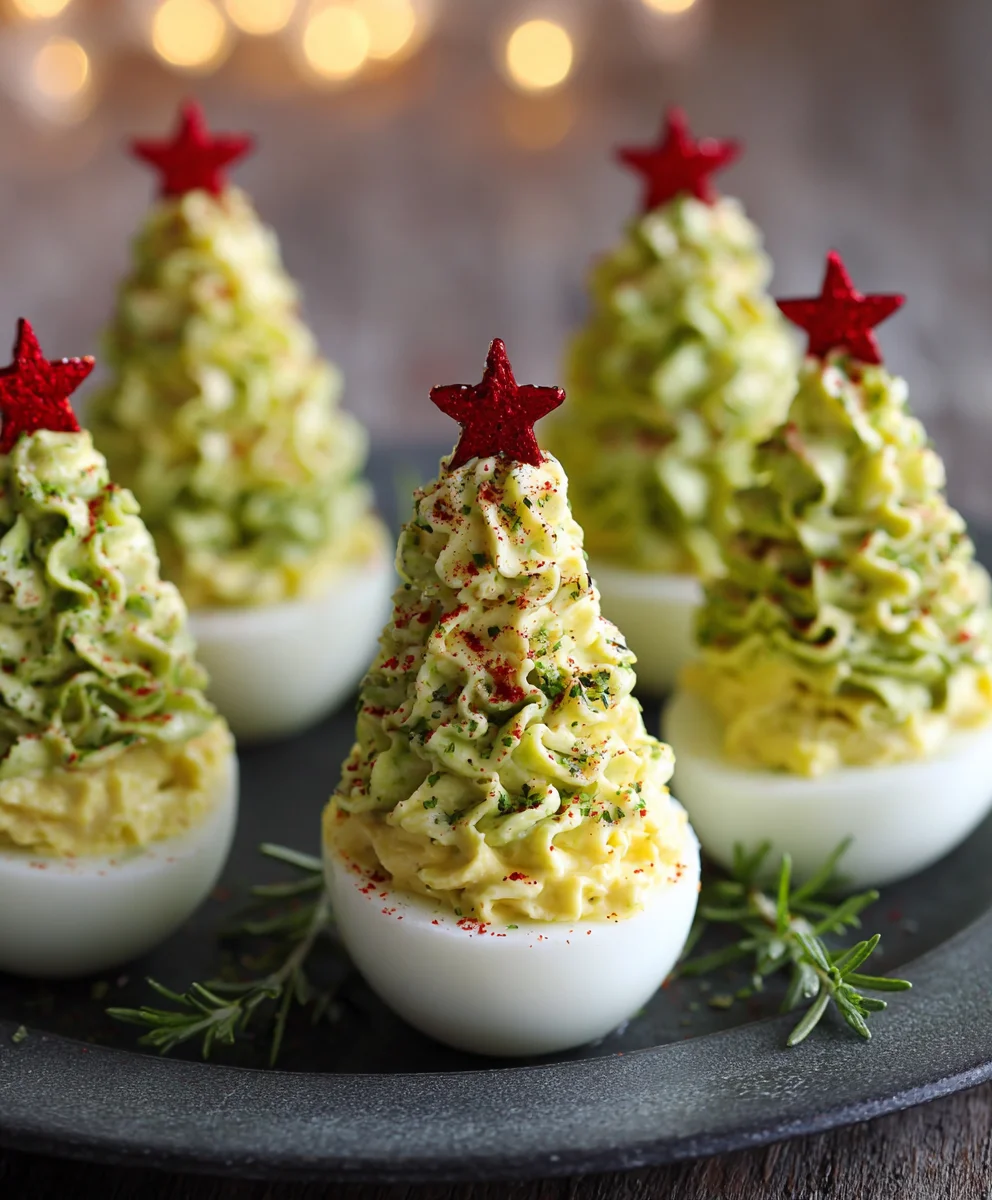
- Build the layers of your tree: Now, slightly release pressure and lift the bag a little, piping a slightly smaller circle on top of the first. Continue this process, piping progressively smaller circles, one on top of the other, to create a conical, tiered Christmas tree shape. You might aim for 3-4 layers to achieve a good height and classic tree silhouette. The key is to create distinct layers that taper towards the top, just like a real evergreen! Gentle, consistent pressure is important here. You’ll be amazed at how quickly you get the hang of shaping these beautiful Deviled Egg Christmas Trees.
- Repeat for all egg halves: Continue piping all of your egg white halves until you have a festive forest of green trees. Arrange them nicely on your serving platter as you go, leaving a little space between each one for decoration.
- Add the tree trunks: Gently insert a mini pretzel stick or a small cracker piece into the bottom-front of each piped Deviled Egg Christmas Tree. Push it just enough into the filling so that it stands upright and looks like a sturdy little tree trunk. This adds a charming rustic touch and makes them even more whimsical.
-
Decorate your Christmas Trees with festive flair: This is where your creativity truly shines!
- Ornaments: Take your small pieces of pimento or diced red bell pepper and carefully place them onto the green filling. Dot them around the tree to resemble colorful ornaments. You can use tweezers for precision if you wish.
- Garlands/Snow: Sprinkle a tiny amount of finely chopped fresh dill or chives over the “branches” of your trees. This gives the impression of delicate garlands or even a light dusting of snow, adding texture and aroma.
- The Star on Top: Gently place your tiny star-shaped yellow bell pepper or cheese piece right on the very peak of each Deviled Egg Christmas Tree. This is the crowning glory and truly completes the Christmas tree illusion.
- Optional Paprika Dusting: For a final traditional touch and a hint of warm color against the white egg bases, you can lightly dust the empty egg white areas around the base of your trees with a very light sprinkle of paprika.
Phase 4: Tips and Tricks for Perfect Deviled Egg Christmas Trees
- Chill for optimal flavor and structure: Once all your Deviled Egg Christmas Trees are assembled and decorated, it’s absolutely essential to chill them. Cover the platter loosely with plastic wrap to prevent the eggs from drying out or absorbing other refrigerator odors. Refrigerate for at least 30 minutes to an hour before serving. This chilling time allows the flavors to meld beautifully and, crucially, helps the piped filling set even more firmly, ensuring your trees hold their shape perfectly when served. Nobody wants a collapsing Christmas tree!
- Storage instructions: Deviled Egg Christmas Trees are best enjoyed on the day they are made, especially due to the delicate decorations and the fresh filling. However, if you need to store leftovers, place them in an airtight container in the refrigerator for up to 2 days. Keep in mind that the pretzel “trunks” might soften slightly over time, so if you’re making them in advance for a party, consider adding the pretzels and delicate edible stars just before serving for the best presentation.
- Making ahead for holiday parties: If you’re preparing for a big holiday gathering, you can definitely do some prep work in advance. You can hard-boil and peel the eggs up to 2-3 days ahead of time and store them in the refrigerator in a sealed container. You can also prepare the green deviled egg filling a day in advance. Store the filling in an airtight container or even directly in the piping bag (sealed tightly) in the fridge. On the day of your event, simply take out the egg whites and the filling, allow the filling to come to room temperature for about 15-20 minutes (this makes it easier to pipe), and then proceed with piping and decorating your magnificent Deviled Egg Christmas Trees. This strategy significantly reduces stress on the day of the party!
-
Flavor variations to explore: While our classic recipe for Deviled Egg Christmas Trees is fantastic, feel free to experiment with the filling to suit your palate.
- Spicier Kick: Add a pinch of cayenne pepper or a dash of your favorite hot sauce to the yolk mixture.
- Herbal Freshness: Incorporate other finely chopped fresh herbs like chives or parsley directly into the filling for an added layer of flavor.
- Smoky Notes: A tiny bit of smoked paprika (in addition to or instead of regular paprika for dusting) can lend a wonderful smoky depth.
- Creamier Texture: For an even richer filling, some people like to add a teaspoon of softened butter along with the cream cheese.
-
Creative decoration ideas: Don’t limit yourself to just pimentos and dill! Think about other small, colorful edible items that can serve as “ornaments” or “garlands” for your Deviled Egg Christmas Trees.
- Tiny capers: For a briny pop and a different shade of green.
- Finely grated carrots or yellow bell pepper confetti: For yellow “lights” or “tinsel.”
- Chili flakes: For little red “berries” with a kick.
- Edible glitter or sprinkles: For a truly magical, sparkling tree, just ensure they are food-grade and tiny enough not to overwhelm the delicate egg.
-
Troubleshooting common issues:
- Filling too thin: If your filling seems too runny to hold a piped shape, it might be due to too much mayonnaise or liquid. You can try adding a bit more mashed yolk (if you have extra) or a teaspoon of cream cheese, or even a tiny amount of dry mustard powder, which helps to absorb excess moisture and thickens the mixture. Chill the filling for 30 minutes – sometimes that’s all it needs.
- Filling too thick: If the filling is too stiff to pipe smoothly, add a very small amount of mayonnaise or a tiny splash of milk, a quarter teaspoon at a time, mixing well after each addition until it reaches a pipeable consistency.
- Peeling problems: If your eggs are consistently hard to peel, try using slightly older eggs next time. Also, ensuring they go straight from boiling water into an ice bath is the most effective method I’ve found for easy peeling.
- Presentation matters: Arranging your completed Deviled Egg Christmas Trees on a festive platter with some sprigs of fresh rosemary or additional dill will truly make them pop. You could even arrange them in a circle to form a “wreath” of trees! Remember, these aren’t just snacks; they’re edible decorations, and their visual appeal is a huge part of their charm. These Deviled Egg Christmas Trees are designed to be a showstopper at any holiday gathering!
Conclusion:
And there you have it, my friends! We’ve journeyed through the simple yet utterly magical process of transforming a beloved classic into something truly spectacular for the holiday season. I honestly believe that this recipe for Deviled Egg Christmas Trees isn’t just another dish; it’s an experience, a conversation starter, and a guaranteed smile-inducer at any festive gathering you host or attend. Trust me when I say, once you present these adorable, edible little trees, they’ll vanish faster than Santa’s cookies on Christmas Eve!
Why This Recipe is a True Holiday Essential:
What makes this particular deviled egg recipe an absolute must-try? It’s more than just the delightful taste, which, of course, is paramount. It’s the ingenious combination of familiarity and festive flair. You’re taking a universally loved appetizer – the humble, creamy deviled egg – and elevating it to a show-stopping centerpiece with minimal effort. The creamy, tangy, and savory filling, perfectly balanced with a hint of mustard and a touch of sweetness, encased in that delicate egg white, is already a winner. But when you pipe it into that conical “tree” shape and adorn it with festive “ornaments,” it transcends mere deliciousness. It becomes a joyful visual feast that perfectly captures the spirit of the season.
This recipe is incredibly forgiving and perfect for cooks of all skill levels. Whether you’re a seasoned holiday chef or just dipping your toes into festive cooking, you’ll find this an absolute breeze to execute, yielding impressive results every single time. It’s the perfect solution for when you need a crowd-pleasing appetizer that looks incredibly impressive but doesn’t demand hours of your precious holiday time. Imagine the ‘oohs’ and ‘aahs’ as your guests spot these charming creations on your appetizer spread – they truly are miniature works of edible art! The smooth, rich texture of the yolk filling, enhanced by just the right amount of seasoning, creates a burst of classic flavor in every bite, making them utterly irresistible. They’re light enough not to spoil anyone’s appetite for the main course, yet satisfying enough to curb initial hunger pangs, striking that perfect balance for a holiday appetizer.
Elevate Your Presentation and Personalize Your Trees!
When it comes to serving, these delightful Deviled Egg Christmas Trees are incredibly versatile. They are, of course, a fantastic standalone appetizer, but they also shine as part of a larger holiday charcuterie board or an elaborate appetizer platter. Arrange them artfully on a bed of fresh, crisp mixed greens or sprigs of fresh rosemary to simulate a winter forest floor. A sprinkle of finely chopped red bell pepper or pomegranate seeds around the base can add a vibrant pop of color, mimicking fallen berries or festive confetti. For a truly elegant touch, consider serving them on a tiered platter, creating a forest of festive treats. They pair wonderfully with a light sparkling wine, a festive cranberry mocktail, or even a classic holiday punch, making them ideal for everything from a sophisticated Christmas Eve gathering to a casual family brunch on Boxing Day.
And let’s talk about variations – this is where you can truly unleash your culinary creativity! While the core recipe is utterly delicious, don’t hesitate to put your own spin on these festive treats.
- Spicy Kick: For those who love a bit of heat, a dash of your favorite hot sauce or a pinch of cayenne pepper in the yolk mixture can add a delightful fiery dimension.
- Herbaceous Twist: Finely chopped fresh dill, chives, or parsley can be folded into the filling or sprinkled generously on top, adding a fresh, aromatic lift.
- Smoky Depth: A tiny sprinkle of smoked paprika instead of sweet paprika, or even a few finely crumbled bits of crispy bacon, can introduce a wonderful smoky, savory note.
- Umami Boost: A tiny drop of Worcestershire sauce or a very small amount of finely grated Parmesan cheese can deepen the umami profile of the filling.
- “Ornaments” Galore: Beyond the classic pimento star, think about other festive toppings! Tiny capers can act as miniature ornaments, finely minced roasted red pepper can mimic red baubles, or even a few pomegranate seeds can add a beautiful ruby sparkle. For a more sophisticated look, a tiny sliver of black olive or a delicate sprig of fresh thyme can make elegant accents. You could even experiment with different colored food-grade dusts or natural colorings (like a touch of beet juice for a reddish tint in some of the filling for variation) to make your “trees” even more vibrant, though the classic green pipe tip does most of the work here!
- Creaminess Factor: While mayonnaise is traditional, you can experiment with Greek yogurt or even a plant-based mayonnaise alternative for a slightly different texture or dietary need.
Your Turn! I Can’t Wait to See Your Creations!
Now, the most exciting part! I’ve shared my heart and soul in creating this recipe, and now it’s your turn to bring these delightful Deviled Egg Christmas Trees to life in your own kitchen. I genuinely urge you to set aside some time this holiday season, gather your ingredients, and give this recipe a try. You won’t regret the joy and compliments it brings. The process itself is therapeutic and enjoyable, a perfect activity to get into the holiday spirit.
Please, please, please don’t keep your culinary triumphs to yourself! I absolutely adore seeing your creations and hearing about your experiences. Did you add a secret ingredient that made them extra special? Did your family rave about them? How did you choose to decorate your little trees? Share your stories, your photos, and your tips! Tag me on social media, leave a comment below, or just drop me an email to let me know how they turned out. Your feedback and shared experiences are what truly make this community special, and I’m always so inspired by your creativity. Let’s make this holiday season delicious, beautiful, and full of shared culinary joy. Happy cooking, and Happy Holidays!
Festive Deviled Egg Christmas Trees
Charming deviled egg Christmas trees, featuring a creamy spinach and smoked paprika filling, topped with festive chili and bell pepper stars. An easy, delightful appetizer perfect for holiday gatherings.
Ingredients
-
7 large eggs
-
2 tablespoons butter
-
2 cloves garlic, thinly sliced
-
5 oz baby spinach
-
1/3 cup mayonnaise
-
1 tablespoon mustard
-
1/2 lemon, juiced
-
1/2 teaspoon smoked paprika
-
1/4 teaspoon hot sauce
-
2 tablespoons dehydrated potato flakes
-
Green food coloring (a few drops, to desired color)
-
1 red Fresno chili pepper, minced
-
1 yellow bell pepper, cut into small stars
-
Parmesan cheese
-
Mini pretzel sticks
Instructions
-
Step 1
Hard-boil eggs (10-12 mins for large). Immediately transfer to an ice bath for 15 mins. Peel, halve lengthwise, and scoop yolks into a bowl. Place whites on a platter. -
Step 2
In a pan, melt butter over medium heat. Sauté sliced garlic until fragrant (1 min). Add baby spinach and cook until wilted. Drain excess liquid. -
Step 3
Mash egg yolks until smooth. Add wilted spinach mixture, mayonnaise, mustard, lemon juice, smoked paprika, hot sauce, dehydrated potato flakes, and green food coloring. Mix until creamy and vibrant green. Taste and adjust seasoning. -
Step 4
Transfer filling to a piping bag with a star tip. Pipe progressively smaller concentric circles onto each egg white half, building a tiered Christmas tree shape. -
Step 5
Insert a mini pretzel stick at the base of each tree for the trunk. Scatter minced red Fresno chili for ornaments. Place yellow bell pepper stars on top. Sprinkle with Parmesan cheese. -
Step 6
Refrigerate Deviled Egg Christmas Trees for at least 30 minutes to set. Serve chilled.
Important Information
Nutrition Facts (Per Serving)
It is important to consider this information as approximate and not to use it as definitive health advice.
Allergy Information
Please check ingredients for potential allergens and consult a health professional if in doubt.


Leave a Comment