

Peanut Butter Roll Cake is not just a dessert; it’s an experience, a delightful fusion that brings together the comforting familiarity of peanut butter with the elegant charm of a classic roll cake. I am absolutely thrilled to share with you a recipe that promises to become a new favorite in your culinary repertoire.
While the concept of a “roll cake” (often known as a Swiss roll) has roots tracing back to 19th-century Europe, where it became a beloved treat for afternoon tea and festive occasions, the addition of peanut butter transforms it into something uniquely American and wonderfully nostalgic. This dish embodies a perfect blend of a light, airy sponge cake swirled around a rich, creamy peanut butter filling, creating a symphony of textures and flavors that is simply irresistible.
Why This Peanut Butter Roll Cake Charms Every Palate
People adore this particular dessert for countless reasons. The exquisite balance of sweet and salty notes, the smooth and fluffy cake contrasting beautifully with the dense, flavorful filling, and the sheer joy of slicing into such an impressive yet surprisingly approachable confection are just a few. It’s a showstopper for any gathering, yet provides that comforting, homey taste everyone craves. This Peanut Butter Roll Cake is truly a testament to how simple, beloved ingredients can be elevated into something truly extraordinary. Get ready to impress your taste buds and your guests!

Ingredients:
Creating this delightful Peanut Butter Roll Cake involves two main components: the tender, airy sponge cake and the rich, creamy peanut butter filling. Here’s what you’ll need to gather to bring this treat to life.
-
For the Peanut Butter Roll Cake Sponge:
- Large Eggs: 4, separated. Room temperature eggs are crucial here, as they separate more cleanly and whip up with better volume, leading to a much airier sponge.
- Granulated Sugar: ½ cup (100g), divided. We’ll use some for the egg yolks and some for the egg whites to achieve the perfect balance of sweetness and stability.
- All-Purpose Flour: ½ cup (60g), sifted. Sifting ensures a lump-free batter and helps incorporate air, contributing to that delicate texture we’re aiming for in our roll cake.
- Baking Powder: ½ teaspoon. A leavening agent to give our cake an extra lift.
- Salt: ¼ teaspoon. Just a pinch to enhance all the flavors and balance the sweetness.
- Unsalted Butter: 2 tablespoons (28g), melted and cooled slightly. Butter adds richness and moisture to the cake.
- Whole Milk: 2 tablespoons (30ml). Adds moisture and helps create a tender crumb.
- Vanilla Extract: 1 teaspoon. For that classic, comforting flavor that complements the peanut butter beautifully.
-
For the Creamy Peanut Butter Filling:
- Unsalted Butter: ½ cup (113g or 1 stick), softened to room temperature. This is the base of our luscious buttercream filling.
- Creamy Peanut Butter: 1 cup (250g). Make sure to use a good quality creamy peanut butter, not the natural, oily kind, as it can separate and affect the texture of the filling.
- Powdered Sugar (Confectioners’ Sugar): 3 cups (360g), sifted. Sifting is essential to avoid lumps in your smooth, creamy filling.
- Heavy Cream or Whole Milk: ¼ cup (60ml), plus more if needed. To achieve the perfect spreadable consistency.
- Vanilla Extract: 1 teaspoon. A dash of vanilla always elevates the flavor profile.
- Salt: ¼ teaspoon. To cut through the sweetness and enhance the peanut butter flavor.
-
Optional Garnish:
- Chopped Roasted Peanuts: ¼ cup. For a lovely textural contrast and an extra burst of peanut flavor on your finished Peanut Butter Roll Cake.
- Drizzled Melted Chocolate: 2 tablespoons. A beautiful addition for presentation and a touch of extra indulgence.
Preparing the Peanut Butter Roll Cake Sponge:
The foundation of a great roll cake is a flexible, moist sponge. Follow these steps carefully to ensure your Peanut Butter Roll Cake has the perfect base.
-
Preheat and Prepare: First things first, let’s get our oven ready. Preheat your oven to 375°F (190°C). While the oven heats up, prepare a 10×15-inch (25×38 cm) jelly roll pan. Grease it lightly, then line it with parchment paper, leaving a slight overhang on the longer sides. This overhang will be your friend later when lifting the cake. Lightly grease the parchment paper as well, or spray it with non-stick baking spray, and then dust it with a little flour. This double preparation ensures your delicate sponge doesn’t stick.
-
Separate Eggs for Success: Carefully separate your four large, room-temperature eggs. Place the egg whites in a very clean, grease-free large mixing bowl – even a tiny bit of grease can prevent them from whipping up properly. Put the egg yolks into a separate medium-sized mixing bowl. Using room temperature eggs is truly important here, as they will yield better volume when whipped, resulting in a lighter and more airy cake.
-
Whip Egg Yolks: To the bowl with the egg yolks, add half of the granulated sugar (¼ cup or 50g) and the vanilla extract. Using an electric mixer on medium-high speed, beat the egg yolks and sugar mixture for about 3-5 minutes until it becomes pale yellow, thick, and almost ribbons when you lift the beaters. This process incorporates air and makes the yolks light and fluffy, contributing to the sponge’s texture.
-
Combine Wet Ingredients: Gently melt the 2 tablespoons of unsalted butter and allow it to cool slightly. It should be warm but not hot. Add the cooled melted butter and the 2 tablespoons of whole milk to the whipped egg yolk mixture. Mix on low speed until just combined. Be careful not to overmix at this stage.
-
Sift Dry Ingredients: In a separate small bowl, whisk together your sifted all-purpose flour, baking powder, and salt. Sifting the flour ensures there are no lumps and helps aerate the flour, which is important for a tender cake. Gradually add these dry ingredients to the egg yolk mixture, mixing on low speed until just combined. The key here is to mix until no streaks of flour remain, but absolutely avoid overmixing, as this can develop the gluten too much and lead to a tough cake.
-
Whip Egg Whites: Now for the egg whites! Using your electric mixer (with clean beaters), begin whipping the egg whites on medium speed. Once they start to get foamy, gradually add the remaining ¼ cup (50g) of granulated sugar, one tablespoon at a time, while continuing to whip. Increase the speed to high and continue beating until you achieve stiff, glossy peaks. When you lift the beaters, the egg whites should stand straight up with a slight curl at the tip, and they should look shiny. This meringue is what gives our Peanut Butter Roll Cake its incredible lightness.
-
Fold with Care: This is a crucial step for maintaining the airiness of your sponge. Gently fold about one-third of the whipped egg whites into the egg yolk batter. Use a rubber spatula and a gentle ‘cut and fold’ motion, lifting from the bottom of the bowl and folding it over. Once partially incorporated, add the remaining egg whites and continue folding carefully until no streaks of white remain. It’s vital not to deflate the egg whites; they are the primary leavening agent for this cake.
-
Bake the Sponge: Pour the batter evenly into your prepared jelly roll pan. Use an offset spatula or the back of a spoon to spread it all the way to the edges, ensuring an even thickness. Gently tap the pan a couple of times on the counter to release any large air bubbles. Bake for 10-12 minutes, or until the cake springs back when lightly touched and the edges are lightly golden. Do not overbake, as this will make the cake dry and difficult to roll.
-
The Art of Rolling: As soon as the cake comes out of the oven, immediately invert it onto a clean kitchen towel (or a piece of parchment paper dusted with powdered sugar). Carefully peel off the parchment paper that was used for baking. While it’s still warm, gently roll the cake up tightly from one of the shorter sides, along with the towel (or new parchment paper). Place the rolled cake, seam-side down, on a wire rack and let it cool completely. Allowing the cake to cool in this rolled shape trains it to hold its form, making it much easier to unroll and re-roll later without cracking. This step is a game-changer for a perfect Peanut Butter Roll Cake.
Making the Creamy Peanut Butter Filling:
This filling is the heart of our Peanut Butter Roll Cake, offering a rich, sweet, and utterly satisfying peanut butter flavor that perfectly complements the light sponge.
-
Cream the Butter and Peanut Butter: In a large mixing bowl, using an electric mixer, beat the softened unsalted butter on medium speed until creamy and smooth, about 1-2 minutes. Then, add the creamy peanut butter and continue beating until well combined and lightened in color, another 2-3 minutes. Scrape down the sides of the bowl as needed to ensure everything is incorporated evenly. Ensure your butter is truly at room temperature to achieve a smooth, lump-free filling.
-
Gradually Add Powdered Sugar: With the mixer on low speed, gradually add the sifted powdered sugar, about one cup at a time, mixing well after each addition until fully incorporated. The mixture will become very thick. Once all the powdered sugar is in, increase the speed to medium and beat for an additional minute.
-
Achieve Perfect Consistency: Now, add the heavy cream (or whole milk), vanilla extract, and salt to the mixture. Beat on medium-high speed for 2-3 minutes, or until the filling becomes light, fluffy, and spreadable. If the filling seems too thick, add more heavy cream or milk, one teaspoon at a time, until you reach your desired consistency. If it’s too thin, you can add a little more sifted powdered sugar. The goal is a filling that’s easy to spread but holds its shape well.
-
Tips for the Perfect Peanut Butter Filling Consistency:
- Temperature Matters: Both your butter and peanut butter should be at a consistent room temperature to prevent a grainy or separated filling.
- Sift Your Sugar: Always sift your powdered sugar! This prevents lumps and ensures a silky-smooth texture for your filling, which is essential for a beautiful presentation on your Peanut Butter Roll Cake.
- Adjust Gradually: When adding liquid to adjust consistency, do so very slowly. It’s much easier to add more liquid than to try and thicken a too-runny filling.
Assembling Your Delicious Peanut Butter Roll Cake:
This is where all your hard work comes together! Assembling the Peanut Butter Roll Cake requires a gentle touch to ensure a beautiful, crack-free finish.
-
Unroll with Care: Once your cake sponge has completely cooled in its rolled form, gently unroll it. If you used a kitchen towel, the cake should spring back nicely. If you used parchment paper, carefully peel it away. Don’t worry if there are tiny cracks; the filling will help conceal them, and practice makes perfect! Lay the cake flat on your work surface.
-
Spread the Filling: Evenly spread about two-thirds of the creamy peanut butter filling over the entire surface of the cake, leaving a ½-inch border clear around the edges. This border prevents the filling from squeezing out excessively when you re-roll. Use an offset spatula for the smoothest application. Make sure the filling is spread right to the unrolled edge that will become the center of your roll.
-
Re-Roll the Cake: Starting from one of the shorter ends, gently and carefully re-roll the cake, without the towel or parchment this time. Roll it up tightly but gently, ensuring the filling stays within. Take your time with this step to avoid major cracks. Use your hands to guide and tuck the cake as you roll. When you reach the end, place the roll cake seam-side down onto a serving platter or a sheet of parchment paper.
-
Chill for Stability: To allow the filling to set and the cake to firm up, making it easier to slice, refrigerate the Peanut Butter Roll Cake for at least 1-2 hours. You can even chill it overnight for best results. This chilling period is essential for the structure of your roll cake.
-
Frost and Garnish (Optional but Recommended!): Once the cake is thoroughly chilled, you can choose to frost the outside with the remaining peanut butter filling for an extra indulgent layer. Spread it evenly over the top and sides using an offset spatula. For an even more professional look, use a pastry comb to create ridges on the frosting. Finally, garnish with chopped roasted peanuts for crunch and a visual cue to the delicious flavor inside. A drizzle of melted chocolate can also add an elegant touch and another layer of flavor that beautifully complements peanut butter.
-
Slice and Serve: When you’re ready to serve, use a sharp, thin knife to slice the cake into individual servings. For the cleanest slices, wipe your knife with a warm, damp cloth between each cut. Present your beautiful slices of Peanut Butter Roll Cake and watch them disappear!
Storage and Serving Suggestions for Your Peanut Butter Roll Cake:
To ensure your delicious Peanut Butter Roll Cake stays fresh and delightful for as long as possible, and to serve it at its best, consider these tips.
-
Proper Storage: Store any leftover Peanut Butter Roll Cake in an airtight container in the refrigerator. This protects it from drying out and keeps the peanut butter filling fresh and firm. You can cover the exposed cut ends with plastic wrap or extra parchment paper to maintain moisture.
-
Shelf Life: When properly stored in the refrigerator, your Peanut Butter Roll Cake will remain fresh and delicious for up to 3-4 days. The flavors tend to meld even more beautifully after the first day, so it can even be a fantastic make-ahead dessert.
-
Serving Temperature: While the cake should be stored in the refrigerator, I find that serving it at a slightly cooler room temperature, rather than straight from the fridge, allows the flavors of the peanut butter and vanilla to really shine, and the cake sponge becomes a bit softer. Take it out of the refrigerator about 15-20 minutes before you plan to serve it, especially if you’ve frosted the outside, as this will soften the frosting to a perfect consistency.
-
Freezing Instructions: If you want to enjoy your Peanut Butter Roll Cake at a later date, it freezes surprisingly well! Place the entire unfrosted roll cake (or individual slices) on a baking sheet and freeze until firm, about 1-2 hours. Then, wrap it tightly in plastic wrap, followed by a layer of aluminum foil. It can be stored in the freezer for up to 1 month. To thaw, simply unwrap and let it sit in the refrigerator overnight, or at room temperature for a few hours before serving. You can then frost it if you hadn’t done so initially, or simply enjoy it as is.
-
Pairing Suggestions: This sweet and savory cake is wonderful on its own, but it also pairs beautifully with a glass of cold milk, a hot cup of coffee or tea, or even a scoop of vanilla bean ice cream for an extra special treat. The richness of the peanut butter is a fantastic contrast to the subtle creaminess of vanilla ice cream.
-
Presentation Ideas: For an elegant presentation, sprinkle a little extra powdered sugar on top just before serving, or arrange thin slices of fresh banana alongside each piece. The banana and peanut butter combination is a classic for a reason! A delicate drizzle of honey or a sprinkle of flaky sea salt could also elevate the flavors and visual appeal of your magnificent Peanut Butter Roll Cake.
<h2>Conclusion:</h2>
<p>And so, we arrive at the sweet culmination of our journey. I truly believe that this <strong>Peanut Butter Roll Cake</strong> isn’t just another dessert; it’s an experience waiting to unfold in your kitchen and at your table. It encapsulates everything wonderful about baking: the simple joy of combining ingredients, the delightful aroma that fills your home, and the pure satisfaction of sharing something utterly delicious with loved ones. What makes this recipe an absolute must-try, in my humble opinion, is its perfect balance. It’s not overly sweet, allowing the rich, nutty notes of the peanut butter to truly shine, complemented beautifully by the tender, airy cake and that luscious, creamy filling. It’s a sophisticated twist on a beloved classic, delivering comfort and elegance in every single slice. Forget everything you thought you knew about roll cakes being intimidating; I’ve guided you through each step to ensure your success, promising a result that will impress both your palate and your guests.</p>
<p>The beauty of this particular creation lies in its surprising lightness despite the decadence of peanut butter. The cake itself is designed to be soft and pliable, making the rolling process a breeze and ensuring a melt-in-your-mouth texture. Then there’s the filling – a dreamy, cloud-like confection that provides a delightful counterpoint to the intensity of the peanut butter. It’s this textural interplay, the soft cake, the creamy filling, and the subtle chew from the peanut butter, that truly elevates this dessert from good to absolutely unforgettable. Whether you’re a long-time baker looking for a new challenge or a novice eager to create something truly spectacular, this recipe offers a rewarding and incredibly tasty endeavor. It’s a testament to how humble ingredients can be transformed into something extraordinary with a little care and creativity. <strong>I promise you, the effort will be repaid tenfold by the sheer delight on the faces of those who taste it.</strong></p>
<h4>Serving Up Your Masterpiece</h4>
<p>Now that you’ve crafted this magnificent <strong>Peanut Butter Roll Cake</strong>, let’s talk about how to best enjoy it. It’s truly versatile. A slice of this cake pairs exquisitely with a hot cup of freshly brewed coffee or a soothing herbal tea, making it the perfect afternoon treat or an indulgent breakfast (no judgment here!). For a more decadent dessert experience, consider serving it alongside a scoop of vanilla bean ice cream or a dollop of freshly whipped cream. A light drizzle of chocolate ganache or a sprinkle of chopped roasted peanuts over the top just before serving can add another layer of visual appeal and textural intrigue. This cake also shines as the centerpiece of any celebration – birthdays, anniversaries, or just a simple gathering of friends. Its impressive spiral design makes for a stunning presentation, ensuring it will be the star of your dessert table. Don’t hesitate to cut generous slices; trust me, everyone will be coming back for more.</p>
<h4>Making It Your Own: Delightful Variations</h4>
<p>While the classic <strong>Peanut Butter Roll Cake</strong> recipe is a winner on its own, I always encourage you to get creative and put your own spin on things. For a different flavor profile, consider incorporating a swirl of raspberry jam or chocolate fudge into the peanut butter filling before rolling. The combination of peanut butter and jelly, or peanut butter and chocolate, is a timeless classic for a reason! You could also experiment with adding finely chopped chocolate chips or mini peanut butter cups to the filling for an extra textural surprise. If you’re feeling adventurous, try swapping out half of the peanut butter in the filling for another nut butter, like almond or cashew, to create a slightly different, yet equally delicious, experience. For those who love a bit of spice, a tiny pinch of cinnamon or nutmeg in the cake batter can add a warm, inviting complexity. <strong>The possibilities are truly endless, limited only by your imagination!</strong> Don’t be afraid to experiment; baking is, after all, an art form, and your kitchen is your canvas.</p>
<h4>Your Turn to Bake and Share!</h4>
<p>Now, dear reader, the whisk is in your hands! I genuinely hope you feel inspired and excited to try out this amazing <strong>Peanut Butter Roll Cake</strong> recipe. It’s a journey that culminates in a truly rewarding treat that you’ll be proud to share. Don’t be intimidated by the roll; with patience and the detailed steps I’ve provided, you’ll master it in no time. Once you’ve baked your masterpiece, I would absolutely love to hear about your experience. Did you add any fun variations? How did your family and friends react? What was your favorite part of the process? Your feedback and creations are what make this community so vibrant and inspiring. <strong>Please, share your stories, your photos, and your tips!</strong> There’s immense joy in baking, but there’s even greater joy in sharing that passion and its delicious results. Happy baking, and I can’t wait to see what delightful creations you conjure up!</p>
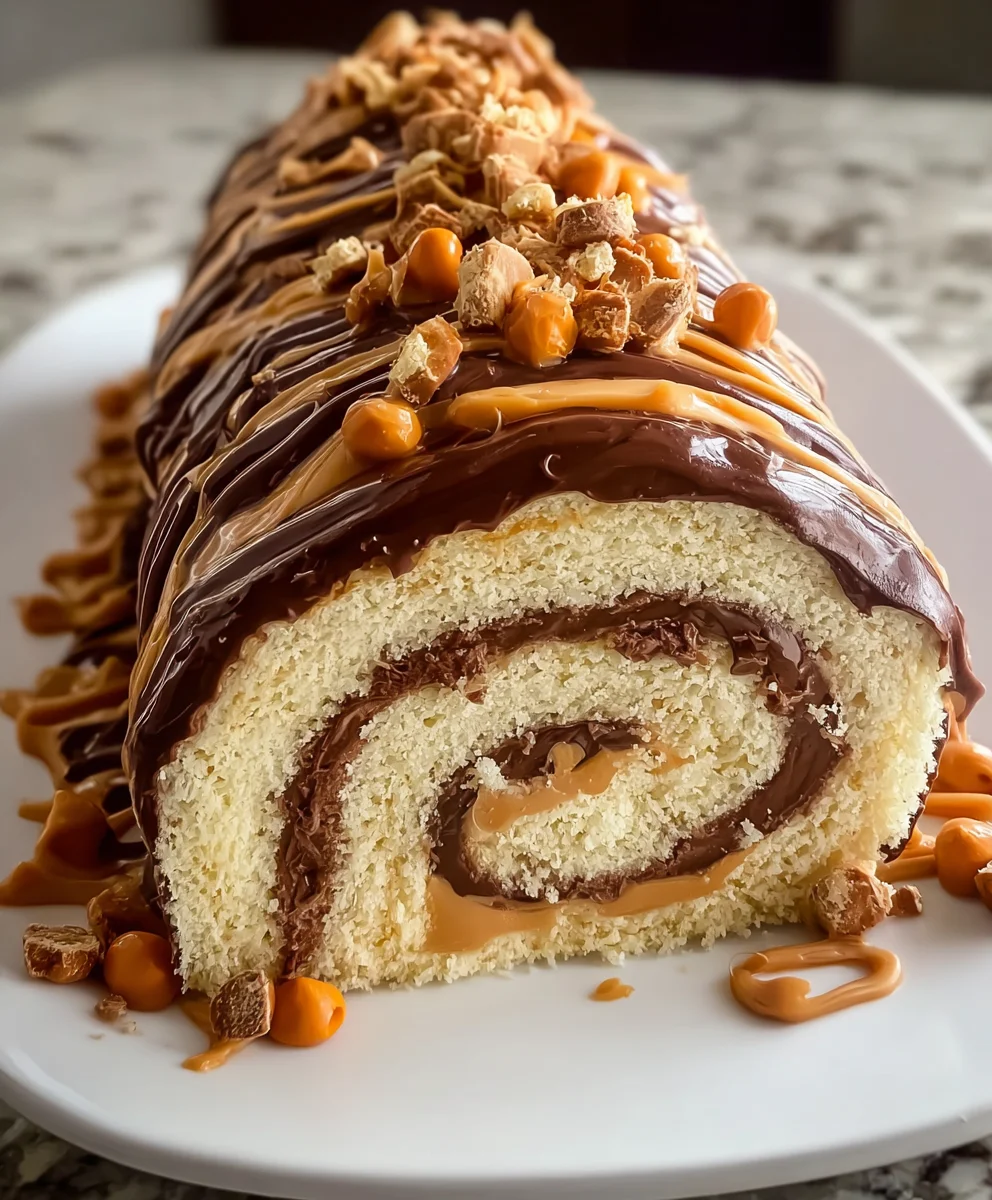
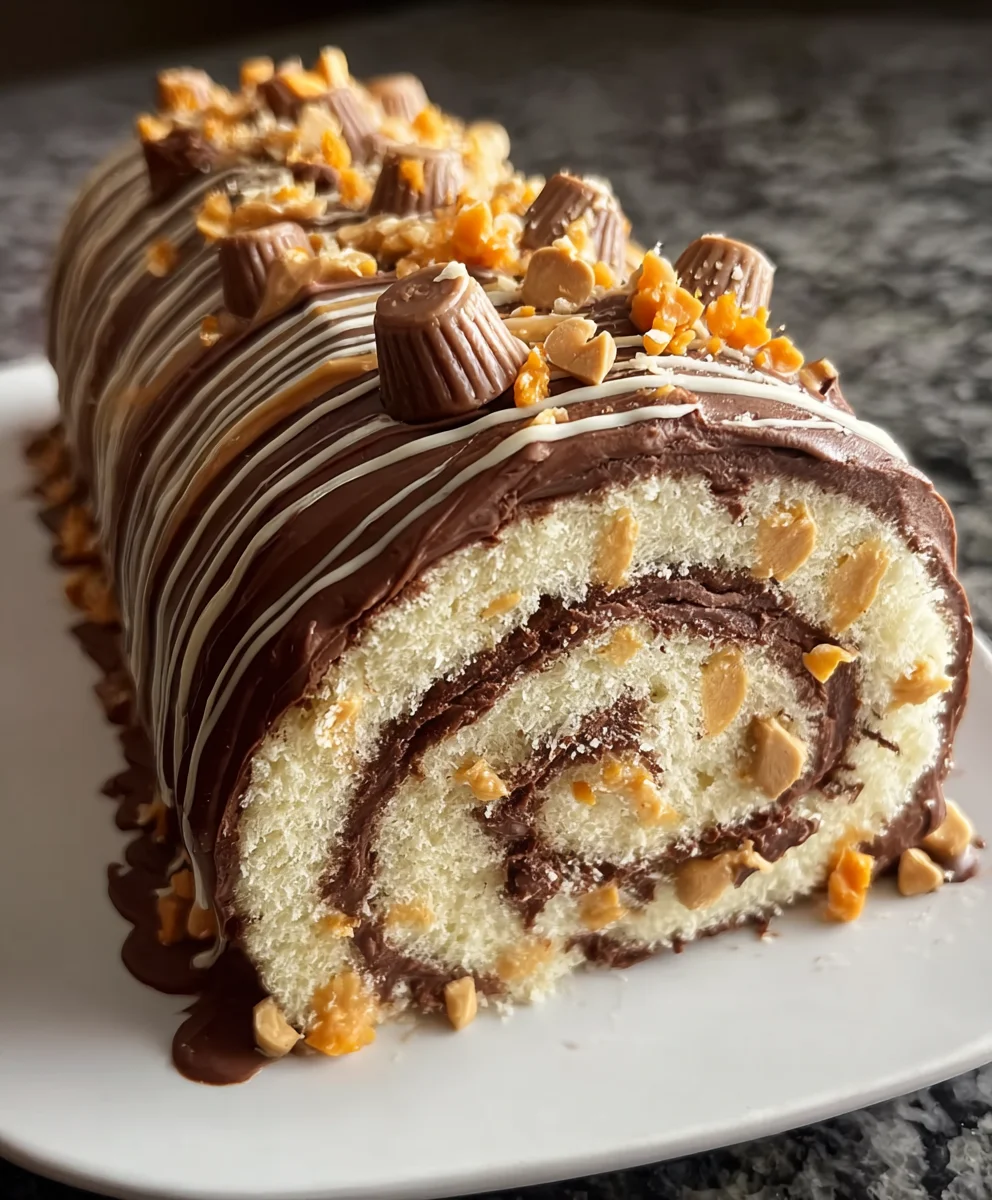
Reese’s Peanut Butter Cup Roll Cake
This showstopping dessert is a Reese’s Peanut Butter Cup Roll Cake, featuring a soft chocolate sponge wrapped around a creamy peanut butter filling, studded with chopped Reese’s cups. It’s then topped with a rich chocolate ganache and more candies, creating a delightful fusion for peanut butter cup lovers.
Ingredients
-
4 Large Eggs, separated (room temperature)
-
½ cup (100g) Granulated Sugar, divided
-
¼ cup (30g) All-Purpose Flour, sifted
-
¼ cup (25g) Unsweetened Cocoa Powder, sifted
-
½ teaspoon Baking Powder
-
¼ teaspoon Salt
-
2 tablespoons (28g) Unsalted Butter, melted and cooled slightly
-
2 tablespoons (30ml) Whole Milk
-
1 teaspoon Vanilla Extract
-
½ cup (113g or 1 stick) Unsalted Butter, softened (for filling)
-
1 cup (250g) Creamy Peanut Butter (for filling)
-
3 cups (360g) Powdered Sugar, sifted (for filling)
-
¼ cup (60ml) Heavy Cream or Whole Milk, plus more if needed (for filling)
-
1 teaspoon Vanilla Extract (for filling)
-
¼ teaspoon Salt (for filling)
-
1 cup (approx. 150g) Reese’s Peanut Butter Cups, chopped (for filling and garnish)
-
½ cup (120ml) Heavy Cream (for ganache)
-
4 oz (113g) Semi-Sweet Chocolate, finely chopped (for ganache)
Instructions
-
Step 1
Preheat oven to 375°F (190°C). Grease a 10×15-inch jelly roll pan, line with parchment paper (overhang on long sides), grease parchment, and dust with flour. -
Step 2
In a bowl, beat egg yolks with ¼ cup (50g) sugar and 1 tsp vanilla until pale and thick (3-5 min). -
Step 3
Mix melted butter and milk into egg yolks. In a separate bowl, whisk sifted flour, cocoa powder, baking powder, and salt. Gradually add dry ingredients to yolk mixture, mixing on low until just combined; do not overmix. -
Step 4
In a clean bowl, whip egg whites on medium. Gradually add remaining ¼ cup (50g) sugar while whipping. Increase to high and beat until stiff, glossy peaks form. -
Step 5
Gently fold one-third of whipped egg whites into the yolk batter, then add remaining whites. Fold carefully until no streaks remain; do not deflate. -
Step 6
Pour batter into prepared pan, spread evenly. Tap pan to release air. Bake 10-12 minutes, or until cake springs back and edges are lightly golden. Do not overbake. -
Step 7
Immediately invert hot cake onto a clean kitchen towel (or sugared parchment). Carefully peel off baking parchment. While warm, roll cake tightly with the towel from a shorter side. Cool completely seam-side down on a wire rack. -
Step 8
Beat softened butter until creamy. Add peanut butter and beat until combined. Gradually add sifted powdered sugar (3 cups), then heavy cream, vanilla, and salt. Beat 2-3 minutes until light and fluffy. Adjust consistency with more cream or sugar if needed. Stir in half of the chopped Reese’s Peanut Butter Cups. -
Step 9
Once cake is completely cool, gently unroll it. Evenly spread two-thirds of the peanut butter filling over the cake, leaving a ½-inch border. Re-roll the cake tightly but gently from a shorter end. Place seam-side down on a serving platter. -
Step 10
Refrigerate the roll cake for at least 1-2 hours (or overnight) to allow the filling to set and cake to firm up. -
Step 11
Heat ½ cup heavy cream until simmering. Pour over 4 oz finely chopped semi-sweet chocolate. Let sit 5 minutes, then whisk until smooth. Let cool slightly until thick enough to spread/drizzle. -
Step 12
Once chilled, spread remaining peanut butter filling on the outside of the cake if desired. Drizzle or spread chocolate ganache over the top. Garnish with the remaining chopped Reese’s Peanut Butter Cups. -
Step 13
Use a sharp, thin knife to slice the chilled cake. Wipe knife between cuts for clean slices. Serve at a slightly cooler room temperature.
Important Information
Nutrition Facts (Per Serving)
It is important to consider this information as approximate and not to use it as definitive health advice.
Allergy Information
Please check ingredients for potential allergens and consult a health professional if in doubt.
Leave a Comment