

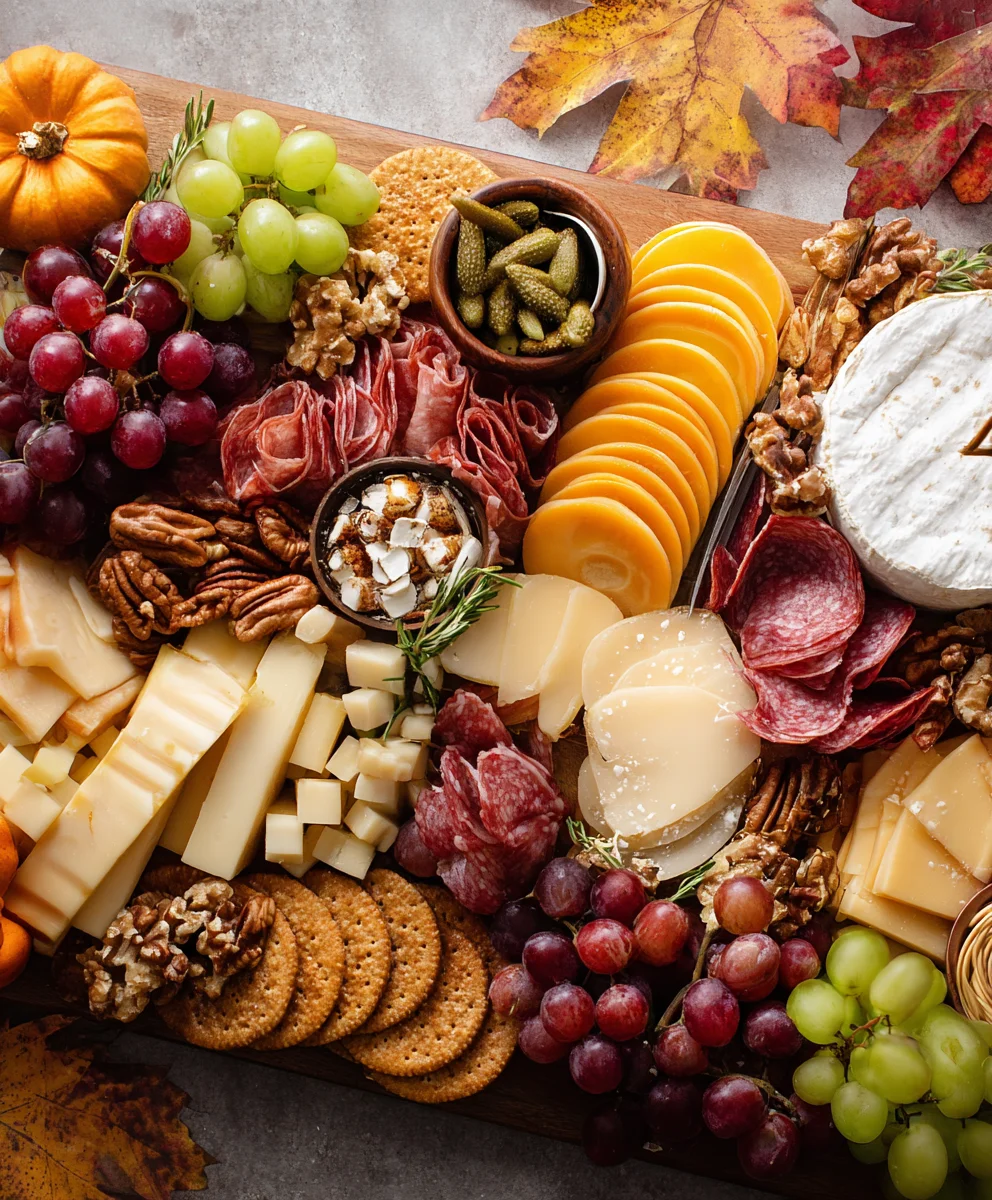
How To Build An Easy Fall Charcuterie Board is a question I often get as the leaves begin to turn and the air grows crisp. There’s something undeniably magical about a beautifully arranged charcuterie board, especially when it captures the rich essence of autumn. Originating from the French culinary art of preparing cured meats, charcuterie has evolved into a beloved global phenomenon, transforming from a simple meat platter into an elaborate display of cheeses, fruits, nuts, and more. What was once a practical method to preserve food has become the ultimate symbol of effortless, elegant entertaining.
I find immense joy in crafting these edible masterpieces, and you’ll soon discover why they are adored by so many. People absolutely love charcuterie boards for their incredible versatility, stunning visual appeal, and the delightful variety they offer, ensuring there’s a tempting bite for every palate. The true beauty of a fall charcuterie board lies in its ability to bring warmth and bounty to any gathering, big or small, with minimal cooking required. It’s the perfect centerpiece that encourages conversation and shared delight. Let me show you how to build an easy fall charcuterie board that will impress your guests and bring a touch of seasonal elegance to your table without any stress.

Ingredients:
Creating a beautiful and delicious fall charcuterie board is all about balancing flavors, textures, and seasonal colors. Here’s a comprehensive list of what I typically gather to build an easy, impressive spread that truly captures the essence of autumn.
- A Curated Selection of Cheeses:
- Soft/Creamy Cheese: One wheel of creamy brie or camembert. I adore how brie melts slightly at room temperature, making it perfect for spreading.
- Semi-Hard Cheese: About 4-6 ounces of aged cheddar, gouda, or gruyère, often cut into cubes or slices. These provide a satisfying bite and nutty undertones.
- Crumbly/Sharp Cheese: 4-6 ounces of blue cheese (like a robust stilton or a milder gorgonzola) or a sharp goat cheese. These add a bold, tangy counterpoint that elevates the whole experience.
- Fresh Cheese (Optional): A small log of fresh goat cheese, perhaps rolled in herbs or pepper, offers a lighter, zesty option.
- Artisanal Cured Meats:
- Prosciutto: 2-3 ounces, thinly sliced. Its delicate, salty flavor and melt-in-your-mouth texture are always a crowd-pleaser.
- Salami: 4-6 ounces of a hard salami (like a genoa or sopressata), sliced into thin rounds. The slight spice and chewiness are wonderful.
- Capicola or Coppa: 2-3 ounces, thinly sliced. These offer a bit more fat and flavor than prosciutto, with a lovely marbled appearance.
- Smoked Sausage (Optional): A small amount of thinly sliced smoked sausage for an extra savory depth.
- Fresh Seasonal Fruits:
- Apples: 2-3 crisp apples (Honeycrisp, Fuji, Gala), thinly sliced. Their natural sweetness and crunch are fantastic with cheese.
- Pears: 1-2 firm pears (Bosc, Anjou), sliced. Pears bring a slightly different, more subtle sweetness than apples.
- Grapes: One small bunch of red or green grapes. They add a refreshing burst of juiciness and beautiful color.
- Fresh Figs: 4-6 fresh figs, halved or quartered. Their unique texture and sweet, earthy flavor scream “fall.”
- Pomegranate Arils: From 1 whole pomegranate, for a vibrant pop of color and tartness.
- Clementines or Mandarin Oranges: 2-3, peeled and separated, for a bright citrus note.
- Crisp Vegetables (Optional, but highly recommended for freshness):
- Baby Carrots: A handful, for a touch of earthy sweetness and crunch.
- Radishes: 4-6, thinly sliced or left whole, for a peppery bite.
- Mini Bell Peppers: 2-3, sliced, offering sweet crispness and bright colors.
- Cucumber: Half a cucumber, thinly sliced or cut into sticks, for cool refreshment.
- Assorted Crackers & Breads:
- Water Crackers or Plain Biscuits: A box, for neutral canvases to build flavors upon.
- Artisan Crackers: A box of interesting flavored crackers (rosemary, olive oil, fig & olive).
- Toasted Baguette Slices or Crostini: Half a baguette, sliced and lightly toasted, provides a sturdier option.
- Grissini (Breadsticks): A few, for visual interest and a different texture.
- Complementary Spreads & Dips:
- Honey: A small jar or squeeze bottle. It pairs beautifully with almost all cheeses, especially blue and brie.
- Fig Jam or Fruit Preserves: One small jar. Fig jam is a fall essential for me; its sweetness and texture are perfect. Apricot or cranberry jam also work wonderfully.
- Whole Grain Mustard or Dijon: One small jar, for a savory, piquant kick with meats.
- Olives: A small bowl of mixed olives (kalamata, castelvetrano) for briny goodness.
- Cornichons or Gherkins: A small bowl, offering a sharp, vinegary counterpoint.
- Hearty Nuts & Dried Fruits:
- Walnuts or Pecans: Half a cup, toasted if desired, for earthy crunch.
- Candied Pecans or Walnuts: For a touch of sweet indulgence.
- Almonds: Half a cup, either raw or roasted.
- Dried Apricots or Cranberries: Half a cup, for concentrated sweetness and chewy texture.
- Aromatic Garnishes:
- Fresh Rosemary Sprigs: A few sprigs, for a beautiful visual and a subtle herbaceous aroma.
- Cinnamon Sticks: 2-3, for a quintessential fall scent and aesthetic.
- Small Edible Flowers (Optional): For an elegant touch.
- Serving Essentials:
- A large charcuterie board or platter (wood, slate, or marble).
- Small bowls or ramekins for dips, nuts, and olives.
- Cheese knives or spreaders for each cheese.
- Small serving tongs or picks for meats and fruits.
Pre-Board Preparation: Gathering & Prepping Your Elements
Before you even think about laying anything on your board, a little preparation goes a long way. This is where we ensure everything is ready to be showcased beautifully and devoured easily. Remember, the goal is to make How To Build An Easy Fall Charcuterie Board as effortless as possible on the day of serving.
- Select Your Canvas: First, choose your charcuterie board. I always go for a large wooden board or a beautiful slate platter; the size dictates how much you can comfortably fit without overcrowding. A good rule of thumb is to pick a board that allows a little breathing room between items, making it more appealing and easier for guests to grab.
- Plan Your Layout & Shop Smart: While not strictly a preparation step, a little mental planning or even a quick sketch can help. Consider the focal points you want to create. Then, make your grocery list based on your chosen ingredients, focusing on fresh, seasonal produce for that authentic fall feel. I always check for sales on specialty cheeses and meats to make it more budget-friendly.
- Prepare Your Cheeses:
- Bringing to Room Temperature: This is crucial! Remove your cheeses from the refrigerator at least 30-60 minutes before you plan to serve. Warm cheese truly shines, allowing its full flavor profile and creamy texture to develop.
- Pre-Cutting for Convenience: For semi-hard cheeses like cheddar or gouda, I often pre-cut some into cubes or thin slices. This makes it much easier for guests to serve themselves. For soft cheeses like brie, I might make a few initial cuts to encourage easy slicing, or leave it whole with a dedicated spreader.
- Shaping & Presentation: If I’m feeling fancy, I might gently warm a brie wheel slightly in a very low oven (or even just at room temperature) and then top it with a drizzle of honey and a few nuts before placing it on the board.
- Arrange Your Cured Meats:
- Fanning & Folding: Thinly sliced prosciutto looks elegant fanned out or draped artfully. For rounder meats like salami or capicola, I like to fold them into quarters or roll them into loose rosettes. This adds visual interest and makes them easier to pick up.
- Separating for Ease: Sometimes, especially with very thin meats, they can stick together. Gently separate slices beforehand so they’re ready to be artfully arranged without guests struggling.
- Wash & Slice Fresh Fruits:
- Thorough Washing: Always wash all your fresh fruits thoroughly under cold water.
- Careful Slicing: Slice apples and pears just before assembly to minimize browning. If you need to slice them ahead of time, a quick dip in lemon water (1 part lemon juice to 3 parts water) can help prevent oxidation, but I prefer fresh-cut for the best texture.
- Artful Cuts: Halve or quarter your figs to reveal their beautiful interior. Pomegranates can be de-seeded and their arils placed in a small bowl for easy scattering. Grapes can be left on small vines or separated into smaller clusters.
- Clean & Prep Vegetables (If Using):
- Wash and Trim: Wash baby carrots, radishes, and mini bell peppers. Trim as needed.
- Slice or Leave Whole: Slice radishes thinly, cut bell peppers into strips, or leave baby carrots whole. Cucumber can be sliced into rounds or spears.
- Portion Nuts, Dips, and Olives:
- Small Bowls are Your Friend: Decant honey, jams, mustards, olives, cornichons, and nuts into small, attractive bowls or ramekins. This not only looks nicer but also prevents spillage and keeps flavors from mingling inappropriately on the main board.
- Pre-Soaking Olives (Optional): If your olives are very briny, you can rinse them quickly under cold water or even soak them for 10-15 minutes to reduce their saltiness, then pat dry.
- Ready Your Crackers & Breads:
- Variety is Key: Open your cracker boxes and arrange a selection of different shapes, sizes, and flavors. Toast baguette slices for crostini, if using.
- Keep Them Fresh: Keep crackers sealed until just before assembly to maintain their crispness.
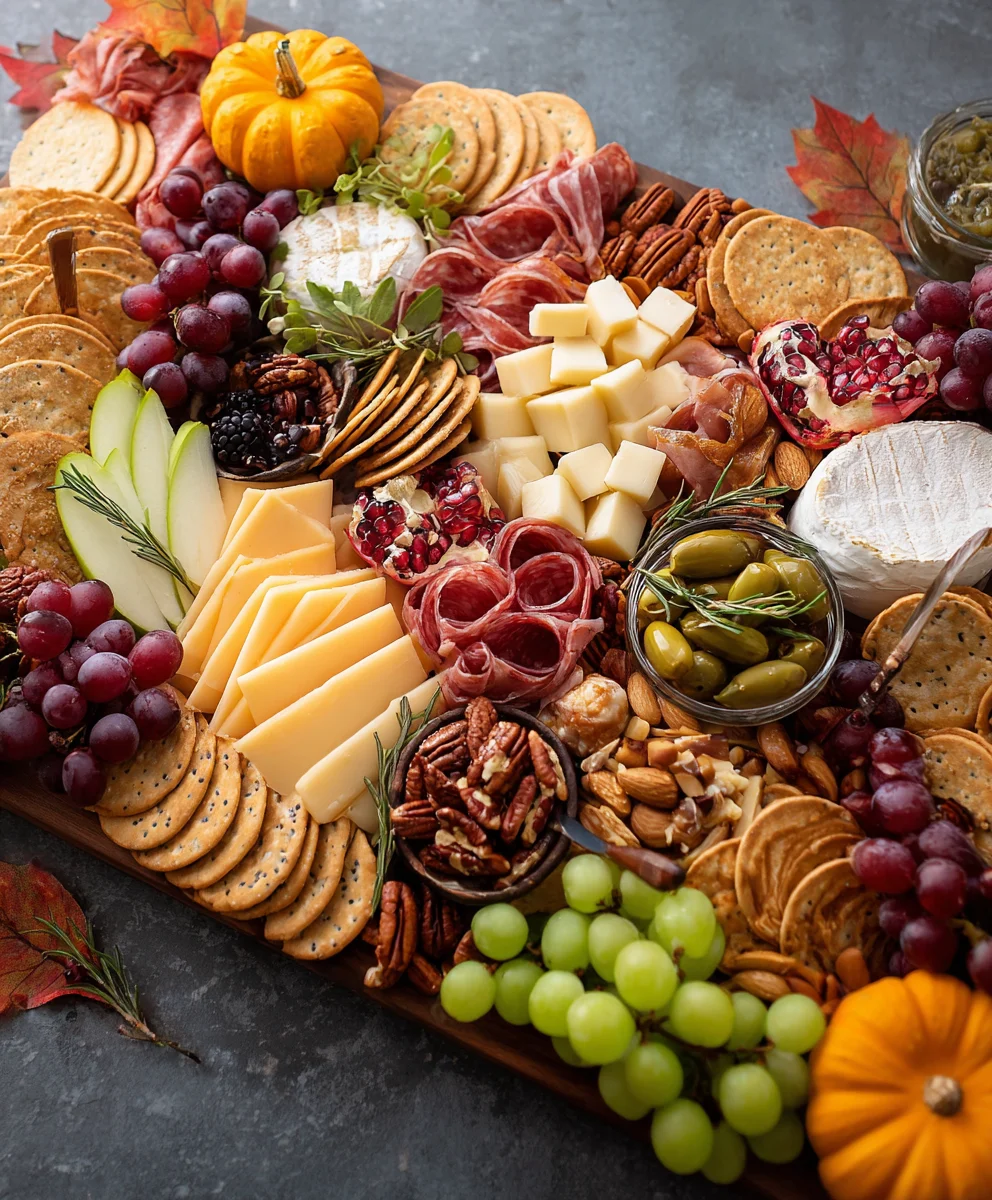
The Art of Assembling Your Fall Charcuterie Board
Now for the fun part! This is where you transform all your beautifully prepped ingredients into a visually stunning and incredibly tempting spread. The key to How To Build An Easy Fall Charcuterie Board that looks professionally done is to layer and fill, creating abundance and visual interest. Don’t be afraid to get creative!
- Anchor the Board with Large Items and Bowls:
- Placement of Bowls: Start by placing your small bowls or ramekins for dips, olives, nuts, and perhaps even some of the smaller fruits directly onto the board. I usually distribute these strategically around the board to create natural dividing lines and focal points.
- Largest Cheeses First: Next, place your largest cheese blocks or wheels. These also serve as anchors. Think about creating a triangle or zigzag pattern with your cheeses for balance.
- Artfully Arrange Your Cheeses:
- Spreading Out: Arrange the remaining cheeses around your initial anchor points. Ensure there’s a good mix of textures and colors. A soft brie next to a sharp cheddar, for instance.
- Providing Tools: Place a dedicated cheese knife or spreader next to each cheese. This is a small detail that makes a big difference in guest experience.
- Creating Visual Peaks: For hard cheeses, you can stack some slices or cubes to create varying heights, adding more visual dimension.
- Drape and Fold the Cured Meats:
- Weaving and Layering: Now it’s time for the meats! Arrange your folded or fanned prosciutto, salami, and other cured meats in flowing lines or small clusters between the cheeses and bowls.
- Adding Texture: Don’t just lay them flat. Create volume by folding them loosely, rolling them into spirals, or fanning them out. This makes the board look more bountiful and inviting.
- Filling Gaps: Meats are excellent for filling those initial larger gaps around your main anchors.
- Incorporate the Fresh Fruits:
- Clusters of Color: Place clusters of grapes, fanned apple and pear slices, and halved figs onto the board. Distribute them strategically to add pops of vibrant fall color.
- Mixing Textures: Fruits provide a crucial fresh, sweet, and often juicy counterpoint to the rich cheeses and salty meats. Arrange them so they are easily accessible.
- Preventing Browning (if not pre-treated): If you didn’t pre-treat your apples and pears, ensure they are placed where they will be enjoyed quickly or given a fresh cut just before serving.
- Nestle in the Vegetables (If Using):
- Adding Crispness: Arrange your baby carrots, radish slices, or bell pepper strips in small piles or fanned out, tucked into empty spaces.
- Freshness and Crunch: Vegetables add a wonderful fresh crunch and another layer of texture and color. They also help lighten the board.
- Fill the Remaining Spaces with Crackers and Bread:
- Strategic Placement: This is where you really start to fill out the board. Arrange your crackers and bread around the perimeter and in any remaining open spaces. I like to stand some crackers upright in clusters for height, while others can be laid flat in overlapping rows.
- Variety and Accessibility: Make sure a variety of crackers and bread options are within easy reach of the different cheeses and spreads.
- Abundance: Don’t be shy with crackers; you’ll likely need more than you think! It’s easy to replenish them as the board gets picked over.
- Scatter Nuts and Dried Fruits:
- The “Filler” Elements: Now for the smaller, more scatter-friendly items. Sprinkle your walnuts, pecans, almonds, dried apricots, and cranberries into the smallest nooks and crannies.
- Visual Appeal and Texture: These add fantastic texture, flavor, and visual appeal, making the board look truly abundant and inviting. They fill in those tiny gaps that can make a board look sparse.
- Proximity to Cheese: I often sprinkle nuts near a cheese they pair well with, like walnuts near a blue cheese or candied pecans near brie.
- Place Dips and Spreads (and their accoutrements):
- Near Pairing Items: Ensure your honey is near a soft cheese, your fig jam near a hard cheese, and your mustard near the meats.
- Providing Utensils: Each dip, jam, or spread should have its own small spoon or spreader. This maintains hygiene and makes serving simple.
- The Final Touches and Garnishes:
- Adding Aroma and Beauty: Tuck fresh rosemary sprigs and cinnamon sticks strategically around the board. These aren’t just for looks; they release subtle, inviting fall aromas that enhance the whole experience.
- A Dash of Elegance: If you’re using pomegranate arils, scatter a few over an open area of cheese or fruit for a sparkling, jewel-like effect.
- Aesthetic Check: Step back and look at your creation. Does it look balanced? Is there a good mix of colors and textures? Do you see any glaring empty spots? Adjust as needed! This final polish is what makes How To Build An Easy Fall Charcuterie Board truly exceptional.
Presentation & Enjoyment Tips for Your Fall Charcuterie Board
You’ve put in the effort to create a masterpiece, now let’s ensure it’s enjoyed to its fullest! These final tips will help you present your board like a seasoned pro and ensure your guests have a delightful experience with your easy fall charcuterie board.
- Temperature is Key:
- Serving Cheeses: As I mentioned in prep, allowing cheeses to come to room temperature (about 30-60 minutes before serving) truly enhances their flavor and texture. A cold cheese is a muted cheese.
- Keeping it Fresh: If you’re serving outdoors or in a very warm environment, consider using a chiller board or placing ice packs beneath the board to keep delicate items like some cheeses and meats at an optimal temperature for longer. However, for most indoor gatherings, room temperature is perfect for about 2-3 hours.
- Offer Variety in Texture and Flavor:
- Sensory Experience: When building your easy fall charcuterie board, always think about the journey your guests’ taste buds will take. Aim for a mix of salty, sweet, savory, tangy, crunchy, creamy, and chewy. This ensures every bite offers a new and exciting experience.
- Pairing Suggestions: While not strictly necessary, you can sometimes offer little suggestion cards, like “Pairs well with brie!” next to a fig jam, especially if you have adventurous or unfamiliar cheeses. This encourages exploration.
- Provide Ample Serving Implements:
- Individual Tools: Make sure each cheese has its own knife. Provide small spoons for jams and honey, and mini tongs or toothpicks for meats, olives, and certain fruits. This is crucial for hygiene and ease of serving.
- No Double-Dipping: Clearly communicate or subtly encourage guests to use the provided tools to avoid cross-contamination and maintain freshness.
- Strategic Replenishment Strategy:
- Keep Reserves Handy: Have extra crackers, fruits (especially apples and pears that might brown), and meats prepped and ready in the kitchen. As the board gets picked over, it’s easy to discreetly add fresh items to keep it looking abundant.
- Clean Up Crumbs: Keep a small, clean brush or cloth nearby to quickly sweep away cracker crumbs or stray bits, maintaining a tidy appearance.
- Consider Drink Pairings:
- Wine Wisdom: For a fall charcuterie board, hearty red wines like Pinot Noir, Merlot, or a Zinfandel pair beautifully with aged cheeses and cured meats. For white wines, a crisp Sauvignon Blanc or an unoaked Chardonnay can offer a nice contrast.
- Beyond Wine: Don’t forget craft beers, especially seasonal ales or ciders, which are fantastic with fall flavors. Even sparkling cider or a spiced non-alcoholic punch can elevate the experience for all guests.
- Embrace Creative Theme Ideas:
- Seasonal Decor: Beyond the food, consider adding small, non-edible fall decor elements to your table, like mini pumpkins, gourds, or autumn leaves, around the board. This amplifies the seasonal aesthetic.
- Personal Touches: Don’t be afraid to add a personal touch that reflects your taste. Maybe a homemade spiced nut mix, or a unique local preserve. Your personality truly makes an easy fall charcuterie board your own.
- Storytelling Through Food: Think about the “story” you want your board to tell. Is it an homage to local farms? A journey through European flavors? This mindset helps guide your ingredient choices and presentation.
<h2>Conclusion:</h2>
<p>Well, friends, we’ve journeyed through the wonderful world of fall flavors and effortless entertaining, and I truly hope you’re feeling inspired. What we’ve explored isn’t just a recipe; it’s a philosophy for stress-free gatherings and delightful dining. This isn’t about slaving away in the kitchen for hours; it’s about smart, thoughtful assembly that yields a truly spectacular result. The beauty of what we’ve discussed lies in its incredible versatility, its stunning visual appeal, and the sheer joy it brings to any table. It’s a culinary masterpiece that requires more curation than cooking, allowing you to actually enjoy your guests and the autumn ambiance.</p>
<p>I honestly believe that <strong>mastering How To Build An Easy Fall Charcuterie Board</strong> is one of the best entertaining skills you can cultivate. It’s a skill that will serve you well through countless seasons and celebrations. Imagine the warm glow of candlelight, the rich aroma of spiced nuts and crisp apples, the vibrant colors of cheeses and seasonal fruits – all coming together on one abundant platter. It’s an experience for all the senses, a conversation starter, and a true testament to the simple pleasures of good food shared with good company. This approach demystifies entertaining, transforming what can often feel daunting into an enjoyable, creative process. It champions the idea that impressive doesn’t have to mean complicated, and delicious doesn’t have to mean laborious. The textures, the colors, the interplay of sweet, savory, and tangy elements all contribute to an unforgettable eating experience that feels both sophisticated and wonderfully approachable.</p>
<h4>Serving Suggestions and Creative Variations:</h4>
<p>While our focus has been on the quintessential fall board, don’t let your creativity stop there! This concept is incredibly adaptable. For a cozy night in, consider scaling it down to a “mini board” for two, perhaps with a focus on specific cheeses you adore and a handful of your favorite seasonal accompaniments. Thinking ahead to holiday gatherings? You could elevate your board with more gourmet cheeses, truffle-infused honey, or even a small bowl of cranberry chutney. For those who love a sweet finish, why not dedicate a section of your board, or even an entirely separate small board, to dessert elements? Think mini pumpkin cheesecakes, dark chocolate squares, candied pecans, and dried cranberries alongside a dollop of whipped cream or a drizzle of caramel. <strong>Consider a “Breakfast in Bed” charcuterie board</strong> for a special morning, featuring mini pancakes, fresh berries, bacon or sausage links, and maple syrup in a small ramekin.</p>
<p>You can also theme your board around a specific region or cuisine. Imagine an Italian-inspired board with prosciutto, salami, fresh mozzarella, olives, and sundried tomatoes, or a French provincial theme with brie, pâté, cornichons, and crusty baguette. Don’t be afraid to experiment with different dips and spreads – a spicy pepper jam, a creamy artichoke dip, or even a homemade pesto can add an exciting dimension. For beverages, pair your fall board with a robust red wine like a Cabernet Sauvignon or a crisp Pinot Noir, a local craft beer, or warm spiced apple cider. For a non-alcoholic option, sparkling cider, cranberry spritzers, or even a perfectly brewed cup of chai tea can complement the autumnal flavors beautifully. The possibilities truly are limitless, limited only by your imagination and the delicious bounty of the season.</p>
<h4>Your Turn to Create and Share!</h4>
<p>Now that you have all the insider tips and inspiration, I wholeheartedly encourage you to roll up your sleeves (metaphorically, of course, since there’s no actual cooking!) and create your very own fall charcuterie board. Don’t feel pressured to make it perfect; the true joy lies in the process of selection, arrangement, and eventually, sharing. <strong>Embrace the journey of discovering new flavor combinations</strong> and presenting them beautifully. I promise you’ll find it immensely satisfying, and your guests will be thoroughly impressed by your effortless elegance.</p>
<p>Once you’ve assembled your masterpiece, I would absolutely love to hear about your experience! What were your favorite components? Did you discover any unexpected pairings? Did you try any unique variations that really wowed your friends and family? Please, share your stories, your triumphs, and even your “lessons learned” in the comments below. Better yet, snap a photo of your stunning creation and tag me on social media – I can’t wait to see the incredible fall charcuterie boards you bring to life! Let’s build a community of enthusiastic entertainers who celebrate the art of beautiful, easy food. Happy building, and happy feasting!</p>
Easy Fall Charcuterie Board: Simple Harvest Spreads
Craft an effortless and elegant Fall Charcuterie Board, perfect for any autumn gathering, from football tailgates to cozy snacking. This customizable board features a delightful array of cheeses, cured beef meats, seasonal fruits, nuts, breads, and savory spreads, offering a tempting bite for every palate with minimal cooking.
Ingredients
-
1 wheel creamy cheese (Brie or Camembert)
-
4-6 oz semi-hard cheese (aged cheddar, gouda, or gruyère), cubed/sliced
-
4-6 oz sharp cheese (blue or goat cheese), crumbled
-
Optional: Small log fresh goat cheese
-
2-3 oz thinly sliced Beef Prosciutto or Bresaola
-
4-6 oz sliced Beef Salami rounds
-
2-3 oz thinly sliced Beef Coppa
-
Optional: Small amount thinly sliced Smoked Beef Sausage
-
2-3 crisp apples (Honeycrisp, Fuji), thinly sliced
-
1-2 firm pears (Bosc, Anjou), sliced
-
1 small bunch red or green grapes
-
4-6 fresh figs, halved or quartered
-
Arils from 1 whole pomegranate
-
2-3 clementines or mandarin oranges, peeled and separated
-
Optional: Handful baby carrots
-
Optional: 4-6 radishes, sliced or whole
-
Optional: 2-3 mini bell peppers, sliced
-
Optional: 1/2 cucumber, sliced or sticks
-
1 box water crackers or plain biscuits
-
1 box artisan crackers (rosemary, olive oil, fig & olive)
-
Half a baguette, sliced and lightly toasted (for crostini)
-
A few grissini (breadsticks)
-
Small jar or squeeze bottle Honey
-
1 small jar fig jam or fruit preserves (apricot or cranberry)
-
1 small jar whole grain mustard or Dijon
-
Small bowl mixed olives (kalamata, castelvetrano)
-
Small bowl cornichons or gherkins
-
1/2 cup walnuts or pecans (toasted optional)
-
Optional: Candied pecans or walnuts
-
1/2 cup almonds (raw or roasted)
-
1/2 cup dried apricots or cranberries
-
A few fresh rosemary sprigs
-
2-3 cinnamon sticks
-
Optional: Small edible flowers
Instructions
-
Step 1
Choose a large serving board. Remove cheeses from the refrigerator 30-60 minutes before serving to reach room temperature. Pre-cut semi-hard cheeses; make initial cuts for soft cheeses or provide a spreader. -
Step 2
Fan out or artfully drape thinly sliced Beef Prosciutto or Bresaola. Fold Beef Salami and Beef Coppa into quarters, rosettes, or loose spirals for visual interest. Gently separate slices if they stick together. -
Step 3
Wash all fresh fruits and vegetables thoroughly. Slice apples and pears just before assembly (or dip in lemon water to prevent browning). Halve figs. Deseed pomegranates for arils. Separate grapes into smaller clusters and clementines into segments. Slice or trim optional vegetables like carrots, radishes, bell peppers, and cucumber. -
Step 4
Decant Honey, jams, mustards, olives, cornichons, and nuts into small attractive bowls or ramekins. If olives are very briny, rinse quickly and pat dry to reduce saltiness. -
Step 5
Open cracker boxes and arrange a selection of different types. Toast baguette slices for crostini if using. Keep crackers sealed until just before assembly to maintain crispness. -
Step 6
Begin assembly by placing small bowls (for dips, olives, nuts) and the largest cheese blocks/wheels strategically on the board. These serve as anchors and focal points. Provide a dedicated cheese knife or spreader for each cheese. -
Step 7
Drape and fold the cured beef meats in flowing lines or small clusters between cheeses and bowls, creating volume and filling initial gaps. Arrange remaining cheeses around anchor points, mixing textures and colors for balance. -
Step 8
Place clusters of grapes, fanned apple and pear slices, halved figs, and other prepared fruits onto the board, distributing them for vibrant fall color and easy access. Tuck in prepared vegetables if using, filling any remaining empty spaces. -
Step 9
Arrange crackers and bread around the perimeter and in any remaining open spaces. Stand some crackers upright in clusters for height, while others can be laid flat in overlapping rows. Ensure a variety of options are easily accessible. -
Step 10
Sprinkle walnuts, pecans, almonds, dried apricots, and cranberries into the smallest nooks and crannies. These add fantastic texture, flavor, and visual appeal, making the board look truly abundant and inviting. -
Step 11
Ensure Honey, jams, and mustards are placed near their suggested pairing items, each with its own small spoon or spreader. Tuck fresh rosemary sprigs and cinnamon sticks strategically around the board for aroma and aesthetic. Scatter pomegranate arils over an open area of cheese or fruit if desired. Step back and adjust for overall balance and abundance. -
Step 12
Serve the charcuterie board at room temperature for optimal cheese flavor. Keep extra crackers and fruits ready for replenishment. Offer ample individual serving implements for hygiene and ease. Consider pairing with non-alcoholic seasonal beverages like sparkling cider to complete the experience.
Important Information
Nutrition Facts (Per Serving)
It is important to consider this information as approximate and not to use it as definitive health advice.
Allergy Information
Please check ingredients for potential allergens and consult a health professional if in doubt.


Leave a Comment