

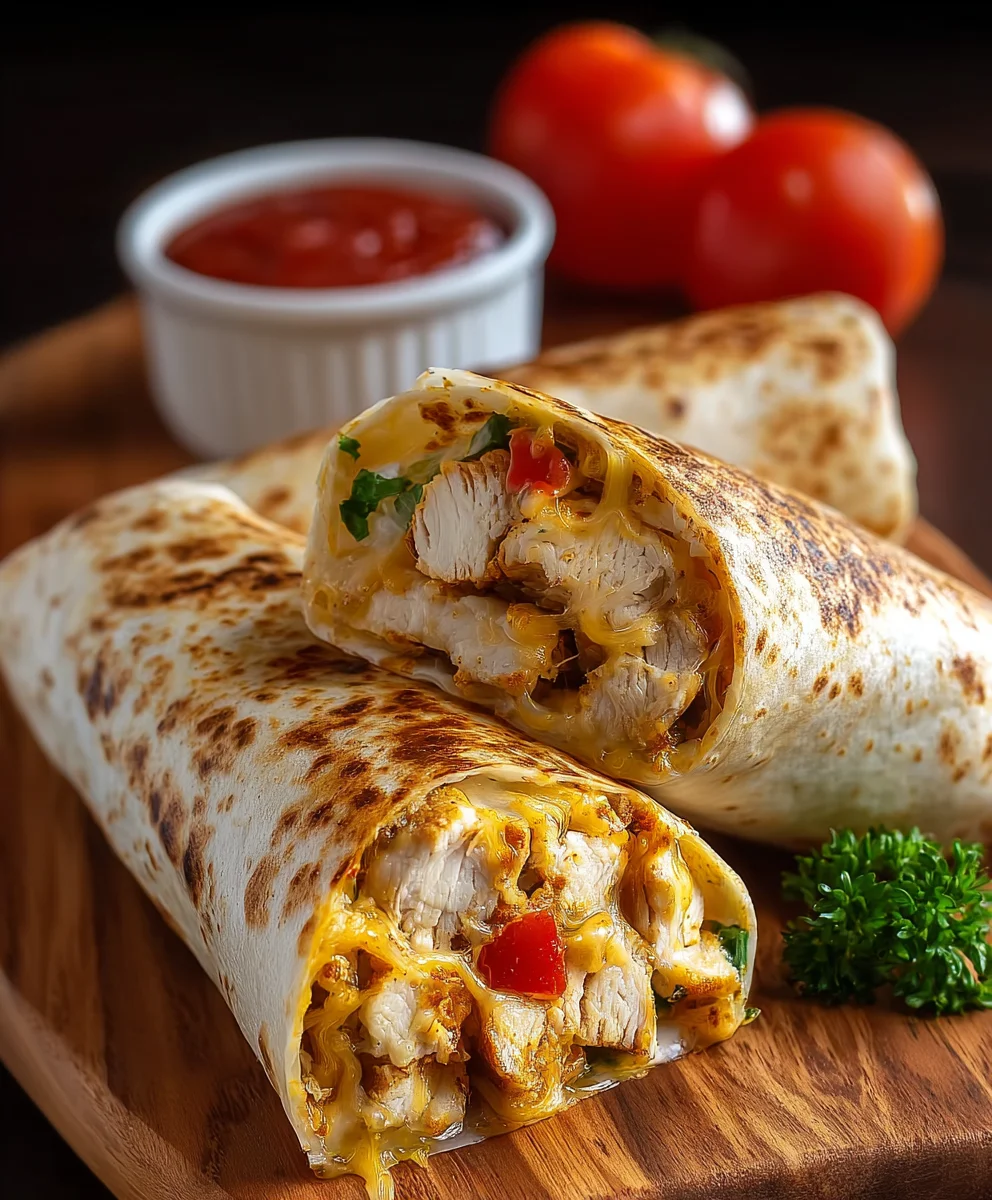
Cheesy Garlic Chicken Wraps are more than just a meal; they’re an experience! Imagine sinking your teeth into a warm, soft tortilla, generously filled with succulent, tender chicken, infused with the irresistible aroma of garlic, and then elevated by a luscious, gooey embrace of melted cheese. It’s the ultimate comfort food, conveniently bundled into one perfect handheld package that promises to tantalize your taste buds and satisfy your cravings.
For centuries, the concept of wrapping delicious fillings in flatbreads has been a culinary cornerstone across diverse cultures, from ancient Mediterranean pita to Mexican burritos. This universal appeal stems from the sheer versatility and delightful convenience they offer, making them a global staple. Our modern take on this beloved tradition brings together the universally adored flavors of garlic and cheese with lean protein, making it an instant crowd-pleaser that fits seamlessly into today’s busy lifestyles.
What makes these Cheesy Garlic Chicken Wraps truly special is their incredible balance of flavors and textures. The savory chicken and pungent garlic are perfectly complemented by the rich, creamy cheese, all encased in a soft wrapper that makes every bite a delightful journey. Whether you’re seeking a quick and satisfying weeknight dinner, a fun addition to your lunch rotation, or an easy dish to impress guests, this recipe is designed to deliver maximum flavor with minimal fuss. Prepare to discover your new go-to favorite!

Ingredients:
- For the Juicy Garlic Chicken:
- 1.5 lbs boneless, skinless chicken breasts or thighs, cut into 1/2-inch cubes
- 2 tablespoons olive oil
- 5-6 cloves garlic, freshly minced (about 2 tablespoons)
- 1 teaspoon smoked paprika
- 1/2 teaspoon dried oregano
- 1/4 teaspoon cayenne pepper (optional, for a little kick!)
- Salt and freshly ground black pepper to taste (I usually start with 1 teaspoon salt and 1/2 teaspoon pepper)
- For the Creamy Cheesy Garlic Sauce:
- 4 ounces cream cheese, softened to room temperature
- 1/2 cup full-fat mayonnaise (don’t skimp here, it makes a difference!)
- 1/4 cup sour cream or plain Greek yogurt (for a bit of tang and extra creaminess)
- 3-4 cloves garlic, very finely minced or grated (yes, more garlic, you can never have enough for Cheesy Garlic Chicken Wraps!)
- 1/4 cup grated Parmesan cheese
- 1/4 cup shredded mozzarella cheese (it melts beautifully into the sauce)
- 2 tablespoons fresh chives or parsley, finely chopped, plus extra for garnish
- 1-2 tablespoons milk or chicken broth, to achieve desired sauce consistency
- Salt and black pepper to taste
- For Assembling the Cheesy Garlic Chicken Wraps:
- 8-10 large flour tortillas (burrito size, about 10-12 inches)
- 1.5 cups shredded Monterey Jack or a Mexican cheese blend (for layering inside the wraps)
- Optional Fresh Fillings: 1/2 cup finely shredded crisp lettuce, 1/2 cup diced ripe tomatoes, or 1/4 cup thinly sliced red onion for a refreshing crunch
- A little extra olive oil or butter for toasting the wraps (optional but highly recommended!)
Preparing the Flavorful Cheesy Garlic Chicken Filling
This is where we build the heart of our amazing Cheesy Garlic Chicken Wraps. We’ll start by infusing our chicken with incredible garlic flavor, then create a rich, creamy sauce that brings it all together.
- Prepare the Chicken: First things first, grab your boneless, skinless chicken breasts or thighs. I find thighs offer a bit more juiciness, but breasts work perfectly too. Cut your chosen chicken into uniform 1/2-inch cubes. This size is ideal because it cooks quickly and ensures every bite of your wrap gets a good amount of chicken without being too chunky. Place the cubed chicken in a medium bowl.
- Season the Chicken: To that chicken, add your 2 tablespoons of olive oil, the generous 5-6 cloves of freshly minced garlic (about 2 tablespoons), 1 teaspoon of smoked paprika for that lovely smoky depth, 1/2 teaspoon of dried oregano for an earthy aroma, and if you like a little heat, go ahead and add that 1/4 teaspoon of cayenne pepper. Finish with a good pinch of salt and freshly ground black pepper. Give everything a really good stir to ensure every piece of chicken is beautifully coated in those aromatic spices and garlic. You can let this marinate for 15-30 minutes at room temperature if you have the time, or even longer in the fridge, but it’s not strictly necessary if you’re short on time. The key is to make sure every piece is evenly seasoned.
- Cook the Chicken: Heat a large non-stick skillet or cast-iron pan over medium-high heat. Once hot, add your seasoned chicken in a single layer. You might need to do this in batches if your pan isn’t large enough to avoid overcrowding, which can steam the chicken instead of browning it. Cook for about 4-6 minutes, stirring occasionally, until the chicken is cooked through and beautifully golden brown on all sides. You’re looking for those lovely caramelized bits, which add so much flavor. Once cooked, remove the chicken from the pan and set it aside in a clean bowl. Don’t worry if there are some flavorful bits left in the pan – those are pure gold for our sauce!
Crafting the Luscious Cheesy Garlic Sauce
Now for the star of the show: the creamy, cheesy, garlicky sauce that truly makes these “Cheesy Garlic Chicken Wraps” unforgettable. This sauce is designed to be rich and deeply flavorful.
- Prepare the Sauce Base: In a medium bowl, combine your 4 ounces of softened cream cheese, 1/2 cup of full-fat mayonnaise, and 1/4 cup of sour cream or Greek yogurt. The cream cheese provides a wonderful tang and body, while the mayo adds unctuous richness, and the sour cream a delightful zing. Use a whisk to beat these ingredients together until they are completely smooth and free of lumps. This might take a minute or two, but a smooth base is essential for a velvety sauce.
- Infuse with Garlic and Cheese: To your creamy base, add the remaining 3-4 cloves of very finely minced or grated garlic. Grating the garlic ensures that its potent flavor is evenly distributed throughout the sauce without large chunks. Next, stir in your 1/4 cup of grated Parmesan cheese and 1/4 cup of shredded mozzarella cheese. These cheeses will melt into the sauce, adding incredible depth and that signature cheesy goodness. Finally, fold in 2 tablespoons of your freshly chopped chives or parsley. Fresh herbs really brighten up the sauce and add a pop of color.
- Adjust Consistency and Season: Stir everything together until well combined. At this point, the sauce might be quite thick. To achieve the perfect spreadable consistency for your Cheesy Garlic Chicken Wraps, gradually whisk in 1-2 tablespoons of milk or chicken broth, a little bit at a time, until the sauce is smooth, creamy, and easily spreadable but not watery. Taste the sauce and season it generously with salt and freshly ground black pepper. Remember, this sauce needs to carry a lot of flavor, so don’t be shy with the seasoning!
- Combine Chicken and Sauce: Gently fold the cooked, golden-brown chicken cubes into your creamy cheesy garlic sauce. Stir until every piece of chicken is thoroughly coated. This is your magnificent Cheesy Garlic Chicken filling, ready for wrapping! The aroma alone at this stage is absolutely heavenly.
Assembling and Finishing Your Cheesy Garlic Chicken Wraps
With our incredible filling ready, it’s time to bring everything together into these delightful wraps. This section details how to prepare your tortillas and assemble each wrap for maximum enjoyment.
- Warm the Tortillas: This is a crucial step for pliable, easy-to-roll wraps that won’t crack. You have a few options here:
- Microwave: Stack a few tortillas (2-3) on a plate, cover with a damp paper towel, and microwave for 20-30 seconds until warm and soft. Repeat with remaining tortillas.
- Dry Skillet: Heat a dry skillet over medium heat. Place one tortilla at a time in the hot skillet for 15-20 seconds per side, until it’s soft and slightly puffed. Keep them warm by wrapping them in a clean kitchen towel.
- Oven: Wrap a stack of tortillas in foil and warm in a 300°F (150°C) oven for about 10-15 minutes.
Warm tortillas are much more cooperative and less likely to tear!
- Lay Out and Fill Each Tortilla: Lay one warm tortilla flat on a clean work surface. Spoon about 1/2 to 3/4 cup of the warm Cheesy Garlic Chicken filling onto the center of the tortilla, leaving a border of about 1-2 inches around the edges. Don’t overfill, or it will be hard to roll!
- Add Extra Cheese and Optional Freshness: Now, for that extra cheesy goodness that truly lives up to the name “Cheesy Garlic Chicken Wraps”! Sprinkle about 2-3 tablespoons of your shredded Monterey Jack or Mexican cheese blend directly over the chicken filling. If you’re adding optional fresh fillings like shredded lettuce, diced tomatoes, or thinly sliced red onion, now is the time to add a small amount on top of the cheese. These fresh elements add a lovely textural contrast and burst of freshness against the rich, creamy chicken.
- Roll the Wrap:
- First, fold the left and right sides of the tortilla inward over the filling, just enough to cover the sides of the filling. This creates neat, enclosed ends.
- Next, starting from the bottom edge closest to you, tightly fold the bottom edge up and over the filling.
- Continue to roll the tortilla upwards, away from you, keeping it as snug and tight as possible. You want a compact wrap that holds its shape.
Repeat this process for all remaining tortillas and filling.
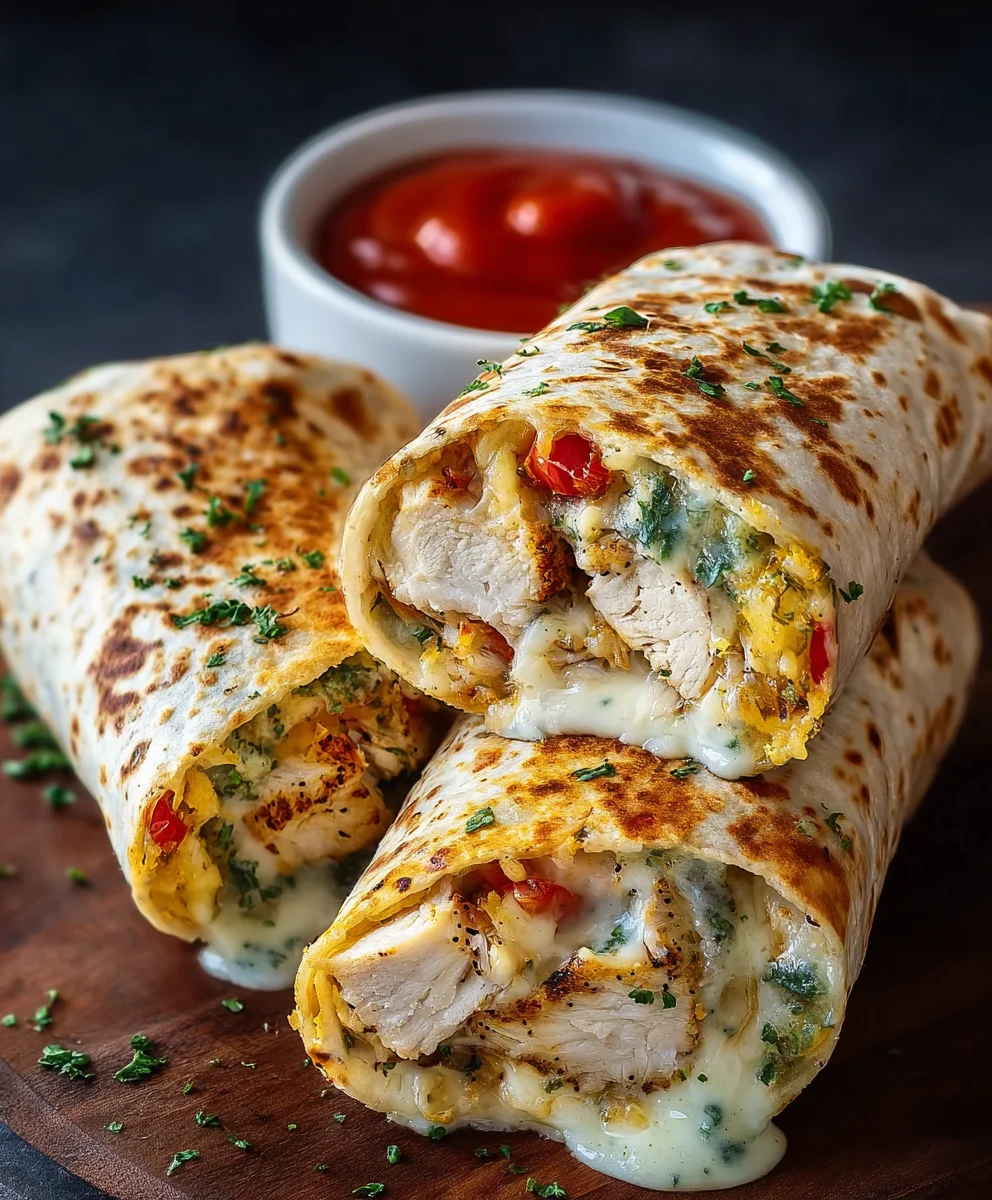
- Optional (but Highly Recommended!) Toasting: For an extra layer of texture and warmth, I absolutely love lightly toasting my Cheesy Garlic Chicken Wraps. Heat a clean, dry skillet over medium heat (you can add a tiny bit of olive oil or butter if you like, for extra crispness and color). Place the assembled wraps seam-side down in the hot pan. Cook for 2-3 minutes per side, or until the tortilla is golden brown and crispy, and the cheese inside is gloriously melted and gooey. This step takes your wrap from good to absolutely phenomenal!
Serving Suggestions and Enjoying Your Cheesy Garlic Chicken Wraps
Your beautiful Cheesy Garlic Chicken Wraps are now ready to be devoured! Here are some ideas for how to serve and enjoy them, along with some tips for storage and variations.
- Serve Immediately: These wraps are best served warm, especially if you toasted them. The melted cheese and hot chicken filling are at their peak. You can cut them in half diagonally for an attractive presentation and easier handling.
- Accompaniments: While these wraps are hearty enough to be a meal on their own, they also pair wonderfully with a simple side salad dressed with a light vinaigrette, some crispy sweet potato fries, or even a cup of your favorite tomato soup for a comforting meal.
- Storage: If you have any leftover Cheesy Garlic Chicken Wraps, you can store them in an airtight container in the refrigerator for up to 2-3 days.
- Reheating: To reheat, I recommend using a dry skillet over medium-low heat to gently warm them through and re-crisp the tortilla. You can also use a toaster oven or even a regular oven at 350°F (175°C) for 10-15 minutes until heated through. Microwaving is an option, but it might make the tortilla soft rather than crispy.
- Variations to Explore:
- Spicy Kick: Increase the cayenne pepper in the chicken seasoning or add a dash of hot sauce to the creamy garlic sauce for more heat.
- Veggie Boost: Feel free to sauté some finely diced bell peppers or spinach with the chicken to sneak in extra vegetables.
- Cheese Swaps: Experiment with different shredded cheeses like a sharp cheddar, provolone, or even a smoky gouda for unique flavor profiles in your Cheesy Garlic Chicken Wraps.
- Grilling Option: If you have a panini press or grill pan, you can use it to press and toast your wraps for beautiful grill marks and a wonderfully compressed, warm interior.
Whether it’s a quick weeknight dinner or a delightful lunch, these Cheesy Garlic Chicken Wraps are a guaranteed crowd-pleaser. Enjoy every garlicky, cheesy bite!
Conclusion:
And there you have it, friends! We’ve journeyed through the simple steps to create a truly unforgettable dish that I am absolutely convinced will become a staple in your culinary repertoire. These Cheesy Garlic Chicken Wraps aren’t just another meal; they are an experience, a symphony of flavors and textures that come together in perfect harmony. From the succulent, perfectly seasoned chicken to the vibrant, aromatic garlic, and let’s not forget that irresistible blanket of gooey, melted cheese, every single bite is designed to delight your taste buds. This recipe is a must-try for so many reasons. It’s incredibly versatile, adaptable to whatever you have on hand, and forgiving for even the most novice of cooks. It’s the ideal solution for those busy weeknights when you crave something deeply satisfying and homemade, but just don’t have hours to spend in the kitchen. Moreover, it’s a guaranteed crowd-pleaser, perfect for family dinners, casual get-togethers, or even a delightful packed lunch that will make your colleagues envious.
I truly believe the magic of these wraps lies in their comfort factor, delivering warmth and satisfaction with every bite. The crispy exterior of the tortilla giving way to that tender, flavor-packed filling is pure bliss. But don’t just take my word for it! I encourage you to unleash your inner chef and get creative with how you serve and customize these wonderful wraps. For a complete meal, consider pairing them with a fresh, crisp green salad tossed in a light vinaigrette, or a hearty bowl of tomato soup for ultimate comfort. If you’re hosting, a side of crunchy tortilla chips with a vibrant homemade salsa or a dollop of cooling sour cream makes for an excellent accompaniment. Don’t hesitate to explore variations to suit your palate!
Want to amp up the heat? A few dashes of your favorite hot sauce or some finely diced jalapeños mixed into the chicken will do the trick. Looking to boost the veggie content? Sautéed bell peppers, onions, spinach, or mushrooms can be easily folded into the chicken mixture, adding both nutrition and depth of flavor. For those who prefer a different protein, sliced beef or even a hearty plant-based alternative can be substituted for the chicken, making this recipe incredibly flexible. And when it comes to cheese, feel free to experiment beyond cheddar and Monterey Jack; a spicy pepper jack will add a kick, while provolone offers a delightful mild creaminess. You could even turn this into a delicious “wrap bowl” by serving the cheesy garlic chicken mixture over a bed of rice or quinoa for a gluten-free option.
Ultimately, my biggest hope is that you find as much joy in making and devouring these Cheesy Garlic Chicken Wraps as I do. This isn’t just a recipe; it’s an invitation to create, to share, and to savor truly good food. So, please, gather your ingredients, fire up your stove, and give this recipe a try! I am so excited for you to experience the deliciousness firsthand. Once you’ve whipped up your own batch, I would absolutely love to hear about your experience. Did you add any unique twists? What did you serve them with? Share your culinary adventures and feedback in the comments below, or better yet, snap a photo and tag me on social media! Your insights and variations inspire us all. Happy cooking, and bon appétit!
People Also Ask (FAQs):
Can I prepare the Cheesy Garlic Chicken Wraps filling ahead of time?
Absolutely! The chicken filling for these Cheesy Garlic Chicken Wraps can be cooked up to 2-3 days in advance. Simply let it cool completely, then store it in an airtight container in the refrigerator. When you’re ready to make your wraps, just reheat the filling gently on the stovetop or in the microwave before assembling and toasting. This makes them perfect for meal prepping!
What kind of tortillas are best for these wraps?
I typically use large, soft flour tortillas (about 8-10 inches) as they are pliable and hold the filling well without tearing. However, you can certainly experiment with whole wheat tortillas for a healthier option, or even smaller street-taco-sized tortillas for mini wraps or appetizers. Just be sure they are fresh and pliable to prevent cracking when folding.
How can I make my Cheesy Garlic Chicken Wraps extra crispy?
To achieve maximum crispiness, brush the exterior of your assembled wraps lightly with a bit of butter or olive oil before placing them in your hot pan or on your griddle. Press down gently with a spatula as they cook, ensuring even contact with the heat. Cook on medium heat for a few minutes per side until golden brown and the cheese is beautifully melted and bubbling.
Can I make a vegetarian version of these wraps?
Yes, absolutely! This recipe is incredibly versatile. Instead of chicken, you could use a mixture of sautéed black beans and corn, seasoned mushrooms, crumbled firm tofu, or even a plant-based chicken alternative. Ensure your vegetarian filling is well-seasoned to maintain that delicious flavor profile.
What are some good dipping sauces for Cheesy Garlic Chicken Wraps?
While these wraps are flavorful on their own, a good dipping sauce can elevate the experience! My personal favorites include a classic sour cream, a zesty homemade salsa, creamy guacamole, or even a spicy sriracha mayo. A simple ranch dressing or a cilantro-lime crema would also be fantastic additions!
Easy Cheesy Garlic Chicken Wraps
Cheesy Garlic Chicken Wraps are an irresistible experience: succulent, tender chicken infused with garlic and melted cheese, all wrapped in a warm, soft tortilla. This ultimate comfort food is conveniently bundled into a perfect handheld package, promising to tantalize your taste buds and satisfy your cravings. It’s a quick and satisfying meal for any day of the week.
Ingredients
-
1.5 lbs boneless, skinless chicken, cubed
-
2 tbsp olive oil
-
5-6 cloves garlic, minced (2 tbsp)
-
1 tsp smoked paprika
-
0.5 tsp dried oregano
-
0.25 tsp cayenne pepper (optional)
-
Salt and black pepper to taste (approx. 1 tsp salt, 0.5 tsp pepper)
-
4 oz cream cheese, softened
-
0.5 cup full-fat mayonnaise
-
0.25 cup sour cream or plain Greek yogurt
-
3-4 cloves garlic, finely minced/grated
-
0.25 cup grated Parmesan cheese
-
0.25 cup shredded mozzarella cheese
-
2 tbsp fresh chives or parsley, chopped
-
1-2 tbsp milk or chicken broth
-
Salt and black pepper to taste
-
8-10 large flour tortillas (10-12 inch)
-
1.5 cups shredded Monterey Jack or Mexican cheese blend
-
Optional: 0.5 cup shredded lettuce
-
Optional: 0.5 cup diced tomatoes
-
Optional: 0.25 cup sliced red onion
-
Olive oil or butter, for toasting (optional)
Instructions
-
Step 1
Cut chicken into 1/2-inch cubes. In a bowl, toss chicken with 2 tbsp olive oil, 5-6 cloves minced garlic, smoked paprika, oregano, cayenne (optional), salt, and pepper. Cook chicken in a hot skillet over medium-high heat for 4-6 minutes until golden brown and cooked through. Remove and set aside. -
Step 2
In a medium bowl, whisk softened cream cheese, mayonnaise, and sour cream or Greek yogurt until smooth. Stir in 3-4 cloves finely minced garlic, Parmesan, mozzarella, and chives or parsley. Add 1-2 tbsp milk or chicken broth to reach desired consistency. Season with salt and pepper. -
Step 3
Gently fold the cooked chicken into the creamy garlic sauce until well coated. -
Step 4
Warm tortillas (microwave, dry skillet, or oven). Lay a warm tortilla flat. Spoon 1/2-3/4 cup chicken filling onto the center, leaving a border. -
Step 5
Sprinkle 2-3 tbsp Monterey Jack or Mexican cheese blend over the filling. Add optional fresh fillings like shredded lettuce, diced tomatoes, or sliced red onion. -
Step 6
Fold the sides of the tortilla inward, then fold the bottom edge up and over the filling, rolling tightly to form a wrap. Repeat for remaining tortillas. -
Step 7
For an extra crispy finish, toast wraps seam-side down in a lightly oiled skillet over medium heat for 2-3 minutes per side until golden brown and crispy. -
Step 8
Serve the Cheesy Garlic Chicken Wraps immediately, cut in half diagonally for easier handling. Enjoy with a side salad or sweet potato fries. Store leftovers in an airtight container in the refrigerator for 2-3 days and reheat in a skillet or oven.
Important Information
Nutrition Facts (Per Serving)
It is important to consider this information as approximate and not to use it as definitive health advice.
Allergy Information
Please check ingredients for potential allergens and consult a health professional if in doubt.

Leave a Comment