

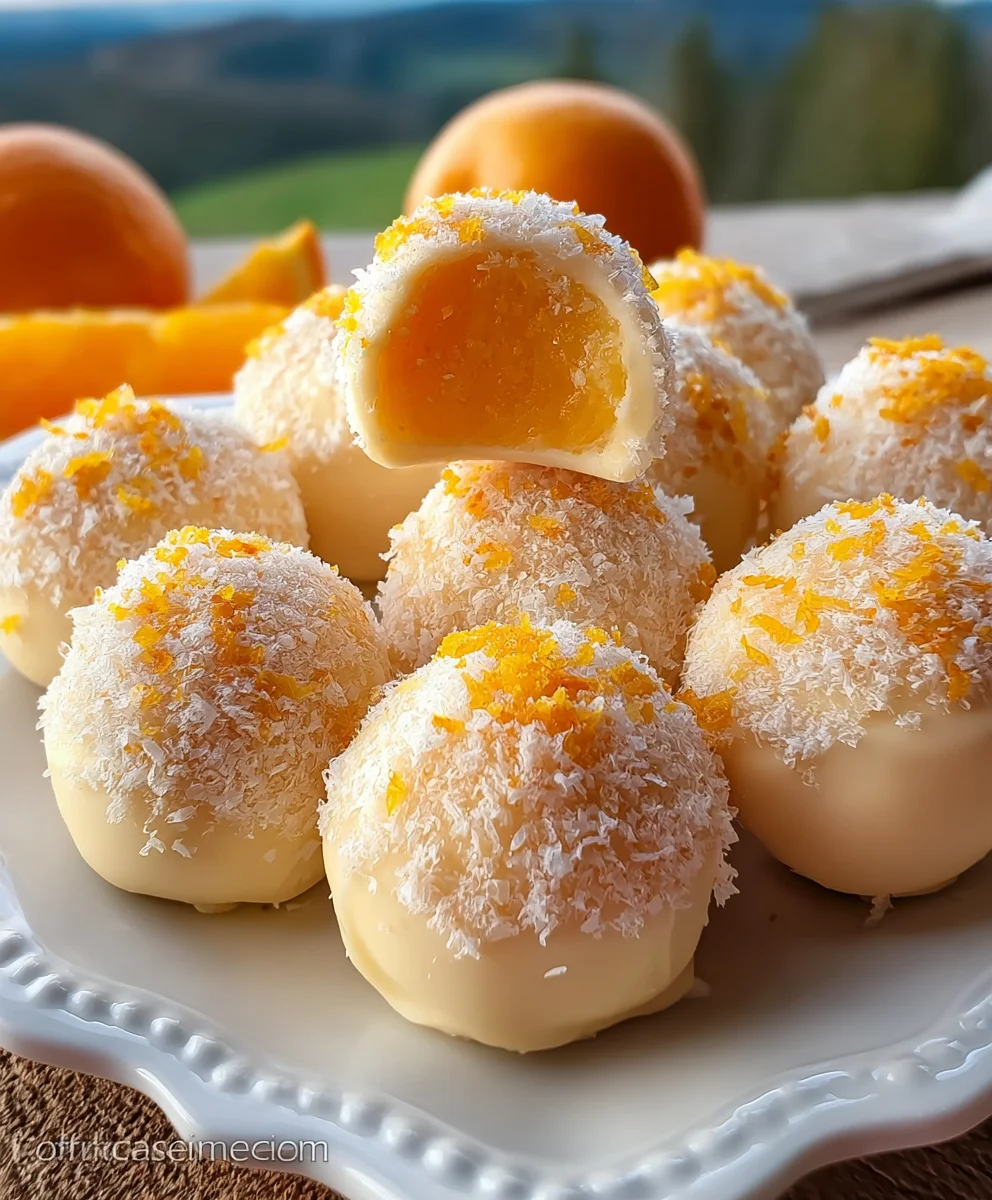
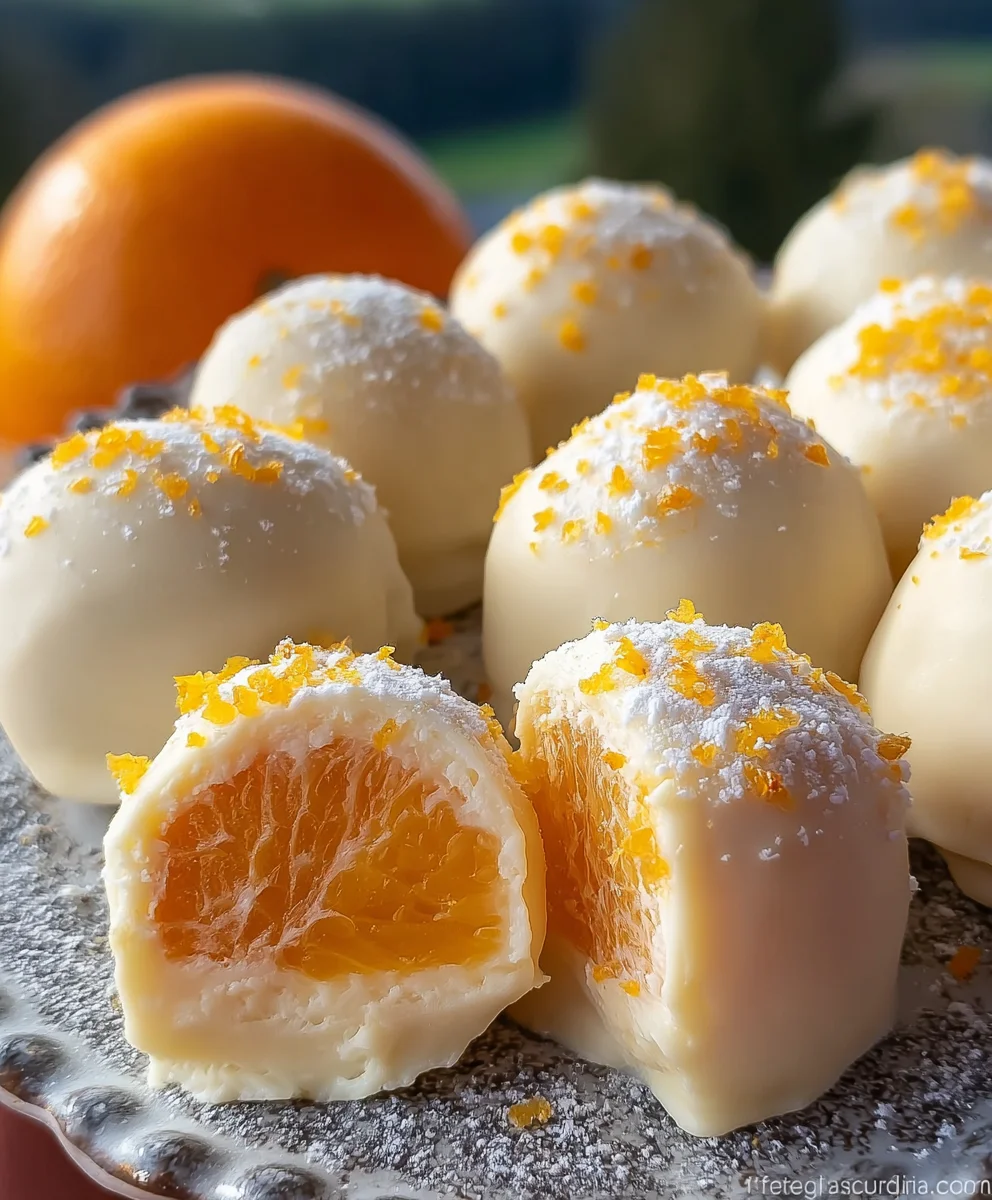
Orange Creamsicle Truffles are here to transport your taste buds straight back to those sun-drenched summer days of childhood! Do you remember the sheer delight of a classic orange creamsicle melting in your hand, its vibrant citrus cutting through a smooth, creamy vanilla? I certainly do, and I’ve always cherished that perfect flavor combination. This recipe encapsulates all that nostalgic joy in an elegant, bite-sized form that’s surprisingly easy to create.
I am absolutely thrilled to share with you a dessert that captures the essence of that beloved treat, reimagining it as a decadent confection. People absolutely adore these delightful truffles not just for their stunning flavor profile—the bright, zesty orange harmonizing beautifully with sweet, rich creaminess—but also for their irresistible, smooth texture that simply melts in your mouth. They’re incredibly convenient as a no-bake option, making them perfect for last-minute gifts, elegant party favors, or simply a luxurious personal indulgence. These Orange Creamsicle Truffles are truly a testament to how classic flavors can be elevated into something extraordinary and utterly unforgettable. I promise, one bite and you’ll understand why they’ve become such a favorite!

Ingredients:
- For the Truffle Base:
- 12 ounces (about 3 cups) vanilla wafers or shortbread cookies
- 8 ounces (1 block) full-fat cream cheese, softened to room temperature
- 1 cup powdered sugar (confectioners’ sugar), sifted
- 2 tablespoons fresh orange zest (from about 2-3 medium oranges)
- 1 teaspoon pure vanilla extract
- 1 teaspoon orange extract (or more to taste, start with 1 tsp)
- Pinch of salt
- For the Coating:
- 24 ounces good quality white chocolate, chopped or in chip form
- 1 tablespoon coconut oil or paramount crystals (optional, for thinning/shining chocolate)
- 2-3 drops orange gel food coloring (optional, for an orange tint)
- For Garnish (Optional):
- Additional orange zest
- White chocolate drizzle
- Orange and white sprinkles
Equipment You’ll Need:
- Food processor
- Large mixing bowl
- Electric mixer (handheld or stand mixer)
- Rubber spatula
- Small cookie scoop (about 1-inch diameter, 1.5 tablespoon capacity)
- Baking sheets
- Parchment paper or silicone baking mats
- Double boiler setup or microwave-safe bowl for melting chocolate
- Dipping tools (forks, candy dipping tools)
- Airtight container for storage
Phase 1: Preparing the Orange Creamsicle Truffle Base
- Prepare Your Vanilla Wafers: The very first step to creating these delightful Orange Creamsicle Truffles is to get our cookie base ready. I always start by taking my vanilla wafers (or shortbread cookies if you prefer a slightly different texture!) and placing them into the bowl of a food processor. You want to process them until they are finely ground, resembling fine sand or a very fine crumb. It’s important to get them as fine as possible because this will ensure a super smooth and consistent texture for our truffle base. If there are any larger chunks, they can make your truffles a bit grainy, and we’re aiming for pure bliss! Once processed, set these delicious crumbs aside in a medium-sized bowl.
- Cream the Cream Cheese and Flavorings: Now, let’s get to the creamy heart of our Orange Creamsicle Truffles. In a large mixing bowl, I combine the softened cream cheese with the sifted powdered sugar. Making sure your cream cheese is at room temperature is absolutely crucial here. If it’s too cold, it won’t blend smoothly with the sugar, and you’ll end up with lumps, which we definitely want to avoid for that silky truffle texture. I use an electric mixer on medium speed to beat these two together until the mixture is light, fluffy, and completely smooth. This usually takes about 2-3 minutes.
- Infuse with Orange and Vanilla Goodness: Once the cream cheese and sugar are beautifully combined, it’s time to add the signature flavors that make these Orange Creamsicle Truffles truly shine. I carefully add the fresh orange zest, pure vanilla extract, and orange extract to the cream cheese mixture. Don’t skip the fresh orange zest! It provides an incredible bright, authentic orange aroma and flavor that really sets these truffles apart. The extracts boost that classic creamsicle profile. I mix again on low speed until everything is just incorporated. You don’t want to overmix at this stage, just ensure the flavors are evenly distributed. Give it a quick taste – is it orange-y enough for you? If you like a stronger orange punch, you can add another 1/4 teaspoon of orange extract, but remember a little goes a long way!
- Combine Crumbs with Cream Cheese Mixture: Now for the magic of bringing it all together! I gently fold in the vanilla wafer crumbs that we prepared earlier into the cream cheese mixture. I use a rubber spatula for this, mixing until the crumbs are just fully incorporated. The mixture will be quite thick and sticky, almost like a very dense cookie dough. This is exactly what we want! It’s important not to overmix here; just combine until no dry streaks of crumbs remain. You’ll notice a lovely aroma of orange and vanilla starting to waft from the bowl – a promise of the deliciousness to come!
Phase 2: Chilling and Forming Your Orange Creamsicle Truffles
- Initial Chill for Firmness: This step is non-negotiable for perfectly shaped Orange Creamsicle Truffles. Once the truffle base is mixed, I cover the bowl tightly with plastic wrap and place it in the refrigerator for at least 1 hour. Honestly, I often chill it for 2-3 hours, or even overnight, especially if I’m not in a rush. A well-chilled mixture is key for easy handling and preventing the truffles from melting too quickly when you start forming them. The firmer the base, the easier it will be to roll into neat, uniform balls without a sticky mess.
- Prepare Your Workspace for Rolling: While the truffle base is chilling, I get my workspace ready. I line a baking sheet with parchment paper or a silicone baking mat. This provides a non-stick surface for our formed truffles before they go back into the fridge. I also grab my small cookie scoop (about 1-inch in diameter, which yields roughly 1.5 tablespoon-sized truffles – a perfect bite!). Having everything prepped makes the rolling process much smoother.
- Scoop and Roll the Truffles: After the truffle base is nicely chilled and firm, I remove it from the refrigerator. Using my small cookie scoop, I portion out even amounts of the mixture. For each portion, I gently roll it between the palms of my hands to form a smooth, round ball. Aim for consistency in size so they all look lovely and uniform. If the mixture starts to get too soft or sticky, pop it back into the fridge for 15-20 minutes to firm up again. This might happen if your kitchen is warm or if you’re taking a long time to roll. Don’t be afraid to wash your hands with cold water periodically; this helps keep the truffle mixture from sticking and ensures nice, smooth spheres. As I roll each truffle, I place it onto the prepared baking sheet.
- Second Chill for Setting: Once all the truffle balls are formed and neatly arranged on the baking sheet, it’s time for another crucial chill. I place the entire baking sheet back into the refrigerator for at least 30 minutes, or even longer. This second chill is incredibly important for ensuring the truffles are firm enough to be dipped into the warm chocolate coating without losing their shape or falling apart. A cold truffle will set the chocolate much faster and prevent melting. You want them to be quite solid before the dipping phase.
Phase 3: Coating the Orange Creamsicle Truffles
- Melt the White Chocolate: Now for the beautiful white chocolate coating that will encase our vibrant Orange Creamsicle Truffles. I chop my good quality white chocolate into small, even pieces – this helps it melt more smoothly and evenly. I prefer to use a double boiler setup for melting chocolate, as it provides gentle, indirect heat, minimizing the risk of scorching. If you don’t have a double boiler, a microwave works too: heat in 30-second intervals, stirring thoroughly after each, until smooth and fully melted. Be very careful not to overheat white chocolate as it can seize and become lumpy. If using, I stir in the coconut oil or paramount crystals at this stage; this helps to thin the chocolate slightly for a smoother dip and a glossier finish.
- Add Optional Orange Color: If you want to give your Orange Creamsicle Truffles that iconic creamsicle look, this is the time to add a touch of orange color to your melted white chocolate. I add 2-3 drops of orange gel food coloring (gel colors work best as they don’t add extra liquid to your chocolate, which can cause seizing). Stir it well until the color is uniform and achieves the desired creamsicle orange hue. You can add more drops for a deeper color, but remember that a subtle pastel orange is often very elegant and true to the creamsicle theme. Ensure the color is completely mixed in before you start dipping.
- Dip the Truffles: With your melted and optionally colored white chocolate ready, it’s time to dip! I retrieve my thoroughly chilled truffle balls from the refrigerator. Working with one truffle at a time, I carefully drop it into the melted white chocolate. Using a candy dipping tool or two forks, I gently roll the truffle in the chocolate until it’s completely coated. Ensure you lift the truffle out carefully, allowing any excess chocolate to drip back into the bowl. A light tap on the side of the bowl helps to remove any drips. You want a nice, even coating without thick puddles at the bottom.
- Place on Prepared Sheet: As each truffle is coated, I gently place it back onto the parchment-lined baking sheet. The coldness of the truffle will help the chocolate coating to set fairly quickly. I try to leave a little space between each truffle so they don’t stick together as the chocolate sets. If the chocolate in your bowl starts to cool and thicken too much during the dipping process, you can gently reheat it over the double boiler or in the microwave for a few seconds to bring it back to a dippable consistency. Patience is key here for achieving beautifully coated Orange Creamsicle Truffles.
Phase 4: Final Touches and Storage for Your Orange Creamsicle Truffles
- Garnish While Chocolate is Wet (Optional): If you plan to add any optional garnishes, now is the time to do it! While the chocolate coating is still wet on the truffles, I sprinkle a little extra orange zest on top of some for an extra burst of fresh aroma and a pop of color. For others, I might use orange and white sprinkles or even drizzle a contrasting color of chocolate. Working quickly is important here, as the chocolate will set fast on the cold truffles. This is where you can really let your creativity shine and make your Orange Creamsicle Truffles visually stunning!
- Final Chill for Setting: Once all the truffles are dipped and garnished, I place the entire baking sheet back into the refrigerator for a final chill. This last chill is essential for the chocolate coating to fully harden and set completely. This usually takes about 15-30 minutes. You want the chocolate to be firm to the touch before you handle or store them. A perfectly set chocolate coating provides a satisfying snap when you bite into these delicious Orange Creamsicle Truffles.
- Trimming Any “Feet” (Optional): Sometimes, when dipping, a small “foot” or pool of chocolate can form at the base of the truffle. Once the chocolate is completely set, I carefully trim any excess chocolate from the bottom edges using a small, sharp knife. This isn’t strictly necessary for taste, but it does give your Orange Creamsicle Truffles a cleaner, more professional appearance. I find this especially helpful if I’m presenting them as a gift or on a platter.
- Storage Instructions: Once fully set, these irresistible Orange Creamsicle Truffles are best stored in an airtight container in the refrigerator. They will remain fresh and absolutely delicious for up to 1-2 weeks. I find that taking them out of the fridge about 15-20 minutes before serving allows them to come slightly closer to room temperature, which really enhances their creamy texture and allows the flavors to fully bloom. However, if you prefer them firm and cold, they are just as delightful straight from the fridge! These make wonderful gifts or a perfect treat for any occasion, and I guarantee they’ll be a hit with anyone who loves that classic creamsicle flavor.
Conclusion:
If you’ve journeyed with me through this delightful recipe, you’ll know exactly why these aren’t just any treats – they’re a revelation. I genuinely believe that if you’re looking to infuse a little sunshine and a whole lot of joy into your day, or impress your guests with minimal fuss but maximum impact, these Orange Creamsicle Truffles are an absolute must-try. They embody everything wonderful about a nostalgic flavor, transformed into an elegant, bite-sized confection that sings with vibrant citrus notes, creamy sweetness, and a perfect, melt-in-your-mouth texture. It’s a truly unique dessert experience that transcends the ordinary, proving that simple ingredients can, indeed, create something extraordinary and unforgettable.
I find immense satisfaction in how effortlessly these truffles come together, yet the sophisticated flavor profile suggests hours of intricate work. The beauty lies in their deceptive simplicity; they’re approachable for even the most novice baker, yet yield results that would make any professional pastry chef proud. Every bite transports me back to those carefree summer days, evoking the pure, unadulterated happiness of enjoying a classic creamsicle, but with a luxurious, grown-up twist. They are the perfect embodiment of a culinary hug, a small indulgence that truly brightens any moment, whether it’s a quiet afternoon treat for yourself or the grand finale to a festive dinner party. I simply adore making them because the entire process, from mixing to rolling, is so wonderfully therapeutic, and the reward is pure, unadulterated bliss.
Serving Suggestions & Creative Variations to Explore:
While these truffles are undeniably perfect just as they are, there’s always room for a little culinary creativity! For serving, I love arranging them on a beautiful platter alongside a cup of freshly brewed coffee or a soothing herbal tea – the slight bitterness of the coffee or the aromatic notes of the tea beautifully complement the sweet and tangy truffles. They also make an incredibly thoughtful and charming gift, nestled in a decorative box tied with a ribbon. Imagine the delight on someone’s face receiving a handmade box of these delightful confections!
When it comes to variations, the possibilities are truly endless, and I encourage you to experiment! You could try rolling them in different toppings; finely chopped pistachios or almonds would add a lovely textural crunch and a hint of nutty flavor. A dusting of confectioners’ sugar mixed with a touch of orange zest offers a sophisticated finish, or for a touch of sparkle, some edible glitter can transform them into dazzling party treats. Another idea I’ve played with is dipping half of the truffle in melted white chocolate and then sprinkling it with more orange zest or a few colorful sprinkles before it sets – this adds another layer of sweetness and a visually appealing contrast. If you’re feeling adventurous, a hint of other citrus zest, like lime or lemon, could be incorporated into a portion of the mixture to create a multi-citrus medley, offering a slightly different twist on the original creamsicle flavor. Or, for a truly decadent take, you could add a very small amount of orange liqueur to the mixture for an adult-friendly version.
Your Turn: Make & Share Your Orange Creamsicle Magic!
Now that you have all the insider tips and creative inspiration, it’s truly your turn to bring these incredible treats to life in your own kitchen. I wholeheartedly urge you to set aside some time, gather your ingredients, and immerse yourself in the delightful process of creating these Orange Creamsicle Truffles. I promise you, the reward of that first bite will be absolutely worth it. There’s something profoundly satisfying about crafting something so delicious with your own hands, and I guarantee these truffles will quickly become a cherished favorite in your recipe repertoire.
And when you do embark on this sweet adventure, please don’t keep the magic to yourself! I would absolutely love to hear about your experience. Did you stick to the classic recipe, or did you venture into one of the variations? Perhaps you even came up with your own ingenious twist! Share your triumphs, your serving suggestions, and especially any photos of your beautiful creations. There’s a wonderful community of home bakers out there, and I truly believe that sharing our culinary journeys not only inspires others but also enriches our own experiences. Let’s celebrate the joy of homemade treats together!
Orange Creamsicle Truffles
Transport your taste buds back to childhood with these no-bake Orange Creamsicle Truffles! This elegant, bite-sized dessert captures the nostalgic joy of a classic creamsicle with vibrant, zesty orange harmonizing beautifully with sweet, rich creaminess. An irresistible, smooth confection that melts in your mouth.
Ingredients
-
12 oz (3 cups) vanilla wafers or shortbread cookies
-
8 oz (1 block) full-fat cream cheese, softened
-
1 cup sifted powdered sugar
-
2 tbsp fresh orange zest
-
1 tsp pure vanilla extract
-
1 tsp orange extract (or more to taste)
-
Pinch of salt
-
24 oz good quality white chocolate, chopped or chips
-
1 tbsp coconut oil or paramount crystals (optional)
-
2-3 drops orange gel food coloring (optional)
-
Optional garnishes: additional orange zest, white chocolate drizzle, orange and white sprinkles
Instructions
-
Step 1
Process vanilla wafers or shortbread cookies into fine crumbs using a food processor. Set aside. -
Step 2
In a large bowl, beat softened cream cheese and sifted powdered sugar with an electric mixer until light, fluffy, and smooth (2-3 minutes). -
Step 3
Mix in fresh orange zest, vanilla extract, orange extract, and a pinch of salt until just incorporated. Taste and adjust orange extract if desired. -
Step 4
Gently fold in the cookie crumbs until just combined; the mixture will be thick and sticky. -
Step 5
Cover the truffle base and refrigerate for at least 1-2 hours (or overnight) until firm. -
Step 6
Line a baking sheet with parchment paper. Using a small cookie scoop (approx. 1.5 tbsp), portion the chilled mixture and roll into smooth, round balls between your palms. Place on the prepared baking sheet. -
Step 7
Refrigerate formed truffle balls for at least 30 minutes until very firm. -
Step 8
Melt chopped white chocolate in a double boiler or microwave (stirring every 30 seconds). Stir in coconut oil or paramount crystals (optional) for thinning. -
Step 9
If desired, stir 2-3 drops of orange gel food coloring into the melted chocolate until uniform. -
Step 10
Dip each chilled truffle into the melted chocolate using a dipping tool or forks, ensuring full coverage. Lift and tap gently to remove excess chocolate. -
Step 11
Place coated truffles onto the parchment-lined baking sheet. If garnishing (with orange zest, sprinkles, or white chocolate drizzle), do so while the chocolate coating is still wet. -
Step 12
Refrigerate truffles for 15-30 minutes until the chocolate coating is fully hardened and set. -
Step 13
Once set, carefully trim any excess chocolate from the base. Store in an airtight container in the refrigerator for 1-2 weeks. For best texture and flavor, allow to come slightly closer to room temperature for 15-20 minutes before serving, or enjoy chilled.
Important Information
Nutrition Facts (Per Serving)
It is important to consider this information as approximate and not to use it as definitive health advice.
Allergy Information
Please check ingredients for potential allergens and consult a health professional if in doubt.

Leave a Comment