

Classic Banana Pudding is a timeless dessert that brings a sense of nostalgia to every gathering. Growing up, I remember my grandmother whipping up this delightful treat, filling the kitchen with the sweet aroma of ripe bananas and creamy vanilla pudding. This dish has deep roots in Southern cuisine, often served at family reunions and holiday celebrations, making it a beloved staple in many households. What I adore about Classic Banana Pudding is its perfect balance of flavors and texturesthe smooth, velvety pudding, the soft, sweet bananas, and the crunchy vanilla wafers create a symphony of taste that is simply irresistible. Not only is it delicious, but its also incredibly easy to prepare, making it a go-to recipe for both novice and experienced bakers alike. Join me as we dive into the world of Classic Banana Pudding and discover why this dessert continues to capture hearts and taste buds across generations.

Ingredients:
- 4 ripe bananas
- 1 box (5.1 oz) instant vanilla pudding mix
- 2 cups cold milk
- 1 cup heavy whipping cream
- 1/2 cup powdered sugar
- 1 teaspoon vanilla extract
- 1 box (12 oz) vanilla wafers
- Optional: additional banana slices and crushed vanilla wafers for garnish
Preparing the Pudding
1. In a large mixing bowl, combine the instant vanilla pudding mix and cold milk. Using a whisk, mix them together until the pudding is smooth and well combined. This should take about 2 minutes. Youll notice it thickening up nicely as you whisk. 2. Once the pudding has thickened, cover the bowl with plastic wrap and place it in the refrigerator to chill for about 15 minutes. This step is crucial as it allows the flavors to meld together and the pudding to set properly.Whipping the Cream
3. While the pudding is chilling, its time to whip the cream. In a separate mixing bowl, pour in the heavy whipping cream. Using an electric mixer, beat the cream on medium-high speed until it starts to thicken. 4. Gradually add the powdered sugar and vanilla extract to the cream. Continue to beat until stiff peaks form. This means that when you lift the beaters out of the cream, the peaks should stand up straight without drooping. Be careful not to overbeat, as this can turn the cream into butter.Combining the Pudding and Whipped Cream
5. Once the pudding has chilled, take it out of the refrigerator. Gently fold the whipped cream into the pudding mixture. Use a spatula to carefully combine them, ensuring you maintain the light and airy texture of the whipped cream. This step is essential for achieving that creamy, dreamy consistency we all love in banana pudding.Assembling the Banana Pudding
6. Now its time to assemble our classic banana pudding! Start by slicing the ripe bananas into thin rounds. Youll want about 2 bananas for the layers and reserve the remaining 2 for garnish. 7. In a large trifle dish or a 9×13 inch baking dish, begin layering the ingredients. Start with a layer of vanilla wafers at the bottom. You can arrange them in a single layer or break them up a bit to fit the dish. 8. Next, add a layer of sliced bananas over the wafers. Make sure to cover the wafers evenly with the banana slices. 9. Spoon a layer of the pudding mixture over the bananas, spreading it out evenly with a spatula. Repeat the layering process: another layer of vanilla wafers, followed by banana slices, and then more pudding. Continue this process until you run out of ingredients, finishing with a layer of pudding on top.Final Touches
10. For the final touch, you can garnish the top of the pudding with additional banana slices and crushed vanilla wafers. This not only adds a beautiful presentation but also gives a delightful crunch when you dig in. 11. Cover the assembled banana pudding with plastic wrap and place it in the refrigerator. Allow it to chill for at least 4 hours, but overnight is even better. This resting time allows the flavors to meld and the wafers to soften, creating that classic banana pudding texture.Serving the Banana Pudding
12. When youre ready to serve, remove the banana pudding from the refrigerator. Use a large spoon or spatula to scoop out portions into individual bowls or dessert cups. 13. If you want to elevate the presentation, you can add a dollop of whipped cream on top of each serving and sprinkle some crushed vanilla wafers for an extra touch. 14. Enjoy your classic banana pudding with family and friends! This dessert is perfect for gatherings, potlucks, or simply as a sweet treat to enjoy at home.Storage Tips
15. If you have any leftovers (which is rare!), cover the dish tightly with plastic wrap and store it in the refrigerator. Its best enjoyed within 2-3 days, as the bananas may start to brown and the wafers will continue to soften. 16. If you want to prepare this dessert in advance, consider layering the pudding without the bananas and wafers. You can add those just before serving to keep everything fresh and maintain the desired texture. Now that you have this delightful recipe for classic banana pudding, I hope you enjoy making it as much as I do! Its a timeless dessert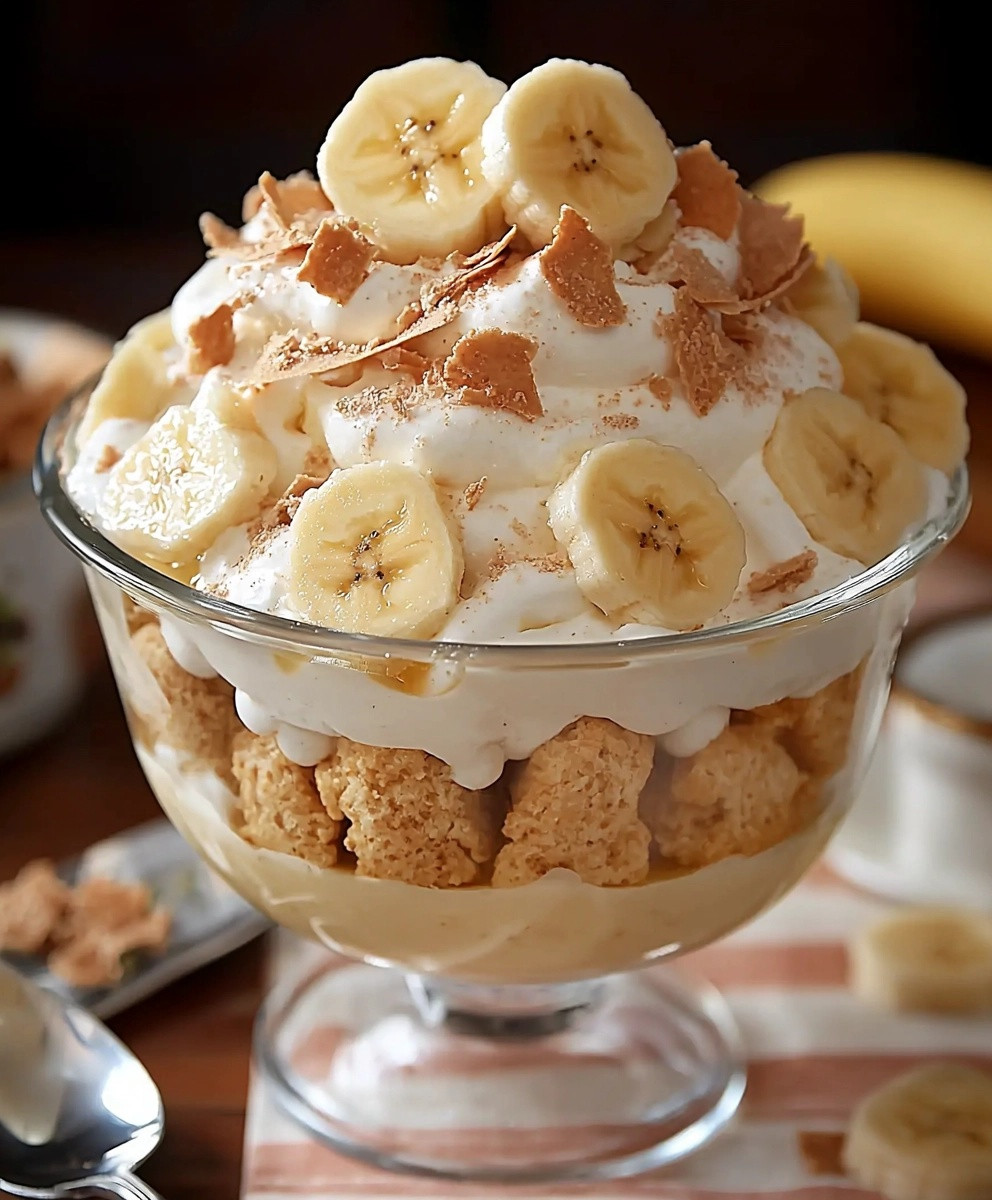
Conclusion:
In summary, this Classic Banana Pudding recipe is an absolute must-try for anyone who loves a delightful dessert that combines creamy textures with the sweet, comforting flavor of ripe bananas. Its a nostalgic treat that brings back memories of family gatherings and sunny afternoons, making it perfect for any occasion. Whether youre serving it at a potluck, a birthday party, or simply enjoying it at home, this pudding is sure to impress your friends and family. For serving suggestions, consider topping your banana pudding with a dollop of freshly whipped cream or a sprinkle of crushed vanilla wafers for added crunch. You can also experiment with variations by incorporating layers of chocolate pudding for a twist or adding a hint of peanut butter for a unique flavor profile. The possibilities are endless, and I encourage you to get creative! I genuinely hope you give this Classic Banana Pudding a try. Its a simple yet satisfying dessert thats bound to become a favorite in your household. Once youve made it, Id love to hear about your experience! Share your thoughts, any variations you tried, or even a picture of your delicious creation. Lets spread the joy of this classic dessert together! Print
Classic Banana Pudding: A Timeless Dessert Recipe Youll Love
- Total Time: 260 minutes
- Yield: 8–10 servings 1x
Description
Enjoy a nostalgic treat with this classic Banana Pudding, featuring layers of creamy vanilla pudding, fresh bananas, and crunchy vanilla wafers. Perfect for any occasion, this dessert is easy to make and sure to delight everyone!
Ingredients
- 4 ripe bananas
- 1 box (5.1 oz) instant vanilla pudding mix
- 2 cups cold milk
- 1 cup heavy whipping cream
- 1/2 cup powdered sugar
- 1 teaspoon vanilla extract
- 1 box (12 oz) vanilla wafers
- Optional: additional banana slices and crushed vanilla wafers for garnish
Instructions
- In a large mixing bowl, combine the instant vanilla pudding mix and cold milk. Whisk until smooth and thickened, about 2 minutes.
- Cover with plastic wrap and refrigerate for 5-10 minutes to set.
- In a separate bowl, pour in the heavy whipping cream. Beat on medium-high speed until it thickens.
- Gradually add powdered sugar and vanilla extract while continuing to beat until soft peaks form, about 3-5 minutes.
- Gently fold the whipped cream into the chilled pudding mixture using a spatula until uniform in color and consistency.
- Slice the ripe bananas into thin rounds.
- In a large trifle dish or individual cups, layer the ingredients: start with vanilla wafers, then banana slices, and a layer of pudding mixture. Repeat until all ingredients are used, finishing with pudding on top.
- Garnish with additional banana slices and crushed vanilla wafers. Cover with plastic wrap and refrigerate for at least 4 hours or overnight.
- Serve directly from the trifle dish or scoop into individual bowls. Optionally, add a dollop of whipped cream on top.
Notes
- Use ripe bananas for optimal sweetness.
- For a twist, consider adding chocolate pudding or using chocolate wafers.
- To prevent browning, toss banana slices in lemon juice before layering.
- This dessert is best enjoyed chilled, allowing flavors to meld and wafers to soften.
- Prep Time: 20 minutes
- Cook Time: 0 minutes


Leave a Comment