

Christmas cookies: just the words conjure up images of twinkling lights, cozy fireplaces, and the sweet aroma of cinnamon and spice filling the air. Is there anything more evocative of the holiday season? I think not! These aren’t just cookies; they’re edible memories, passed down through generations and shared with loved ones.
The tradition of baking Christmas cookies dates back centuries, with roots in medieval Europe. Spices like ginger, cinnamon, and cloves, once rare and expensive, were incorporated into festive treats, signifying celebration and abundance. Over time, each culture developed its own unique variations, from German Lebkuchen to Scandinavian pepparkakor, each telling a story of heritage and holiday cheer.
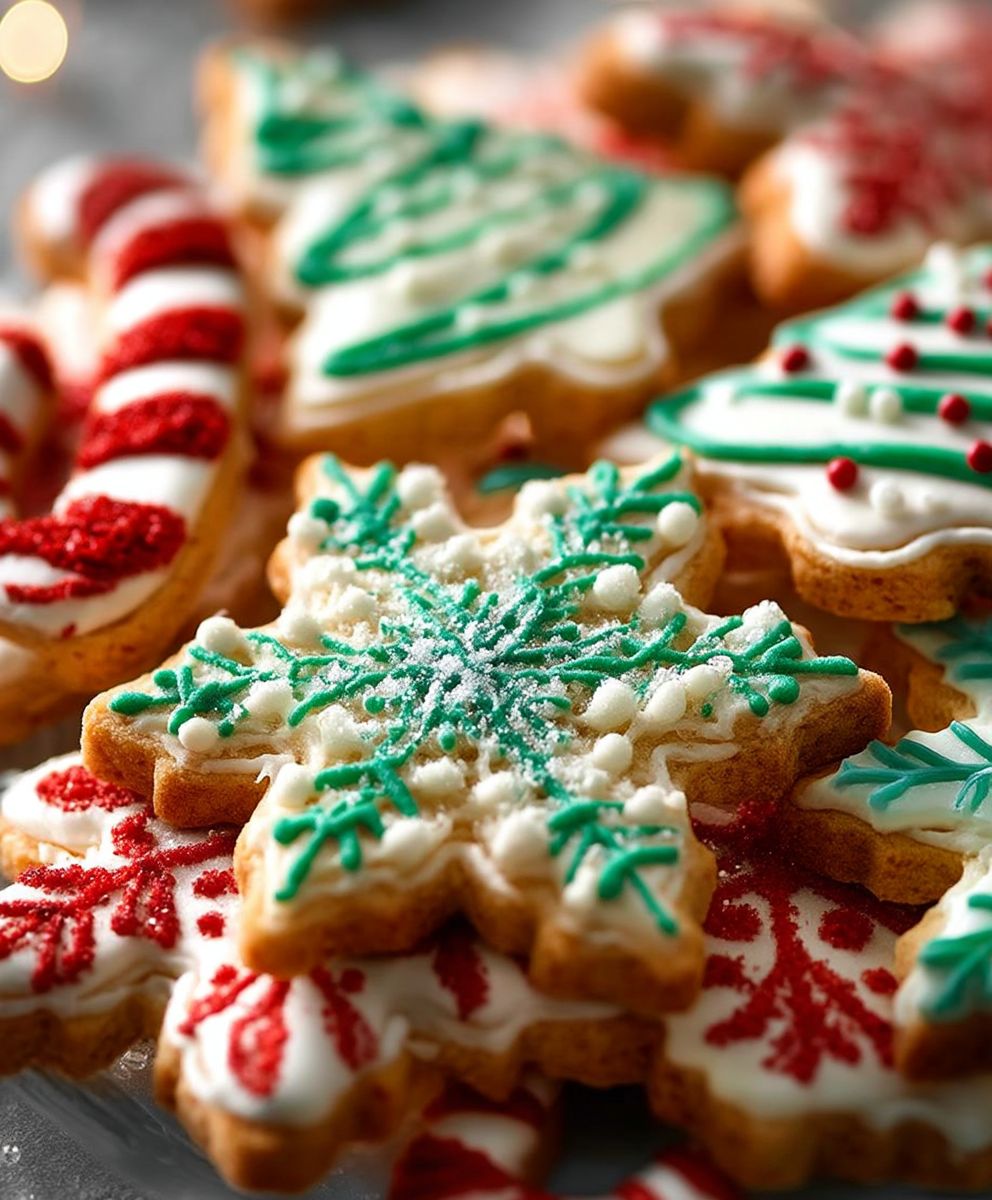
But what is it about these delightful treats that makes them so universally beloved? Perhaps it’s the sheer variety from delicate sugar cookies adorned with intricate icing to chewy gingerbread men and melt-in-your-mouth shortbread. Or maybe it’s the comforting flavors that evoke feelings of warmth and nostalgia. Whatever the reason, baking and sharing Christmas cookies is a tradition that continues to bring joy to families around the world. Get ready to create some magic in your kitchen!

Ingredients:
- For the Dough:
- 3 cups all-purpose flour, plus more for dusting
- 1 teaspoon baking powder
- 1/2 teaspoon baking soda
- 1/4 teaspoon salt
- 1 cup (2 sticks) unsalted butter, softened
- 1 1/2 cups granulated sugar
- 2 large eggs
- 1 teaspoon vanilla extract
- 1/2 teaspoon almond extract (optional, but adds a lovely flavor!)
- For the Royal Icing:
- 4 cups (1 pound) powdered sugar, sifted
- 3 tablespoons meringue powder
- 1/2 cup warm water, plus more as needed
- 1 teaspoon vanilla extract
- Gel food coloring (various colors)
- For Decorating (optional):
- Sprinkles (various shapes and colors)
- Edible glitter
- Silver dragees
- Chocolate chips (mini or regular)
- Other candies of your choice
Preparing the Cookie Dough:
- Combine Dry Ingredients: In a medium bowl, whisk together the flour, baking powder, baking soda, and salt. Make sure everything is well combined so your cookies rise evenly. This step is crucial for achieving the right texture!
- Cream Butter and Sugar: In a large bowl (or the bowl of a stand mixer), cream together the softened butter and granulated sugar until light and fluffy. This usually takes about 3-5 minutes. Scrape down the sides of the bowl occasionally to ensure everything is evenly mixed. The mixture should be pale and airy.
- Add Eggs and Extracts: Beat in the eggs one at a time, mixing well after each addition. Then, stir in the vanilla extract and almond extract (if using). The batter might look slightly curdled at this point, but don’t worry, it will come together when you add the dry ingredients.
- Gradually Add Dry Ingredients: Gradually add the dry ingredients to the wet ingredients, mixing on low speed until just combined. Be careful not to overmix, as this can result in tough cookies. Mix until the flour is just incorporated and no streaks remain.
- Divide and Chill the Dough: Divide the dough in half, flatten each half into a disc, and wrap tightly in plastic wrap. Refrigerate for at least 2 hours, or preferably overnight. Chilling the dough is essential for preventing the cookies from spreading too much during baking and makes the dough easier to handle. I usually chill mine overnight for the best results.
Rolling, Cutting, and Baking the Cookies:
- Preheat Oven and Prepare Baking Sheets: Preheat your oven to 375°F (190°C). Line baking sheets with parchment paper or silicone baking mats. This will prevent the cookies from sticking and make cleanup a breeze.
- Roll Out the Dough: On a lightly floured surface, roll out one disc of dough to about 1/4 inch thickness. Keep the other disc of dough refrigerated while you work. If the dough is sticking, add a little more flour to the surface. Try to roll the dough evenly so the cookies bake uniformly.
- Cut Out Shapes: Use cookie cutters to cut out your desired shapes. I love using Christmas-themed cookie cutters like stars, trees, and gingerbread men! Dip the cookie cutters in flour before each cut to prevent sticking.
- Place on Baking Sheets: Carefully transfer the cut-out cookies to the prepared baking sheets, leaving about 1 inch of space between each cookie.
- Bake: Bake for 8-10 minutes, or until the edges are lightly golden brown. The baking time will vary depending on the size and thickness of your cookies, so keep a close eye on them. Don’t overbake, or they will be dry.
- Cool: Let the cookies cool on the baking sheets for a few minutes before transferring them to a wire rack to cool completely. Make sure the cookies are completely cool before decorating.
- Repeat: Repeat steps 2-6 with the remaining dough. You can re-roll the scraps of dough, but keep in mind that the more you re-roll the dough, the tougher the cookies will become. I usually try to minimize re-rolling.
Preparing the Royal Icing:
- Combine Dry Ingredients: In a large bowl, whisk together the sifted powdered sugar and meringue powder. Sifting the powdered sugar is important to remove any lumps and ensure a smooth icing.
- Add Wet Ingredients: Gradually add the warm water and vanilla extract to the dry ingredients, mixing on low speed with an electric mixer (or by hand) until smooth. Start with 1/2 cup of water and add more, one tablespoon at a time, until you reach the desired consistency.
- Adjust Consistency: The consistency of the royal icing is crucial for decorating. You’ll want two different consistencies: one for outlining (a thicker consistency) and one for flooding (a thinner consistency).
- For Outlining: The icing should be thick enough to hold its shape when piped. If it’s too thin, add more powdered sugar, one tablespoon at a time.
- For Flooding: The icing should be thin enough to spread easily but not so thin that it runs off the edges of the cookie. If it’s too thick, add more water, one teaspoon at a time. A good test is the “10-second rule”: if you drag a knife through the icing and it takes about 10 seconds for the line to disappear, it’s the right consistency.
- Divide and Color: Divide the icing into separate bowls, depending on how many colors you want to use. Add gel food coloring to each bowl, a few drops at a time, and mix well until you achieve your desired color. Gel food coloring is preferred over liquid food coloring because it won’t change the consistency of the icing as much.
- Prepare Piping Bags: Transfer the icing to piping bags fitted with small round tips (for outlining) or use squeeze bottles (for flooding). You can also use ziplock bags with a small corner snipped off.
Decorating the Cookies:
- Outline the Cookies: Use the thicker outlining icing to outline the edges of each cookie. This will create a dam to prevent the flooding icing from running off the edges.
- Flood the Cookies: Use the thinner flooding icing to fill in the outlined areas. Gently shake the cookie to help the icing spread evenly. You can use a toothpick or scribe tool to pop any air bubbles and guide the icing into corners.
- Add Details: While the flooding icing is still wet, add sprinkles, edible glitter, silver dragees, or other decorations. The decorations will adhere to the wet icing.
- Let the Icing Dry: Let the icing dry completely before adding any additional layers of decoration. This usually takes several hours, or even overnight. The icing should be hard to the touch.
- Add Additional Layers (Optional): Once the base layer of icing is dry, you can add additional layers of decoration, such as piped details, writing, or more sprinkles. Get creative and have fun!
- Enjoy! Once the icing is completely dry, your Christmas cookies are ready to enjoy! Store them in an airtight container at room temperature. They should stay fresh for several days.
Tips for Success:
- Use Room Temperature Ingredients: Make sure your butter and eggs are at room temperature for the best results. This will help them cream together properly and create a smooth batter.
- Don’t Overmix the Dough: Overmixing the dough will develop the gluten and result in tough cookies. Mix until the flour is just incorporated.
- Chill the Dough: Chilling the dough is essential for preventing the cookies from spreading too much during baking.
- Use Parchment Paper or Silicone Baking Mats: This will prevent the cookies from sticking and make cleanup a breeze.
- Don’t Overbake the Cookies: Overbaked cookies will be dry and crumbly. Bake until the edges are lightly golden brown.
- Adjust the Icing Consistency: The consistency of the royal icing is crucial for decorating. Make sure you have the right consistency for outlining and flooding.
- Be Patient: Decorating cookies can be time-consuming, but it’s also a lot of fun! Take your time and enjoy the process.
- 3 cups all-purpose flour, plus more for dusting
- 1 teaspoon baking powder
- 1/2 teaspoon baking soda
- 1/4 teaspoon salt
- 1 cup (2 sticks) unsalted butter, softened
- 1 1/2 cups granulated sugar
- 2 large eggs
- 1 teaspoon vanilla extract
- 1/2 teaspoon almond extract (optional)
- 4 cups (1 pound) powdered sugar, sifted
- 3 tablespoons meringue powder
- 1/2 cup warm water, plus more as needed
- 1 teaspoon vanilla extract
- Gel food coloring (various colors)
- Sprinkles (various shapes and colors)
- Edible glitter
- Silver dragees
- Chocolate chips (mini or regular)
- Other candies of your choice
- Combine Dry Ingredients: In a medium bowl, whisk together the flour, baking powder, baking soda, and salt.
- Cream Butter and Sugar: In a large bowl (or the bowl of a stand mixer), cream together the softened butter and granulated sugar until light and fluffy (3-5 minutes). Scrape down the sides of the bowl occasionally.
- Add Eggs and Extracts: Beat in the eggs one at a time, mixing well after each addition. Stir in the vanilla extract and almond extract (if using).
- Gradually Add Dry Ingredients: Gradually add the dry ingredients to the wet ingredients, mixing on low speed until just combined. Be careful not to overmix.
- Divide and Chill the Dough: Divide the dough in half, flatten each half into a disc, and wrap tightly in plastic wrap. Refrigerate for at least 2 hours, or preferably overnight.
- Preheat Oven and Prepare Baking Sheets: Preheat your oven to 375°F (190°C). Line baking sheets with parchment paper or silicone baking mats.
- Roll Out the Dough: On a lightly floured surface, roll out one disc of dough to about 1/4 inch thickness. Keep the other disc of dough refrigerated.
- Cut Out Shapes: Use cookie cutters to cut out your desired shapes. Dip the cookie cutters in flour before each cut to prevent sticking.
- Place on Baking Sheets: Carefully transfer the cut-out cookies to the prepared baking sheets, leaving about 1 inch of space between each cookie.
- Bake: Bake for 8-10 minutes, or until the edges are lightly golden brown.
- Cool: Let the cookies cool on the baking sheets for a few minutes before transferring them to a wire rack to cool completely.
- Repeat: Repeat steps 2-6 with the remaining dough.
- Combine Dry Ingredients: In a large bowl, whisk together the sifted powdered sugar and meringue powder.
- Add Wet Ingredients: Gradually add the warm water and vanilla extract to the dry ingredients, mixing on low speed with an electric mixer (or by hand) until smooth. Start with 1/2 cup of water and add more, one tablespoon at a time, until you reach the desired consistency.
- Adjust Consistency:
- For Outlining: The icing should be thick enough to hold its shape when piped. If it’s too thin, add more powdered sugar, one tablespoon at a time.
- For Flooding: The icing should be thin enough to spread easily but not so thin that it runs off the edges of the cookie. If it’s too thick, add more water, one teaspoon at a time.
- Divide and Color: Divide the icing into separate bowls, depending on how many colors you want to use. Add gel food coloring to each bowl, a few drops at a time, and mix well until you achieve your desired color.
- Prepare Piping Bags: Transfer the icing to piping bags fitted with small round tips (for outlining) or use squeeze bottles (for flooding).
- Outline the Cookies: Use the thicker outlining icing to outline the edges of each cookie.
- Flood the Cookies: Use the thinner flooding icing to fill in the outlined areas. Gently shake the cookie to help the icing spread evenly. Use a toothpick or scribe tool to pop any air bubbles and guide the icing into corners.
- Add Details: While the flooding icing is still wet, add sprinkles, edible glitter, silver dragees, or other decorations.
- Let the Icing Dry: Let the icing dry completely before adding any additional layers of decoration. This usually takes several hours, or even overnight.
- Add Additional Layers (Optional): Once the base layer of icing is dry, you can add additional layers of decoration, such as piped details, writing, or more sprinkles.
- Enjoy! Store them in an airtight container at room temperature.
- Use room temperature ingredients for the best results.
- Don’t overmix the dough.
- Chilling the dough is essential.
- Use parchment paper or silicone baking mats.
- Don’t overbake the cookies.
- Adjust the icing consistency as needed.
- Be patient and have fun decorating!
Conclusion:
And there you have it! I truly believe this Christmas cookies recipe is a must-try this holiday season. Why? Because it’s more than just a recipe; it’s a gateway to creating cherished memories with loved ones. The aroma alone, as these bake, will fill your home with the warm, comforting scent of Christmas, instantly transporting you back to joyful moments from years past. But beyond the nostalgia, these cookies are simply delicious. The perfect balance of sweetness and spice, combined with their melt-in-your-mouth texture, makes them utterly irresistible.
But the best part? This recipe is incredibly versatile! Feel free to experiment with different extracts almond, peppermint, or even a hint of orange can add a unique twist. For serving suggestions, consider arranging them beautifully on a festive platter for your holiday gatherings. They also make wonderful homemade gifts! Package them in decorative tins or cellophane bags tied with ribbon for a personal touch that your friends and family will truly appreciate.
If you’re looking to add a little extra flair, try dipping half of each cookie in melted chocolate and then sprinkling them with crushed peppermint candies or festive sprinkles. Another fun variation is to create sandwich cookies by spreading a layer of buttercream frosting between two cookies. You could even get the kids involved in decorating them with colorful icing and edible glitter a guaranteed way to create lasting memories!
Don’t be intimidated by the thought of baking from scratch. This recipe is designed to be easy to follow, even for beginner bakers. I’ve included detailed instructions and helpful tips to guide you through each step of the process. And remember, baking is all about having fun and experimenting, so don’t be afraid to put your own personal spin on it.
I’m confident that these Christmas cookies will become a beloved tradition in your family, just as they have in mine. They’re the perfect treat to share with friends, family, and neighbors, spreading holiday cheer one delicious bite at a time. Imagine the smiles on their faces as they savor the taste of homemade goodness!
So, what are you waiting for? Gather your ingredients, preheat your oven, and get ready to embark on a baking adventure! I promise you won’t regret it. These cookies are not only delicious but also a wonderful way to connect with loved ones and create lasting memories during this special time of year.
I’m so excited for you to try this recipe and experience the joy of baking these delightful Christmas cookies. Once you’ve made them, I would absolutely love to hear about your experience! Please share your photos, tips, and variations in the comments below. Let’s create a community of cookie lovers and inspire each other with our baking creations. Happy baking, and Merry Christmas!
Christmas Cookies: Delicious Recipes and Baking Tips
Festive sugar cookies perfect for the holidays! Cut-out cookies decorated with royal icing and sprinkles for a fun, creative treat.
Leave a Comment