

Christmas Cookie Bars are a truly magical solution for anyone who adores the festive spirit of holiday baking but might be short on time or patience for individual cookie decorating. I know I’ve certainly been there, gazing at dozens of cooling cookies, contemplating the next step of intricate frosting designs! That’s precisely why I’m so excited to share this incredibly delightful and surprisingly simple recipe with you today. While traditional Christmas cookies have graced our tables for centuries, becoming synonymous with the season’s joy, the emergence of cookie bars offers a modern, efficient twist on a beloved custom, allowing us to capture that festive essence with considerably less fuss.
Why We Adore These Festive Christmas Cookie Bars
There’s an undeniable charm to these holiday treats. We all cherish the warmth and nostalgia that homemade Christmas goodies bring, and these bars deliver all of that iconic flavor and holiday cheer in one convenient pan. Imagine soft, chewy, and perfectly sweetened squares bursting with all your favorite seasonal additions – from vibrant sprinkles and rich chocolate chips to hints of peppermint or cozy spices. People absolutely adore these Christmas Cookie Bars not just for their mouth-watering taste and satisfyingly tender texture, but also for their incredible ease of preparation. They are perfect for potlucks, gifting, or simply ensuring your holiday cookie platter is always bountiful, without spending countless hours in the kitchen. It’s a wonderful way to embrace the festive baking tradition with less fuss and more fun!

Ingredients:
- For the Christmas Cookie Bar Base:
- 1 cup (2 sticks or 226g) unsalted butter, very soft, at room temperature
- 1 ½ cups (300g) granulated sugar
- 2 large eggs, at room temperature
- 1 tablespoon pure vanilla extract
- 3 cups (360g) all-purpose flour, spooned and leveled
- 1 teaspoon baking powder
- ½ teaspoon salt
- Optional: ½ teaspoon almond extract for an extra layer of flavor
- For the Festive Cream Cheese Frosting:
- 8 ounces (226g) full-fat cream cheese, softened to room temperature
- ½ cup (1 stick or 113g) unsalted butter, softened to room temperature
- 4 cups (480g) powdered sugar (confectioners’ sugar), sifted
- 1 teaspoon pure vanilla extract
- ¼ teaspoon salt
- 2-3 tablespoons milk (whole milk or half-and-half works best), as needed
- Green and/or Red gel food coloring, for a vibrant Christmas touch
- For Decoration (make these Christmas Cookie Bars extra special!):
- Assorted Christmas sprinkles (nonpareils, jimmies, sanding sugar, shaped sprinkles like stars or trees)
- Mini chocolate chips or white chocolate chips
- Crushed candy canes
- Festive M&M’s or other small candies
Preparing the Christmas Cookie Bar Base
- Preheat and Prepare Your Pan: First things first, my dear bakers! You’ll want to preheat your oven to 375°F (190°C). Then, grab a 9×13 inch baking pan. For easy removal of your gorgeous Christmas Cookie Bars, I always recommend lining the pan with parchment paper, leaving an overhang on the sides. This creates little “handles” for you to lift the entire slab out once it’s baked and cooled. Lightly grease the parchment paper and any exposed parts of the pan with baking spray or butter. This step is crucial for preventing sticking and ensuring a clean lift.
- Cream the Wet Ingredients: In the bowl of a stand mixer fitted with the paddle attachment, or with a large bowl and a handheld electric mixer, combine the very soft unsalted butter and granulated sugar. Beat them together on medium-high speed for about 3-4 minutes, until the mixture is light in color and fluffy. This creaming process incorporates air, which contributes to the tender texture of our Christmas Cookie Bars. Don’t rush this step! It’s foundational for a truly delightful bar.
- Incorporate Eggs and Flavoring: Reduce the mixer speed to low. Add the large eggs one at a time, mixing well after each addition until fully incorporated. Scrape down the sides of the bowl as needed to ensure everything is evenly combined. Once the eggs are in, stir in the pure vanilla extract and, if you’re using it, the optional almond extract. That little hint of almond really elevates the flavor profile and makes these Christmas Cookie Bars even more unique.
- Add the Dry Ingredients: In a separate medium bowl, whisk together the all-purpose flour, baking powder, and salt. This ensures that the leavening agent and salt are evenly distributed throughout the flour, preventing pockets of unmixed ingredients in your final bars. With the mixer on low speed, gradually add the dry ingredients to the wet ingredients, mixing until just combined. Be careful not to overmix! Overmixing can develop the gluten in the flour too much, leading to tough, dense bars instead of the soft, chewy Christmas Cookie Bars we’re aiming for. A few streaks of flour are perfectly fine; you can finish mixing by hand with a spatula.
- Press into the Pan: Transfer the dough to your prepared 9×13 inch baking pan. The dough will be thick and somewhat sticky. Use your hands (lightly floured if it’s too sticky), or a rubber spatula, to press the dough evenly into the bottom of the pan. Pay attention to getting it into the corners for a consistent thickness across all your Christmas Cookie Bars. You want a nice, uniform layer so they bake evenly.
- Bake to Golden Perfection: Place the pan in the preheated oven. Bake for 22-28 minutes, or until the edges are lightly golden brown and a wooden skewer or toothpick inserted into the center comes out with moist crumbs, but not wet batter. The center should look set and no longer jiggly. Keep an eye on them, as oven temperatures can vary! You want them cooked through but still soft and tender.
- Cool Completely: Once baked, remove the pan from the oven and place it on a wire rack to cool completely. This is a critical step! Do not try to frost these Christmas Cookie Bars while they are warm or even slightly warm. The frosting will melt and slide right off, turning into a messy disaster. Patience is a virtue here, my friends. It can take 1-2 hours for the bars to cool down entirely, so plan accordingly. You can even pop them in the fridge for about 30 minutes once they’ve mostly cooled down to speed up the process a bit, ensuring they are absolutely stone cold before moving on.
Making the Festive Cream Cheese Frosting
- Cream the Bases: In the bowl of your stand mixer with the paddle attachment (or using your handheld mixer), beat the softened full-fat cream cheese and softened unsalted butter together on medium speed for 2-3 minutes. You want this mixture to be incredibly smooth, light, and lump-free. It’s essential that both are at room temperature to achieve this silky-smooth consistency. Cold cream cheese or butter will result in a lumpy frosting, and nobody wants lumpy Christmas Cookie Bars!
- Gradually Add Powdered Sugar: Reduce the mixer speed to low. Gradually add the sifted powdered sugar, one cup at a time, mixing until fully incorporated after each addition. Sifting the powdered sugar beforehand is key to preventing lumps and ensuring a super smooth frosting. If you don’t sift, you might end up with little sugar granules in your frosting, which detracts from the luxurious texture.
- Introduce Flavor and Liquid: Once all the powdered sugar is mixed in, add the pure vanilla extract and salt. Mix on low until combined. Now, slowly add the milk, starting with 2 tablespoons. Beat on medium-high speed for another 1-2 minutes, until the frosting is light, fluffy, and spreadable. If the frosting seems too thick, add the remaining tablespoon of milk, or even a tiny bit more, half a teaspoon at a time, until it reaches your desired consistency. It should be thick enough to hold its shape but easy to spread.
- Color Your Frosting (Optional, but highly recommended for Christmas Cookie Bars!): This is where we bring in the festive cheer! Divide the frosting into two bowls if you want two colors (e.g., green and red). Add a few drops of gel food coloring to each bowl and mix until you achieve your desired vibrant shade. Gel food coloring is much more concentrated than liquid food coloring, so you’ll use less and avoid thinning out your frosting. Mix thoroughly until the color is uniform throughout. I love a bright green and a rich red for the ultimate Christmas Cookie Bars.
Assembling and Decorating Your Beautiful Christmas Cookie Bars
- Frosting the Cooled Bars: Once your cookie bar base is completely, utterly cool, use the parchment paper overhangs to carefully lift the entire slab out of the baking pan and transfer it to a large cutting board or a serving platter. This makes it much easier to frost and cut.
- Spread the Frosting: Using an offset spatula or the back of a spoon, evenly spread your festive cream cheese frosting over the cooled cookie bars. If you made two colors, you can spread one color over half the bars and the other color over the other half, or get creative with swirls! Aim for a consistent layer from edge to edge. The smoother and more even your frosting, the prettier your Christmas Cookie Bars will look.
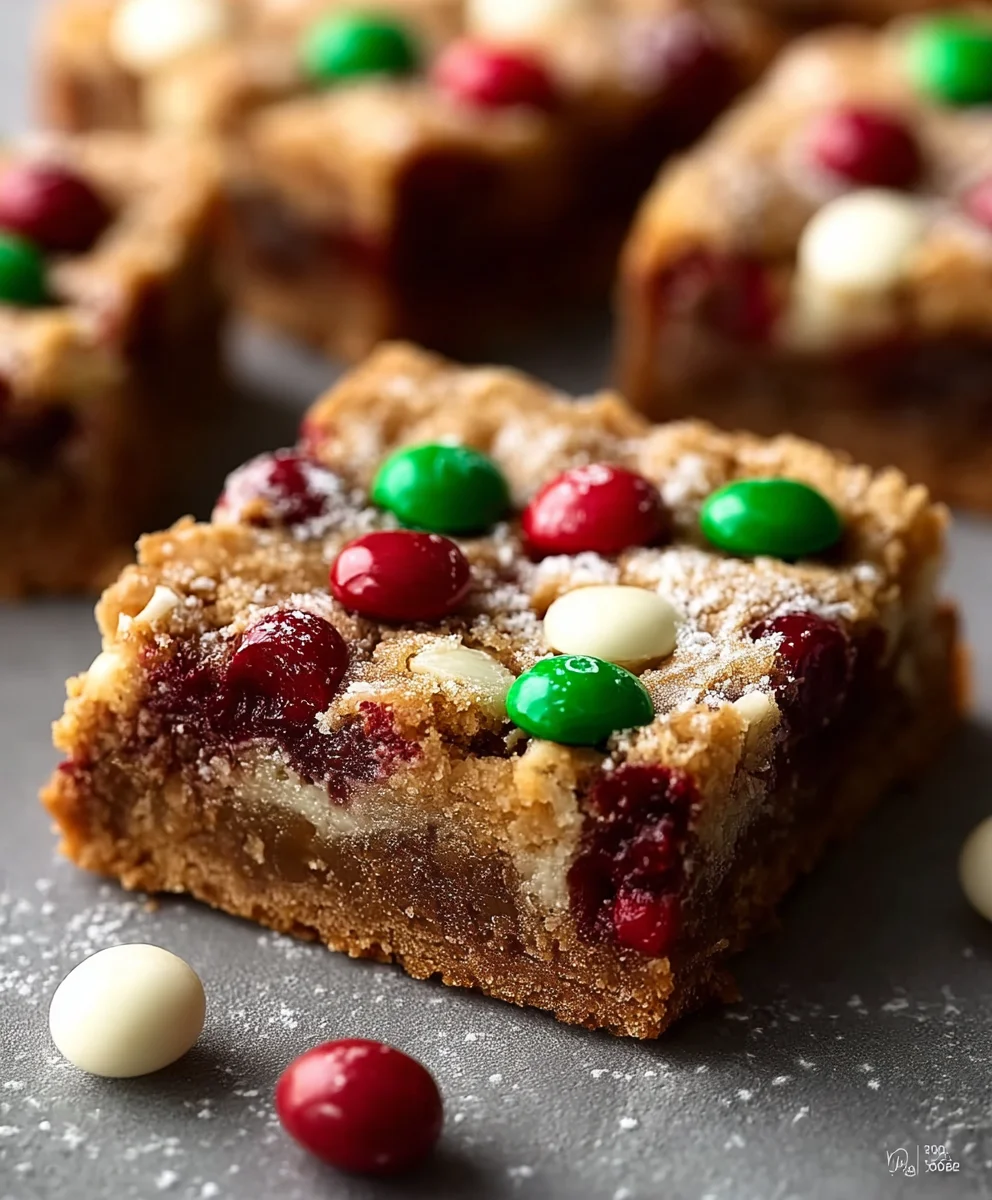
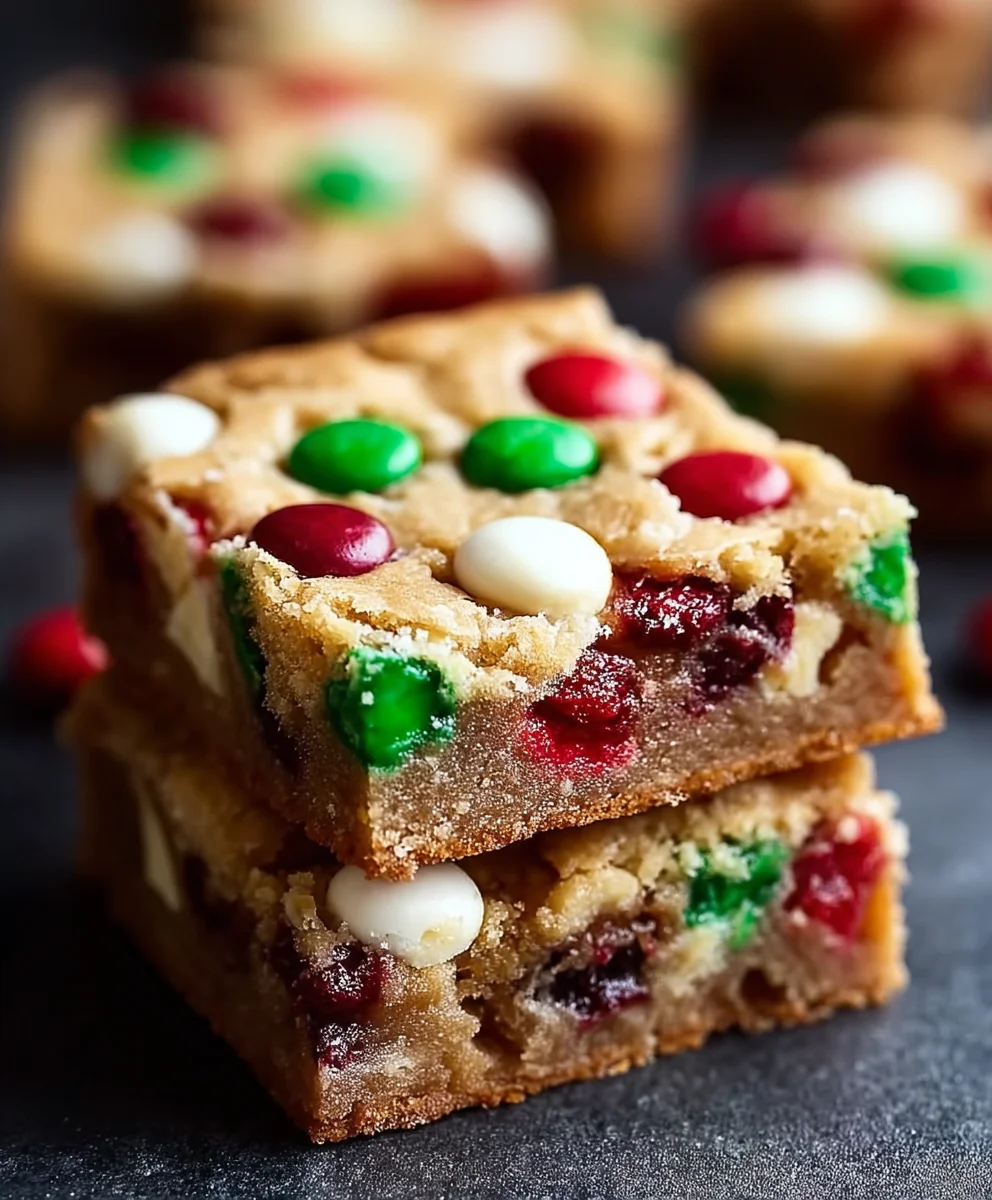
- Decorate Immediately: This is the fun part! While the frosting is still soft and tacky, immediately cover your Christmas Cookie Bars with your chosen decorations. Shower them generously with assorted Christmas sprinkles, strategically place festive M&M’s, or scatter crushed candy canes for a refreshing minty crunch. Don’t be shy – more is more when it comes to festive decorations on these bars! The sprinkles will adhere beautifully to the fresh frosting.
- Chill for Easier Cutting: To achieve clean, neat cuts, I highly recommend placing the decorated Christmas Cookie Bars in the refrigerator for at least 30 minutes (or up to an hour). This allows the frosting to firm up, preventing it from smearing when you slice through it.
- Slice and Serve Your Christmas Cookie Bars: Once chilled, remove the slab from the refrigerator. Using a large, sharp knife, cut the bars into your desired size and shape. I typically go for 24 squares (6 rows x 4 rows) for a good serving size, but you could do smaller bites or even festive shapes with cookie cutters if you prefer. For the cleanest cuts, wipe your knife clean with a damp cloth after each slice, especially when cutting through the frosting layer.
- Storage Instructions: These delightful Christmas Cookie Bars are best stored in an airtight container in the refrigerator for up to 5-7 days due to the cream cheese frosting. They are wonderful served chilled or at room temperature after letting them sit out for about 15-20 minutes. Enjoy sharing these festive treats with your loved ones and make this holiday season extra sweet!
Conclusion:
And so, we arrive at the culmination of our culinary journey, a sweet destination that promises to fill your home with warmth and your heart with holiday cheer. If you’ve been searching for that one quintessential recipe to elevate your festive season, something effortlessly impressive yet utterly comforting, then look no further. I truly believe that these incredible
Christmas Cookie Bars
are precisely what you’ve been dreaming of. They embody everything wonderful about holiday baking: a symphony of flavors, a delightful texture that’s both chewy and tender, and an undeniable visual appeal that practically screams “celebration!”
I crafted this recipe with the intention of creating a dessert that feels both special and achievable. It’s designed to be a joyous experience from start to finish, removing the stress often associated with elaborate holiday treats. The rich, buttery base, the perfectly balanced sweetness, and the festive array of toppings come together in a way that truly sings. You’re not just baking a dessert; you’re creating edible memories. The aroma alone, wafting through your kitchen as these bars bake, is enough to transport you to a cozy, festive wonderland. It’s a truly magical experience that I can’t wait for you to discover.
Now, let’s talk about how you can best enjoy these delightful creations. While they are undeniably perfect straight from the pan (once cooled, of course!), there are so many wonderful ways to serve them. Imagine a plate of these bars, artfully arranged, as the centerpiece of your holiday dessert table. They pair beautifully with a steaming mug of hot cocoa, a robust cup of coffee, or even a delicate herbal tea on a chilly evening. For an extra touch of decadence, try serving a warm bar with a scoop of vanilla bean ice cream, allowing the heat to slightly melt the ice cream into a creamy puddle of bliss. Or, for a sophisticated twist, a drizzle of high-quality caramel sauce or a sprinkle of flaky sea salt can elevate them even further. They are incredibly versatile, fitting seamlessly into any festive gathering, from a casual family game night to a elegant Christmas dinner.
Fantastic for Gifting!
Beyond serving them at home, these bars make truly thoughtful and cherished gifts. Cut them into individual squares, wrap them in festive cellophane or small decorative boxes, and tie them with a pretty ribbon. They’re perfect for hostess gifts, neighborly gestures, or as a homemade addition to a holiday care package. There’s something incredibly personal and heartwarming about receiving a delicious, homemade treat during the holidays, and these bars are guaranteed to bring smiles. They travel well, too, making them an excellent choice if you’re attending a potluck or needing to transport a dessert.
Feeling creative? This recipe is incredibly adaptable, inviting you to put your own unique spin on it. Consider swapping out some of the chocolate chips for white chocolate chunks, butterscotch chips, or even chopped candied ginger for a different flavor profile. A sprinkling of toasted pecans or walnuts would add a lovely crunch, or for a citrusy brightness, a teaspoon of orange or lemon zest mixed into the dough would be divine. For those who adore mint, a few crushed candy canes sprinkled on top right after baking (while the bars are still warm) would create a delightful peppermint twist. You could even experiment with different extracts – perhaps a hint of almond or a touch of rum extract for an adult-friendly version. The possibilities are truly endless, allowing you to tailor these bars to your family’s favorite tastes and preferences.
For my friends with dietary considerations, don’t shy away! With a few thoughtful substitutions, you can often adapt this recipe. Gluten-free flour blends work wonderfully in bar recipes like this, and dairy-free butter and chocolate chips can easily be incorporated for a delicious vegan-friendly version. The core of the recipe is so robust, it can handle these changes with grace, ensuring that everyone can enjoy a taste of holiday magic.
So, my friend, please don’t just read about these bars – make them! I promise you, they will become an instant holiday classic in your home, a recipe you’ll return to year after year. The joy of baking them, the delight of sharing them, and the sheer pleasure of savoring each bite is an experience I genuinely want for you. Your holiday season deserves this kind of deliciousness! When you do make them, I would absolutely love to hear all about your experience. Did you add any fun variations? What did your family think? Please share your photos and stories; seeing your culinary creations brings me so much happiness. Let’s make this holiday season the tastiest one yet, filled with warmth, laughter, and plenty of these unforgettable Christmas Cookie Bars!
Christmas Cookie Bars: Easy, Chewy & Festive Dessert!
These cookie bars are the ultimate holiday treat, combining the sweet flavors of chocolate and festive M&Ms in a buttery, chewy base. They’re easy to make and perfect for sharing with friends and family during the holiday season. Whether you’re baking for a party or a cozy night in, these bars are sure to bring a bit of holiday cheer to your dessert table. Fold in ¾ cup of M&Ms and white chocolate chips, reserving some M&Ms for topping.
Ingredients
-
1 cup unsalted butter, softened
-
1 ½ cups granulated sugar
-
2 large eggs
-
1 tbsp vanilla extract
-
3 cups all-purpose flour
-
1 tsp baking powder
-
½ tsp salt
-
½ tsp almond extract (optional)
-
¾ cup M&Ms
-
¾ cup white chocolate chips
-
8 oz full-fat cream cheese, softened
-
½ cup unsalted butter, softened
-
4 cups powdered sugar, sifted
-
1 tsp vanilla extract
-
¼ tsp salt
-
2-3 tbsp milk
-
Green/Red gel food coloring (optional)
-
Assorted Christmas sprinkles
-
Reserved M&Ms
-
Crushed candy canes
Instructions
-
Step 1
Preheat oven to 375°F (190°C). Line a 9×13 inch baking pan with parchment paper, grease lightly. -
Step 2
In a mixer, beat softened butter and granulated sugar until light and fluffy (3-4 mins). -
Step 3
Add eggs one at a time, then vanilla and optional almond extract. Mix well. -
Step 4
Whisk flour, baking powder, and salt. Gradually add to wet ingredients, mixing until just combined. Do not overmix. Fold in ¾ cup M&Ms and ¾ cup white chocolate chips. -
Step 5
Press dough evenly into the prepared 9×13 inch pan. -
Step 6
Bake 22-28 minutes until edges are golden and a toothpick comes out with moist crumbs. -
Step 7
Cool completely on a wire rack (1-2 hours). Bars must be stone cold before frosting. -
Step 8
In a mixer, beat softened cream cheese and butter until smooth and lump-free (2-3 mins). -
Step 9
Gradually add sifted powdered sugar on low speed, mixing until incorporated. Stir in vanilla and salt. Add 2-3 tbsp milk slowly, then beat until light and fluffy. -
Step 10
(Optional) Divide frosting and color with gel food coloring for festive shades. -
Step 11
Lift cooled bars from pan onto a cutting board. Evenly spread frosting over the cooled cookie bars. -
Step 12
Decorate immediately with assorted Christmas sprinkles, reserved M&Ms, and crushed candy canes. -
Step 13
Chill bars for 30-60 minutes to firm frosting for cleaner cuts. -
Step 14
Slice into 24 squares (or desired size) with a sharp, clean knife. -
Step 15
Store in an airtight container in the refrigerator for 5-7 days. Serve chilled or at room temperature.
Important Information
Nutrition Facts (Per Serving)
It is important to consider this information as approximate and not to use it as definitive health advice.
Allergy Information
Please check ingredients for potential allergens and consult a health professional if in doubt.


Leave a Comment