

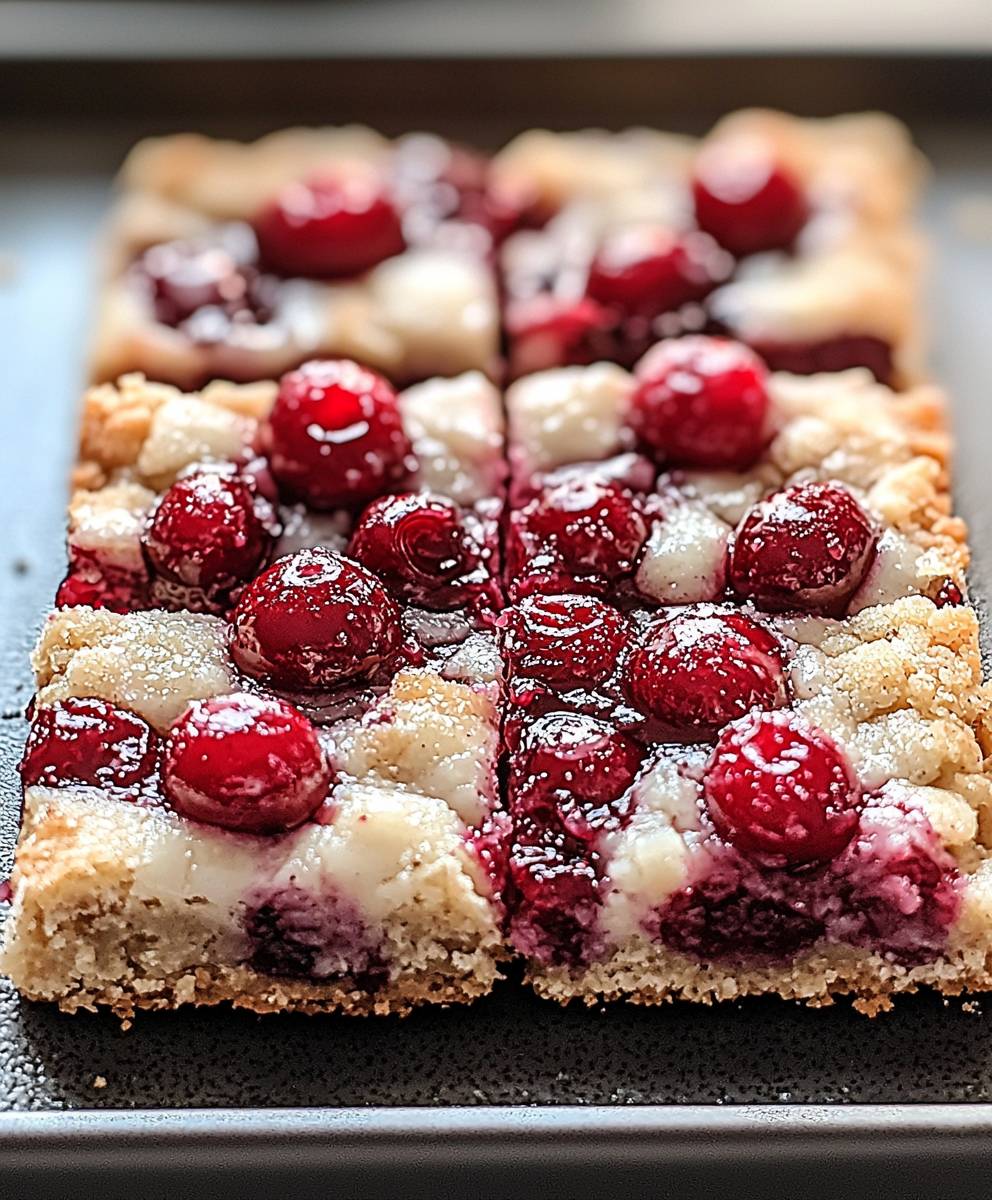
Christmas Cherry Bars: Prepare to deck the halls with the most festive and delightful treat imaginable! Imagine biting into a chewy, buttery bar bursting with the bright, sweet-tart flavor of cherries a taste of Christmas magic in every single bite. These aren’t just any holiday dessert; they’re a nostalgic trip back to cozy family gatherings and the joyous anticipation of Christmas morning.
While the exact origins of cherry bars are a bit hazy, they’ve become a beloved staple in many households during the holiday season. Cherries themselves have a rich history, often associated with abundance and good fortune, making them a perfect symbol for the festive spirit. For generations, families have passed down their cherished recipes, each with its own unique twist, but the essence remains the same: a simple yet incredibly satisfying treat that embodies the warmth and generosity of Christmas.
What makes Christmas Cherry Bars so irresistible? It’s the perfect combination of textures the soft, slightly crumbly base, the chewy, fruity filling, and often a sprinkle of crunchy nuts or a dusting of powdered sugar. But beyond the delightful texture, it’s the taste that truly captivates. The sweetness of the cherries is perfectly balanced by a hint of almond extract or a touch of citrus zest, creating a flavor profile that’s both comforting and exciting. Plus, they are incredibly convenient to make ahead of time, making them ideal for holiday parties or a simple weeknight dessert. So, gather your ingredients, preheat your oven, and let’s create some Christmas magic together!

Ingredients:
- For the Crust:
- 1 1/2 cups all-purpose flour
- 1/2 cup (1 stick) unsalted butter, cold and cubed
- 1/4 cup granulated sugar
- 1/4 teaspoon salt
- 4-6 tablespoons ice water
- For the Cherry Filling:
- 2 (10-ounce) jars maraschino cherries, drained and halved (reserve 1/4 cup of the cherry juice)
- 1/2 cup granulated sugar
- 1/4 cup cornstarch
- 1/4 cup reserved maraschino cherry juice
- 1 tablespoon lemon juice
- 1/4 teaspoon almond extract
- Pinch of salt
- For the Crumble Topping:
- 1/2 cup all-purpose flour
- 1/4 cup packed light brown sugar
- 1/4 cup rolled oats
- 1/4 teaspoon ground cinnamon
- 1/4 cup (1/2 stick) unsalted butter, cold and cubed
- Optional Garnish:
- Powdered sugar, for dusting
- Chopped nuts (almonds, pecans, or walnuts)
Preparing the Crust:
- In a large bowl, whisk together the flour, sugar, and salt. This ensures that the salt and sugar are evenly distributed throughout the flour, which is crucial for a consistent crust.
- Add the cold, cubed butter to the flour mixture. Using a pastry blender or your fingertips, cut the butter into the flour until the mixture resembles coarse crumbs. The key here is to work quickly so the butter doesn’t melt. Small pieces of butter create flaky layers in the crust.
- Gradually add the ice water, one tablespoon at a time, mixing until the dough just comes together. Be careful not to overmix, as this can develop the gluten in the flour and result in a tough crust. The dough should be slightly moist but not sticky. I usually start with 4 tablespoons and add more if needed.
- Form the dough into a disc, wrap it in plastic wrap, and refrigerate for at least 30 minutes. This allows the gluten to relax and the butter to firm up, making the dough easier to roll out. Chilling is a crucial step for a tender crust.
- Preheat your oven to 375°F (190°C). While the oven is preheating, prepare your baking pan. I recommend using a 9×13 inch baking pan. Lightly grease the pan or line it with parchment paper, leaving an overhang for easy removal of the bars later.
- On a lightly floured surface, roll out the chilled dough to fit the bottom of the prepared baking pan. Carefully transfer the dough to the pan and press it evenly into the bottom. You can use a fork to prick the bottom of the crust to prevent it from puffing up during baking.
- Bake the crust for 15-20 minutes, or until it is lightly golden brown. This par-baking helps to prevent the crust from becoming soggy when the cherry filling is added. Keep a close eye on it to prevent burning.
Making the Cherry Filling:
- While the crust is baking, prepare the cherry filling. In a medium saucepan, combine the drained and halved maraschino cherries, sugar, cornstarch, reserved cherry juice, lemon juice, almond extract, and salt.
- Stir the mixture well to ensure that the cornstarch is fully dissolved. This is important to prevent lumps in the filling.
- Place the saucepan over medium heat and cook, stirring constantly, until the mixture thickens and becomes glossy. This usually takes about 5-7 minutes. The filling should be thick enough to coat the back of a spoon.
- Remove the saucepan from the heat and set aside.
Preparing the Crumble Topping:
- In a medium bowl, combine the flour, brown sugar, rolled oats, and cinnamon. The cinnamon adds a warm, comforting flavor to the crumble topping.
- Add the cold, cubed butter to the flour mixture. Using a pastry blender or your fingertips, cut the butter into the flour until the mixture resembles coarse crumbs. Again, work quickly to prevent the butter from melting.
- Set the crumble topping aside.
Assembling and Baking the Cherry Bars:
- Once the crust is par-baked, remove it from the oven.
- Pour the cherry filling evenly over the par-baked crust. Spread it out to ensure that it covers the entire surface.
- Sprinkle the crumble topping evenly over the cherry filling. Make sure to distribute it well so that each bar has a good amount of crumble.
- Return the baking pan to the oven and bake for 25-30 minutes, or until the crumble topping is golden brown and the filling is bubbly. The baking time may vary depending on your oven, so keep a close eye on the bars.
- Remove the baking pan from the oven and let the bars cool completely in the pan before cutting. This is important because the filling needs time to set up. If you try to cut them while they are still warm, they will be messy. I usually let them cool for at least 2-3 hours, or even overnight.
Serving and Storing:
- Once the bars are completely cool, lift them out of the pan using the parchment paper overhang (if you used it). Cut them into squares or rectangles. I usually cut them into about 24 bars.
- Dust the bars with powdered sugar, if desired. This adds a touch of sweetness and makes them look even more appealing.
- Garnish with chopped nuts, if desired. Almonds, pecans, or walnuts are all great choices.
- Serve the cherry bars and enjoy!
- To store, place the cooled bars in an airtight container at room temperature for up to 3 days, or in the refrigerator for up to 5 days. They can also be frozen for longer storage. Wrap them individually in plastic wrap and then place them in a freezer-safe bag or container.
Tips for Success:
- Use cold butter: Cold butter is essential for creating a flaky crust and a crumbly topping. Make sure your butter is well-chilled before you start.
- Don’t overmix the dough: Overmixing the dough will develop the gluten and result in a tough crust. Mix just until the ingredients are combined.
- Par-bake the crust: Par-baking the crust helps to prevent it from becoming soggy when the cherry filling is added.
- Let the bars cool completely: Letting the bars cool completely before cutting is important because the filling needs time to set up.
- Adjust sweetness to your liking: If you prefer a less sweet filling, you can reduce the amount of sugar.
- Add other fruits: Feel free to add other fruits to the filling, such as blueberries, raspberries, or peaches.
- Experiment with extracts: Try using different extracts, such as vanilla extract or rum extract, to add a unique flavor to the filling.
Variations:
- Chocolate Cherry Bars: Add 1/4 cup of cocoa powder to the crust for a chocolatey twist. You can also add chocolate chips to the cherry filling.
- Almond Cherry Bars: Add 1/2 cup of sliced almonds to the crumble topping for a nutty flavor and texture.
- Coconut Cherry Bars: Add 1/2 cup of shredded coconut to the crumble topping for a tropical twist.
- Spiced Cherry Bars: Add a pinch of nutmeg or cloves to the cherry filling for a warm, spiced flavor.
Conclusion:
And there you have it! These Christmas Cherry Bars are more than just a dessert; they’re a slice of holiday cheer, baked with love and ready to be devoured. I truly believe this recipe is a must-try this holiday season, and here’s why: the delightful combination of sweet cherries, buttery shortbread, and that hint of almond extract creates a flavor profile that’s both comforting and festive. It’s a guaranteed crowd-pleaser, whether you’re serving it at a Christmas party, gifting it to friends and neighbors, or simply enjoying a quiet evening by the fire.
But the best part? They’re surprisingly easy to make! No complicated techniques or hard-to-find ingredients are required. Even if you’re a novice baker, you can confidently whip up a batch of these beauties and impress everyone with your baking skills. The recipe is straightforward, the instructions are clear, and the results are consistently delicious. Trust me, you’ll be amazed at how simple it is to create such a stunning and flavorful treat.
Now, let’s talk about serving suggestions and variations. These Christmas Cherry Bars are fantastic on their own, but you can elevate them even further with a few simple additions. A dollop of whipped cream or a scoop of vanilla ice cream adds a touch of decadence. A dusting of powdered sugar creates a beautiful, snowy effect. And for a truly indulgent experience, try drizzling them with melted white chocolate or a homemade cherry glaze.
If you’re feeling adventurous, you can also experiment with different variations of the recipe. Substitute the almond extract with vanilla or lemon extract for a different flavor profile. Add chopped nuts, such as pecans or walnuts, to the shortbread crust for extra crunch. Or, use a mix of dried fruits, like cranberries and apricots, instead of cherries for a unique twist. You can even add a layer of cream cheese frosting on top for an extra layer of sweetness and tanginess. The possibilities are endless!
I personally love serving these bars with a warm cup of coffee or hot chocolate. The combination of the sweet, fruity bars and the rich, comforting beverage is simply divine. They’re also a perfect addition to a holiday dessert platter, alongside other festive treats like gingerbread cookies, peppermint bark, and chocolate fudge.
But no matter how you choose to serve them, I’m confident that these Christmas Cherry Bars will be a hit. They’re the perfect way to spread holiday cheer and create lasting memories with your loved ones.
So, what are you waiting for? Grab your apron, gather your ingredients, and get baking! I promise you won’t regret it. And once you’ve tried this recipe, I’d love to hear about your experience. Did you make any variations? What did your family and friends think? Share your photos and comments in the section below. I can’t wait to see your creations and hear your stories. Happy baking, and happy holidays! I hope you enjoy making these Christmas Cherry Bars as much as I do!
Christmas Cherry Bars: A Festive Holiday Treat
Delicious cherry bars with buttery crust, sweet cherry filling, and crumbly oat topping. Perfect for dessert!
Ingredients
- 1 1/2 cups all-purpose flour
- 1/2 cup (1 stick) unsalted butter, cold and cubed
- 1/4 cup granulated sugar
- 1/4 teaspoon salt
- 4-6 tablespoons ice water
- 2 (10-ounce) jars maraschino cherries, drained and halved (reserve 1/4 cup of the cherry juice)
- 1/2 cup granulated sugar
- 1/4 cup cornstarch
- 1/4 cup reserved maraschino cherry juice
- 1 tablespoon lemon juice
- 1/4 teaspoon almond extract
- Pinch of salt
- 1/2 cup all-purpose flour
- 1/4 cup packed light brown sugar
- 1/4 cup rolled oats
- 1/4 teaspoon ground cinnamon
- 1/4 cup (1/2 stick) unsalted butter, cold and cubed
- Powdered sugar, for dusting
- Chopped nuts (almonds, pecans, or walnuts)
Instructions
- Prepare the Crust: In a large bowl, whisk together the flour, sugar, and salt. Add the cold, cubed butter and cut it into the flour using a pastry blender or your fingertips until the mixture resembles coarse crumbs. Gradually add the ice water, one tablespoon at a time, mixing until the dough just comes together. Form the dough into a disc, wrap it in plastic wrap, and refrigerate for at least 30 minutes.
- Preheat your oven to 375°F (190°C). Lightly grease a 9×13 inch baking pan or line it with parchment paper.
- On a lightly floured surface, roll out the chilled dough to fit the bottom of the prepared baking pan. Carefully transfer the dough to the pan and press it evenly into the bottom. Prick the bottom of the crust with a fork.
- Bake the crust for 15-20 minutes, or until it is lightly golden brown.
- Make the Cherry Filling: While the crust is baking, prepare the cherry filling. In a medium saucepan, combine the drained and halved maraschino cherries, sugar, cornstarch, reserved cherry juice, lemon juice, almond extract, and salt. Stir well to dissolve the cornstarch.
- Place the saucepan over medium heat and cook, stirring constantly, until the mixture thickens and becomes glossy (about 5-7 minutes). Remove from heat.
- Prepare the Crumble Topping: In a medium bowl, combine the flour, brown sugar, rolled oats, and cinnamon. Add the cold, cubed butter and cut it into the flour until the mixture resembles coarse crumbs.
- Assemble and Bake: Once the crust is par-baked, remove it from the oven. Pour the cherry filling evenly over the crust. Sprinkle the crumble topping evenly over the cherry filling.
- Return the baking pan to the oven and bake for 25-30 minutes, or until the crumble topping is golden brown and the filling is bubbly.
- Remove the baking pan from the oven and let the bars cool completely in the pan before cutting (at least 2-3 hours, or overnight).
- Serve: Once the bars are completely cool, lift them out of the pan using the parchment paper overhang (if you used it). Cut them into squares or rectangles. Dust with powdered sugar and garnish with chopped nuts, if desired.
Notes
- Use cold butter for a flaky crust and crumbly topping.
- Don’t overmix the dough to avoid a tough crust.
- Par-baking the crust prevents it from becoming soggy.
- Let the bars cool completely before cutting for a cleaner cut.
- Adjust sweetness to your liking by reducing the sugar.
- Experiment with other fruits or extracts in the filling.
- See variations for chocolate, almond, coconut, or spiced cherry bars.
- To store, place the cooled bars in an airtight container at room temperature for up to 3 days, or in the refrigerator for up to 5 days. They can also be frozen for longer storage. Wrap them individually in plastic wrap and then place them in a freezer-safe bag or container.
Leave a Comment