

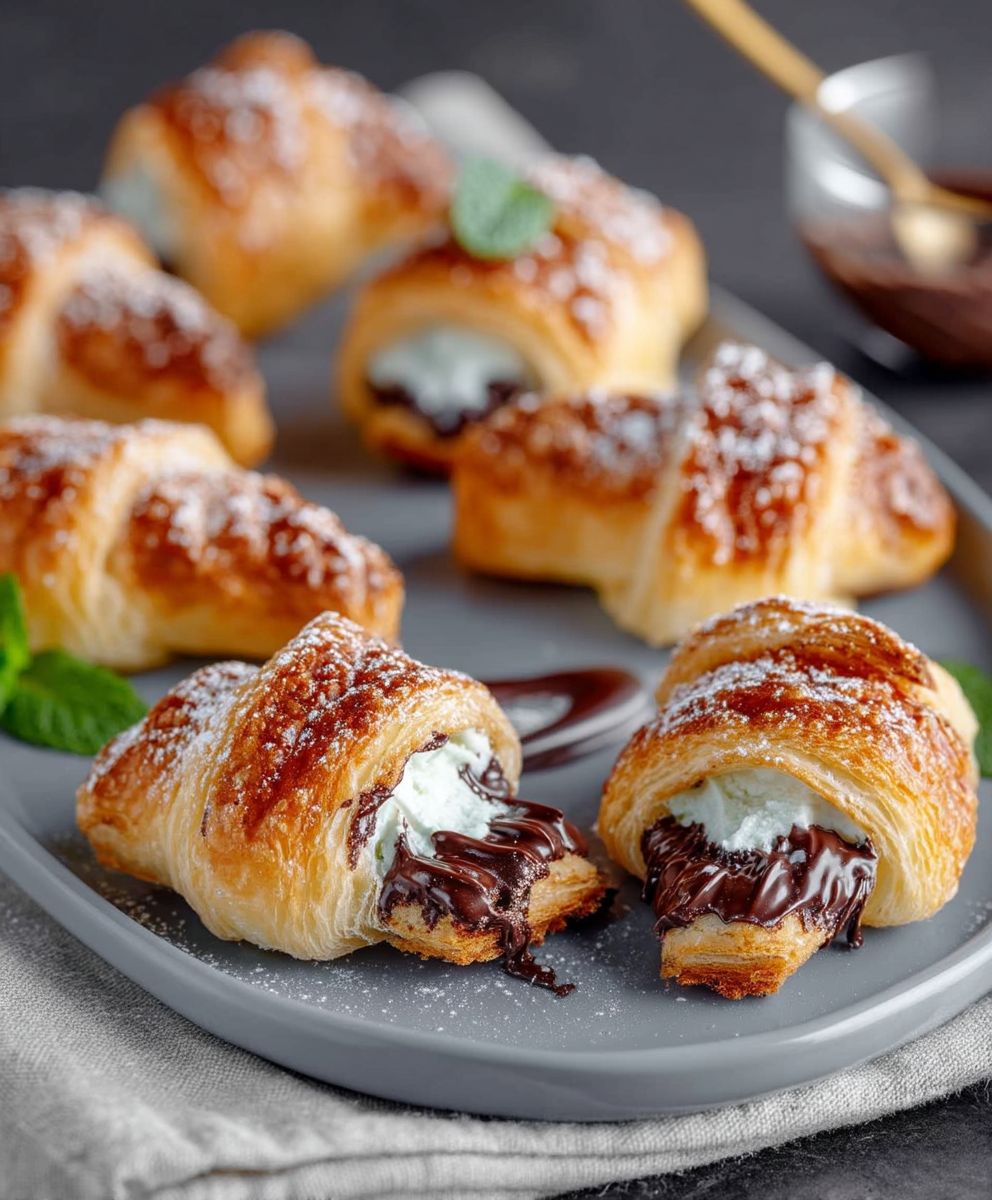
Chocolate Puff Pastry: Prepare to be amazed by this incredibly simple yet utterly decadent treat! Imagine biting into layers of flaky, buttery pastry, giving way to a rich, molten chocolate center. It’s a symphony of textures and flavors that will have you reaching for seconds (and maybe thirds!).
While the exact origins of combining chocolate and puff pastry are somewhat shrouded in mystery, the love affair between these two ingredients is undeniable. Puff pastry, with its light and airy structure, has been a staple in European baking for centuries, often used in elaborate desserts and savory dishes alike. The addition of chocolate, a New World treasure that quickly captivated European palates, elevated puff pastry to new heights of indulgence. Think of it as a delightful marriage of classic technique and irresistible flavor.
What makes chocolate puff pastry so universally appealing? It’s the perfect balance of textures the crisp, delicate layers of the pastry against the smooth, melting chocolate. It’s also incredibly versatile; you can enjoy it warm from the oven as a comforting dessert, or let it cool for a more portable treat. Plus, with pre-made puff pastry readily available, it’s a surprisingly quick and easy recipe to whip up, making it ideal for both casual weeknight desserts and elegant gatherings. Get ready to experience the magic!

Ingredients:
- 2 sheets frozen puff pastry, thawed
- 1 cup high-quality chocolate chips (semi-sweet or dark, your preference!)
- 1/4 cup unsalted butter, melted
- 1/4 cup granulated sugar
- 1/4 cup cocoa powder (unsweetened)
- 1 teaspoon vanilla extract
- 1/4 teaspoon salt
- 1 large egg, beaten (for egg wash)
- Optional: Coarse sugar or chopped nuts for topping
Preparing the Chocolate Filling:
- First, let’s get that delicious chocolate filling ready! In a medium-sized, microwave-safe bowl, combine the chocolate chips and melted butter.
- Microwave in 30-second intervals, stirring in between each interval, until the chocolate is completely melted and smooth. Be careful not to overheat the chocolate, as it can seize up. Patience is key here!
- Once the chocolate and butter are melted and combined, add the granulated sugar, cocoa powder, vanilla extract, and salt to the bowl.
- Stir everything together until the filling is smooth, glossy, and well combined. It should resemble a thick, decadent chocolate paste. If it seems too thick, you can add a teaspoon of milk or cream to loosen it up slightly.
- Set the chocolate filling aside to cool slightly while you prepare the puff pastry. This will make it easier to spread.
Assembling the Puff Pastries:
- Now, let’s work with our puff pastry! Lightly flour a clean, flat surface. This will prevent the pastry from sticking.
- Unfold one sheet of puff pastry onto the floured surface. Gently roll it out slightly with a rolling pin to even it out and make it a bit thinner. You want it to be about 12×12 inches. Don’t overwork the pastry, or it won’t puff up properly!
- Spread half of the chocolate filling evenly over the entire surface of the puff pastry, leaving a small border (about 1/2 inch) around the edges. This will help seal the pastry later.
- Repeat the process with the second sheet of puff pastry. Unfold it, roll it out slightly, and spread the remaining chocolate filling evenly over the surface, again leaving a small border.
- Carefully place the second sheet of puff pastry on top of the first sheet, chocolate-side down. Gently press the edges together to seal them.
- Now, for the fun part! We’re going to cut the pastry into individual portions. You can make them any size or shape you like. I prefer to make long strips, but squares or triangles work just as well.
- Using a sharp knife or pizza cutter, cut the layered pastry into your desired shapes. For strips, cut the pastry lengthwise into 1-inch wide strips.
- Once you’ve cut the pastry, gently twist each strip a few times to create a spiral effect. This will give them a beautiful, flaky texture when baked.
- Place the twisted puff pastry strips onto a baking sheet lined with parchment paper. Make sure to leave some space between each strip so they can puff up properly.
Baking the Chocolate Puff Pastries:
- Preheat your oven to 375°F (190°C). Make sure your oven is fully preheated before you put the pastries in.
- In a small bowl, whisk together the beaten egg with a tablespoon of water to create an egg wash.
- Brush the tops of the puff pastry strips with the egg wash. This will give them a beautiful golden-brown color and a slightly glossy finish.
- If desired, sprinkle the tops of the pastries with coarse sugar or chopped nuts for added texture and flavor.
- Bake in the preheated oven for 15-20 minutes, or until the pastries are golden brown and puffed up. Keep a close eye on them, as they can burn easily.
- Once the pastries are baked, remove them from the oven and let them cool on the baking sheet for a few minutes before transferring them to a wire rack to cool completely.
Tips and Variations:
- Chocolate Options: Feel free to experiment with different types of chocolate chips. Milk chocolate, white chocolate, or even a combination of chocolates would be delicious. You could also add chopped nuts, dried fruit, or even a sprinkle of cinnamon to the chocolate filling.
- Flavor Enhancements: A pinch of espresso powder added to the chocolate filling will enhance the chocolate flavor and add a subtle coffee note. You could also add a few drops of peppermint extract for a festive holiday treat.
- Glaze It Up: For an extra touch of sweetness, you can drizzle the cooled pastries with a simple glaze made from powdered sugar and milk.
- Storage: These puff pastries are best enjoyed fresh, but they can be stored in an airtight container at room temperature for up to 2 days. They may lose some of their crispness over time.
- Freezing: You can freeze the unbaked puff pastry strips for up to 2 months. Simply place them on a baking sheet lined with parchment paper and freeze until solid. Then, transfer them to a freezer bag or container. When ready to bake, thaw them in the refrigerator overnight and bake as directed.
- Puff Pastry Brands: Different brands of puff pastry can vary in quality. I recommend using an all-butter puff pastry for the best flavor and texture.
- Don’t Overfill: Be careful not to overfill the puff pastry with the chocolate filling, as it can leak out during baking.
- Sealing the Edges: Make sure to seal the edges of the puff pastry well to prevent the filling from escaping. You can use a fork to crimp the edges for a decorative touch.
- Baking Time: The baking time may vary depending on your oven. Keep a close eye on the pastries and adjust the baking time as needed.
- Serving Suggestions: These chocolate puff pastries are delicious on their own, but they also pair well with a scoop of vanilla ice cream, a dollop of whipped cream, or a cup of coffee or tea.
Troubleshooting:
- Puff Pastry Not Puffing: Make sure your puff pastry is cold when you work with it. If it gets too warm, the butter will melt, and the pastry won’t puff up properly. Also, avoid overworking the pastry.
- Chocolate Filling Leaking: Make sure to seal the edges of the puff pastry well and don’t overfill it with the chocolate filling.
- Pastries Burning: Keep a close eye on the pastries while they are baking and adjust the baking time as needed. You can also tent the pastries with foil if they are browning too quickly.
- Filling Too Thick: If the chocolate filling is too thick, you can add a teaspoon of milk or cream to loosen it up slightly.
- Filling Too Thin: If the chocolate filling is too thin, you can add a tablespoon of cocoa powder to thicken it up.
Enjoy!
I hope you enjoy making and eating these delicious chocolate puff pastries! They’re perfect for a quick and easy dessert, a special occasion, or just a sweet treat to enjoy any time of day. Happy baking!
Conclusion:
This Chocolate Puff Pastry recipe isn’t just another dessert; it’s a gateway to effortless indulgence. Seriously, if you’re looking for a show-stopping treat that requires minimal effort and delivers maximum flavor, then look no further. The flaky, buttery layers of puff pastry combined with the rich, decadent chocolate filling create a symphony of textures and tastes that will have everyone begging for more. It’s the perfect balance of sweet and satisfying, making it an ideal choice for everything from a casual weeknight dessert to a more sophisticated brunch offering.
Why is this a must-try? Because it’s ridiculously easy! We’re talking about a recipe that even a novice baker can master. Forget spending hours in the kitchen wrestling with complicated techniques. This recipe utilizes store-bought puff pastry, which cuts down on prep time significantly, allowing you to focus on the fun part: creating that luscious chocolate filling. And the best part? The results are so impressive, no one will ever guess how simple it was to make. It’s the ultimate secret weapon for impressing your friends and family without breaking a sweat.
But the beauty of this recipe lies not only in its simplicity but also in its versatility. Feel free to get creative with your serving suggestions and variations! For a truly decadent experience, serve warm with a scoop of vanilla ice cream or a dollop of freshly whipped cream. A dusting of powdered sugar adds a touch of elegance, while a drizzle of chocolate sauce elevates it to a whole new level of indulgence.
Looking for variations? Consider adding chopped nuts, such as pecans or walnuts, to the chocolate filling for a delightful crunch. Or, for a hint of citrus, add a teaspoon of orange zest to the filling. You could even experiment with different types of chocolate, such as dark chocolate for a more intense flavor or white chocolate for a sweeter treat. If you’re feeling adventurous, try adding a layer of raspberry jam between the puff pastry and the chocolate filling for a burst of fruity flavor. The possibilities are endless!
Don’t be intimidated by the word “pastry.” This Chocolate Puff Pastry is truly approachable and forgiving. The key is to follow the instructions carefully and to use high-quality ingredients. Trust me, the effort is well worth the reward. You’ll be amazed at how quickly this dessert comes together and how much everyone will love it.
So, what are you waiting for? Grab a box of puff pastry, gather your ingredients, and get ready to create a dessert masterpiece. I’m confident that this recipe will become a staple in your baking repertoire.
I’m incredibly excited for you to try this recipe! Once you do, I’d love to hear about your experience. Did you make any variations? What did your family and friends think? Share your photos and stories in the comments below! Your feedback is invaluable and helps me to continue creating recipes that you’ll love. Happy baking, and enjoy every delicious bite of your homemade Chocolate Puff Pastry! I can’t wait to hear all about your baking adventures!
Chocolate Puff Pastry: A Delicious & Easy Dessert Recipe
Flaky, buttery puff pastry filled with a rich, decadent chocolate filling. These easy-to-make pastries are perfect for a quick dessert or a special treat!
Ingredients
- 2 sheets frozen puff pastry, thawed
- 1 cup high-quality chocolate chips (semi-sweet or dark, your preference!)
- 1/4 cup unsalted butter, melted
- 1/4 cup granulated sugar
- 1/4 cup cocoa powder (unsweetened)
- 1 teaspoon vanilla extract
- 1/4 teaspoon salt
- 1 large egg, beaten (for egg wash)
- Optional: Coarse sugar or chopped nuts for topping
Instructions
- Prepare the Chocolate Filling: In a medium-sized, microwave-safe bowl, combine the chocolate chips and melted butter. Microwave in 30-second intervals, stirring in between each interval, until the chocolate is completely melted and smooth. Be careful not to overheat the chocolate.
- Add the granulated sugar, cocoa powder, vanilla extract, and salt to the bowl. Stir everything together until the filling is smooth, glossy, and well combined. If it seems too thick, add a teaspoon of milk or cream to loosen it up slightly. Set aside to cool slightly.
- Assemble the Puff Pastries: Lightly flour a clean, flat surface. Unfold one sheet of puff pastry onto the floured surface. Gently roll it out slightly with a rolling pin to even it out and make it a bit thinner (about 12×12 inches). Don’t overwork the pastry!
- Spread half of the chocolate filling evenly over the entire surface of the puff pastry, leaving a small border (about 1/2 inch) around the edges.
- Repeat the process with the second sheet of puff pastry. Unfold it, roll it out slightly, and spread the remaining chocolate filling evenly over the surface, again leaving a small border.
- Carefully place the second sheet of puff pastry on top of the first sheet, chocolate-side down. Gently press the edges together to seal them.
- Cut the layered pastry into individual portions. You can make them any size or shape you like. For strips, cut the pastry lengthwise into 1-inch wide strips.
- Gently twist each strip a few times to create a spiral effect.
- Place the twisted puff pastry strips onto a baking sheet lined with parchment paper, leaving some space between each strip.
- Bake the Chocolate Puff Pastries: Preheat your oven to 375°F (190°C).
- In a small bowl, whisk together the beaten egg with a tablespoon of water to create an egg wash.
- Brush the tops of the puff pastry strips with the egg wash.
- If desired, sprinkle the tops of the pastries with coarse sugar or chopped nuts.
- Bake in the preheated oven for 15-20 minutes, or until the pastries are golden brown and puffed up.
- Remove from the oven and let them cool on the baking sheet for a few minutes before transferring them to a wire rack to cool completely.
Notes
- Chocolate Options: Experiment with different types of chocolate chips (milk, white, etc.). Add chopped nuts, dried fruit, or cinnamon to the filling.
- Flavor Enhancements: Add a pinch of espresso powder or peppermint extract to the chocolate filling.
- Glaze It Up: Drizzle cooled pastries with a simple glaze made from powdered sugar and milk.
- Storage: Best enjoyed fresh, but can be stored in an airtight container at room temperature for up to 2 days.
- Freezing: Freeze unbaked puff pastry strips for up to 2 months. Thaw in the refrigerator overnight before baking.
- Puff Pastry Brands: Use an all-butter puff pastry for the best flavor and texture.
- Don’t Overfill: Avoid overfilling the puff pastry.
- Sealing the Edges: Seal the edges well to prevent filling from escaping.
- Baking Time: Adjust baking time as needed based on your oven.
- Serving Suggestions: Serve with vanilla ice cream, whipped cream, or coffee/tea.


Leave a Comment