

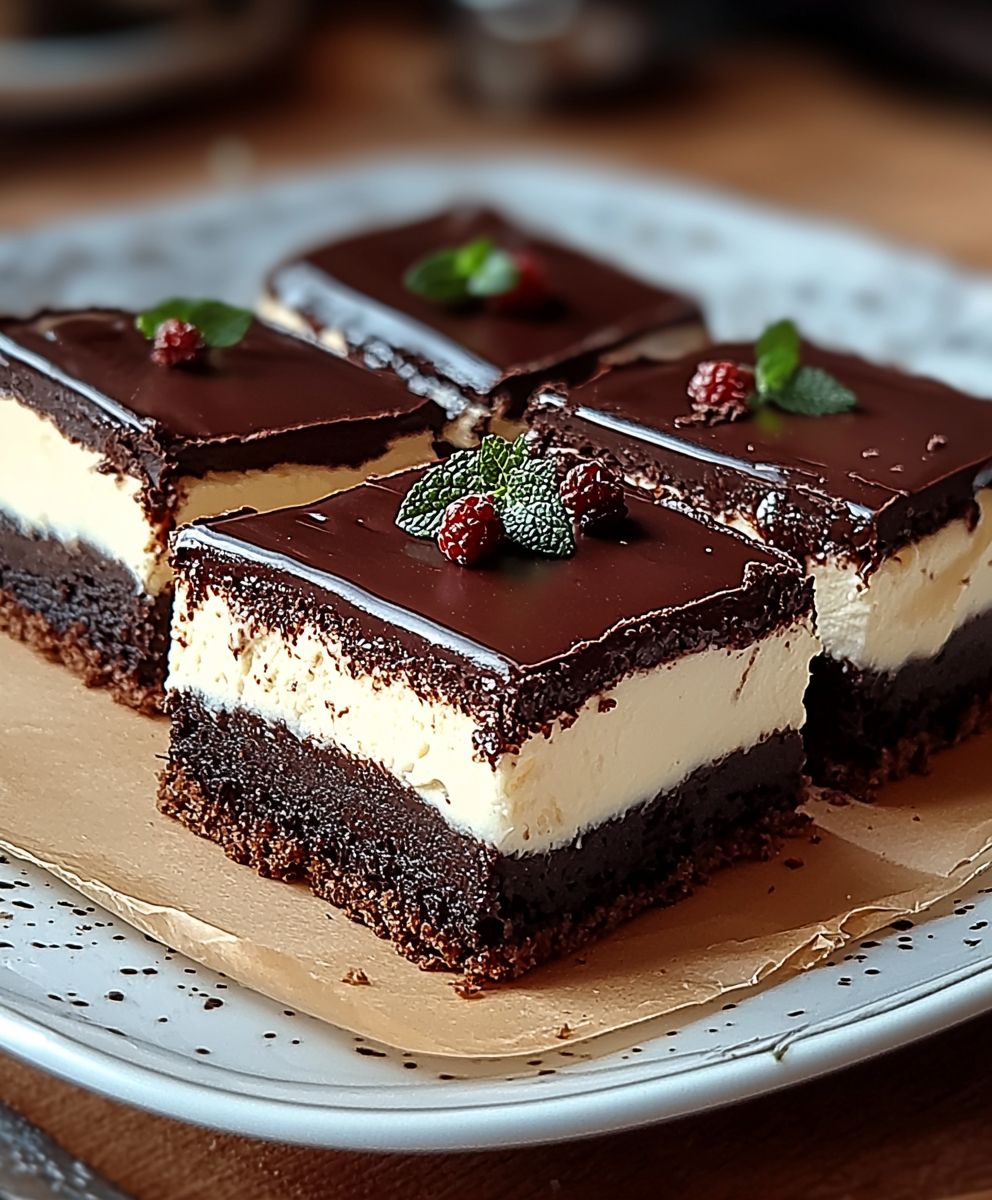
Chocolate cream slice, oh, where do I even begin? This isn’t just a dessert; it’s a nostalgic trip down memory lane, a comforting hug in every bite, and a guaranteed crowd-pleaser at any gathering. Imagine sinking your fork into layers of crisp, buttery pastry, followed by a cloud of rich, decadent chocolate cream that melts in your mouth. Are you drooling yet? I know I am just thinking about it!
While the exact origins of the chocolate cream slice are debated, similar layered cream desserts have been enjoyed for centuries across Europe. Some believe it evolved from simpler custard-filled pastries, gradually incorporating the beloved flavor of chocolate as it became more readily available. Regardless of its precise history, this dessert has become a staple in bakeries and homes worldwide.
So, what makes this particular treat so irresistible? It’s the perfect balance of textures and flavors. The flaky pastry provides a delightful crunch, contrasting beautifully with the smooth, velvety cream. The intense chocolate flavor is rich without being overwhelming, leaving you wanting just one more bite. Plus, it’s surprisingly easy to make at home, allowing you to impress your friends and family with a show-stopping dessert that tastes like it came straight from a professional patisserie. Get ready to experience chocolate heaven!

Ingredients:
- For the Chocolate Crust:
- 1 ½ cups all-purpose flour
- ½ cup unsweetened cocoa powder
- ½ teaspoon baking soda
- ¼ teaspoon salt
- ¾ cup (1 ½ sticks) unsalted butter, softened
- ¾ cup granulated sugar
- ¾ cup packed light brown sugar
- 1 large egg
- 1 teaspoon vanilla extract
- For the Chocolate Cream Filling:
- 4 cups heavy cream
- ½ cup granulated sugar
- 1 teaspoon vanilla extract
- 8 ounces bittersweet chocolate, finely chopped
- For the Chocolate Ganache Topping:
- 8 ounces bittersweet chocolate, finely chopped
- 1 cup heavy cream
- 2 tablespoons unsalted butter, softened
- Optional Garnish:
- Chocolate shavings
- Fresh raspberries
- Powdered sugar
Preparing the Chocolate Crust
- Combine Dry Ingredients: In a medium bowl, whisk together the flour, cocoa powder, baking soda, and salt. Make sure everything is evenly distributed so you don’t get pockets of baking soda or cocoa in your crust. This step is crucial for a consistent flavor and texture.
- Cream Butter and Sugars: In a large bowl (or the bowl of a stand mixer), cream together the softened butter, granulated sugar, and brown sugar until light and fluffy. This usually takes about 3-5 minutes. Scrape down the sides of the bowl occasionally to ensure everything is evenly incorporated. The mixture should be noticeably lighter in color and texture.
- Add Egg and Vanilla: Beat in the egg and vanilla extract until well combined. Again, scrape down the sides of the bowl to make sure everything is mixed properly. Don’t overmix at this stage, just mix until the egg is fully incorporated.
- Gradually Add Dry Ingredients: Gradually add the dry ingredients to the wet ingredients, mixing on low speed until just combined. Be careful not to overmix, as this can result in a tough crust. Mix until you see no more streaks of flour.
- Divide and Press Dough: Divide the dough in half. Press one half of the dough into the bottom of a 9×13 inch baking pan. I like to use my fingers to evenly distribute the dough. You can also use the bottom of a measuring cup to help smooth it out.
- Bake the First Layer: Bake in a preheated oven at 350°F (175°C) for 12-15 minutes, or until the edges are set and the center is slightly firm. Let it cool completely in the pan. This is important so the cream filling doesn’t melt.
- Prepare the Second Layer: While the first layer is baking, place the remaining dough between two sheets of parchment paper and roll it out to a size slightly larger than the 9×13 inch pan. This makes it easier to transfer.
- Bake the Second Layer: Carefully transfer the rolled-out dough to a baking sheet lined with parchment paper. Bake for 10-12 minutes, or until the edges are set. Let it cool completely on the baking sheet. This layer will be the top of your slice, so handle it carefully.
Making the Chocolate Cream Filling
- Chill the Bowl and Whisk: Place the bowl of your stand mixer (or a large metal bowl) and the whisk attachment in the freezer for at least 15 minutes. This helps the cream whip up faster and hold its shape better.
- Combine Cream and Sugar: In the chilled bowl, combine the heavy cream and granulated sugar.
- Whip to Soft Peaks: Whip the cream mixture on medium-high speed until soft peaks form. Be careful not to overwhip, or the cream will turn into butter. Soft peaks should hold their shape briefly but will curl over at the tip.
- Add Vanilla: Add the vanilla extract and whip for a few more seconds to combine.
- Melt the Chocolate: In a heatproof bowl set over a saucepan of simmering water (or in the microwave in 30-second intervals), melt the bittersweet chocolate until smooth. Be careful not to let the bowl touch the water, and stir frequently to prevent burning.
- Temper the Chocolate: This is a crucial step to prevent the chocolate from seizing. Take a spoonful of the whipped cream and gently stir it into the melted chocolate. Repeat with another spoonful. This will gradually lower the temperature of the chocolate.
- Fold Chocolate into Cream: Gently fold the tempered chocolate into the whipped cream until just combined. Be careful not to deflate the whipped cream. You want to maintain the light and airy texture.
Assembling the Chocolate Cream Slice
- Spread the Filling: Spread the chocolate cream filling evenly over the cooled bottom crust in the 9×13 inch pan. Make sure it’s a nice, even layer.
- Top with Second Crust Layer: Carefully place the second cooled crust layer on top of the filling. If the crust breaks a little, don’t worry, it will still taste delicious!
- Chill: Cover the pan with plastic wrap and chill in the refrigerator for at least 4 hours, or preferably overnight. This allows the filling to set properly and the flavors to meld together.
Preparing the Chocolate Ganache Topping
- Chop the Chocolate: Finely chop the bittersweet chocolate and place it in a heatproof bowl.
- Heat the Cream: In a saucepan, heat the heavy cream over medium heat until it just begins to simmer. Do not boil.
- Pour Cream over Chocolate: Pour the hot cream over the chopped chocolate. Let it sit for a minute or two to allow the chocolate to melt.
- Stir Until Smooth: Gently stir the mixture until the chocolate is completely melted and the ganache is smooth and glossy.
- Add Butter: Stir in the softened butter until it is fully incorporated and the ganache is even more glossy.
- Let Cool Slightly: Let the ganache cool slightly for about 10-15 minutes, or until it thickens to a spreadable consistency. This will prevent it from running off the slice.
Finishing Touches
- Spread Ganache: Spread the cooled ganache evenly over the top crust layer.
- Chill Again: Chill the slice in the refrigerator for at least 30 minutes to allow the ganache to set.
- Cut and Serve: Cut the slice into squares or rectangles.
- Garnish (Optional): Garnish with chocolate shavings, fresh raspberries, or a dusting of powdered sugar, if desired.
- Enjoy!: Serve cold and enjoy your decadent chocolate cream slice! This slice is best enjoyed within 2-3 days. Store in the refrigerator.
Conclusion:
And there you have it! This chocolate cream slice recipe isn’t just another dessert; it’s a guaranteed crowd-pleaser, a comforting indulgence, and a surprisingly simple way to elevate any occasion. From the satisfying snap of the chocolate crust to the velvety smooth, intensely chocolatey cream filling, every bite is a symphony of textures and flavors that will leave you wanting more. I truly believe this recipe is a must-try for any chocolate lover, regardless of your baking experience. Why is it a must-try? Because it delivers that “wow” factor without requiring hours in the kitchen. The crust comes together quickly, the filling is a breeze to whip up, and the assembly is straightforward. Plus, the ingredients are readily available, meaning you can satisfy that chocolate craving whenever it strikes! It’s the perfect balance of elegance and ease, making it ideal for everything from casual weeknight desserts to more formal gatherings. Trust me, the rave reviews you’ll receive will make all the effort worthwhile. But the best part? This recipe is incredibly versatile! Feel free to experiment with different variations to suit your taste. For a richer, more decadent experience, try using dark chocolate with a higher cocoa percentage in both the crust and the filling. Or, if you prefer a lighter flavor, milk chocolate works beautifully too. You could even add a hint of espresso powder to the filling to enhance the chocolate notes and create a mocha-inspired treat. Serving suggestions are endless! A simple dusting of cocoa powder or a few chocolate shavings adds a touch of elegance. For a more festive presentation, top each slice with fresh berries like raspberries or strawberries. A dollop of whipped cream or a scoop of vanilla ice cream is always a welcome addition. And for the ultimate indulgence, drizzle a warm chocolate sauce over the top. Consider these variations to make it your own: * Peanut Butter Chocolate Dream: Swirl peanut butter into the chocolate cream filling before chilling. * Mint Chocolate Magic: Add a few drops of peppermint extract to the filling for a refreshing twist. * Salted Caramel Sensation: Drizzle salted caramel sauce over the finished slice for a sweet and salty delight. * Oreo Overload: Crush Oreo cookies and sprinkle them over the crust before baking or mix them into the filling. I’m so excited for you to try this recipe and experience the joy of creating your own stunning chocolate cream slice. It’s a recipe that I’ve perfected over time, and I’m confident that it will become a staple in your dessert repertoire. So, what are you waiting for? Gather your ingredients, preheat your oven, and get ready to embark on a chocolatey adventure! I’m absolutely certain you’ll love the results. And most importantly, I’d love to hear about your experience! Did you make any variations? What did your friends and family think? Share your photos and stories in the comments below. Let’s create a community of chocolate lovers who appreciate the simple pleasures of a perfectly crafted dessert. Happy baking! I can’t wait to see your creations! Print
Chocolate Cream Slice: The Ultimate Guide to Baking Perfection
- Total Time: 300 minutes
- Yield: 12–16 servings 1x
Description
Decadent chocolate cream slice with a rich chocolate crust, creamy chocolate filling, and smooth chocolate ganache topping. Perfect for chocolate lovers!
Ingredients
- 1 ½ cups all-purpose flour
- ½ cup unsweetened cocoa powder
- ½ teaspoon baking soda
- ¼ teaspoon salt
- ¾ cup (1 ½ sticks) unsalted butter, softened
- ¾ cup granulated sugar
- ¾ cup packed light brown sugar
- 1 large egg
- 1 teaspoon vanilla extract
- 4 cups heavy cream
- ½ cup granulated sugar
- 1 teaspoon vanilla extract
- 8 ounces bittersweet chocolate, finely chopped
- 8 ounces bittersweet chocolate, finely chopped
- 1 cup heavy cream
- 2 tablespoons unsalted butter, softened
- Chocolate shavings
- Fresh raspberries
- Powdered sugar
Instructions
- In a medium bowl, whisk together the flour, cocoa powder, baking soda, and salt. Make sure everything is evenly distributed so you don’t get pockets of baking soda or cocoa in your crust. This step is crucial for a consistent flavor and texture.
- In a large bowl (or the bowl of a stand mixer), cream together the softened butter, granulated sugar, and brown sugar until light and fluffy. This usually takes about 3-5 minutes. Scrape down the sides of the bowl occasionally to ensure everything is evenly incorporated. The mixture should be noticeably lighter in color and texture.
- Beat in the egg and vanilla extract until well combined. Again, scrape down the sides of the bowl to make sure everything is mixed properly. Don’t overmix at this stage, just mix until the egg is fully incorporated.
- Gradually add the dry ingredients to the wet ingredients, mixing on low speed until just combined. Be careful not to overmix, as this can result in a tough crust. Mix until you see no more streaks of flour.
- Divide the dough in half. Press one half of the dough into the bottom of a 9×13 inch baking pan. I like to use my fingers to evenly distribute the dough. You can also use the bottom of a measuring cup to help smooth it out.
- Bake in a preheated oven at 350°F (175°C) for 12-15 minutes, or until the edges are set and the center is slightly firm. Let it cool completely in the pan. This is important so the cream filling doesn’t melt.
- While the first layer is baking, place the remaining dough between two sheets of parchment paper and roll it out to a size slightly larger than the 9×13 inch pan. This makes it easier to transfer.
- Carefully transfer the rolled-out dough to a baking sheet lined with parchment paper. Bake for 10-12 minutes, or until the edges are set. Let it cool completely on the baking sheet. This layer will be the top of your slice, so handle it carefully.
- Place the bowl of your stand mixer (or a large metal bowl) and the whisk attachment in the freezer for at least 15 minutes. This helps the cream whip up faster and hold its shape better.
- In the chilled bowl, combine the heavy cream and granulated sugar.
- Whip the cream mixture on medium-high speed until soft peaks form. Be careful not to overwhip, or the cream will turn into butter. Soft peaks should hold their shape briefly but will curl over at the tip.
- Add the vanilla extract and whip for a few more seconds to combine.
- In a heatproof bowl set over a saucepan of simmering water (or in the microwave in 30-second intervals), melt the bittersweet chocolate until smooth. Be careful not to let the bowl touch the water, and stir frequently to prevent burning.
- This is a crucial step to prevent the chocolate from seizing. Take a spoonful of the whipped cream and gently stir it into the melted chocolate. Repeat with another spoonful. This will gradually lower the temperature of the chocolate.
- Gently fold the tempered chocolate into the whipped cream until just combined. Be careful not to deflate the whipped cream. You want to maintain the light and airy texture.
- Spread the chocolate cream filling evenly over the cooled bottom crust in the 9×13 inch pan. Make sure it’s a nice, even layer.
- Carefully place the second cooled crust layer on top of the filling. If the crust breaks a little, don’t worry, it will still taste delicious!
- Cover the pan with plastic wrap and chill in the refrigerator for at least 4 hours, or preferably overnight. This allows the filling to set properly and the flavors to meld together.
- Finely chop the bittersweet chocolate and place it in a heatproof bowl.
- In a saucepan, heat the heavy cream over medium heat until it just begins to simmer. Do not boil.
- Pour the hot cream over the chopped chocolate. Let it sit for a minute or two to allow the chocolate to melt.
- Gently stir the mixture until the chocolate is completely melted and the ganache is smooth and glossy.
- Stir in the softened butter until it is fully incorporated and the ganache is even more glossy.
- Let the ganache cool slightly for about 10-15 minutes, or until it thickens to a spreadable consistency. This will prevent it from running off the slice.
- Spread the cooled ganache evenly over the top crust layer.
- Chill the slice in the refrigerator for at least 30 minutes to allow the ganache to set.
- Cut the slice into squares or rectangles.
- Garnish with chocolate shavings, fresh raspberries, or a dusting of powdered sugar, if desired.
- Serve cold and enjoy your decadent chocolate cream slice! This slice is best enjoyed within 2-3 days. Store in the refrigerator.
Notes
- Chilling time is crucial for the filling and ganache to set properly.
- Tempering the chocolate for the filling prevents it from seizing.
- Don’t overmix the crust dough, or it will become tough.
- Use high-quality chocolate for the best flavor.
- Prep Time: 45 minutes
- Cook Time: 27 minutes


Leave a Comment