

Chicken brine: the secret weapon for unbelievably juicy and flavorful chicken! Have you ever bitten into a piece of chicken that was so succulent, so bursting with savory goodness, that you couldn’t help but close your eyes and savor every single morsel? That, my friends, is the magic of brining. For centuries, cooks have understood the power of salt and water to transform ordinary poultry into something truly extraordinary.
While the exact origins of brining are debated, its roots can be traced back to ancient methods of preserving food. Today, we’re not necessarily brining for preservation, but rather for the unparalleled taste and texture it imparts. The process allows the chicken to absorb moisture, resulting in a final product that is incredibly tender and resistant to drying out during cooking.
People adore brined chicken for a multitude of reasons. First and foremost, it’s the taste! The salt enhances the natural flavors of the chicken, while the added moisture creates a juicy, almost melt-in-your-mouth texture. Whether you’re grilling, roasting, or frying, a good chicken brine will elevate your dish to a whole new level. Plus, it’s surprisingly easy to do, making it a simple yet effective way to impress your family and friends. So, are you ready to unlock the secrets to perfectly cooked, incredibly flavorful chicken? Let’s dive in!

Ingredients:
- 1 gallon cold water
- 1/2 cup kosher salt
- 1/4 cup granulated sugar
- 1/4 cup packed brown sugar
- 2 tablespoons black peppercorns, crushed
- 2 tablespoons dried thyme
- 1 tablespoon dried rosemary
- 1 tablespoon garlic powder
- 1 tablespoon onion powder
- 1 teaspoon red pepper flakes (optional, for a little heat)
- 1 lemon, sliced
- 1 orange, sliced
- 4-5 lbs whole chicken or chicken pieces (bone-in, skin-on recommended)
Preparing the Brine:
Okay, let’s get started with the brine! This is where the magic happens, infusing your chicken with flavor and moisture. Don’t skip this step it’s the key to incredibly juicy and delicious chicken.
- Combine the Water and Salt: In a large, non-reactive container (like a food-grade plastic bucket, a large stockpot, or a brining bag), pour in the 1 gallon of cold water. Add the 1/2 cup of kosher salt. Stir well until the salt is completely dissolved. This is crucial because undissolved salt can create overly salty spots on your chicken. I usually use a whisk to make sure it’s fully incorporated.
- Add the Sugars: Now, add the 1/4 cup of granulated sugar and the 1/4 cup of packed brown sugar to the saltwater mixture. Stir again until both sugars are completely dissolved. The sugars help to balance the saltiness and contribute to browning during cooking. The brown sugar also adds a subtle molasses flavor that I really enjoy.
- Incorporate the Spices and Herbs: Add the 2 tablespoons of crushed black peppercorns, 2 tablespoons of dried thyme, 1 tablespoon of dried rosemary, 1 tablespoon of garlic powder, 1 tablespoon of onion powder, and 1 teaspoon of red pepper flakes (if using) to the brine. Stir well to distribute the spices evenly. I like to crush the peppercorns slightly with a mortar and pestle or the flat side of a knife to release their aroma.
- Add the Citrus: Add the sliced lemon and orange to the brine. Gently squeeze the slices as you add them to release their juices. The citrus adds a bright, fresh flavor to the chicken and also helps to tenderize the meat.
- Taste and Adjust (Optional): At this point, you can taste the brine. It should be salty, sweet, and aromatic. If you feel it needs more of any particular flavor, you can add a little more salt, sugar, or spices to your liking. Remember, the brine will be diluted slightly when the chicken is added, so don’t be afraid to be a little generous with the seasonings.
Brining the Chicken:
Now comes the important part: submerging the chicken in the brine. Make sure the chicken is fully submerged for the best results.
- Submerge the Chicken: Gently place the chicken (whole or pieces) into the brine. Make sure the chicken is completely submerged in the liquid. If necessary, use a plate or a heavy object to weigh the chicken down and keep it submerged. This is important because any part of the chicken that is not submerged will not be properly brined.
- Refrigerate: Cover the container with a lid or plastic wrap and refrigerate for at least 4 hours, and up to 12 hours. I find that 6-8 hours is the sweet spot for most chicken pieces. For a whole chicken, you can brine it for the full 12 hours. Do not brine for longer than 12 hours, as the chicken can become too salty and the texture can become mushy.
Preparing to Cook:
After brining, it’s crucial to rinse the chicken and pat it dry. This helps to remove excess salt and ensures crispy skin when cooking.
- Remove the Chicken from the Brine: Carefully remove the chicken from the brine and discard the brine. Do not reuse the brine.
- Rinse Thoroughly: Rinse the chicken thoroughly under cold running water for several minutes to remove any excess salt and spices. This is a very important step! You don’t want overly salty chicken.
- Pat Dry: Pat the chicken completely dry with paper towels, inside and out. This is essential for achieving crispy skin when cooking. The drier the skin, the better it will brown.
- Rest (Optional): Place the chicken on a wire rack set over a baking sheet and let it rest in the refrigerator for at least 30 minutes, or up to a few hours. This allows the skin to dry out even further, resulting in even crispier skin. This step is optional, but I highly recommend it if you have the time.
Cooking the Chicken (Example: Roasting):
Here’s an example of how to roast the brined chicken. You can also grill, pan-fry, or use other cooking methods.
- Preheat the Oven: Preheat your oven to 425°F (220°C).
- Prepare the Chicken for Roasting: If roasting a whole chicken, you can truss it with kitchen twine to help it cook evenly. This is optional, but it helps to create a more uniform shape and prevents the wings and legs from overcooking. You can also tuck the wing tips under the body of the chicken.
- Season (Optional): While the brining process adds a lot of flavor, you can add a little extra seasoning if desired. I usually just sprinkle the chicken with a little black pepper. You can also use other herbs and spices, such as paprika, garlic powder, or onion powder. Be careful not to add any additional salt, as the chicken is already well-seasoned from the brine.
- Roast the Chicken: Place the chicken on a roasting rack in a roasting pan. Roast for 15 minutes at 425°F (220°C), then reduce the oven temperature to 350°F (175°C) and continue roasting for another 45-60 minutes, or until the internal temperature of the chicken reaches 165°F (74°C) in the thickest part of the thigh. Use a meat thermometer to ensure accuracy.
- Baste (Optional): During the roasting process, you can baste the chicken with its own juices or with melted butter or olive oil. This helps to keep the chicken moist and adds flavor. Baste every 15-20 minutes.
- Rest Before Carving: Once the chicken is cooked through, remove it from the oven and let it rest for at least 10-15 minutes before carving. This allows the juices to redistribute throughout the meat, resulting in a more tender and flavorful chicken. Cover the chicken loosely with foil while it rests.
- Carve and Serve: Carve the chicken and serve immediately. Enjoy your incredibly juicy and flavorful brined chicken!
Tips and Variations:
Here are some extra tips and ideas to customize your chicken brine:
- Spice it Up: Experiment with different spices and herbs to create your own signature brine. Try adding bay leaves, coriander seeds, or star anise for a unique flavor.
- Add Heat: If you like spicy chicken, add more red pepper flakes or a chopped jalapeño pepper to the brine.
- Sweeten it Up: For a sweeter brine, use honey or maple syrup instead of granulated sugar.
- Use Different Liquids: You can substitute some of the water with apple cider, beer, or chicken broth for added flavor.
- Brining Time: Adjust the brining time based on the size and type of chicken. Smaller pieces of chicken will require less brining time than a whole chicken.
- Safety First: Always keep the chicken refrigerated while brining to prevent bacterial growth.
I hope you enjoy this chicken brine recipe! It’s a game-changer for achieving incredibly juicy and flavorful chicken every time. Don’t be afraid to experiment with different flavors and find what works best for you. Happy cooking!

Conclusion:
This isn’t just another chicken recipe; it’s a game-changer. Trust me, once you experience the juicy, flavorful perfection that comes from using this chicken brine, you’ll never look at chicken the same way again. The difference is truly remarkable, transforming even the most basic cut into a culinary masterpiece. It’s the secret weapon you need to elevate your weeknight dinners and impress your guests at your next barbecue.
Why is this a must-try? Because it’s simple, effective, and delivers unparalleled results. We’re talking about chicken that’s consistently moist, tender, and bursting with flavor from the inside out. No more dry, bland chicken breasts! This brine infuses every fiber with savory goodness, ensuring a delightful eating experience every single time. It’s a small investment of time that yields a huge payoff in terms of taste and texture.
But the best part? It’s incredibly versatile! While this recipe is fantastic as is, feel free to experiment with different herbs and spices to create your own signature brine. Add a touch of sweetness with brown sugar or honey, a kick of heat with chili flakes, or a burst of citrus with lemon or orange zest. The possibilities are endless!
Serving Suggestions and Variations:
* Grilled Chicken: Brine your chicken before grilling for the ultimate barbecue experience. The brine helps the chicken stay moist and prevents it from drying out on the grill. Serve with your favorite barbecue sauce and sides like corn on the cob, potato salad, and coleslaw.
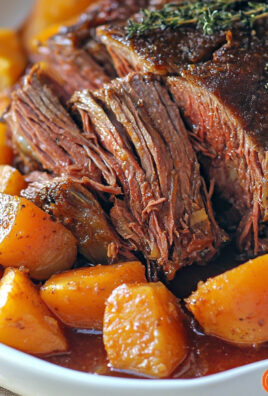
* Roasted Chicken: For a succulent roasted chicken, brine it overnight before roasting. The result will be a beautifully browned bird with incredibly juicy meat. Serve with roasted vegetables like potatoes, carrots, and Brussels sprouts.
* Fried Chicken: Brining chicken before frying is a secret weapon for achieving crispy, flavorful fried chicken. The brine helps the chicken stay moist and tender, while also adding a layer of flavor that complements the crispy coating. Serve with mashed potatoes, gravy, and biscuits.
* Chicken Salad: Use brined chicken to make a delicious and flavorful chicken salad. The brine adds a depth of flavor that elevates the salad to a whole new level. Serve on croissants, lettuce wraps, or crackers.
* Chicken Tacos: Shredded brined chicken makes a fantastic filling for tacos. The juicy, flavorful chicken pairs perfectly with your favorite taco toppings like salsa, guacamole, and sour cream.
Don’t be afraid to get creative and adapt this recipe to your own tastes. That’s the beauty of cooking it’s all about experimentation and finding what works best for you.
I’m so confident that you’ll love this chicken brine that I urge you to try it out as soon as possible. Once you do, I’d love to hear about your experience! Share your photos and comments on social media using #MyBrinedChicken and let me know what variations you tried and how they turned out. Did you add any special ingredients? What did you serve it with? I’m always looking for new ideas and inspiration.
So, what are you waiting for? Gather your ingredients, prepare the brine, and get ready to experience chicken like never before. Happy cooking! I can’t wait to see what delicious creations you come up with. Let’s revolutionize the way we cook chicken, one brine at a time! I promise you won’t regret it. This is more than just a recipe; it’s a culinary adventure waiting to happen.
Chicken Brine: The Ultimate Guide to Juicy, Flavorful Chicken
This brine guarantees incredibly juicy and flavorful chicken! Infuse your chicken with moisture and deliciousness using this simple, customizable recipe.
Ingredients
- 1 gallon cold water
- 1/2 cup kosher salt
- 1/4 cup granulated sugar
- 1/4 cup packed brown sugar
- 2 tablespoons black peppercorns, crushed
- 2 tablespoons dried thyme
- 1 tablespoon dried rosemary
- 1 tablespoon garlic powder
- 1 tablespoon onion powder
- 1 teaspoon red pepper flakes (optional, for a little heat)
- 1 lemon, sliced
- 1 orange, sliced
- 4-5 lbs whole chicken or chicken pieces (bone-in, skin-on recommended)
Instructions
- In a large, non-reactive container (like a food-grade plastic bucket, a large stockpot, or a brining bag), pour in the 1 gallon of cold water. Add the 1/2 cup of kosher salt. Stir well until the salt is completely dissolved.
- Add the 1/4 cup of granulated sugar and the 1/4 cup of packed brown sugar to the saltwater mixture. Stir again until both sugars are completely dissolved.
- Add the 2 tablespoons of crushed black peppercorns, 2 tablespoons of dried thyme, 1 tablespoon of dried rosemary, 1 tablespoon of garlic powder, 1 tablespoon of onion powder, and 1 teaspoon of red pepper flakes (if using) to the brine. Stir well to distribute the spices evenly.
- Add the sliced lemon and orange to the brine. Gently squeeze the slices as you add them to release their juices.
- Taste the brine. It should be salty, sweet, and aromatic. Adjust seasonings to your liking.
- Gently place the chicken (whole or pieces) into the brine. Make sure the chicken is completely submerged in the liquid. Use a plate or heavy object to weigh the chicken down if needed.
- Cover the container and refrigerate for at least 4 hours, and up to 12 hours. 6-8 hours is ideal for chicken pieces, and 12 hours for a whole chicken. Do not brine for longer than 12 hours.
- Carefully remove the chicken from the brine and discard the brine. Do not reuse the brine.
- Rinse the chicken thoroughly under cold running water for several minutes to remove any excess salt and spices.
- Pat the chicken completely dry with paper towels, inside and out.
- Place the chicken on a wire rack set over a baking sheet and let it rest in the refrigerator for at least 30 minutes, or up to a few hours.
- Preheat your oven to 425°F (220°C).
- If roasting a whole chicken, you can truss it with kitchen twine to help it cook evenly.
- While the brining process adds a lot of flavor, you can add a little extra seasoning if desired. Be careful not to add any additional salt, as the chicken is already well-seasoned from the brine.
- Place the chicken on a roasting rack in a roasting pan. Roast for 15 minutes at 425°F (220°C), then reduce the oven temperature to 350°F (175°C) and continue roasting for another 45-60 minutes, or until the internal temperature of the chicken reaches 165°F (74°C) in the thickest part of the thigh. Use a meat thermometer to ensure accuracy.
- During the roasting process, you can baste the chicken with its own juices or with melted butter or olive oil. Baste every 15-20 minutes.
- Once the chicken is cooked through, remove it from the oven and let it rest for at least 10-15 minutes before carving. Cover the chicken loosely with foil while it rests.
- Carve the chicken and serve immediately.
Notes
- Experiment with different spices and herbs to create your own signature brine. Try adding bay leaves, coriander seeds, or star anise for a unique flavor.
- If you like spicy chicken, add more red pepper flakes or a chopped jalapeño pepper to the brine.
- For a sweeter brine, use honey or maple syrup instead of granulated sugar.
- You can substitute some of the water with apple cider, beer, or chicken broth for added flavor.
- Adjust the brining time based on the size and type of chicken. Smaller pieces of chicken will require less brining time than a whole chicken.
- Always keep the chicken refrigerated while brining to prevent bacterial growth.
- Do not brine for longer than 12 hours, as the chicken can become too salty and the texture can become mushy.
- Rinsing the chicken thoroughly after brining is a very important step! You don’t want overly salty chicken.
- Patting the chicken completely dry with paper towels, inside and out, is essential for achieving crispy skin when cooking. The drier the skin, the better it will brown.
- Resting the chicken on a wire rack set over a baking sheet and let it rest in the refrigerator for at least 30 minutes, or up to a few hours, allows the skin to dry out even further, resulting in even crispier skin. This step is optional, but I highly recommend it if you have the time.


Leave a Comment