

Chicken Adobo Instant Pot: Craving that classic, savory-sweet Filipino comfort food but short on time? Imagine tender, juicy chicken, infused with the rich flavors of soy sauce, vinegar, garlic, and peppercorns, ready in a fraction of the time compared to traditional methods. That’s the magic of cooking Chicken Adobo in your Instant Pot!
Adobo, considered by many to be the unofficial national dish of the Philippines, boasts a history as rich and complex as its flavor profile. The name “adobo” comes from the Spanish “adobar,” meaning “to marinate,” but the cooking method itself predates Spanish colonization. Filipinos have long preserved meats in vinegar and salt, a technique perfectly suited to the tropical climate. Over time, soy sauce, garlic, peppercorns, and bay leaves were incorporated, creating the iconic flavor we know and love today.
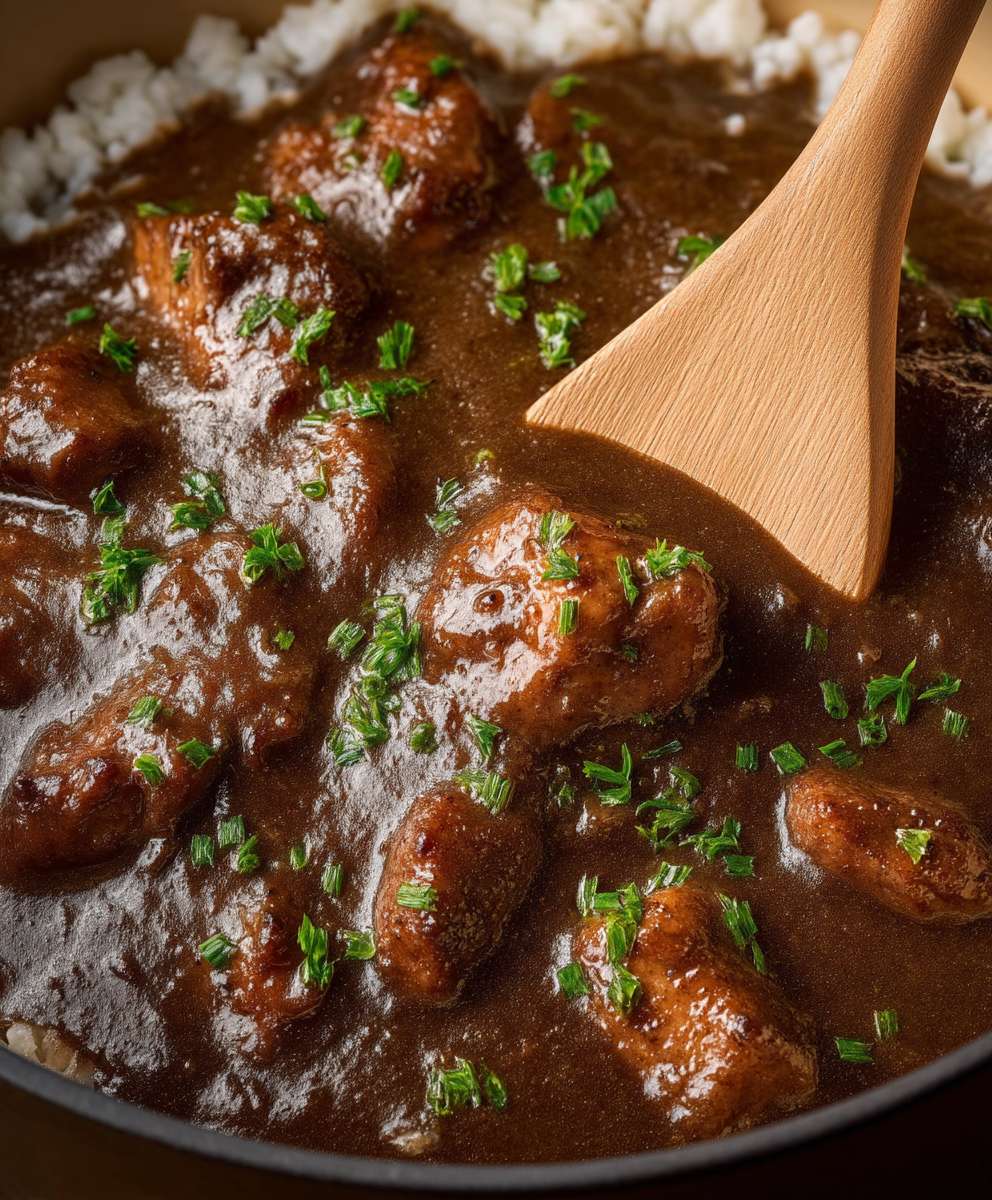
What makes Chicken Adobo so universally appealing? It’s the perfect balance of savory, tangy, and slightly sweet. The chicken becomes incredibly tender, practically falling off the bone, and the sauce is simply irresistible over rice. Plus, it’s incredibly versatile! You can adjust the sweetness, tanginess, and spice levels to your liking. And now, with the Instant Pot, you can enjoy this beloved dish any night of the week. Forget hours of simmering on the stovetop; this Chicken Adobo Instant Pot recipe delivers authentic flavor with minimal effort. Let’s get cooking!

Ingredients:
- 2 lbs boneless, skinless chicken thighs, cut into 1-inch pieces
- 1 large onion, thinly sliced
- 6 cloves garlic, minced
- 1/2 cup soy sauce (I prefer low sodium)
- 1/4 cup white vinegar (or apple cider vinegar)
- 1/4 cup water
- 2 tablespoons brown sugar, packed
- 1 tablespoon whole black peppercorns
- 2 bay leaves
- 1 tablespoon vegetable oil
- Cooked white rice, for serving
- Chopped green onions, for garnish (optional)
Preparing the Chicken and Aromatics:
Before we jump into the Instant Pot magic, let’s get our chicken and aromatics ready. This step is crucial for building flavor right from the start.
- Prepare the Chicken: Cut the chicken thighs into bite-sized pieces, about 1-inch each. This helps them cook evenly and absorb the delicious adobo sauce. Don’t worry about being too precise; just aim for roughly the same size.
- Slice the Onion: Thinly slice the onion. The thinner the slices, the more easily they’ll soften and release their sweetness into the sauce. I like to use a mandoline for this, but a sharp knife works just as well.
- Mince the Garlic: Mince the garlic cloves. Freshly minced garlic is key for that pungent, aromatic flavor that’s characteristic of adobo. You can use a garlic press or mince it finely with a knife.
Searing the Chicken (Optional but Recommended):
While not strictly necessary, searing the chicken adds a beautiful color and depth of flavor to the final dish. It’s a simple step that makes a big difference.
- Heat the Oil: Turn on your Instant Pot and select the “Sauté” function. Add the vegetable oil to the pot and let it heat up for a minute or two until it’s shimmering.
- Sear the Chicken: Add the chicken pieces to the Instant Pot in a single layer, being careful not to overcrowd the pot. If necessary, work in batches. Sear the chicken for 2-3 minutes per side, until it’s nicely browned. Don’t worry about cooking it all the way through at this point; we just want to develop some color and flavor.
- Remove the Chicken: Once the chicken is seared, remove it from the Instant Pot and set it aside.
Building the Adobo Sauce:
Now comes the heart of the dish: creating that tangy, savory adobo sauce that will transform the chicken into something truly special.
- Sauté the Onion and Garlic: Add the sliced onion to the Instant Pot and sauté for 3-4 minutes, until it’s softened and translucent. Scrape up any browned bits from the bottom of the pot those are packed with flavor!
- Add the Garlic: Add the minced garlic to the pot and sauté for another minute, until fragrant. Be careful not to burn the garlic, as it can become bitter.
- Deglaze the Pot: Pour in the soy sauce and vinegar. Use a wooden spoon or spatula to scrape up any remaining browned bits from the bottom of the pot. This process, called deglazing, is essential for adding depth of flavor to the sauce.
- Add the Remaining Ingredients: Add the water, brown sugar, black peppercorns, and bay leaves to the Instant Pot. Stir to combine.
Pressure Cooking the Chicken Adobo:
This is where the Instant Pot really shines, quickly and efficiently cooking the chicken to tender perfection while infusing it with the rich adobo flavors.
- Return the Chicken: Add the seared chicken back to the Instant Pot, making sure it’s submerged in the sauce.
- Pressure Cook: Close the Instant Pot lid and seal the valve. Select the “Manual” or “Pressure Cook” function and set the cooking time to 8 minutes on high pressure.
- Natural Pressure Release: Once the cooking time is up, let the Instant Pot naturally release pressure for 10 minutes. This allows the chicken to continue cooking gently and prevents it from becoming tough. After 10 minutes, carefully release any remaining pressure manually.
Reducing the Sauce (Optional but Recommended):
For a thicker, more concentrated sauce, I highly recommend reducing it after pressure cooking. This step intensifies the flavors and creates a beautiful glaze for the chicken.
- Remove the Chicken: Carefully remove the chicken from the Instant Pot and set it aside.
- Simmer the Sauce: Select the “Sauté” function again. Bring the sauce to a simmer and cook for 10-15 minutes, or until it has reduced to your desired consistency. Stir occasionally to prevent sticking. The sauce should thicken and become glossy.
- Adjust Seasoning: Taste the sauce and adjust the seasoning as needed. You may want to add a little more soy sauce for saltiness, vinegar for tanginess, or brown sugar for sweetness.
Serving the Chicken Adobo:
Finally, it’s time to enjoy the fruits of your labor! This Chicken Adobo is best served hot, with plenty of rice to soak up that delicious sauce.
- Return Chicken to Sauce: Return the chicken to the Instant Pot and toss to coat it in the reduced sauce.
- Serve: Serve the Chicken Adobo over cooked white rice. Garnish with chopped green onions, if desired.
Tips and Variations:
- Chicken Cuts: While I prefer chicken thighs for their tenderness and flavor, you can also use chicken breasts. However, be careful not to overcook them, as they can become dry. Reduce the cooking time to 6 minutes if using chicken breasts.
- Vinegar: I typically use white vinegar or apple cider vinegar, but you can experiment with other types of vinegar, such as rice vinegar or cane vinegar. Each will impart a slightly different flavor to the dish.
- Sweetness: The amount of brown sugar can be adjusted to your liking. If you prefer a less sweet adobo, reduce the amount of brown sugar or omit it altogether. You can also use honey or maple syrup as a substitute.
- Spice: For a spicier adobo, add a pinch of red pepper flakes or a chopped chili pepper to the Instant Pot along with the other ingredients.
- Potatoes: Add cubed potatoes to the Instant Pot along with the chicken for a heartier meal.
- Hard-Boiled Eggs: Some people like to add hard-boiled eggs to their Chicken Adobo. If you want to try this, add the hard-boiled eggs to the Instant Pot during the last few minutes of cooking.
- Coconut Milk: For a richer, creamier adobo, add a can of coconut milk to the Instant Pot along with the other ingredients. This variation is known as Chicken Adobo sa Gata.
- Storage: Leftover Chicken Adobo can be stored in the refrigerator for up to 3 days. Reheat it gently on the stovetop or in the microwave.
Enjoy!
I hope you enjoy this recipe for Instant Pot Chicken Adobo! It’s a quick, easy, and delicious way to enjoy this classic Filipino dish. Let me know in the comments if you have any questions or if you try any variations. Happy cooking!
Conclusion:
And there you have it! This Chicken Adobo Instant Pot recipe is truly a game-changer. Forget spending hours simmering on the stovetop; with the magic of the Instant Pot, you can achieve that authentic, deeply flavorful adobo taste in a fraction of the time. The chicken comes out incredibly tender, practically falling off the bone, and the sauce is a perfect balance of savory, tangy, and slightly sweet. I promise, once you try this method, you’ll never want to make adobo any other way.
But why is this recipe a must-try? It’s simple: it delivers incredible flavor with minimal effort. It’s perfect for busy weeknights when you crave a comforting, home-cooked meal but don’t have hours to spend in the kitchen. Plus, the Instant Pot makes clean-up a breeze! The depth of flavor you get from pressure cooking is unmatched, infusing every morsel of chicken with that signature adobo goodness. It’s a guaranteed crowd-pleaser, whether you’re serving it to your family or impressing guests.
Looking for serving suggestions? Classic adobo is traditionally served with steamed white rice, which perfectly soaks up all that delicious sauce. But don’t be afraid to get creative! Try serving it with coconut rice for an extra layer of flavor, or alongside some stir-fried vegetables for a complete and balanced meal. For a low-carb option, cauliflower rice works wonderfully. You can even shred the chicken and use it as a filling for tacos or lettuce wraps.
And speaking of variations, the possibilities are endless! Want to add a little heat? Throw in a few chopped chili peppers or a dash of chili flakes. Prefer a sweeter adobo? Add a tablespoon or two of brown sugar or honey. Some people even like to add potatoes or hard-boiled eggs to their adobo for extra heartiness. Feel free to experiment and adjust the recipe to your own personal taste.
Serving and Variation Ideas:
- Serve over steamed white rice, brown rice, or coconut rice.
- Pair with stir-fried vegetables like bok choy, green beans, or snow peas.
- Shred the chicken and use it as a filling for tacos, burritos, or lettuce wraps.
- Add potatoes or hard-boiled eggs for a heartier meal.
- Spice it up with chili peppers or chili flakes.
- Sweeten it with brown sugar or honey.
I truly believe this Chicken Adobo Instant Pot recipe will become a staple in your kitchen. It’s easy, delicious, and endlessly adaptable. So, what are you waiting for? Grab your Instant Pot, gather your ingredients, and get cooking! I’m confident you’ll love the results.
I’m so excited for you to try this recipe! Once you do, please come back and share your experience in the comments below. Let me know what you thought of the flavor, what variations you tried, and any tips or tricks you discovered along the way. I love hearing from you and learning from your culinary adventures. Happy cooking! I can’t wait to hear how much you enjoyed this quick and easy take on a classic dish. Don’t forget to rate the recipe too! Your feedback helps others discover this amazing Chicken Adobo Instant Pot recipe.
Chicken Adobo Instant Pot: Easy Recipe & Cooking Tips
Tender, flavorful Instant Pot Chicken Adobo, a classic Filipino dish made easy with chicken thighs simmered in a tangy, savory sauce of soy sauce, vinegar, garlic, and spices.
Ingredients
- 2 lbs boneless, skinless chicken thighs, cut into 1-inch pieces
- 1 large onion, thinly sliced
- 6 cloves garlic, minced
- 1/2 cup soy sauce (low sodium preferred)
- 1/4 cup white vinegar (or apple cider vinegar)
- 1/4 cup water
- 2 tablespoons brown sugar, packed
- 1 tablespoon whole black peppercorns
- 2 bay leaves
- 1 tablespoon vegetable oil
- Cooked white rice, for serving
- Chopped green onions, for garnish (optional)
Instructions
- Prepare the Chicken: Cut the chicken thighs into bite-sized pieces, about 1-inch each.
- Slice the Onion: Thinly slice the onion.
- Mince the Garlic: Mince the garlic cloves.
- (Optional) Sear the Chicken: Turn on your Instant Pot and select the “Sauté” function. Add the vegetable oil to the pot and let it heat up. Add the chicken pieces to the Instant Pot in a single layer, being careful not to overcrowd the pot. If necessary, work in batches. Sear the chicken for 2-3 minutes per side, until it’s nicely browned. Remove the Chicken from the Instant Pot and set it aside.
- Sauté the Onion and Garlic: Add the sliced onion to the Instant Pot and sauté for 3-4 minutes, until it’s softened and translucent. Scrape up any browned bits from the bottom of the pot. Add the minced garlic to the pot and sauté for another minute, until fragrant.
- Deglaze the Pot: Pour in the soy sauce and vinegar. Use a wooden spoon or spatula to scrape up any remaining browned bits from the bottom of the pot.
- Add the Remaining Ingredients: Add the water, brown sugar, black peppercorns, and bay leaves to the Instant Pot. Stir to combine.
- Return the Chicken: Add the seared chicken back to the Instant Pot, making sure it’s submerged in the sauce.
- Pressure Cook: Close the Instant Pot lid and seal the valve. Select the “Manual” or “Pressure Cook” function and set the cooking time to 8 minutes on high pressure.
- Natural Pressure Release: Once the cooking time is up, let the Instant Pot naturally release pressure for 10 minutes. After 10 minutes, carefully release any remaining pressure manually.
- (Optional) Reduce the Sauce: Carefully remove the chicken from the Instant Pot and set it aside. Select the “Sauté” function again. Bring the sauce to a simmer and cook for 10-15 minutes, or until it has reduced to your desired consistency. Stir occasionally to prevent sticking.
- Adjust Seasoning: Taste the sauce and adjust the seasoning as needed. You may want to add a little more soy sauce for saltiness, vinegar for tanginess, or brown sugar for sweetness.
- Return Chicken to Sauce: Return the chicken to the Instant Pot and toss to coat it in the reduced sauce.
- Serve: Serve the Chicken Adobo over cooked white rice. Garnish with chopped green onions, if desired.
Notes
- Chicken thighs are recommended for tenderness, but chicken breasts can be used (reduce cooking time to 6 minutes).
- White vinegar or apple cider vinegar are typical, but other vinegars can be used.
- Adjust the amount of brown sugar to your liking. Honey or maple syrup can be substituted.
- For a spicier adobo, add red pepper flakes or a chopped chili pepper.
- Cubed potatoes can be added for a heartier meal.
- Hard-boiled eggs can be added during the last few minutes of cooking.
- For a richer, creamier adobo, add a can of coconut milk (Chicken Adobo sa Gata).
- Leftovers can be stored in the refrigerator for up to 3 days.


Leave a Comment