

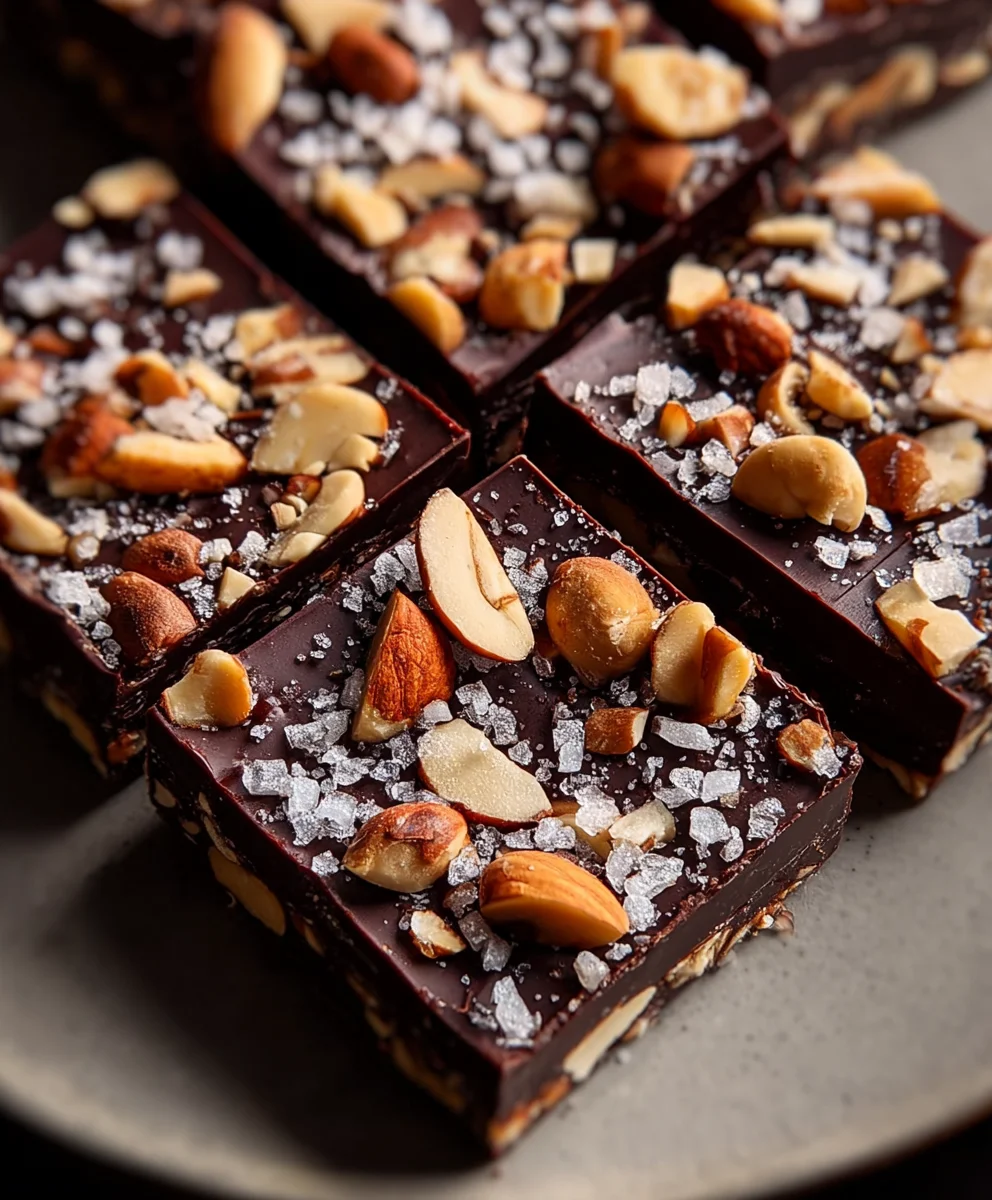
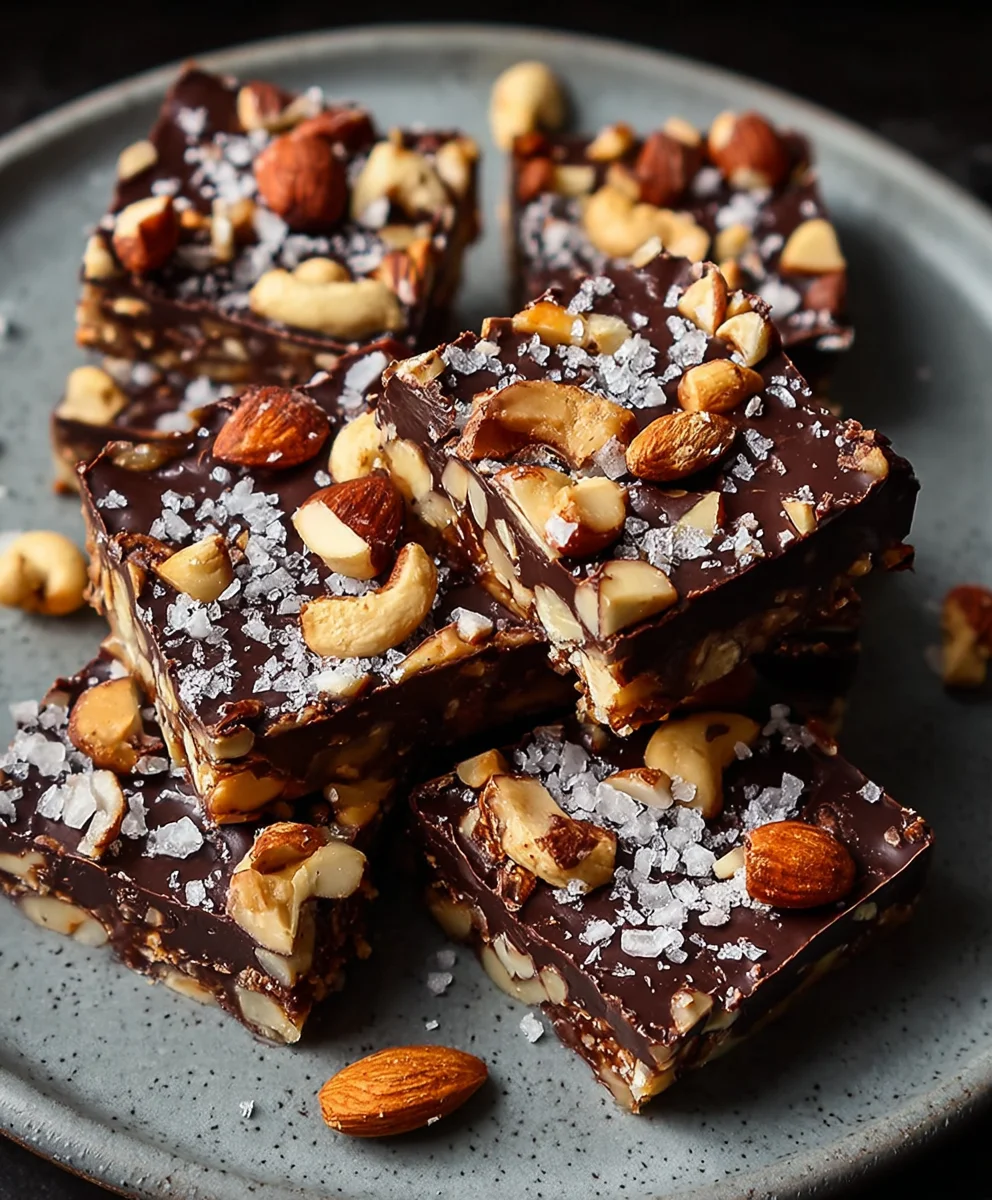
Dark Chocolate And Sea Salt Nut Bars are not merely a snack; they are an invitation to experience a perfect harmony of flavors and textures that I believe truly elevates the simple treat. Imagine sinking your teeth into a bar where the luxurious richness of dark chocolate melts effortlessly, followed by the satisfying crunch of toasted nuts, all beautifully counterbalanced by a delicate sprinkle of sea salt that awakens the palate. It’s a compelling combination that offers both comfort and an exciting burst of taste in every bite.
The modern desire for wholesome yet indulgent portable snacks has seen the rise of gourmet bars, and these delectable creations stand at the forefront. While ancient civilizations cherished nuts and natural sweeteners, our contemporary palate appreciates the sophisticated evolution that brings premium ingredients together in such a thoughtful way. This specific recipe for
Dark Chocolate And Sea Salt Nut Bars caters to that desire for a snack that is both deeply satisfying and conveniently wholesome.
People universally adore this dish for countless reasons. Beyond the incredible taste and the delightful interplay of chewy and crunchy textures, these bars offer a superb source of sustained energy, making them ideal for busy mornings, a midday pick-me-up, or even a sophisticated post-dinner treat. They strike that elusive balance, proving that a truly delicious indulgence can also be a remarkably beneficial one.

Ingredients:
- For the Nut and Seed Base:
- 2 cups (about 250g) unsalted mixed nuts (I love a combination of almonds, cashews, pecans, and walnuts for a rich flavor profile)
- ½ cup (about 70g) pumpkin seeds (pepitas)
- ½ cup (about 70g) sunflower seeds
- ¼ cup (about 30g) chia seeds
- 2 tablespoons ground flaxseed (this acts as a great binder and adds nutritional value!)
- 1 cup (about 90g) rolled oats (ensure they are gluten-free if needed)
- For the Sticky-Sweet Binder:
- ½ cup (about 120g) creamy natural nut butter (almond or cashew butter works wonderfully, make sure it’s unsweetened and unsalted)
- ½ cup (about 160g) maple syrup or honey (I often alternate based on my mood, both provide fantastic sweetness and stickiness)
- ¼ cup (about 60ml) coconut oil, melted (this helps everything bind and set beautifully)
- 1 teaspoon pure vanilla extract (a little goes a long way in enhancing all those lovely flavors)
- ½ teaspoon fine sea salt (don’t skip this – it balances the sweetness perfectly)
- For the Dark Chocolate and Sea Salt Finish:
- 6 ounces (about 170g) good quality dark chocolate, chopped (I recommend 70% cacao or higher for that intense, bittersweet flavor)
- 1-2 tablespoons coconut oil (optional, for melting the chocolate smoothly)
- 1 teaspoon flaky sea salt (Maldon or a similar type is ideal for that perfect textural crunch and burst of saltiness)
Equipment You’ll Need:
- 9×13 inch baking pan
- Parchment paper
- Large mixing bowl
- Medium saucepan or microwave-safe bowl
- Spatula or sturdy spoon
- Sharp knife or pizza cutter for slicing
- Cutting board
Preparing Our Dark Chocolate And Sea Salt Nut Bars:
Gathering and Prepping Your Nuts and Seeds:
This initial step is all about building the foundation of flavor and texture for our incredible Dark Chocolate And Sea Salt Nut Bars. It’s where we awaken the nutty goodness!
-
Preheat and Prepare: First things first, let’s get our oven ready. Preheat your oven to a moderate 325°F (160°C). While it’s heating, grab your 9×13 inch baking pan. Line it with parchment paper, making sure to leave an overhang on the sides. This overhang will act as a sling later, making it super easy to lift the finished bars out of the pan. A little spray of cooking oil underneath the parchment can help it stick to the pan and prevent shifting while you’re pressing your mixture.
-
Chop Those Nuts: If your mixed nuts are very large (like whole pecans or large walnuts), I like to give them a rough chop on a cutting board. We’re aiming for varied textures here – some larger pieces for bite, some smaller for even distribution. Don’t pulverize them; we want character! Transfer your chopped mixed nuts, pumpkin seeds, sunflower seeds, chia seeds, ground flaxseed, and rolled oats into a large, heat-proof mixing bowl. Give them a good toss with your hands or a spoon to combine everything evenly.
-
Toasting for Depth: Now, for a flavor secret! While optional, toasting the nuts and seeds significantly deepens their flavor and adds a wonderful aroma that permeates through our Dark Chocolate And Sea Salt Nut Bars. Spread your combined nut and seed mixture in a single layer on a baking sheet. Pop it into the preheated oven for about 8-10 minutes. Keep a very close eye on them, stirring halfway through. You’re looking for a light golden color and a fragrant, toasty smell. Be careful not to burn them, as nuts can go from perfectly toasted to burnt very quickly. Once toasted, remove them from the oven and carefully pour them back into your large mixing bowl. Allow them to cool slightly while we prepare the binder.
Crafting the Sticky-Sweet Binder:
This is the magical glue that holds our Dark Chocolate And Sea Salt Nut Bars together. It’s all about creating that perfect balance of sweetness and richness.
-
Melt and Mix the Wet Ingredients: In a medium saucepan over low heat, or in a microwave-safe bowl, combine your creamy natural nut butter, maple syrup (or honey), melted coconut oil, vanilla extract, and fine sea salt. If using the stovetop, stir constantly until the mixture is smooth, warm, and well combined, which usually takes about 2-3 minutes. If using the microwave, heat in 30-second intervals, stirring well after each, until it reaches the same smooth, uniform consistency. We don’t want it to boil; just warm it gently until everything is melded together. This gentle warmth helps the ingredients emulsify beautifully and ensures an even coating for our dry ingredients.
Combining and Pressing the Bar Mixture:
This is where our toasted nutty goodness meets its sticky destiny, on its way to becoming delicious Dark Chocolate And Sea Salt Nut Bars.
-
Combine Wet and Dry: Pour the warm, smooth binder mixture directly over the toasted nuts, seeds, and oats in your large mixing bowl. Using a sturdy spatula or a wooden spoon, mix everything together thoroughly. You’ll want to ensure every single nut, seed, and oat flake is coated in that delicious, sticky binder. This might take a few minutes of good stirring, but it’s crucial for ensuring the bars hold together well. Take your time here; an even coating is key!
-
Press into the Pan: Now, transfer the entire mixture into your prepared 9×13 inch baking pan. This is where you put your muscles to work! Using the back of your spatula, or even the bottom of a clean measuring cup, press the mixture down firmly and evenly into the pan. You want a really compact layer, leaving no air pockets. The harder and more evenly you press, the better your Dark Chocolate And Sea Salt Nut Bars will hold their shape once cooled. Pay special attention to the corners and edges to ensure they are just as compacted as the center.
The Crucial Baking Process:
Baking solidifies the binder and further toasts the ingredients, making our Dark Chocolate And Sea Salt Nut Bars perfectly crisp and chewy.
-
Bake to Perfection: Place your pan into the preheated 325°F (160°C) oven. Bake for approximately 25-30 minutes. You’re looking for the edges to turn a light golden brown and the entire surface to look set and firm. The exact baking time can vary depending on your oven, so keep an eye on them after the 20-minute mark. A perfectly baked bar will be golden, fragrant, and feel slightly firm to the touch when gently pressed.
-
Cool Completely (Mostly): Once baked, remove the pan from the oven and place it on a wire rack to cool. This step is incredibly important for the structural integrity of your Dark Chocolate And Sea Salt Nut Bars. Allow the bars to cool in the pan for at least 30-45 minutes. They need this time to firm up before we add the glorious chocolate layer. If you try to add the chocolate too soon, it will just melt into the warm bars rather than forming a distinct layer on top.
Adding the Decadent Dark Chocolate Finish:
This is where the “Dark Chocolate” part of our Dark Chocolate And Sea Salt Nut Bars truly comes to life!
-
Melt the Dark Chocolate: While the bars are cooling, it’s time to prepare our luscious dark chocolate topping. In a double boiler or a microwave-safe bowl, combine your chopped dark chocolate with the optional 1-2 tablespoons of coconut oil. If using a double boiler, place the bowl over a saucepan of simmering water (make sure the bottom of the bowl doesn’t touch the water) and stir until the chocolate is smooth and completely melted. If using the microwave, heat in 30-second intervals, stirring vigorously after each, until smooth and glossy. The coconut oil helps create a beautifully smooth, pourable chocolate that sets nicely.
-
Spread the Chocolate: Once the chocolate is perfectly melted and smooth, pour it evenly over the slightly cooled nut bar base in the pan. Use an offset spatula or the back of a spoon to spread the chocolate layer right to the edges, ensuring every square inch of our future Dark Chocolate And Sea Salt Nut Bars is covered in decadent goodness.
A Sprinkle of Sea Salt and the Cooling Game:
This small addition elevates our Dark Chocolate And Sea Salt Nut Bars from great to absolutely extraordinary.
-
The Flaky Sea Salt Moment: Immediately after spreading the chocolate, grab your flaky sea salt. Generously sprinkle it over the melted chocolate layer. The contrast of the dark chocolate with the sharp, delicate crunch of the sea salt is truly magical and is one of the signature elements of these amazing Dark Chocolate And Sea Salt Nut Bars. Don’t be shy here; the salt truly enhances the chocolate’s depth.
-
The Final Cool Down: Now for the hardest part – waiting! Place the pan back on the wire rack and let the bars cool completely at room temperature for at least 2-3 hours, or until the chocolate is fully set and firm. For a quicker set, you can pop the pan into the refrigerator for about 30-60 minutes, but sometimes chilling too quickly can cause the chocolate to bloom (develop white streaks). Room temperature cooling provides the best texture for the chocolate. Patience is a virtue, especially when it comes to perfect Dark Chocolate And Sea Salt Nut Bars!
Slicing and Storing Your Delicious Dark Chocolate And Sea Salt Nut Bars:
The moment of truth! Get ready to enjoy the fruits of your labor.
-
Lift and Slice: Once the chocolate is completely set, use the parchment paper overhang to carefully lift the entire slab of Dark Chocolate And Sea Salt Nut Bars out of the pan and transfer it to a large cutting board. This parchment paper sling is truly a lifesaver!
-
Cutting with Care: Using a sharp chef’s knife or a pizza cutter, carefully slice the large slab into your desired bar size. I usually aim for 12-16 bars, depending on how generous I’m feeling. For cleaner cuts, you can run your knife under hot water and wipe it dry between slices, especially if the chocolate is very firm. If the chocolate cracks when you try to slice it, your bars might be too cold; let them warm up a little at room temperature before trying again. These Dark Chocolate And Sea Salt Nut Bars are robust but benefit from a steady hand during slicing.
-
Enjoy and Store: Your beautiful Dark Chocolate And Sea Salt Nut Bars are now ready to be enjoyed! Store any leftovers in an airtight container at room temperature for up to one week, or in the refrigerator for up to two weeks. If stacking them, you might want to place a piece of parchment paper between layers to prevent the chocolate from sticking. They also freeze wonderfully for up to three months; just thaw at room temperature before indulging. These bars are perfect for a quick breakfast, a satisfying snack, or a delightful treat any time of day!
Conclusion:
Well, my friends, we’ve reached the end of our culinary journey for today, and I truly hope you’re feeling as excited as I am about what we’ve just discussed. If there’s one recipe I could implore you to try from my entire collection, this one for the Dark Chocolate And Sea Salt Nut Bars would be right at the top of the list. Seriously, it’s a game-changer. These aren’t just any snack bars; they are a symphony of flavors and textures, meticulously balanced to deliver an unforgettable experience with every single bite. Imagine the delightful crunch of toasted nuts, the luxurious melt of rich dark chocolate, and that perfect, subtle pop of sea salt that elevates every other element. It’s a combination that hits all the right notes – sweet, savory, slightly bitter, and deeply satisfying. This recipe isn’t complicated, demanding hours in the kitchen or obscure ingredients. Instead, it’s remarkably straightforward, allowing even novice bakers to achieve professional-looking and tasting results. You’ll be amazed at how quickly you can whip up a batch of these delectable treats, transforming a few simple ingredients into something truly extraordinary.
What makes these Dark Chocolate And Sea Salt Nut Bars an absolute must-try isn’t just their incredible taste, but also their versatility and general appeal. They strike that coveted balance of being indulgent yet feeling wholesome, packed with good-for-you nuts and the mood-boosting power of dark chocolate. They are perfect for so many occasions. Need a quick, energizing breakfast on the go? Grab one! Looking for that afternoon pick-me-up to combat the 3 PM slump? These bars are your answer. Craving a sophisticated, not-too-sweet dessert after dinner? Absolutely! They also make fantastic edible gifts for friends and family, showing you care with a homemade treat that tastes incredibly gourmet. The texture is another highlight; they hold together beautifully without being overly sticky, offering that satisfying snap and chew that keeps you reaching for more. I genuinely believe that once you’ve tasted these, you’ll find it hard to go back to store-bought alternatives that often lack the depth of flavor and quality ingredients you can control at home.
Serving Suggestions and Creative Variations: Elevate Your Bars!
Beyond simply enjoying them as they are, there are so many delightful ways to serve and customize your homemade Dark Chocolate And Sea Salt Nut Bars. For an elegant dessert presentation, try warming them slightly in the microwave for 10-15 seconds; the chocolate becomes perfectly melty and luscious. Serve them alongside a scoop of vanilla bean ice cream or a dollop of fresh whipped cream for an indulgent treat that will impress any guest. They are also incredibly delicious with a steaming cup of coffee or a comforting mug of herbal tea, making your morning or afternoon break feel like a mini-retreat. If you’re planning a picnic or a road trip, these bars are sturdy enough to travel well, providing a much-needed energy boost that’s far superior to most convenience store options.
Unleash Your Inner Chef: Customizing Your Nut Bars
And now for the fun part: variations! While the base recipe for these Dark Chocolate And Sea Salt Nut Bars is stellar on its own, don’t be afraid to experiment and make them truly your own. Think of this recipe as a canvas for your culinary creativity. You can easily swap out the types of nuts used; instead of just almonds and peanuts, consider pistachios for a vibrant green hue and unique flavor, or pecans and walnuts for a richer, buttery profile. A mix of different nuts often yields the most interesting textures and tastes. For an extra layer of flavor and chewiness, try incorporating dried fruits like cranberries, chopped apricots, or even finely diced candied ginger. Just be sure to reduce the added sweetener slightly if your dried fruits are very sweet. A touch of shredded coconut, lightly toasted before adding to the mix, can introduce a tropical note that’s absolutely divine.
You can also play with different types of chocolate. While dark chocolate is specified and highly recommended for its complexity, a mix of dark and milk chocolate chips could cater to those who prefer a sweeter bar. Or, if you’re a white chocolate enthusiast, a drizzle of melted white chocolate over the finished bars would add a beautiful visual contrast and a creamy sweetness. Spices like a pinch of cinnamon, a dash of cardamom, or even a tiny amount of cayenne pepper (for a subtle heat kick!) can transform the flavor profile entirely. A few drops of almond extract or vanilla bean paste can also enhance the overall aroma and taste. Don’t forget the sea salt! While flaky sea salt is ideal for that visual appeal and burst of flavor, you can also try smoked sea salt for an adventurous twist. The possibilities are truly endless, limited only by your imagination!
Your Turn: Create, Enjoy, and Share!
So, there you have it. My heartfelt plea for you to give this recipe for Dark Chocolate And Sea Salt Nut Bars a try. I promise you won’t regret it. The satisfaction of biting into a homemade treat that tastes this good, knowing exactly what went into it, is unparalleled. I truly believe that the kitchen is a place for joy, creativity, and sharing, and this recipe embodies all of that. It’s an accessible way to bring gourmet flavors into your home without any fuss.
I am genuinely excited for you to experience the magic of these bars firsthand. Once you’ve made them, please, please come back and tell me all about your experience! Did you stick to the original recipe, or did you venture into some delicious variations? What were your favorite serving suggestions? I absolutely adore hearing from you and seeing your culinary creations. Don’t hesitate to share your photos and stories with me. Your feedback and enthusiasm fuel my passion for sharing these recipes. So, gather your ingredients, preheat that oven, and get ready to create something truly special. Happy baking, my friends!
Chewy Dark Chocolate & Sea Salt Nut Bars
Chewy Dark Chocolate & Sea Salt Nut Bars offer a perfect harmony of flavors and textures, with the luxurious richness of dark chocolate, satisfying crunch of toasted nuts, and a delicate sprinkle of sea salt. A deeply satisfying, conveniently wholesome, and energizing treat.
Ingredients
-
2 cups (250g) unsalted mixed nuts, roughly chopped
-
½ cup (70g) pumpkin seeds (pepitas)
-
½ cup (70g) sunflower seeds
-
¼ cup (30g) chia seeds
-
2 tbsp ground flaxseed
-
1 cup (90g) rolled oats (ensure gluten-free if needed)
-
½ cup (120g) creamy natural nut butter (unsweetened, unsalted)
-
½ cup (160g) maple syrup or honey
-
¼ cup (60ml) coconut oil, melted (for binder)
-
1 tsp pure vanilla extract (use alcohol-free for non-alcohol substitution)
-
½ tsp fine sea salt (for binder)
-
6 oz (170g) good quality dark chocolate, chopped (70% cacao or higher)
-
1-2 tbsp coconut oil (optional, for melting chocolate)
-
1 tsp flaky sea salt (for topping)
Instructions
-
Step 1
Preheat oven to 325°F (160°C). Line a 9×13 inch baking pan with parchment paper, leaving an overhang. -
Step 2
Roughly chop large nuts. In a large bowl, combine chopped mixed nuts, pumpkin seeds, sunflower seeds, chia seeds, ground flaxseed, and rolled oats. Toss well. -
Step 3
Spread the nut and seed mixture on a baking sheet and toast in the preheated oven for 8-10 minutes, stirring halfway, until lightly golden and fragrant. Return to the large bowl and let cool slightly. -
Step 4
In a medium saucepan over low heat, or in a microwave-safe bowl, gently warm and combine nut butter, maple syrup/honey, ¼ cup melted coconut oil, vanilla extract, and fine sea salt until smooth and well combined. Do not boil. -
Step 5
Pour the warm binder over the toasted nut mixture. Mix thoroughly with a sturdy spatula until all dry ingredients are evenly coated. -
Step 6
Transfer the mixture to the prepared baking pan and press down very firmly and evenly to compact the bars, paying attention to corners and edges. -
Step 7
Bake for 25-30 minutes, until the edges are light golden brown and the entire surface looks set and firm. -
Step 8
Remove from oven and place the pan on a wire rack to cool for at least 30-45 minutes to firm up before adding chocolate. -
Step 9
While bars cool, melt the chopped dark chocolate with the optional 1-2 tablespoons coconut oil using a double boiler or microwave, stirring until smooth and glossy. -
Step 10
Pour the melted chocolate evenly over the slightly cooled nut bar base, using an offset spatula or spoon to spread it to the edges. -
Step 11
Immediately sprinkle flaky sea salt generously over the melted chocolate layer. -
Step 12
Allow bars to cool completely at room temperature for at least 2-3 hours (or refrigerate for 30-60 minutes for a quicker set) until the chocolate is fully set and firm. -
Step 13
Use the parchment paper overhang to carefully lift the entire slab of bars out of the pan and transfer to a large cutting board. Slice into 12-16 bars using a sharp chef’s knife or pizza cutter. -
Step 14
Store in an airtight container at room temperature for up to one week, or in the refrigerator for up to two weeks. Bars can also be frozen for up to three months.
Important Information
Nutrition Facts (Per Serving)
It is important to consider this information as approximate and not to use it as definitive health advice.
Allergy Information
Please check ingredients for potential allergens and consult a health professional if in doubt.


Leave a Comment