

Cherry Cheesecake Puppy Chow: Prepare to be utterly captivated by this irresistible twist on a classic snack! Imagine the nostalgic joy of traditional puppy chow, but elevated to a whole new level of decadent delight. We’re talking crunchy Chex cereal coated in a luscious blend of white chocolate, powdered sugar, and a burst of cherry cheesecake flavor that will have you reaching for handful after handful.
While puppy chow (also known as muddy buddies) doesn’t have a long, storied history, its roots are firmly planted in American snack culture. It’s a homemade treat often shared during holidays, game days, or simply as a fun and easy indulgence. What makes this Cherry Cheesecake Puppy Chow so special is the unexpected yet harmonious marriage of flavors. The tangy sweetness of cherry cheesecake perfectly complements the rich white chocolate and the satisfying crunch of the cereal.
People adore puppy chow for its addictive texture and sweet, comforting taste. It’s incredibly easy to make, requiring no baking and minimal effort. This cherry cheesecake version takes that convenience and amplifies the flavor profile, creating a truly unforgettable snack experience. The creamy, slightly tart cherry cheesecake element adds a sophisticated touch to this beloved treat, making it a crowd-pleaser for all ages. Get ready to experience puppy chow like never before!

Ingredients:
- For the Puppy Chow:
- 9 cups Rice Chex cereal
- 1 cup white chocolate chips
- 1/2 cup (1 stick) unsalted butter
- 1/2 cup powdered sugar
- 1/4 cup cherry gelatin powder (like Jell-O)
- 1/4 cup crushed freeze-dried cherries
- For the Cheesecake Coating:
- 4 ounces cream cheese, softened
- 1/4 cup (1/2 stick) unsalted butter, softened
- 2 cups powdered sugar
- 1 teaspoon vanilla extract
- 2 tablespoons milk
- Optional Toppings:
- Additional crushed freeze-dried cherries
- White chocolate shavings
- Graham cracker crumbs
Preparing the Puppy Chow Base
- Measure the Cereal: First things first, grab a large bowl the biggest one you’ve got! Pour in those 9 cups of Rice Chex cereal. We need a lot of space to toss everything together later, so don’t skimp on the bowl size.
- Melt the White Chocolate and Butter: In a microwave-safe bowl, combine the white chocolate chips and butter. Microwave in 30-second intervals, stirring in between each interval, until completely melted and smooth. Be careful not to overheat the chocolate, or it can seize up. If you prefer, you can melt the chocolate and butter in a double boiler over simmering water. Just make sure the bottom of the bowl doesn’t touch the water.
- Combine Chocolate Mixture and Cereal: Pour the melted white chocolate and butter mixture over the Rice Chex cereal. Gently fold the cereal into the chocolate until every piece is evenly coated. This is where that big bowl comes in handy! You want to be gentle so you don’t crush the cereal.
- Prepare the Powdered Sugar Mixture: In a gallon-sized resealable bag, combine the powdered sugar, cherry gelatin powder, and crushed freeze-dried cherries. Seal the bag tightly and shake it well to mix everything together. This ensures that the cereal gets evenly coated with the cherry-flavored sweetness.
- Coat the Cereal: Add the chocolate-covered cereal to the bag with the powdered sugar mixture. Seal the bag and shake, shake, shake! Make sure every piece of cereal is completely coated in the sugary goodness. You might need to shake it in batches if all the cereal doesn’t fit comfortably in the bag at once.
- Spread and Cool: Spread the puppy chow out in a single layer on a baking sheet lined with parchment paper. This will help it cool and prevent it from clumping together. Let it sit for about 15-20 minutes, or until the chocolate is set.
Making the Cheesecake Coating
- Cream Together Butter and Cream Cheese: In a large bowl, beat the softened cream cheese and butter together with an electric mixer until smooth and creamy. Make sure your cream cheese and butter are truly softened, or you’ll end up with lumps in your coating.
- Add Powdered Sugar and Vanilla: Gradually add the powdered sugar to the cream cheese mixture, beating on low speed until combined. Then, stir in the vanilla extract.
- Adjust Consistency with Milk: Add the milk, one tablespoon at a time, until the coating reaches a smooth, spreadable consistency. You want it to be thick enough to coat the puppy chow but thin enough to work with easily.
Coating the Puppy Chow with Cheesecake Flavor
- Gently Fold in Cheesecake Coating: Place the puppy chow in a very large bowl. Add the cheesecake coating to the bowl. Gently fold the cheesecake coating into the puppy chow until all pieces are evenly coated. Be careful not to break the cereal. This step is a little messy, but it’s worth it for that delicious cheesecake flavor!
- Spread and Set Again: Spread the cheesecake-coated puppy chow back onto the parchment-lined baking sheet in a single layer. This will allow the coating to set properly.
- Chill (Optional): For a firmer coating, you can chill the puppy chow in the refrigerator for about 30 minutes. This will help the cheesecake coating set up even more.
Adding the Finishing Touches
- Add Toppings (Optional): While the cheesecake coating is still slightly soft, sprinkle the puppy chow with your desired toppings. Crushed freeze-dried cherries add a pop of color and extra cherry flavor. White chocolate shavings add a touch of elegance. Graham cracker crumbs give it that classic cheesecake vibe.
- Let it Set Completely: Allow the puppy chow to sit at room temperature until the cheesecake coating is completely set, or chill in the refrigerator for a quicker set.
- Break Apart and Serve: Once the coating is set, break the puppy chow into smaller pieces. Store in an airtight container at room temperature or in the refrigerator. It’s best enjoyed within a few days, but let’s be honest, it probably won’t last that long!
Tips and Tricks for the Best Cherry Cheesecake Puppy Chow
- Don’t Overheat the Chocolate: Overheating white chocolate can cause it to seize and become grainy. Microwave in short intervals and stir frequently.
- Use Softened Ingredients: Make sure your cream cheese and butter are properly softened for the cheesecake coating. This will ensure a smooth and creamy texture.
- Gentle Mixing: Be gentle when folding the chocolate and cheesecake coating into the cereal to avoid crushing it.
- Adjust Sweetness: If you prefer a less sweet puppy chow, you can reduce the amount of powdered sugar in the coating.
- Experiment with Flavors: Feel free to experiment with different flavors of gelatin powder or extracts to customize your puppy chow. Raspberry or strawberry gelatin would also be delicious!
- Storage: Store your Cherry Cheesecake Puppy Chow in an airtight container at room temperature or in the refrigerator. It will stay fresh for several days, but it’s best enjoyed within the first few days for optimal texture.

Conclusion:
This Cherry Cheesecake Puppy Chow isn’t just another snack mix; it’s a flavor explosion that will have everyone begging for more! The sweet, tangy cherry combines perfectly with the creamy cheesecake flavor, all wrapped around the crunchy, addictive puppy chow base. Trust me, once you start, you won’t be able to stop. Its the perfect blend of textures and tastes, making it an irresistible treat for parties, movie nights, or just a sweet craving. Why is this a must-try? Because it’s incredibly easy to make, requires minimal ingredients, and delivers maximum flavor. Forget spending hours in the kitchen; this recipe comes together in minutes, leaving you with more time to enjoy the delicious results. Plus, it’s a guaranteed crowd-pleaser, perfect for sharing (or not!). The unique combination of cherry and cheesecake elevates classic puppy chow to a whole new level of deliciousness. It’s a fun, festive, and utterly addictive treat that will become a staple in your snack repertoire. Looking for serving suggestions? This Cherry Cheesecake Puppy Chow is fantastic on its own, but you can also get creative! Try serving it in individual paper cups for a party, or sprinkle it over ice cream for an extra special dessert. It’s also a great addition to a dessert charcuterie board, adding a pop of color and flavor. For a fun twist, try mixing it with other snack mixes like pretzels or popcorn for a sweet and salty combination. And speaking of twists, there are so many ways to customize this recipe to your liking! If you’re a chocolate lover, add a drizzle of melted dark chocolate over the finished puppy chow. For a more intense cherry flavor, use cherry-flavored gelatin in the coating. You could even experiment with different types of cookies or candies to add even more texture and flavor. Consider adding chopped maraschino cherries for a burst of juicy sweetness. Or, for a more sophisticated flavor, try using dried cherries instead. A sprinkle of graham cracker crumbs will enhance the cheesecake flavor even further. Don’t be afraid to get creative and make it your own! I’m absolutely confident that you’ll love this recipe as much as I do. It’s the perfect balance of sweet, creamy, and crunchy, making it an irresistible treat for any occasion. The bright cherry flavor is especially perfect for spring and summer gatherings, but honestly, I make it year-round! So, what are you waiting for? Gather your ingredients and get ready to whip up a batch of this amazing Cherry Cheesecake Puppy Chow. I promise you won’t regret it! And when you do, please come back and share your experience in the comments below. I’d love to hear what you think and any variations you tried. Did you add chocolate? Did you use different types of cherries? Let me know! I’m always looking for new and exciting ways to enjoy this delicious treat. Happy snacking! I can’t wait to hear all about your Cherry Cheesecake Puppy Chow adventures! Print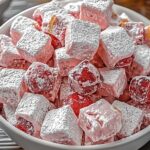
Cherry Cheesecake Puppy Chow: A Delicious & Easy Dessert Recipe
- Total Time: 25 minutes
- Yield: 12 cups 1x
Description
Sweet, addictive snack mix with Rice Chex, white chocolate, cherry gelatin, and creamy cheesecake coating. Perfect for parties!
Ingredients
- 9 cups Rice Chex cereal
- 1 cup white chocolate chips
- 1/2 cup (1 stick) unsalted butter
- 1/2 cup powdered sugar
- 1/4 cup cherry gelatin powder (like Jell-O)
- 1/4 cup crushed freeze-dried cherries
- 4 ounces cream cheese, softened
- 1/4 cup (1/2 stick) unsalted butter, softened
- 2 cups powdered sugar
- 1 teaspoon vanilla extract
- 2 tablespoons milk
- Additional crushed freeze-dried cherries
- White chocolate shavings
- Graham cracker crumbs
Instructions
- Measure the Cereal: In a large bowl, pour in the Rice Chex cereal.
- Melt the White Chocolate and Butter: In a microwave-safe bowl, combine the white chocolate chips and butter. Microwave in 30-second intervals, stirring in between each interval, until completely melted and smooth. Alternatively, melt in a double boiler.
- Combine Chocolate Mixture and Cereal: Pour the melted white chocolate and butter mixture over the Rice Chex cereal. Gently fold the cereal into the chocolate until every piece is evenly coated.
- Prepare the Powdered Sugar Mixture: In a gallon-sized resealable bag, combine the powdered sugar, cherry gelatin powder, and crushed freeze-dried cherries. Seal the bag tightly and shake well to mix.
- Coat the Cereal: Add the chocolate-covered cereal to the bag with the powdered sugar mixture. Seal the bag and shake until every piece of cereal is completely coated. Shake in batches if necessary.
- Spread and Cool: Spread the puppy chow out in a single layer on a baking sheet lined with parchment paper. Let it sit for about 15-20 minutes, or until the chocolate is set.
- Cream Together Butter and Cream Cheese: In a large bowl, beat the softened cream cheese and butter together with an electric mixer until smooth and creamy.
- Add Powdered Sugar and Vanilla: Gradually add the powdered sugar to the cream cheese mixture, beating on low speed until combined. Then, stir in the vanilla extract.
- Adjust Consistency with Milk: Add the milk, one tablespoon at a time, until the coating reaches a smooth, spreadable consistency.
- Gently Fold in Cheesecake Coating: Place the puppy chow in a very large bowl. Add the cheesecake coating to the bowl. Gently fold the cheesecake coating into the puppy chow until all pieces are evenly coated.
- Spread and Set Again: Spread the cheesecake-coated puppy chow back onto the parchment-lined baking sheet in a single layer.
- Chill (Optional): For a firmer coating, chill the puppy chow in the refrigerator for about 30 minutes.
- Add Toppings (Optional): While the cheesecake coating is still slightly soft, sprinkle the puppy chow with your desired toppings (crushed freeze-dried cherries, white chocolate shavings, graham cracker crumbs).
- Let it Set Completely: Allow the puppy chow to sit at room temperature until the cheesecake coating is completely set, or chill in the refrigerator for a quicker set.
- Break Apart and Serve: Once the coating is set, break the puppy chow into smaller pieces. Store in an airtight container at room temperature or in the refrigerator.
Notes
- Don’t Overheat the Chocolate: Overheating white chocolate can cause it to seize and become grainy. Microwave in short intervals and stir frequently.
- Use Softened Ingredients: Make sure your cream cheese and butter are properly softened for the cheesecake coating. This will ensure a smooth and creamy texture.
- Gentle Mixing: Be gentle when folding the chocolate and cheesecake coating into the cereal to avoid crushing it.
- Adjust Sweetness: If you prefer a less sweet puppy chow, you can reduce the amount of powdered sugar in the coating.
- Experiment with Flavors: Feel free to experiment with different flavors of gelatin powder or extracts to customize your puppy chow. Raspberry or strawberry gelatin would also be delicious!
- Storage: Store your Cherry Cheesecake Puppy Chow in an airtight container at room temperature or in the refrigerator. It will stay fresh for several days, but it’s best enjoyed within the first few days for optimal texture.
- Prep Time: 20 minutes
- Cook Time: 5 minutes

Leave a Comment