

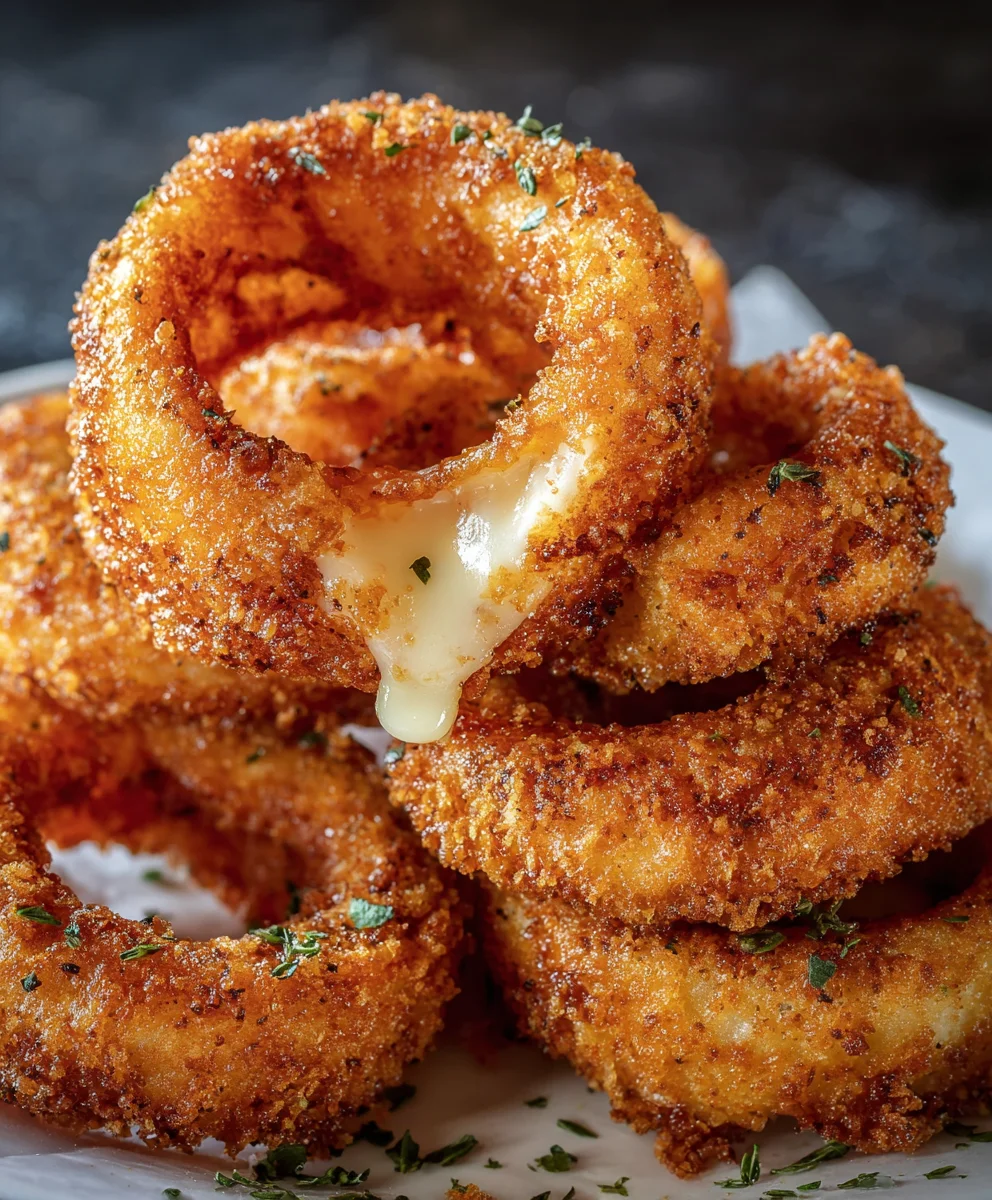
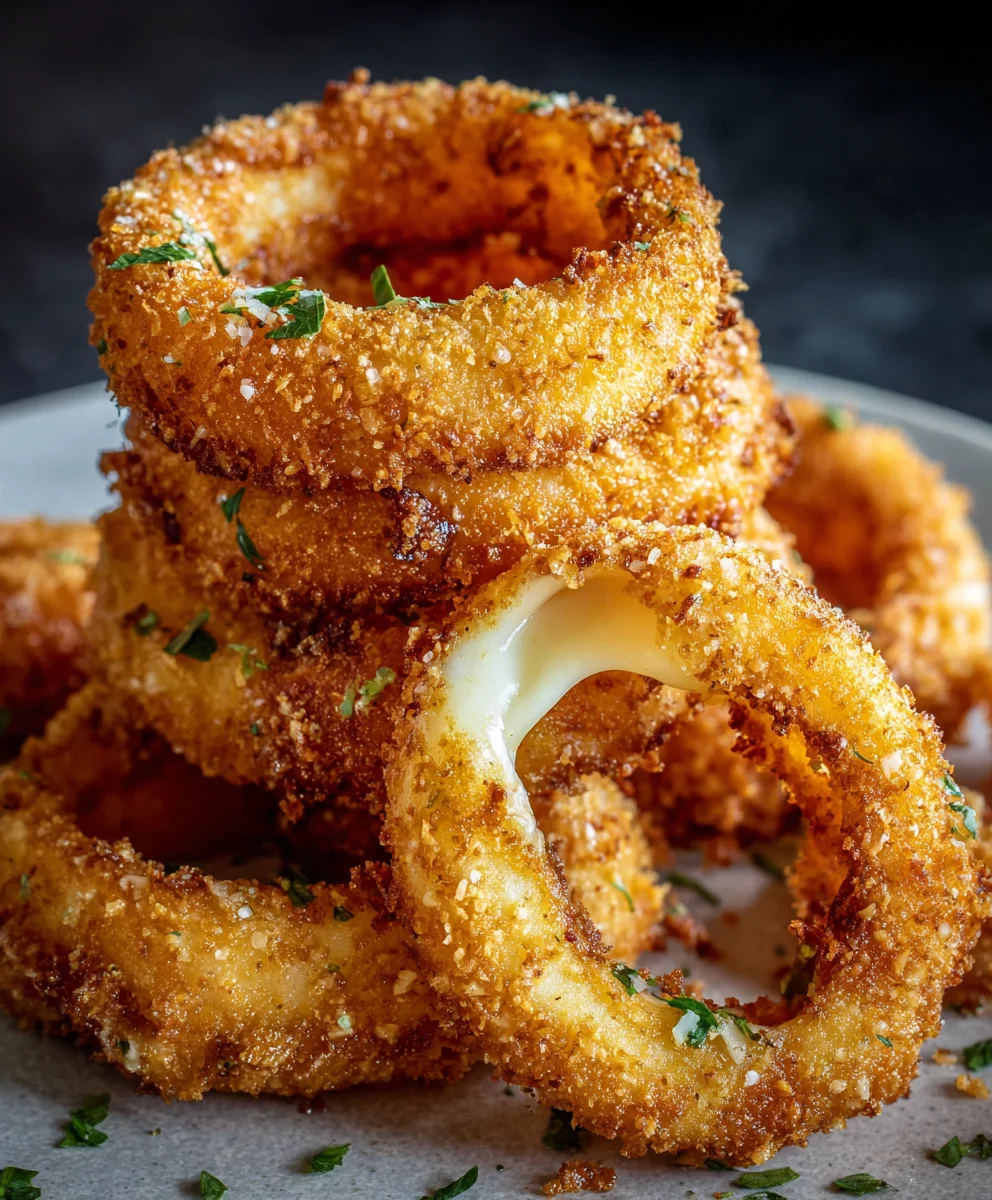
Cheesy Onion Rings – what’s not to adore about this ingenious twist on a beloved classic? Imagine the crisp, golden-brown perfection of a perfectly fried onion ring, now elevated with an irresistible blanket of molten, savory cheese. It’s a culinary innovation that takes comfort food to an entirely new level, promising an explosion of flavor and texture with every single bite. This isn’t just an appetizer; it’s an experience!
While traditional onion rings have graced diner menus and backyard BBQs for decades, with their origins tracing back to early 20th-century American cuisine, the thoughtful addition of cheese transforms them into a truly decadent delight. People simply adore this dish because it masterfully combines the sweet sharpness of tender, caramelized onion with the ultimate gooey, satisfying richness of perfectly melted cheese. The delightful crunch gives way to a soft, flavorful interior and then to that glorious, stretchy cheese pull, making these Cheesy Onion Rings an instant favorite for snack time, game day, or as the ultimate indulgent side dish to any meal. I assure you, once you try them, there’s no turning back.

Ingredients:
- For the Onions:
- 3 large, sweet yellow onions (such as Vidalia or Spanish onions). We’re going for substantial rings that hold up beautifully to all that cheesy goodness.
- For the Initial Dredge:
- 1/2 cup all-purpose flour. This first light coating is crucial for helping our cheesy batter adhere perfectly.
- For the Ultimate Cheesy Batter:
- 1 1/2 cups all-purpose flour. This forms the base of our crispy, flavorful coating.
- 1/2 cup cornstarch. The secret weapon for extra crispiness that lasts!
- 1 teaspoon baking powder. For a light, airy, and puffy batter texture.
- 1 teaspoon salt. Essential for seasoning our rings from the inside out.
- 1/2 teaspoon black pepper. A little kick to complement the cheese.
- 1/2 teaspoon garlic powder. Because garlic and cheese are best friends!
- 1/4 teaspoon cayenne pepper (optional, for a subtle warmth).
- 1 1/2 cups cold beer or sparkling water. The carbonation is fantastic for a light, crisp batter. If you’re not using beer, sparkling water works wonders too!
- 1 large egg. Helps bind the batter and adds richness.
- 1 cup finely shredded sharp cheddar cheese. This is where the magic truly begins for our Cheesy Onion Rings! Make sure it’s finely shredded for even distribution.
- 1/2 cup finely grated Parmesan cheese. Adds an extra layer of savory, umami flavor that elevates the cheese profile.
- For the Crispy Cheesy Breading:
- 2 cups Panko breadcrumbs. These Japanese breadcrumbs are renowned for their incredible crispiness, far superior to regular breadcrumbs.
- 1/2 cup finely shredded sharp cheddar cheese. Yes, even more cheese! This layer will crisp up beautifully.
- 1/4 cup finely grated Parmesan cheese. To ensure every bite is bursting with cheesy flavor.
- 1 teaspoon smoked paprika. Adds a lovely color and a hint of smoky depth.
- 1/2 teaspoon onion powder. Enhances the onion flavor without being overpowering.
- 1/4 teaspoon salt.
- 1/4 teaspoon black pepper.
- For Frying:
- 6-8 cups vegetable oil, canola oil, or peanut oil. Choose an oil with a high smoke point, enough to submerge the onion rings comfortably.
- For Serving (Optional but Recommended):
- Flaky sea salt, for sprinkling immediately after frying.
- Freshly chopped parsley or chives, for garnish and a touch of freshness.
Preparing Our Onions for Their Cheesy Transformation
My first step when making these incredible Cheesy Onion Rings is always to get the onions prepped just right. It’s a seemingly simple task, but doing it correctly makes all the difference in the final texture and taste of your rings. Trust me on this one!
- First things first, carefully peel the three large onions. You want to remove all the papery outer layers, leaving you with the smooth, firm onion underneath.
- Now, place each onion on a cutting board. Using a sharp knife, slice each onion into 1/2-inch thick rounds. Consistency is key here; try to make each slice as uniform as possible. This ensures that all your onion rings cook evenly and at the same rate. Uneven slices can lead to some rings being undercooked and others overcooked, which we definitely want to avoid for our perfect Cheesy Onion Rings.
- Once sliced, gently separate the rings from each other. You’ll find a variety of sizes, which is perfectly fine! The larger outer rings are usually the stars of the show, but don’t discard the smaller inner rings – they’re just as delicious. Handle them carefully to keep their circular shape intact.
- Here’s a little trick I’ve picked up that really elevates these onion rings: place all the separated onion rings into a large bowl filled with ice-cold water. Let them soak for at least 30 minutes, or even up to an hour. Why do this, you ask? This cold bath helps to mellow out the strong, pungent flavor of the raw onion, making them sweeter and more palatable once cooked. More importantly, it also helps to firm up the onion fibers, which contributes to a crispier finished product. It’s a small step that yields big results!
- After their cold bath, thoroughly drain the onion rings in a colander. It is absolutely crucial to dry them completely. Lay them out in a single layer on paper towels or a clean kitchen towel. Then, gently pat them dry with more paper towels. Any excess moisture will prevent the batter and breading from sticking properly, leading to a less-than-perfect coating. Take your time with this drying step – it’s vital for achieving those wonderfully crisp Cheesy Onion Rings.
- While the onions are drying, set up your initial dredging station. Place the 1/2 cup of all-purpose flour in a shallow dish or a wide bowl. We’ll use this just before dipping into the batter.
Crafting Our Irresistible Cheesy Batter
Now, let’s move on to making the heart of our Cheesy Onion Rings: the incredibly flavorful and crisp batter. This isn’t just any batter; it’s infused with two types of cheese and designed for ultimate crunch. Get ready for some serious flavor!
- In a large mixing bowl, combine the dry ingredients for the batter: 1 1/2 cups all-purpose flour, 1/2 cup cornstarch, 1 teaspoon baking powder, 1 teaspoon salt, 1/2 teaspoon black pepper, 1/2 teaspoon garlic powder, and the optional 1/4 teaspoon cayenne pepper. Whisk these ingredients together thoroughly until they are well combined. This ensures that the leavening agents and seasonings are evenly distributed throughout the batter.
- In a separate medium bowl, whisk together the 1 1/2 cups of cold beer (or sparkling water) and the large egg until they are fully incorporated. The cold temperature of the liquid is important here; it helps to create a crisper final product when it hits the hot oil.
- Now, gradually pour the wet ingredients into the dry ingredients. Whisk gently until just combined. It’s okay if there are a few small lumps; overmixing can develop the gluten in the flour, leading to a tougher batter. We want a light, airy coating for our Cheesy Onion Rings.
- Here’s the star ingredient moment! Fold in the 1 cup of finely shredded sharp cheddar cheese and the 1/2 cup of finely grated Parmesan cheese into the batter. Mix just enough to distribute the cheese evenly. You’ll immediately notice the beautiful aroma of the cheese as it mixes in. This generous addition of cheese directly into the batter is what makes these truly Cheesy Onion Rings.
- Allow the batter to rest for about 10-15 minutes at room temperature. This short rest allows the flour to fully hydrate, resulting in a more tender and cohesive batter that adheres better to the onions. While it rests, we can prepare our breading station.
Creating the Crispy Cheesy Breading
To achieve that ultimate crunch and extra layer of cheesy goodness, we’re not just stopping at a cheesy batter. We’re giving our Cheesy Onion Rings a fantastic cheesy breading too! This double-layer approach ensures maximum flavor and texture.
- In another shallow dish or wide bowl, combine the 2 cups of Panko breadcrumbs, 1/2 cup finely shredded sharp cheddar cheese, 1/4 cup finely grated Parmesan cheese, 1 teaspoon smoked paprika, 1/2 teaspoon onion powder, 1/4 teaspoon salt, and 1/4 teaspoon black pepper.
- Use your hands or a fork to thoroughly mix all these breading ingredients together. You want the cheese to be evenly distributed throughout the Panko, ensuring every bit of our Cheesy Onion Rings gets a cheesy, crispy coating. The smoked paprika not only adds a lovely color but also a subtle smoky flavor that pairs wonderfully with the cheese.
The Double-Dipping Process for Ultimate Cheesy Onion Rings
This is where all our preparation comes together! The coating process is critical for achieving perfectly uniform, crispy, and cheesy results. Set up your stations in an assembly line fashion for efficiency: dry onions, then the initial flour dredge, then the cheesy batter, and finally the cheesy Panko breading. Keep one hand for dry ingredients and one for wet to minimize mess.
- Take a well-dried onion ring and first dredge it lightly in the initial 1/2 cup of all-purpose flour. Shake off any excess. This light flour coating acts as a primer, giving the wet batter something extra to cling to.
- Next, fully submerge the floured onion ring into your incredible cheesy batter. Make sure it’s completely coated. Lift it out, allowing any excess batter to drip back into the bowl for a few seconds. We want a good coating, not a gloppy one!
- Immediately transfer the batter-coated onion ring into the cheesy Panko breading mixture. Generously coat the ring with the Panko, gently pressing the breadcrumbs onto all sides to ensure maximum coverage. Don’t be shy here – the more Panko, the crispier your Cheesy Onion Rings will be!
- Carefully transfer the fully coated onion ring to a wire rack set over a baking sheet. Repeat this process with the remaining onion rings. Try not to let them touch too much on the rack; a little air circulation is good.
- Once all the onion rings are coated, I like to place the baking sheet with the rack into the freezer for about 15-20 minutes. This chilling step is another pro tip! It helps the batter and breading set firmly onto the onion, preventing it from falling off during frying and ensuring a super crispy exterior. This small waiting period is truly worth it for the integrity of your Cheesy Onion Rings.
Frying Your Perfect Cheesy Onion Rings to Golden Perfection
Now for the most exciting part: frying! This is where our patient preparation pays off, transforming simple onions into irresistibly crispy, golden, and truly Cheesy Onion Rings. Safety first when frying, always.
- Pour the 6-8 cups of vegetable, canola, or peanut oil into a large, heavy-bottomed pot or a Dutch oven. Ensure the oil is deep enough to fully submerge the onion rings without them touching the bottom, but also leave plenty of headspace to prevent boil-overs once the rings are added.
- Heat the oil over medium-high heat until it reaches a temperature of 350°F (175°C). A good thermometer is your best friend here! Maintaining the correct oil temperature is paramount for perfectly cooked onion rings. If the oil isn’t hot enough, the rings will become greasy and soggy. If it’s too hot, they’ll burn on the outside before the onion inside has softened.
- Once the oil is at the correct temperature, carefully place 3-4 coated onion rings into the hot oil. Do not overcrowd the pot! Frying in small batches is essential. Overcrowding will lower the oil temperature significantly, resulting in greasy rings and uneven cooking. Give each ring enough space to fry properly and evenly.
- Fry the onion rings for 2-4 minutes, or until they are beautifully golden brown and incredibly crispy. Use tongs to gently turn them over halfway through frying to ensure even browning on both sides. You’ll see the cheesy batter puff up and the Panko turn a glorious golden hue. The aroma at this stage is absolutely heavenly!
- Once cooked to perfection, carefully remove the Cheesy Onion Rings from the oil using a slotted spoon or spider tool. Hold them over the pot for a moment to allow any excess oil to drip off.
- Immediately transfer the fried rings to a wire rack set over a baking sheet lined with paper towels. The wire rack allows air to circulate all around the rings, helping to keep them crispy. The paper towels will absorb any remaining excess oil.
- This is a critical step for maximum flavor: while the onion rings are still piping hot from the fryer, generously sprinkle them with flaky sea salt. The heat helps the salt adhere and truly brings out all the incredible flavors.
- Repeat the frying process with the remaining onion rings, making sure to let the oil come back up to 350°F (175°C) between batches. This might take a minute or two, so be patient.
Serving Your Delicious Cheesy Onion Rings
Congratulations! You’ve successfully made a batch of the most amazing, crispy, and truly Cheesy Onion Rings. Now it’s time to enjoy the fruits of your labor.
- Serve your freshly fried Cheesy Onion Rings immediately. They are best enjoyed hot and fresh, when the cheese in the batter is still wonderfully gooey and the exterior is at its crispiest peak.
- For an extra touch of freshness and visual appeal, sprinkle with some freshly chopped parsley or chives just before serving. This adds a lovely herbaceous note that cuts through the richness beautifully.
- While these Cheesy Onion Rings are absolutely fantastic on their own, they also make an incredible side dish to burgers, sandwiches, or even as a standalone appetizer with your favorite dipping sauces. Though, I find their inherent cheesiness often makes additional sauces unnecessary. Just pure, unadulterated cheesy, crispy perfection!
- Don’t hesitate to share! While it might be tempting to hoard them all, these are definitely a crowd-pleaser. Enjoy every crunchy, cheesy bite!
Conclusion:
So, we’ve come to the end of our journey through this delightful recipe, but the real adventure is just beginning in your kitchen! I truly believe that these aren’t just any ordinary snack; they are a revelation waiting to happen. Imagine sinking your teeth into that perfect golden-brown crust, the satisfying crunch giving way to the tender, sweet onion within, all perfectly cradling a heart of molten, savory cheese. It’s an experience that truly transcends the typical fried side dish. We’re talking about an upgrade, a culinary elevation that will make you rethink everything you thought you knew about finger foods.
This recipe isn’t just about frying a few rings; it’s about crafting a moment of pure, unadulterated comfort food bliss. It’s the kind of snack that disappears from the plate almost as quickly as it appears, prompting eager requests for “just one more!” from everyone lucky enough to try them. The combination of textures and flavors – the crisp exterior, the soft interior, the sharp, yet creamy cheese – creates a symphony for your taste buds that is truly unforgettable. I promise you, making these homemade Cheesy Onion Rings will be a decision you won’t regret. They offer a unique twist on a beloved classic, delivering a depth of flavor and a level of satisfaction that store-bought versions simply can’t match. It’s the ultimate combination of savory, sweet, and crispy, a snack that delights on every level and will undoubtedly become a new favorite in your repertoire.
Now, let’s talk about how to best enjoy these golden beauties. While they are utterly fantastic on their own, perhaps with just a sprinkle of sea salt and a squeeze of fresh lime, they truly shine when paired with the right accompaniments. For dipping, think beyond the classic ketchup, though there’s certainly nothing wrong with that! A homemade spicy Sriracha aioli, a cool and creamy ranch dressing, a tangy honey mustard, or even a sweet and smoky BBQ sauce can elevate the experience. Imagine dunking a warm, gooey ring into a vibrant green avocado crema – pure perfection! These aren’t just solo acts; they make incredible supporting players. Serve them alongside your favorite gourmet burgers, piled high next to juicy grilled chicken sandwiches, or as the star attraction on a party platter. For your next game day gathering, these will undoubtedly be the MVP, stealing the show from any other appetizer. Consider them the perfect accompaniment to a casual weekend lunch or a fun movie night treat.
As for variations, the world is your oyster! Don’t be afraid to experiment with different cheeses. A sharp cheddar will give you a bolder, more piquant flavor, while a smoked Gouda can add an incredible depth and a hint of campfire warmth. If you’re feeling adventurous, try adding a pinch of smoked paprika or a dash of cayenne pepper to your flour dredge for a subtle kick. Or, for an even richer experience, incorporate some finely chopped chives or fresh parsley into the cheese mixture before placing it between the onion layers. You could even try baking or air-frying a batch for a slightly lighter (but still incredibly delicious) take, though I personally adore the undeniable crunch and golden perfection of a perfectly fried Cheesy Onion Ring. Think about making mini versions for elegant canapés at your next gathering, or super-sized rings for an impressive individual snack that truly stands out. The possibilities are endless, and each variation allows you to tailor this amazing recipe to your specific tastes and preferences.
So, my friend, the ball is now in your court. I have poured my heart into sharing this incredible recipe with you, and now it’s your turn to bring it to life in your own kitchen. Don’t let the thought of frying intimidate you; with a little care and attention, you’ll be amazed at the professional-quality results you can achieve. I genuinely believe that once you’ve made these irresistible Cheesy Onion Rings, you’ll wonder how you ever settled for plain onion rings again. This recipe is a journey from simple ingredients to extraordinary flavor, and I can’t wait for you to embark on it. When you do try this out – and I sincerely hope you will – please come back and tell me all about it! Did you discover a new favorite dipping sauce? Did you try a unique cheese variation that knocked your socks off? Did your family or friends rave about them? I absolutely love hearing your success stories and seeing your culinary creations. Share your photos, your triumphs, and even your learning moments in the comments below. Let’s build a community of enthusiastic home cooks who aren’t afraid to elevate their snack game. Go on, grab those onions and cheese, and get ready to create something truly spectacular. You’ve got this!
Cheesy Onion Rings Recipe: Crispy, Gooey & Deliciously Simple!
Crispy onion rings with mozzarella cheese stuffed inside, coated in a light batter and Panko breadcrumbs, then fried until golden brown. These indulgent onion rings are a culinary innovation that takes comfort food to an entirely new level, perfect for snack time, game day, or as the ultimate indulgent side dish.
Ingredients
-
3 large sweet yellow onions
-
1 block (approx. 8 oz / 226g) low-moisture mozzarella cheese
-
1/2 cup all-purpose flour (for initial dredge)
-
1 1/2 cups all-purpose flour (for batter)
-
1/2 cup cornstarch
-
1 tsp baking powder
-
1 tsp salt (for batter)
-
1/2 tsp black pepper (for batter)
-
1/2 tsp garlic powder
-
1/4 tsp cayenne pepper (optional)
-
1 1/2 cups cold sparkling water
-
1 large egg
-
2 cups Panko breadcrumbs
-
1 tsp smoked paprika
-
1/2 tsp onion powder
-
1/4 tsp salt (for breading)
-
1/4 tsp black pepper (for breading)
-
6-8 cups vegetable, canola, or peanut oil (for frying)
-
Flaky sea salt (for serving)
-
Freshly chopped parsley or chives (optional, for garnish)
-
Toothpicks
Instructions
-
Step 1
Peel and slice 3 large onions into 1/2-inch thick rounds. Gently separate them into individual rings. Soak rings in ice-cold water for 30-60 minutes to mellow flavor and firm fibers. Drain thoroughly and pat completely dry with paper towels. Place 1/2 cup all-purpose flour in a shallow dish for initial dredging. -
Step 2
For each ring, select a larger outer onion ring and a slightly smaller inner ring. Slice mozzarella cheese into pieces that fit snugly in the space between the two rings when the smaller is placed inside the larger. Place the cheese between the two onion pieces and secure them together with a toothpick. Repeat for all desired rings. -
Step 3
In a large bowl, whisk together 1 1/2 cups all-purpose flour, 1/2 cup cornstarch, 1 tsp baking powder, 1 tsp salt, 1/2 tsp black pepper, 1/2 tsp garlic powder, and the optional 1/4 tsp cayenne pepper. In a separate medium bowl, whisk 1 1/2 cups cold sparkling water and 1 large egg until combined. Gradually pour the wet ingredients into the dry, whisking gently until just combined (a few small lumps are acceptable). Let the batter rest at room temperature for 10-15 minutes. -
Step 4
In another shallow dish or wide bowl, combine 2 cups Panko breadcrumbs, 1 tsp smoked paprika, 1/2 tsp onion powder, 1/4 tsp salt, and 1/4 tsp black pepper. Mix thoroughly with your hands or a fork to ensure even distribution. -
Step 5
Set up an assembly line: dried stuffed onion rings, then the initial flour dredge, then the prepared batter, and finally the Panko breading. Take a stuffed onion ring, dredge it lightly in the 1/2 cup all-purpose flour, shaking off excess. Fully submerge it in the batter, letting excess drip off. Immediately transfer to the Panko breading, pressing firmly to coat all sides completely. -
Step 6
Carefully transfer the fully coated onion rings to a wire rack set over a baking sheet. Place the baking sheet in the freezer for 15-20 minutes. This chilling step helps the coating set firmly and ensures a super crispy exterior during frying. -
Step 7
Pour 6-8 cups vegetable, canola, or peanut oil into a large, heavy-bottomed pot or Dutch oven, ensuring sufficient depth. Heat the oil over medium-high heat to 350°F (175°C) using a thermometer. Carefully place 3-4 coated onion rings into the hot oil, ensuring not to overcrowd the pot. Fry for 2-4 minutes, or until golden brown and crispy, turning halfway through to ensure even browning. You’ll see the batter puff up and the Panko turn glorious golden. -
Step 8
Once cooked, remove the cheesy onion rings from the oil using a slotted spoon or spider tool, allowing excess oil to drip off. Immediately transfer to a wire rack set over a baking sheet lined with paper towels. While still hot, generously sprinkle with flaky sea salt. Repeat the frying process with the remaining onion rings, ensuring the oil returns to 350°F (175°C) between batches. -
Step 9
Serve your freshly fried Cheesy Onion Rings immediately for the best crispy and gooey experience. Garnish with freshly chopped parsley or chives for an extra touch of freshness and visual appeal. Remember to remove toothpicks before serving. Enjoy every crunchy, cheesy bite!
Important Information
Nutrition Facts (Per Serving)
It is important to consider this information as approximate and not to use it as definitive health advice.
Allergy Information
Please check ingredients for potential allergens and consult a health professional if in doubt.

Leave a Comment