

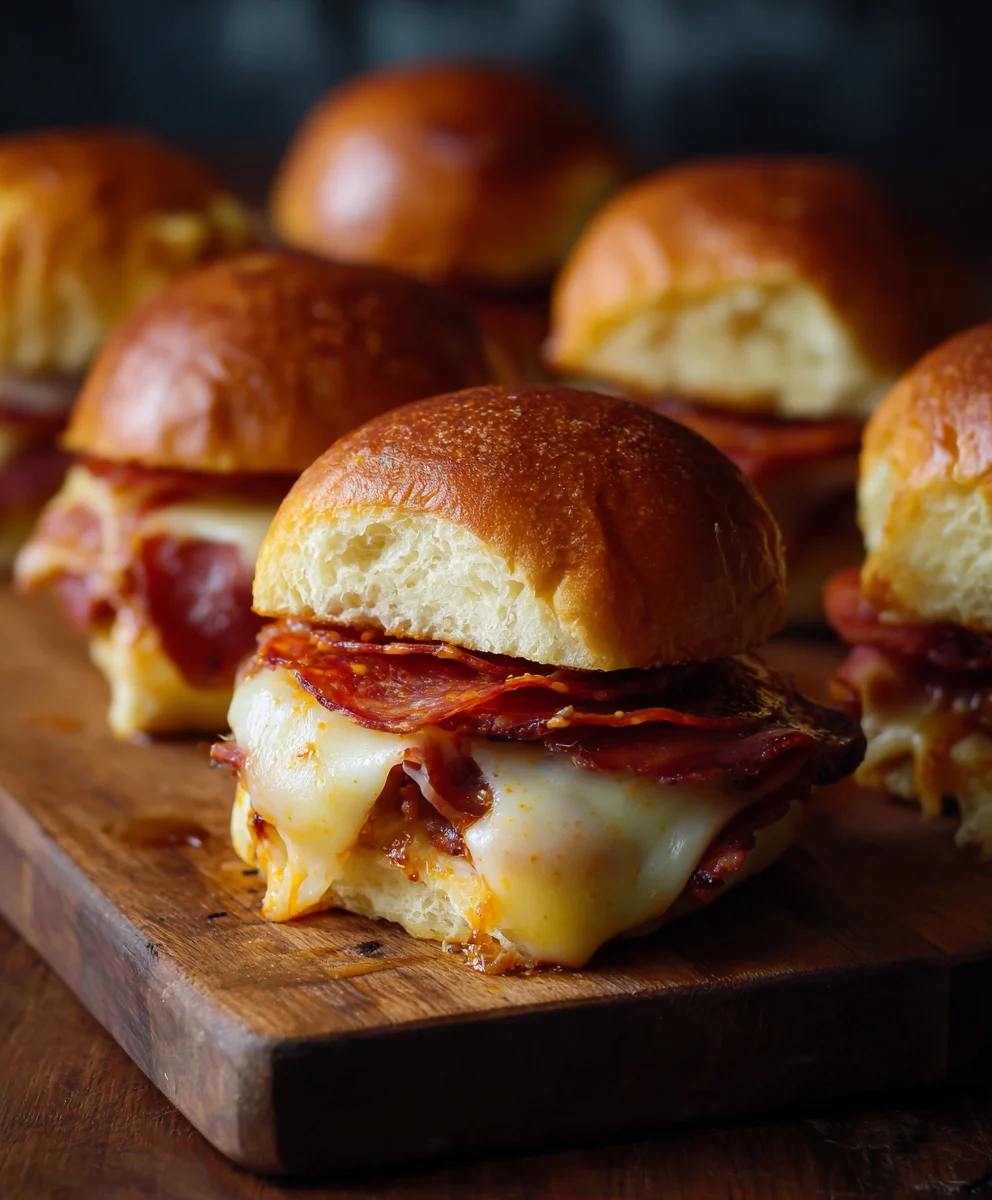
Beef Pepperoni Pizza Sliders – the mere mention of these delightful bites is enough to get taste buds tingling! I’ve always been fascinated by how classic comfort foods evolve, and these sliders are a brilliant example of culinary ingenuity. While the concept of ‘sliders’ traditionally refers to miniature hamburgers, the trend of transforming beloved dishes like pizza into a convenient, shareable, pull-apart format has truly captured our collective imagination. There’s something irresistibly charming about taking the universally adored flavors of a rich, savory beef pepperoni pizza and re-imagining them in such an accessible, handheld form.
I find myself constantly returning to this recipe, not just for its incredibly satisfying taste—that perfect blend of gooey melted cheese, zesty pepperoni, and tender seasoned beef, all nestled in soft, buttery rolls—but also for its sheer convenience. These versatile sliders are the ultimate party appetizer, game-day snack, or even a fun, easy weeknight dinner. They promise smiles all around and are incredibly simple to prepare, making them a fantastic option for any occasion. Get ready to discover why these Beef Pepperoni Pizza Sliders are destined to become a new, much-loved staple in your culinary repertoire.

Ingredients:
- 24 King’s Hawaiian Sweet Rolls (or similar soft slider buns) – often comes in two packs of 12
- 1.5 lbs (about 680g) lean ground beef (85/15 or 90/10 recommended for less grease)
- 1 cup (240ml) your favorite pizza sauce or marinara sauce
- 1 cup (about 120g) mini pepperoni slices, or regular pepperoni cut into quarters
- 3 cups (about 300g) shredded mozzarella cheese, divided
- 1 cup (about 100g) shredded provolone cheese, or an Italian blend (optional, but highly recommended for flavor depth)
- 1/2 cup (113g) unsalted butter, melted
- 2 cloves garlic, minced very finely, or 1 teaspoon garlic powder
- 1 teaspoon Italian seasoning blend
- 1/2 teaspoon onion powder (optional, but adds a lovely savory note)
- 1/4 teaspoon red pepper flakes (optional, for a touch of heat)
- 2 tablespoons fresh parsley, chopped (for garnish)
Preparation Phase: Crafting the Irresistible Filling for Your Beef Pepperoni Pizza Sliders
Welcome to the first exciting step in creating your incredible Beef Pepperoni Pizza Sliders! This phase is all about building the flavorful foundation that will make these sliders truly unforgettable. We’re going to start with our ground beef and then lovingly combine it with all the classic pizza elements.
-
Preheat Your Oven and Prepare Your Baking Dish: Before we dive into cooking, let’s get our oven ready. Preheat your oven to 375°F (190°C). This ensures a consistent temperature for even baking later on. While the oven is heating, grab a large 9×13 inch (23×33 cm) baking dish. You won’t need to grease it because the sliders themselves will contain enough moisture and fat to prevent sticking, but it’s good to have it at the ready. A glass or ceramic dish works wonderfully here, as it retains heat nicely.
-
Brown the Ground Beef to Perfection: Place your lean ground beef into a large skillet or a Dutch oven over medium-high heat. Using a sturdy wooden spoon or a meat chopper, break the beef apart into small, crumbles. We’re aiming for even browning across all the meat, which develops a richer flavor. Cook the beef for about 7-10 minutes, stirring occasionally, until it’s completely browned and no pink remains. It’s crucial at this stage to ensure the beef is cooked through for both safety and optimal texture in your Beef Pepperoni Pizza Sliders.
-
Drain Excess Fat: Once the ground beef is fully cooked, carefully tilt the skillet and drain off any excess grease. Lean ground beef minimizes this step, but even a little bit can make the sliders greasy if not removed. You can use a slotted spoon to transfer the beef to a plate lined with paper towels for a quick blot, or simply pour the grease into a heat-safe container for disposal (never down the sink!). Returning the beef to the skillet after draining will ensure we incorporate our sauces properly.
-
Simmer with Pizza Sauce: Reduce the heat to medium-low. Pour your favorite pizza sauce or marinara sauce over the drained ground beef in the skillet. Stir well to combine, making sure every bit of beef is coated in that delicious tomatoey goodness. Let this mixture simmer gently for about 5-7 minutes, allowing the flavors to meld and the sauce to thicken slightly. This step is important because it deepens the flavor of the beef and sauce, preventing your sliders from being bland or overly wet. During this simmer, the aroma filling your kitchen will be absolutely delightful, setting the stage for the amazing Beef Pepperoni Pizza Sliders to come!
-
Introduce the Pepperoni and Some Cheese: Remove the skillet from the heat. Now, stir in your mini pepperoni slices (or quartered regular pepperoni). Along with the pepperoni, add about 1 cup of the shredded mozzarella cheese and all of the shredded provolone cheese (if using). Stir everything together until the cheeses are just barely starting to melt and combine with the warm beef and sauce mixture. We don’t want them fully melted yet, just integrated. This creates a wonderfully cheesy, meaty, and slightly spicy filling that is truly the heart of these amazing Beef Pepperoni Pizza Sliders.
-
Prepare the Slider Buns: While your filling is just slightly cooling, take your King’s Hawaiian Sweet Rolls. These are perfect because they come connected, which makes assembly much easier. Using a large serrated knife, carefully slice the entire slab of rolls horizontally through the middle, separating the tops from the bottoms, but keeping all the individual rolls connected. Place the bottom half of the rolls into your prepared 9×13 inch baking dish. Try to keep them as intact as possible; a gentle hand will help ensure they stay connected, forming a perfect base for our Beef Pepperoni Pizza Sliders.
Assembly Phase: Layering Perfection for Your Beef Pepperoni Pizza Sliders
Now that our savory beef and pepperoni filling is ready and our buns are perfectly sliced, it’s time to bring everything together. This is where your Beef Pepperoni Pizza Sliders really start to take shape!
-
Spread the Beef Filling Evenly: Spoon the warm beef and pepperoni mixture over the bottom half of the slider buns in the baking dish. Use the back of your spoon or a spatula to spread the filling out evenly from edge to edge. You want a generous layer on every single roll, ensuring that each slider gets a hearty helping of our delicious, cheesy beef mixture. Don’t be shy; a thick layer here guarantees maximum flavor in every bite of your Beef Pepperoni Pizza Sliders.
-
Top with More Cheese: Sprinkle the remaining 2 cups of shredded mozzarella cheese generously over the beef filling. This layer of cheese will melt into a gooey, irresistible blanket, sealing in the flavors and adding that essential pizza pull. Make sure to distribute it evenly, covering as much of the beef mixture as possible. The more cheese, the better the experience for these fantastic sliders!
-
Place the Top Buns: Carefully place the top half of the slider rolls back over the cheese layer. Gently press down on them to ensure they make good contact with the filling below. This gentle press helps to compact the layers slightly, making the sliders easier to handle once baked and giving them that classic, neat slider appearance. Take your time with this step to keep the buns from tearing.
-
Prepare the Garlic Butter Topping: In a small, microwave-safe bowl, melt the 1/2 cup of unsalted butter. This should only take about 30-45 seconds in the microwave. Once melted, add the minced garlic (or garlic powder), Italian seasoning, optional onion powder, and optional red pepper flakes to the butter. Stir everything together until well combined. This aromatic butter mixture is what will give the tops of your Beef Pepperoni Pizza Sliders their golden-brown color, incredible flavor, and irresistible aroma.
-
Brush the Butter Topping: Using a pastry brush, generously brush the garlic butter mixture all over the tops of the slider buns. Make sure to coat every roll thoroughly, including the crevices between them. The butter will seep down slightly, adding moisture and flavor throughout. Don’t be afraid to use all of it; this butter topping is key to the overall deliciousness and helps to create that perfectly crispy-on-the-outside, soft-on-the-inside texture that makes these Beef Pepperoni Pizza Sliders so delightful.
Baking Phase: Achieving Golden Perfection for Your Beef Pepperoni Pizza Sliders
The moment of truth is approaching! We’ve meticulously layered our ingredients and coated our sliders with a fragrant garlic butter. Now, it’s time to bake these beauties to golden-brown, cheesy perfection. Get ready for your kitchen to smell absolutely divine!
-
Cover and Bake Initially: Tightly cover the baking dish with aluminum foil. This is a critical step for the initial baking phase. The foil traps steam, which helps the buns stay soft and allows the cheese to melt beautifully without the tops browning too quickly. Place the covered dish into your preheated 375°F (190°C) oven. Bake for 15 minutes. During this time, the internal temperature of the sliders will rise, the cheese will become wonderfully gooey, and the flavors will continue to meld together.
-
Uncover and Continue Baking: After 15 minutes, carefully remove the foil from the baking dish. Be cautious of the steam that will escape! Return the uncovered dish to the oven. Continue baking for an additional 10-15 minutes, or until the tops of the rolls are beautifully golden brown and the cheese is bubbly and slightly caramelized at the edges. Keep a close eye on them during this phase, as ovens can vary, and you want that perfect golden hue without burning. This final bake without the foil is what gives your Beef Pepperoni Pizza Sliders that desirable crispy top and perfectly melted cheese pull.
-
Check for Doneness and Desired Texture: You’ll know your Beef Pepperoni Pizza Sliders are ready when the cheese is fully melted and bubbling, and the buns have achieved a lovely golden-brown crust on top. The edges of the cheese might even start to turn a light, appealing amber color. If you prefer a darker, crispier top, you can bake for an extra minute or two, but always watch closely to prevent burning. The scent wafting from your oven will be an irresistible indicator that they are almost ready to be devoured.
Finishing Touches and Serving Your Beef Pepperoni Pizza Sliders
Congratulations! Your kitchen is now filled with the intoxicating aroma of freshly baked Beef Pepperoni Pizza Sliders. We’re in the home stretch, just a few final steps before you can enjoy your culinary masterpiece.
-
Allow to Rest: Once you pull the baking dish out of the oven, don’t cut into them immediately! It’s important to let the sliders rest in the dish for about 5-10 minutes. This resting period allows the cheese to set slightly, making the sliders easier to cut and preventing all the delicious filling from oozing out excessively. It also allows the internal heat to redistribute, ensuring every bite is perfectly warm and flavorful. Think of it as allowing the flavors to truly settle and become one cohesive, delicious unit.
-
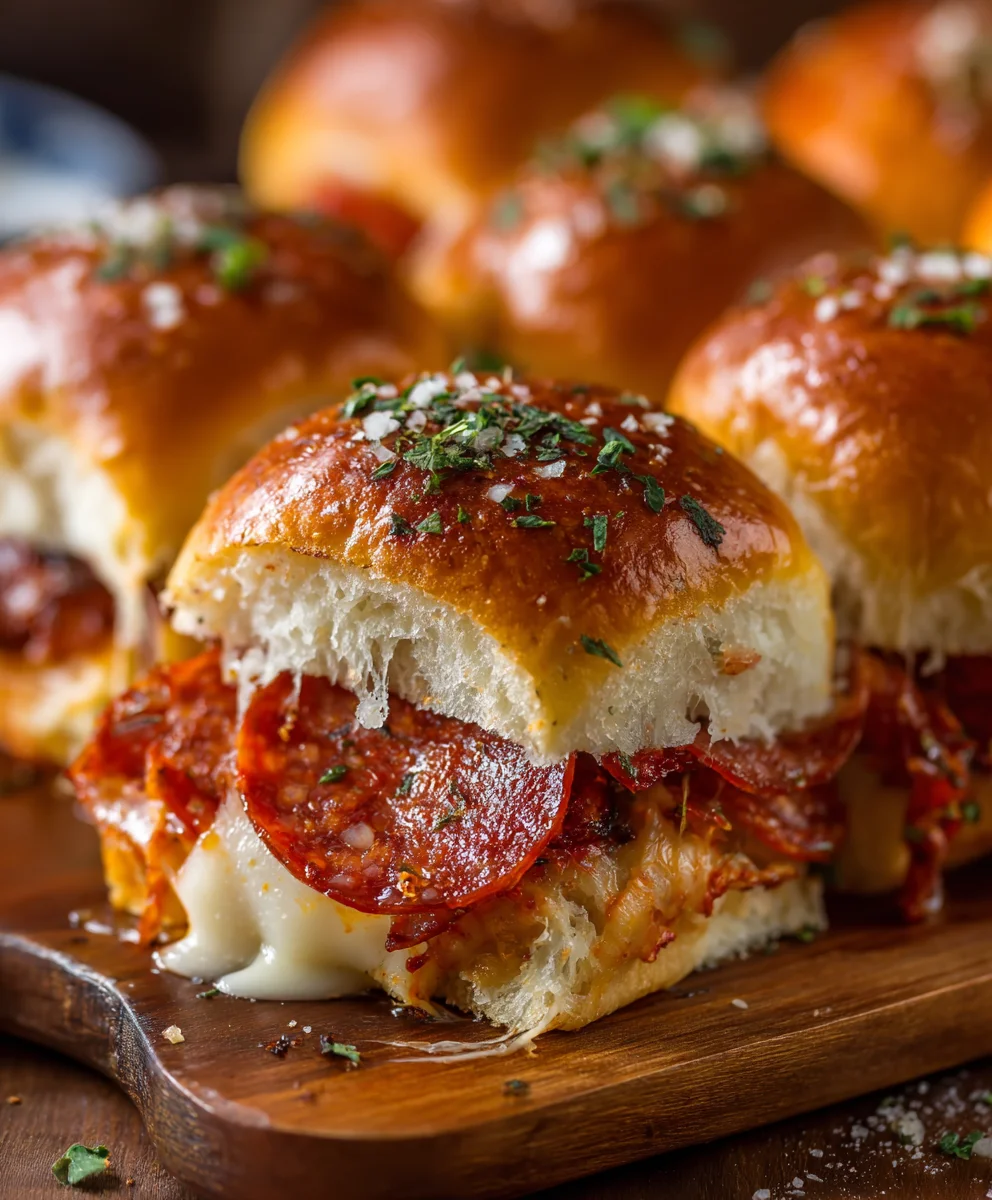
Garnish with Fresh Parsley: While the sliders are resting, sprinkle the fresh chopped parsley over the tops. Not only does this add a beautiful pop of color, making your Beef Pepperoni Pizza Sliders visually appealing, but the fresh herbs also provide a lovely, bright contrast to the rich and savory flavors. It’s a small touch that makes a big difference in presentation and taste.
-
Slice and Serve: Now for the best part! Using that same serrated knife, carefully cut the slab of sliders along the lines of the individual rolls. This is usually pretty easy since the King’s Hawaiian rolls are designed with these divisions. You might need to make one or two cuts lengthwise and then several crosswise cuts to separate them into individual portions. Transfer the individual Beef Pepperoni Pizza Sliders to a serving platter. Serve them immediately while they are warm and the cheese is still wonderfully gooey and stretchy!
-
Enjoy Your Delicious Creation: These sliders are fantastic on their own, but you can also offer extra pizza sauce or marinara on the side for dipping, for those who love an extra saucy experience. They make a perfect appetizer for game day, a fun party snack, or a delightful casual dinner. Your effort in creating these detailed Beef Pepperoni Pizza Sliders will be rewarded with smiles and satisfied appetites. Enjoy every savory, cheesy, beefy bite!
Conclusion:
So, there you have it! We’ve journeyed through the simple yet profoundly satisfying creation of what I truly believe will become a staple in your recipe repertoire. These aren’t just any sliders; they are a miniature explosion of flavor, a perfect marriage of savory beef, zesty pepperoni, and gooey melted cheese, all nestled within soft, golden-brown buns. The Beef Pepperoni Pizza Sliders are, without a doubt, a culinary revelation that you simply must experience. They embody everything you want in a comfort food – ease of preparation, incredible taste, and the ability to bring a smile to anyone’s face, young or old.
What makes this recipe a must-try isn’t just the delightful combination of ingredients, but the sheer effortlessness involved. In a world where time often feels like a luxury, this recipe offers maximum flavor with minimal fuss. It’s perfect for those busy weeknights when you crave something substantial and delicious but don’t want to spend hours slaving over a hot stove. Imagine whipping these up for a spontaneous game night, a relaxed family dinner, or as the star appetizer at your next gathering. They are designed to be a crowd-pleaser, disappearing from the platter almost as quickly as you can make them, proving that sometimes the simplest ideas yield the most impactful results.
Serving Suggestions & Creative Variations:
While these sliders are absolutely fantastic on their own, a few additions can elevate the experience even further. For dipping, a warm bowl of your favorite marinara or pizza sauce is a classic choice, adding another layer of tomatoey goodness. For a more balanced meal, consider serving them alongside a crisp green salad with a light vinaigrette – the fresh greens will provide a lovely counterpoint to the rich, cheesy sliders. And for the ultimate comfort food experience, a side of crispy potato chips or golden french fries can never go wrong!
But don’t stop there! The beauty of sliders lies in their adaptability. Feel free to unleash your inner chef and experiment with different variations. Swap out the provolone for sharp cheddar, creamy mozzarella, or even a smoked gouda for a unique twist. Want to sneak in some veggies? Sautéed onions, bell peppers, or mushrooms can be folded in with the beef mixture before baking. For a spicy kick, a sprinkle of red pepper flakes or thinly sliced jalapeños will do the trick. If you’re feeling adventurous, try adding a layer of cooked crumbled sausage, diced ham, or even shredded chicken to change up the protein profile. And for those who love a Hawaiian pizza vibe, a touch of crushed pineapple and crispy bacon bits could transform these into something truly unexpected and delightful. The garlic butter topping is also ripe for customization; a pinch of dried oregano or basil, or even some grated Parmesan cheese, can add extra aromatic depth.
I genuinely encourage each and every one of you to give these Beef Pepperoni Pizza Sliders a try. They are more than just a recipe; they are an invitation to create delicious memories. Gather your ingredients, follow the steps, and prepare to be amazed by how much flavor can come from such a straightforward dish. Once you’ve experienced the joy of pulling apart those perfectly cheesy, savory buns, I’d absolutely love to hear about it! Please don’t hesitate to share your experiences, your creative variations, or even just a photo of your magnificent sliders with me and our community. Your feedback and culinary adventures inspire us all. Happy cooking, and prepare for a new favorite!
Frequently Asked Questions (FAQs)
Q: Can I prepare these Beef Pepperoni Pizza Sliders ahead of time?
A: Absolutely! You can assemble the sliders completely, including adding the garlic butter topping, and then cover them tightly with plastic wrap. Store them in the refrigerator for up to 12-24 hours before baking. When you’re ready to bake, remove them from the fridge about 30 minutes prior to baking to allow them to come closer to room temperature, then bake as directed. This makes them perfect for parties or busy evenings!
Q: What kind of buns are best for sliders?
A: Hawaiian sweet rolls are a fantastic choice because of their slight sweetness and soft, fluffy texture, which beautifully complements the savory fillings. However, any soft dinner rolls or even mini brioche buns will work wonderfully. Look for buns that are still connected in a sheet, as this makes assembly much easier.
Q: Can I freeze leftover Beef Pepperoni Pizza Sliders?
A: While fresh is always best, you can definitely freeze baked and cooled sliders. Wrap individual sliders or the whole sheet tightly in plastic wrap, then aluminum foil. They can be frozen for up to 1-2 months. To reheat, thaw overnight in the refrigerator, then warm in a preheated oven at 300°F (150°C) until heated through, or in a microwave for quicker reheating (though the buns might become slightly less crisp).
Q: How do I prevent the buns from getting soggy?
A: To minimize sogginess, especially if assembling ahead, ensure any wet ingredients (like onions or mushrooms) are well-sautéed and drained. Also, sometimes a light layer of cheese directly on the bottom bun before adding the meat can act as a barrier. The garlic butter should ideally go on the top buns and contribute to a golden, slightly crisp top, not a soggy bottom. Baking at the right temperature and not overfilling helps too.
Q: What are some other topping ideas for pizza sliders?
A: The possibilities are endless! Beyond beef and pepperoni, you could try crumbled cooked sausage, diced ham, shredded chicken, or even a vegetarian option with roasted vegetables. For cheeses, provolone, mozzarella, cheddar, or a blend work great. Other popular pizza toppings like black olives, sautéed mushrooms, bell peppers, finely diced onions, or even a sprinkle of oregano and basil can be added to your liking before baking. Don’t forget that a sprinkle of red pepper flakes can add a nice kick!
Cheesy Beef Pepperoni Pizza Sliders
These Beef Pepperoni Pizza Sliders transform beloved pizza flavors into a convenient, pull-apart, handheld format. Featuring gooey melted cheese, zesty beef pepperoni, and tender seasoned beef nestled in soft, buttery rolls, they are perfect for parties, game days, or an easy weeknight dinner.
Ingredients
-
24 King’s Hawaiian Sweet Rolls
-
1.5 lbs lean ground beef
-
1 cup pizza sauce or marinara sauce
-
1 cup mini beef pepperoni slices
-
3 cups shredded mozzarella cheese, divided
-
1 cup shredded provolone cheese or Italian blend
-
1/2 cup unsalted butter, melted
-
2 cloves garlic, minced
-
1 teaspoon Italian seasoning blend
-
1/2 teaspoon onion powder
-
1/4 teaspoon red pepper flakes
-
2 tablespoons fresh parsley, chopped
Instructions
-
Step 1
Preheat oven to 375°F (190°C). Brown ground beef in a large skillet over medium-high heat until no pink remains (7-10 minutes). Drain any excess fat. -
Step 2
Reduce heat to medium-low, stir in pizza sauce, and simmer for 5-7 minutes. Remove from heat. Stir in beef pepperoni, 1 cup mozzarella cheese, and all provolone cheese until just combined. -
Step 3
{‘@type’: ‘HowToStep’, ‘name’: ‘Prepare Buns and Assemble Sliders’, ‘text’: “Slice King’s Hawaiian rolls horizontally, keeping them connected. Place the bottom halves in a 9×13 inch baking dish. Spread the beef mixture evenly over the bottom rolls, then sprinkle with the remaining 2 cups mozzarella cheese. Place the top halves of the rolls over the cheese; gently press down.”} -
Step 4
Melt butter and mix with minced garlic, Italian seasoning, onion powder, and red pepper flakes. Brush this mixture generously over the top buns. -
Step 5
Cover the dish tightly with aluminum foil and bake for 15 minutes. Remove the foil and bake for another 10-15 minutes, or until the tops are golden brown and the cheese is bubbly. -
Step 6
Let the sliders rest in the dish for 5-10 minutes before garnishing with fresh chopped parsley. Slice into individual sliders and serve warm, optionally with extra pizza sauce for dipping.
Important Information
Nutrition Facts (Per Serving)
It is important to consider this information as approximate and not to use it as definitive health advice.
Allergy Information
Please check ingredients for potential allergens and consult a health professional if in doubt.


Leave a Comment