

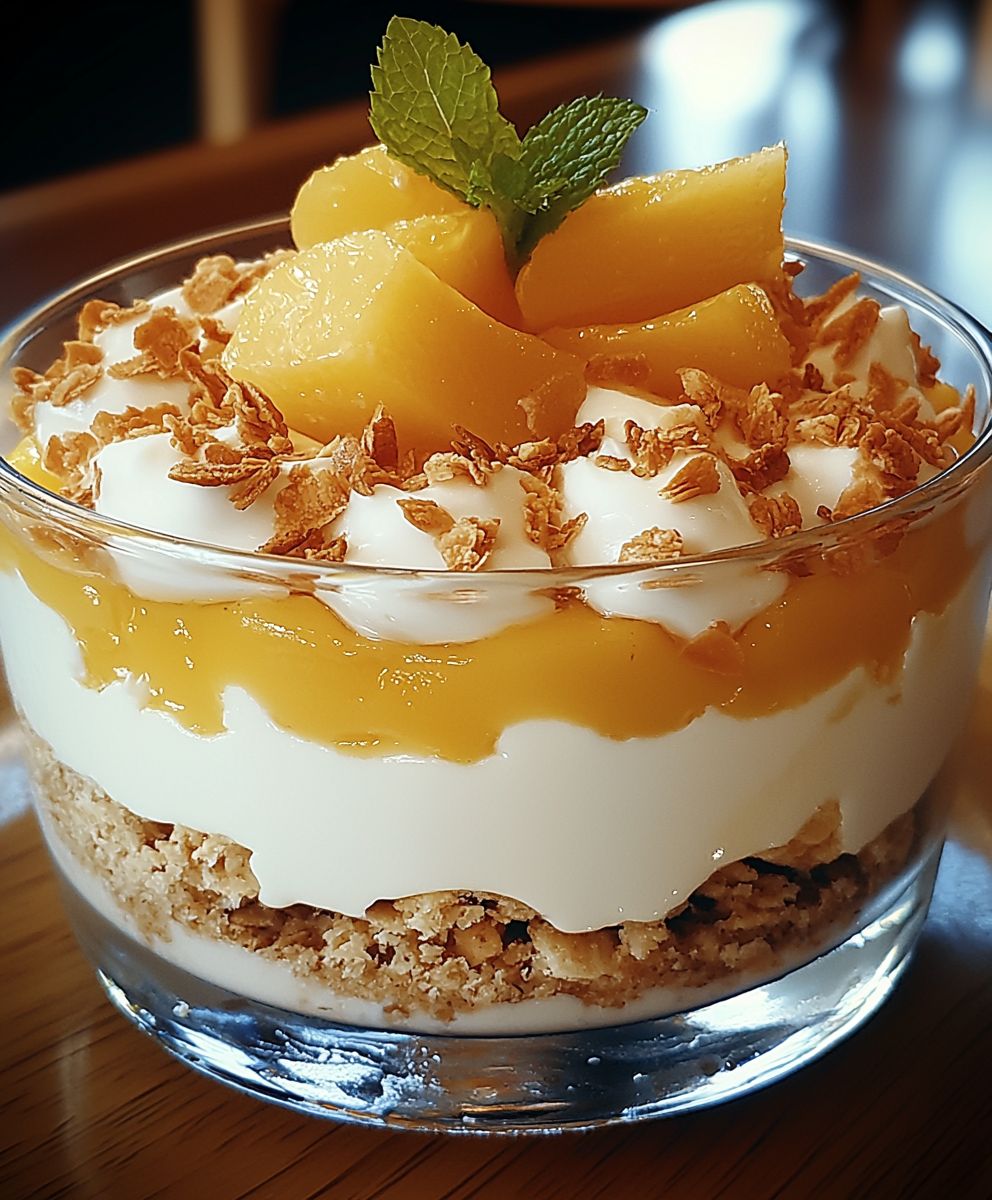
Cheese cream dessert, oh, where do I even begin? Imagine sinking your spoon into a cloud of creamy, tangy sweetness a dessert so decadent, yet surprisingly simple to make. This isn’t just any dessert; it’s an experience, a journey for your taste buds that will leave you craving more. I’m thrilled to share my take on this classic treat with you!
While variations of cheese cream dessert have graced tables for centuries, its modern form likely evolved from European cheesecakes and creamy puddings. Think of the rich history baked into every bite, a lineage of culinary artistry passed down through generations. It’s a dessert that transcends borders, finding a loving home in countless cultures, each adding its unique twist.
But what makes this dessert so universally adored? It’s the perfect balance of flavors and textures. The tangy cream cheese provides a delightful counterpoint to the sweetness, while the smooth, velvety texture melts in your mouth. And let’s be honest, who can resist a dessert that’s both incredibly delicious and relatively easy to prepare? Whether you’re looking for a show-stopping centerpiece for a dinner party or a comforting treat to enjoy on a quiet evening, this cheese cream dessert is guaranteed to be a crowd-pleaser. So, let’s get baking (or rather, chilling!) and create some magic in the kitchen!

Ingredients:
- For the Cream Cheese Base:
- 8 ounces cream cheese, softened to room temperature
- 1/2 cup (1 stick) unsalted butter, softened to room temperature
- 1 cup granulated sugar
- 1 teaspoon vanilla extract
- 1/4 teaspoon salt
- For the Whipped Cream Topping:
- 1 cup heavy cream, chilled
- 1/4 cup powdered sugar
- 1/2 teaspoon vanilla extract
- For the Graham Cracker Crust (Optional):
- 1 1/2 cups graham cracker crumbs (about 12 graham crackers)
- 5 tablespoons (2 1/2 ounces) unsalted butter, melted
- 1/4 cup granulated sugar
- For the Berry Compote (Optional):
- 2 cups mixed berries (strawberries, blueberries, raspberries, blackberries), fresh or frozen
- 1/4 cup granulated sugar
- 1 tablespoon lemon juice
- 1 tablespoon cornstarch (optional, for thickening)
- For Garnish (Optional):
- Fresh berries
- Mint leaves
- Chocolate shavings
Preparing the Graham Cracker Crust (Optional):
If you’re opting for a graham cracker crust, this is the first step. It adds a lovely textural contrast to the creamy dessert. If you prefer to skip the crust, feel free to move directly to preparing the cream cheese base.
- Combine the ingredients: In a medium bowl, combine the graham cracker crumbs, melted butter, and sugar. Mix well until all the crumbs are evenly moistened. The mixture should resemble wet sand.
- Press into the pan: Press the graham cracker mixture into the bottom of a 9-inch pie plate or a similar sized dish. Use the bottom of a measuring cup or your fingers to firmly and evenly press the crumbs. Make sure to press firmly to create a solid base.
- Bake (Optional): For a firmer crust, bake in a preheated oven at 350°F (175°C) for 8-10 minutes. This step is optional, but it helps the crust hold its shape better. If you choose not to bake, simply chill the crust in the refrigerator while you prepare the filling.
- Chill: Let the crust cool completely before adding the cream cheese filling. This will prevent the filling from melting the butter in the crust.
Preparing the Cream Cheese Base:
This is where the magic happens! The key to a smooth and creamy dessert is using softened cream cheese and butter. Don’t rush this step; it’s worth the wait.
- Cream the butter and cream cheese: In a large bowl, using an electric mixer (either a stand mixer or a hand mixer), beat the softened cream cheese and butter together until light and fluffy. This usually takes about 3-5 minutes. Make sure there are no lumps! Scrape down the sides of the bowl occasionally to ensure everything is evenly mixed.
- Add the sugar: Gradually add the granulated sugar, beating on medium speed until well combined. Again, scrape down the sides of the bowl to ensure all the sugar is incorporated.
- Add vanilla and salt: Stir in the vanilla extract and salt. Mix until just combined. Be careful not to overmix at this stage, as it can make the mixture too thin.
Preparing the Whipped Cream Topping:
A light and airy whipped cream topping is the perfect complement to the rich cream cheese base. Make sure your heavy cream is well-chilled for the best results.
- Chill your bowl and beaters: For the best whipped cream, chill your mixing bowl and beaters in the freezer for about 15-20 minutes before starting. This helps the cream whip up faster and hold its shape better.
- Whip the cream: Pour the chilled heavy cream into the chilled bowl. Using an electric mixer, beat on medium speed until soft peaks form. Soft peaks mean the cream holds its shape briefly but the tips curl over.
- Add powdered sugar and vanilla: Gradually add the powdered sugar and vanilla extract. Continue beating until stiff peaks form. Stiff peaks mean the cream holds its shape and the tips stand straight up. Be careful not to overwhip, as this can turn the cream into butter!
Assembling the Dessert:
Now for the fun part! This is where you bring all the components together to create your delicious cream cheese dessert.
- Pour the cream cheese filling: If you’re using a graham cracker crust, pour the cream cheese mixture into the prepared crust. If you’re not using a crust, you can pour the mixture into individual serving dishes or a larger serving bowl.
- Spread the whipped cream: Gently spread the whipped cream evenly over the cream cheese filling. You can use a spatula or a piping bag for a more decorative look.
- Chill: Cover the dessert with plastic wrap and chill in the refrigerator for at least 2-3 hours, or preferably overnight. This allows the flavors to meld together and the dessert to set properly.
Preparing the Berry Compote (Optional):
A homemade berry compote adds a burst of fresh, fruity flavor to this dessert. It’s easy to make and elevates the dish to another level.
- Combine berries and sugar: In a medium saucepan, combine the mixed berries and sugar.
- Cook over medium heat: Cook over medium heat, stirring occasionally, until the berries release their juices and the sugar dissolves. This usually takes about 5-7 minutes.
- Add lemon juice: Stir in the lemon juice.
- Thicken (Optional): If you want a thicker compote, whisk the cornstarch with a tablespoon of cold water to create a slurry. Add the slurry to the saucepan and cook for another minute or two, until the compote thickens.
- Cool: Remove from heat and let the compote cool completely before serving.
Serving and Garnishing:
The final touches! Add your favorite garnishes to make this dessert even more appealing.
- Spoon the berry compote (optional): Spoon the cooled berry compote over the whipped cream topping just before serving.
- Garnish: Garnish with fresh berries, mint leaves, and/or chocolate shavings.
- Serve: Serve chilled and enjoy!
Conclusion:
This cheese cream dessert is truly a revelation, and I wholeheartedly believe it deserves a spot in your regular dessert rotation. It’s the kind of recipe that seems far more complicated than it actually is, delivering a sophisticated flavor profile with minimal effort. The creamy, tangy filling, paired with the [mention crust or topping from the recipe if there was one, otherwise remove this part], creates a symphony of textures and tastes that will leave you wanting more. But more than just being delicious, it’s incredibly versatile, making it perfect for any occasion, from a casual weeknight treat to an elegant dinner party finale. Why is this a must-try? Because it’s the perfect balance of indulgence and simplicity. It’s a crowd-pleaser that requires no special equipment or advanced baking skills. It’s also a fantastic base recipe that you can easily adapt to your own preferences and dietary needs.Serving Suggestions and Variations
The possibilities are endless! For a classic presentation, serve chilled in individual ramekins, garnished with fresh berries and a dusting of powdered sugar. Or, for a more rustic approach, spoon it into a large serving bowl and let everyone help themselves. Looking for variations? Consider these ideas: * Citrus Burst: Add the zest of a lemon, lime, or orange to the cheese cream mixture for a bright, refreshing twist. * Chocolate Indulgence: Swirl in melted dark chocolate or sprinkle chocolate shavings on top for a decadent treat. * Coffee Kick: Incorporate a tablespoon of instant espresso powder into the cream for a coffee-flavored delight. * Berry Bliss: Fold in fresh raspberries, blueberries, or strawberries for a fruity explosion. * Spiced Delight: Add a pinch of cinnamon, nutmeg, or cardamom for a warm, comforting flavor. * Lower Sugar Option: Experiment with sugar substitutes like stevia or erythritol to reduce the sugar content without sacrificing taste. Just be sure to adjust the amount according to the product’s instructions. * Vegan Variation: While this recipe traditionally uses dairy, you can explore vegan cream cheese and coconut cream alternatives to create a plant-based version. The texture and flavor will be slightly different, but still incredibly delicious. Don’t be afraid to experiment and make this recipe your own! The beauty of this cheese cream dessert lies in its adaptability. I’m so excited for you to try this recipe and experience the magic for yourself. It’s a guaranteed winner that will impress your friends and family. Once you’ve made it, I’d love to hear about your experience! Did you try any of the variations I suggested? Did you come up with your own creative twist? Share your photos and comments below I can’t wait to see what you create! Happy baking (or rather, chilling!) and enjoy every creamy, delicious bite of this unforgettable dessert. I am confident that this will become a staple in your home. Print
Cheese Cream Dessert: The Ultimate Guide to Delicious Recipes
- Total Time: 210 minutes
- Yield: 8 servings 1x
Description
A luscious and creamy no-bake dessert with a smooth cream cheese base, light whipped cream topping, and optional graham cracker crust and berry compote. Perfect for any occasion!
Ingredients
- 8 ounces cream cheese, softened to room temperature
- 1/2 cup (1 stick) unsalted butter, softened to room temperature
- 1 cup granulated sugar
- 1 teaspoon vanilla extract
- 1/4 teaspoon salt
- 1 cup heavy cream, chilled
- 1/4 cup powdered sugar
- 1/2 teaspoon vanilla extract
- 1 1/2 cups graham cracker crumbs (about 12 graham crackers)
- 5 tablespoons (2 1/2 ounces) unsalted butter, melted
- 1/4 cup granulated sugar
- 2 cups mixed berries (strawberries, blueberries, raspberries, blackberries), fresh or frozen
- 1/4 cup granulated sugar
- 1 tablespoon lemon juice
- 1 tablespoon cornstarch (optional, for thickening)
- Fresh berries
- Mint leaves
- Chocolate shavings
Instructions
- In a medium bowl, combine the graham cracker crumbs, melted butter, and sugar. Mix well until all the crumbs are evenly moistened. The mixture should resemble wet sand.
- Press the graham cracker mixture into the bottom of a 9-inch pie plate or a similar sized dish. Use the bottom of a measuring cup or your fingers to firmly and evenly press the crumbs. Make sure to press firmly to create a solid base.
- For a firmer crust, bake in a preheated oven at 350°F (175°C) for 8-10 minutes. This step is optional, but it helps the crust hold its shape better. If you choose not to bake, simply chill the crust in the refrigerator while you prepare the filling.
- Let the crust cool completely before adding the cream cheese filling. This will prevent the filling from melting the butter in the crust.
- In a large bowl, using an electric mixer (either a stand mixer or a hand mixer), beat the softened cream cheese and butter together until light and fluffy. This usually takes about 3-5 minutes. Make sure there are no lumps! Scrape down the sides of the bowl occasionally to ensure everything is evenly mixed.
- Gradually add the granulated sugar, beating on medium speed until well combined. Again, scrape down the sides of the bowl to ensure all the sugar is incorporated.
- Stir in the vanilla extract and salt. Mix until just combined. Be careful not to overmix at this stage, as it can make the mixture too thin.
- For the best whipped cream, chill your mixing bowl and beaters in the freezer for about 15-20 minutes before starting. This helps the cream whip up faster and hold its shape better.
- Pour the chilled heavy cream into the chilled bowl. Using an electric mixer, beat on medium speed until soft peaks form. Soft peaks mean the cream holds its shape briefly but the tips curl over.
- Gradually add the powdered sugar and vanilla extract. Continue beating until stiff peaks form. Stiff peaks mean the cream holds its shape and the tips stand straight up. Be careful not to overwhip, as this can turn the cream into butter!
- If you’re using a graham cracker crust, pour the cream cheese mixture into the prepared crust. If you’re not using a crust, you can pour the mixture into individual serving dishes or a larger serving bowl.
- Gently spread the whipped cream evenly over the cream cheese filling. You can use a spatula or a piping bag for a more decorative look.
- Cover the dessert with plastic wrap and chill in the refrigerator for at least 2-3 hours, or preferably overnight. This allows the flavors to meld together and the dessert to set properly.
- In a medium saucepan, combine the mixed berries and sugar.
- Cook over medium heat, stirring occasionally, until the berries release their juices and the sugar dissolves. This usually takes about 5-7 minutes.
- Stir in the lemon juice.
- If you want a thicker compote, whisk the cornstarch with a tablespoon of cold water to create a slurry. Add the slurry to the saucepan and cook for another minute or two, until the compote thickens.
- Remove from heat and let the compote cool completely before serving.
- Spoon the cooled berry compote over the whipped cream topping just before serving.
- Garnish with fresh berries, mint leaves, and/or chocolate shavings.
- Serve chilled and enjoy!
Notes
- For the smoothest cream cheese base, ensure your cream cheese and butter are fully softened to room temperature.
- Chilling the bowl and beaters is crucial for achieving perfectly whipped cream.
- Don’t overwhip the whipped cream, or it will turn into butter.
- Chilling the assembled dessert for at least 2-3 hours (or overnight) is essential for the flavors to meld and the dessert to set properly.
- The berry compote can be made ahead of time and stored in the refrigerator.
- Prep Time: 30 minutes
- Cook Time: 10 minutes

Leave a Comment