

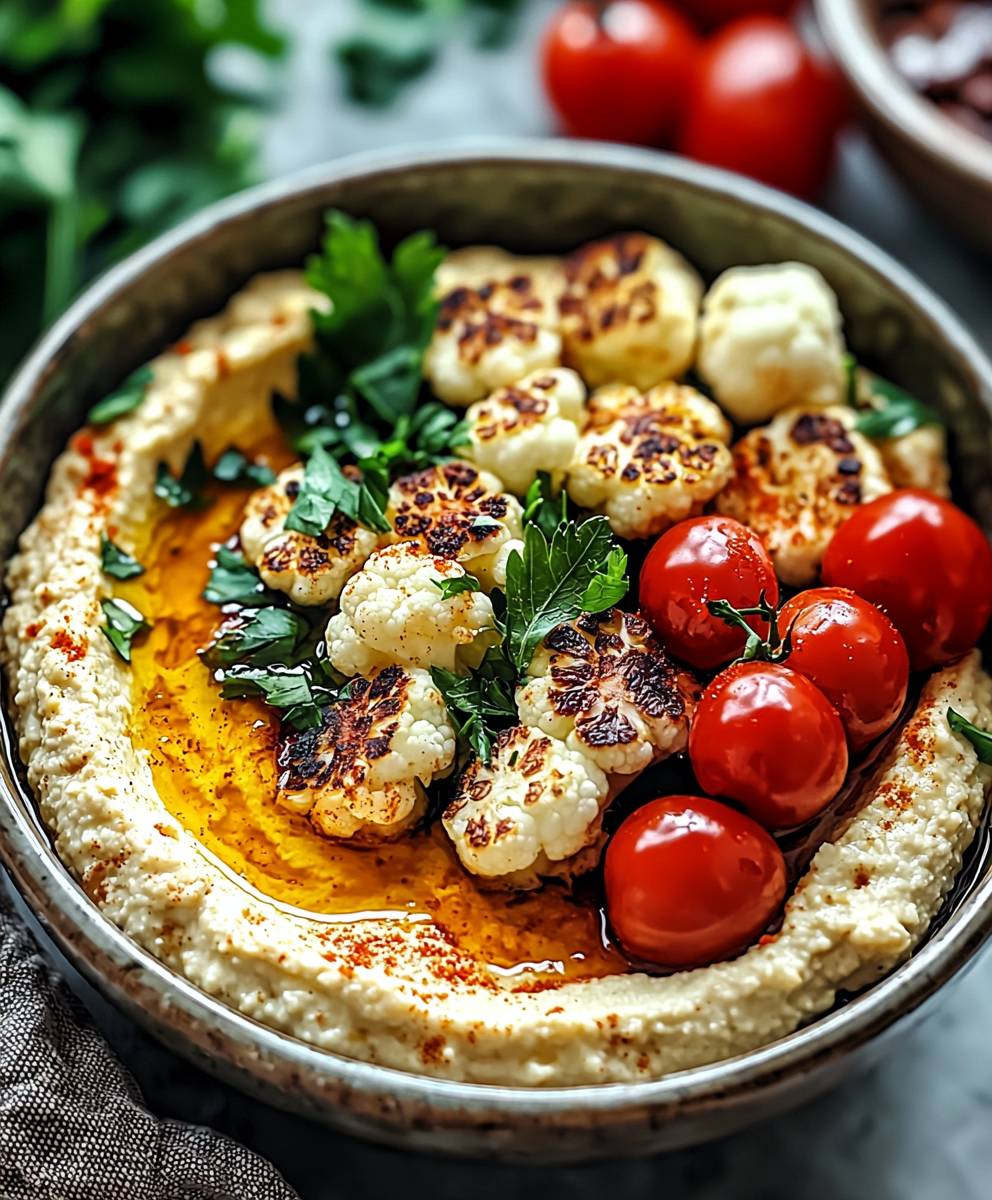
Cauliflower Hummus Bowls are about to revolutionize your lunch game! Forget everything you thought you knew about healthy eating because this vibrant and flavorful dish is proof that nutritious can be incredibly delicious. Imagine a bowl brimming with creamy, dreamy cauliflower hummus, topped with a rainbow of fresh vegetables, and finished with a sprinkle of toasted seeds for the perfect crunch. Sounds amazing, right?
Hummus, traditionally made with chickpeas, has ancient roots in the Middle East, with variations found across numerous cultures for centuries. This Cauliflower Hummus Bowls recipe offers a modern, lighter twist on the classic, perfect for those looking to reduce their legume intake or simply add more vegetables to their diet. The beauty of this dish lies in its versatility. You can customize it with your favorite toppings, making it a satisfying and endlessly adaptable meal.
People adore hummus for its smooth, creamy texture and its ability to pair well with just about anything. By swapping chickpeas for cauliflower, we create a lighter, lower-carb version that doesn’t sacrifice any of the flavor. The roasted cauliflower lends a subtle sweetness that complements the tahini, lemon juice, and garlic perfectly. Plus, these bowls are incredibly convenient to prepare. You can whip up a batch of cauliflower hummus on Sunday and enjoy delicious, healthy lunches all week long. Get ready to fall in love with this vibrant and nourishing dish!

Ingredients:
- For the Roasted Cauliflower:
- 1 large head of cauliflower, cut into florets
- 2 tablespoons olive oil
- 1 teaspoon smoked paprika
- 1/2 teaspoon garlic powder
- 1/4 teaspoon salt
- 1/4 teaspoon black pepper
- For the Hummus:
- 1 (15-ounce) can chickpeas, drained and rinsed
- 1/4 cup tahini
- 1/4 cup lemon juice, freshly squeezed
- 2 cloves garlic, minced
- 2 tablespoons olive oil
- 2-4 tablespoons ice water, to adjust consistency
- 1/2 teaspoon ground cumin
- 1/4 teaspoon salt, or to taste
- 1/4 teaspoon black pepper, or to taste
- For the Quinoa:
- 1 cup quinoa, rinsed
- 2 cups vegetable broth (or water)
- For the Toppings (get creative!):
- 1/2 cup cherry tomatoes, halved
- 1/2 cup cucumber, diced
- 1/4 cup red onion, thinly sliced
- 1/4 cup Kalamata olives, halved
- 1/4 cup crumbled feta cheese (optional)
- Fresh parsley, chopped, for garnish
- Drizzle of olive oil
- Sprinkle of paprika
- Pinch of red pepper flakes (optional, for heat)
- Lemon wedges, for serving
Roasting the Cauliflower:
Okay, let’s start with the star of the show the cauliflower! Roasting it brings out its natural sweetness and gives it a lovely caramelized flavor. Trust me, you won’t regret this step.
- Preheat your oven: Set your oven to 400°F (200°C). This high heat is key to getting that nice roasted texture.
- Prepare the cauliflower: Wash and dry your cauliflower head. Then, cut it into bite-sized florets. You want them to be roughly the same size so they cook evenly.
- Season the florets: In a large bowl, toss the cauliflower florets with olive oil, smoked paprika, garlic powder, salt, and pepper. Make sure every floret is coated evenly with the spices. This is where the magic happens! Don’t be shy with the smoked paprika it adds a wonderful depth of flavor.
- Roast the cauliflower: Spread the seasoned cauliflower florets in a single layer on a baking sheet. Avoid overcrowding the pan, as this will steam the cauliflower instead of roasting it. If necessary, use two baking sheets. Roast for 20-25 minutes, or until the cauliflower is tender and slightly browned, flipping halfway through for even cooking. Keep an eye on it you want it nicely browned, but not burnt.
- Rest and set aside: Once roasted, remove the cauliflower from the oven and let it cool slightly while you prepare the other components.
Making the Creamy Hummus:
Now, let’s whip up some homemade hummus! It’s so much better than store-bought, and you can customize it to your liking. This recipe is super simple and yields a perfectly smooth and creamy hummus.
- Prepare the ingredients: Drain and rinse your can of chickpeas really well. This helps to remove any excess starch and contributes to a smoother hummus. Mince your garlic cloves. Fresh garlic is a must for that authentic hummus flavor!
- Combine ingredients in a food processor: In a food processor, combine the drained and rinsed chickpeas, tahini, lemon juice, minced garlic, olive oil, cumin, salt, and pepper.
- Process until smooth: Process the mixture until it’s very smooth. This might take a few minutes, and you may need to scrape down the sides of the food processor occasionally.
- Adjust the consistency: While the food processor is running, slowly add ice water, one tablespoon at a time, until the hummus reaches your desired consistency. The ice water helps to create a light and fluffy texture. I usually add about 2-4 tablespoons, but it depends on the chickpeas and your personal preference.
- Taste and adjust seasonings: Taste the hummus and adjust the seasonings as needed. You might want to add more lemon juice for tanginess, more cumin for earthiness, or more salt and pepper to taste.
- Refrigerate (optional): For the best flavor, refrigerate the hummus for at least 30 minutes before serving. This allows the flavors to meld together. However, if you’re short on time, you can use it immediately.
Cooking the Quinoa:
Quinoa is a fantastic base for these bowls it’s packed with protein and fiber, and it has a lovely nutty flavor. Plus, it’s super easy to cook!
- Rinse the quinoa: Rinse the quinoa under cold water using a fine-mesh sieve. This helps to remove any bitterness.
- Combine quinoa and broth: In a medium saucepan, combine the rinsed quinoa and vegetable broth (or water). Using vegetable broth adds a little extra flavor, but water works just fine too.
- Bring to a boil, then simmer: Bring the mixture to a boil over medium-high heat. Once boiling, reduce the heat to low, cover the saucepan, and simmer for 15 minutes, or until all the liquid is absorbed and the quinoa is fluffy.
- Fluff with a fork: Remove the saucepan from the heat and let it stand, covered, for 5 minutes. Then, fluff the quinoa with a fork. This helps to separate the grains and prevent them from sticking together.
- Set aside: Set the cooked quinoa aside while you assemble the bowls.
Assembling the Cauliflower Hummus Bowls:
Now for the fun part putting everything together! This is where you can really get creative and customize your bowl to your liking. Don’t be afraid to experiment with different toppings and flavors.
- Prepare your toppings: While the cauliflower, hummus, and quinoa are being prepared, chop your toppings. Halve the cherry tomatoes, dice the cucumber, thinly slice the red onion, and halve the Kalamata olives. Chop some fresh parsley for garnish.
- Layer the ingredients: In a bowl, start with a base of cooked quinoa. Then, add a generous scoop of homemade hummus.
- Add the roasted cauliflower: Arrange the roasted cauliflower florets on top of the hummus.
- Pile on the toppings: Sprinkle the cherry tomatoes, cucumber, red onion, Kalamata olives, and feta cheese (if using) over the cauliflower.
- Garnish and serve: Garnish with chopped fresh parsley, a drizzle of olive oil, a sprinkle of paprika, and a pinch of red pepper flakes (if desired). Serve with lemon wedges on the side.
- Enjoy! Dig in and enjoy your delicious and healthy Cauliflower Hummus Bowl!
Tips and Variations:
- Spice it up: Add a pinch of cayenne pepper to the roasted cauliflower for a little extra heat.
- Add greens: Toss in some baby spinach or arugula for added nutrients and flavor.
- Use different grains: Substitute the quinoa with brown rice, couscous, or farro.
- Make it vegan: Omit the feta cheese to make this recipe vegan.
- Meal prep friendly: These bowls are perfect for meal prepping! Store the components separately in airtight containers in the refrigerator for up to 4 days. Assemble the bowls just before serving.
- Add protein: Add grilled chicken, chickpeas, or falafel for extra protein.
- Different vegetables: Try roasting other vegetables like broccoli, sweet potatoes, or bell peppers along with the cauliflower.
- Herb variations: Experiment with different herbs like dill, mint, or cilantro for garnish.
Conclusion:
This Cauliflower Hummus Bowl recipe isn’t just another healthy meal; it’s a vibrant, flavorful experience that will redefine your perception of what a satisfying and nutritious bowl can be. I truly believe this is a must-try recipe for anyone looking to incorporate more plant-based meals into their diet, or simply seeking a delicious and innovative way to enjoy cauliflower. The creamy, subtly sweet cauliflower hummus forms the perfect base, providing a blank canvas for a symphony of textures and tastes. From the crunch of the toasted chickpeas to the freshness of the chopped vegetables and the tangy zip of the lemon-tahini dressing, every bite is a delightful adventure.
But the best part? This recipe is incredibly versatile! Feel free to experiment with different toppings and variations to suit your own preferences. Craving something a little spicier? Add a pinch of red pepper flakes to the hummus or a drizzle of sriracha to the finished bowl. Want to boost the protein content? Consider adding grilled chicken, baked tofu, or even a sprinkle of hemp seeds. For a heartier meal, you could incorporate quinoa, brown rice, or farro as a base layer beneath the cauliflower hummus.
Serving Suggestions:
* Enjoy it as a light lunch or a satisfying dinner.
* Pack it for a healthy and convenient work lunch.
* Serve it as a vibrant appetizer at your next gathering.
* Deconstruct it and serve the cauliflower hummus with pita bread and crudités for a fun and interactive snack.
* Transform it into a wrap by spreading the cauliflower hummus on a whole-wheat tortilla and adding your favorite toppings.
Variations to Explore:
* Mediterranean Bowl: Add crumbled feta cheese, Kalamata olives, and sun-dried tomatoes.
* Mexican Bowl: Top with black beans, corn, salsa, and a dollop of guacamole.
* Asian-Inspired Bowl: Incorporate edamame, shredded carrots, and a drizzle of sesame oil.
* Roasted Vegetable Bowl: Roast your favorite vegetables, such as sweet potatoes, Brussels sprouts, or bell peppers, and add them to the bowl.
* Spicy Bowl: Add a pinch of cayenne pepper to the cauliflower hummus and top with jalapeños.
I’ve poured my heart into creating this recipe, and I’m confident that you’ll love it as much as I do. It’s a simple, healthy, and incredibly delicious way to enjoy the versatility of cauliflower. The beauty of this Cauliflower Hummus Bowl lies in its adaptability. Don’t be afraid to get creative and make it your own!
So, what are you waiting for? Head to your kitchen, gather your ingredients, and prepare to be amazed by the incredible flavors of this Cauliflower Hummus Bowl. I can’t wait to hear about your experience! Please, try this recipe and share your creations and variations with me in the comments below. Let me know what toppings you loved, what substitutions you made, and how you personalized this recipe to make it your own. Your feedback is invaluable, and I’m always eager to learn from your culinary adventures. Happy cooking!
Cauliflower Hummus Bowls: A Delicious and Healthy Recipe
Flavorful and healthy Cauliflower Hummus Bowls with roasted cauliflower, creamy homemade hummus, fluffy quinoa, and a variety of fresh toppings. A customizable and satisfying meal!
Ingredients
- 1 large head of cauliflower, cut into florets
- 2 tablespoons olive oil
- 1 teaspoon smoked paprika
- 1/2 teaspoon garlic powder
- 1/4 teaspoon salt
- 1/4 teaspoon black pepper
- 1 (15-ounce) can chickpeas, drained and rinsed
- 1/4 cup tahini
- 1/4 cup lemon juice, freshly squeezed
- 2 cloves garlic, minced
- 2 tablespoons olive oil
- 2-4 tablespoons ice water, to adjust consistency
- 1/2 teaspoon ground cumin
- 1/4 teaspoon salt, or to taste
- 1/4 teaspoon black pepper, or to taste
- 1 cup quinoa, rinsed
- 2 cups vegetable broth (or water)
- 1/2 cup cherry tomatoes, halved
- 1/2 cup cucumber, diced
- 1/4 cup red onion, thinly sliced
- 1/4 cup Kalamata olives, halved
- 1/4 cup crumbled feta cheese (optional)
- Fresh parsley, chopped, for garnish
- Drizzle of olive oil
- Sprinkle of paprika
- Pinch of red pepper flakes (optional, for heat)
- Lemon wedges, for serving
Instructions
- Preheat your oven to 400°F (200°C).
- Wash and dry the cauliflower, then cut into bite-sized florets.
- In a large bowl, toss the cauliflower florets with olive oil, smoked paprika, garlic powder, salt, and pepper until evenly coated.
- Spread the seasoned cauliflower florets in a single layer on a baking sheet. Avoid overcrowding.
- Roast for 20-25 minutes, or until the cauliflower is tender and slightly browned, flipping halfway through.
- Remove from oven and let cool slightly.
- Drain and rinse the chickpeas well. Mince the garlic cloves.
- In a food processor, combine the chickpeas, tahini, lemon juice, minced garlic, olive oil, cumin, salt, and pepper.
- Process until very smooth, scraping down the sides as needed.
- While the food processor is running, slowly add ice water, one tablespoon at a time, until the hummus reaches your desired consistency (2-4 tablespoons).
- Taste and adjust seasonings as needed.
- Refrigerate for at least 30 minutes before serving (optional).
- Rinse the quinoa under cold water using a fine-mesh sieve.
- In a medium saucepan, combine the rinsed quinoa and vegetable broth (or water).
- Bring to a boil over medium-high heat. Reduce heat to low, cover, and simmer for 15 minutes, or until all the liquid is absorbed and the quinoa is fluffy.
- Remove from heat and let stand, covered, for 5 minutes. Fluff with a fork.
- Set aside.
- Prepare your toppings: Halve the cherry tomatoes, dice the cucumber, thinly slice the red onion, and halve the Kalamata olives. Chop some fresh parsley for garnish.
- In a bowl, start with a base of cooked quinoa. Then, add a generous scoop of homemade hummus.
- Arrange the roasted cauliflower florets on top of the hummus.
- Sprinkle the cherry tomatoes, cucumber, red onion, Kalamata olives, and feta cheese (if using) over the cauliflower.
- Garnish with chopped fresh parsley, a drizzle of olive oil, a sprinkle of paprika, and a pinch of red pepper flakes (if desired). Serve with lemon wedges on the side.
- Enjoy!
Notes
- Spice it up: Add a pinch of cayenne pepper to the roasted cauliflower for a little extra heat.
- Add greens: Toss in some baby spinach or arugula for added nutrients and flavor.
- Use different grains: Substitute the quinoa with brown rice, couscous, or farro.
- Make it vegan: Omit the feta cheese to make this recipe vegan.
- Meal prep friendly: These bowls are perfect for meal prepping! Store the components separately in airtight containers in the refrigerator for up to 4 days. Assemble the bowls just before serving.
- Add protein: Add grilled chicken, chickpeas, or falafel for extra protein.
- Different vegetables: Try roasting other vegetables like broccoli, sweet potatoes, or bell peppers along with the cauliflower.
- Herb variations: Experiment with different herbs like dill, mint, or cilantro for garnish.

Leave a Comment