

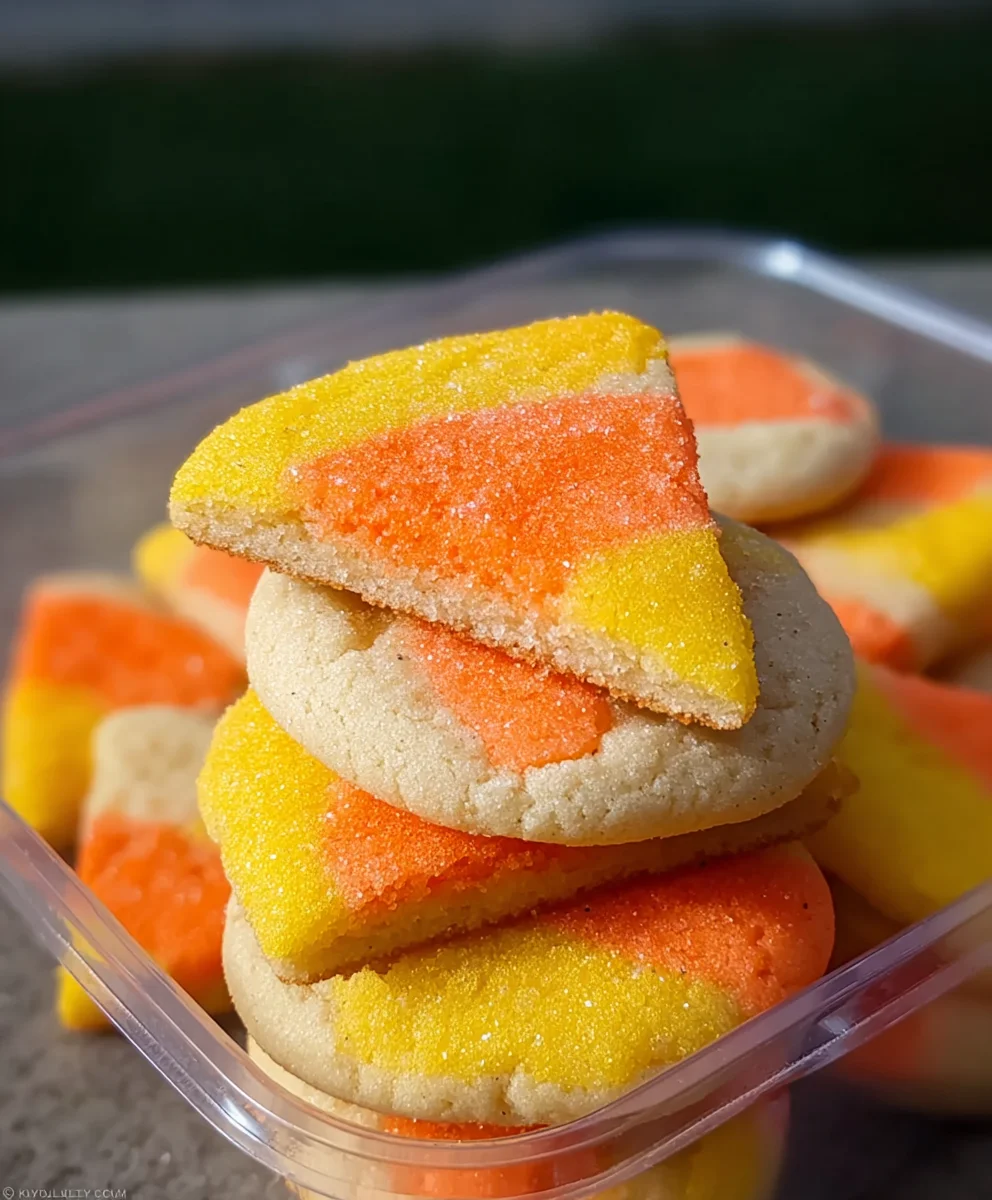
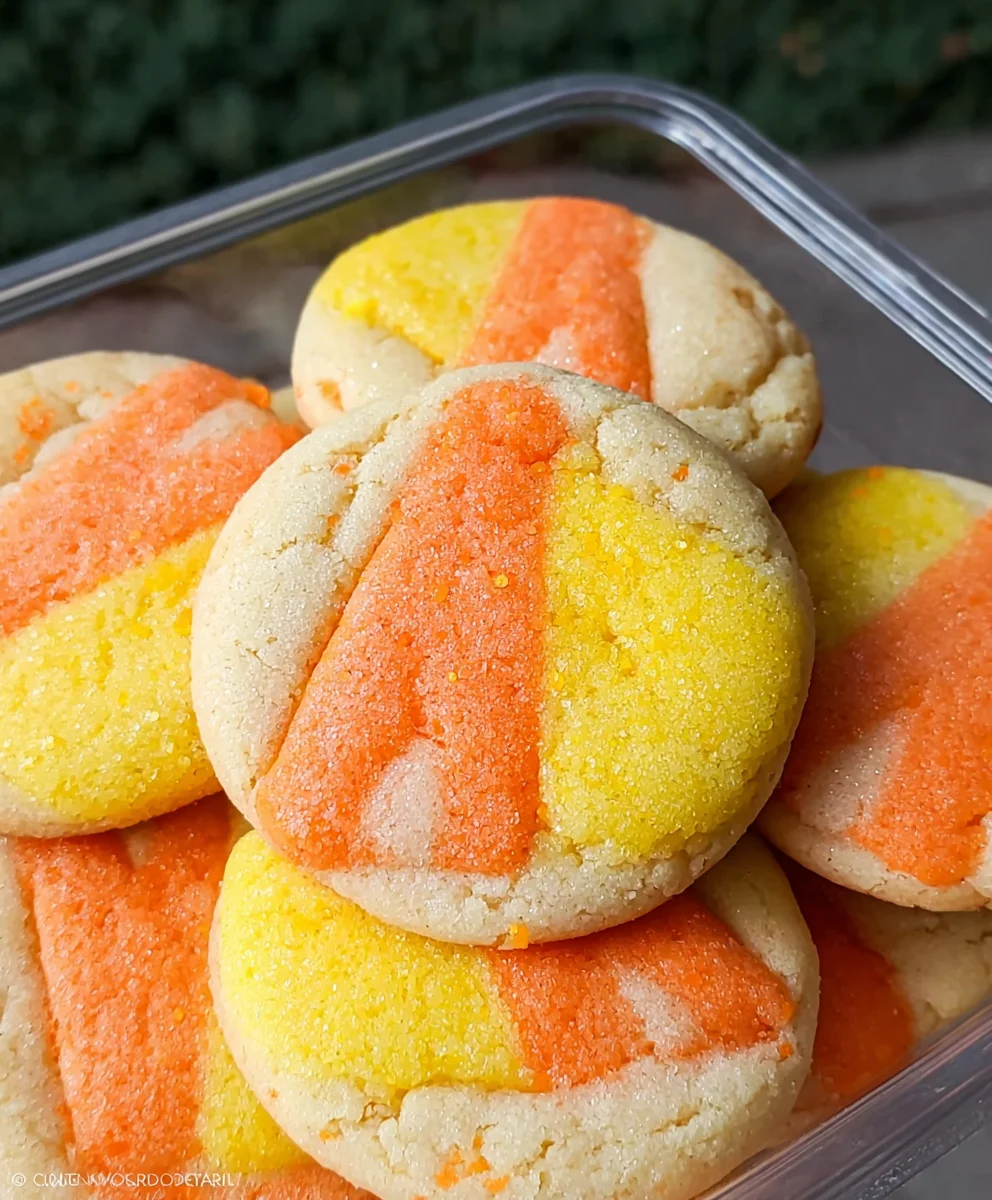
Candy Corn Sugar Cookies are a truly captivating and unexpected treat that perfectly encapsulate the spirit of autumn! Forget any preconceived notions about the iconic, often-debated, tri-colored candy, because when it’s lovingly baked into a soft, chewy sugar cookie, a delightful transformation occurs, creating an irresistibly festive dessert. This recipe celebrates the season by merging two distinct yet beloved confections into one incredible bite.
The humble yet versatile sugar cookie, a beloved staple in kitchens worldwide for generations, offers a canvas of pure comfort and simple sweetness. Candy corn, with its own rich history stretching back to the late 1800s, has become an undeniable symbol of Halloween and fall festivities. This particular recipe masterfully brings these two entities together, creating a modern culinary tradition that effortlessly merges nostalgia with novelty, making it a cherished favorite for seasonal celebrations in countless homes.
I’ve personally found that people absolutely adore these Candy Corn Sugar Cookies not only for their stunning visual appeal—those vibrant yellow, orange, and white hues peeking through—but, more importantly, for their incredible taste and texture. Each bite delivers the familiar buttery, vanilla-scented goodness of a perfectly baked sugar cookie, beautifully punctuated by the unique, melt-in-your-mouth sweetness and slight chewiness that only candy corn can provide. It’s a delightful journey for the palate, offering a playful twist on a timeless classic. Furthermore, their straightforward preparation makes them an ideal choice for a cozy weekend baking project, a charming contribution to any fall gathering, or simply a sweet way to brighten an autumn afternoon. I am confident that these delightful Candy Corn Sugar Cookies will quickly become a cherished recipe in your seasonal baking repertoire.

Ingredients:
- For the Candy Corn Sugar Cookies:
- 3 cups (360g) all-purpose flour, plus more for dusting – This is our base, ensuring a tender cookie.
- 1 teaspoon baking powder – For a little lift, preventing dense cookies.
- 1/2 teaspoon salt – Crucial for balancing sweetness and enhancing flavor.
- 1 cup (226g) unsalted butter, softened – The foundation for a rich, buttery cookie, make sure it’s truly at room temperature.
- 1 cup (200g) granulated sugar – Provides sweetness and helps with crisp edges.
- 1 large egg – Binds everything together and adds richness.
- 1 teaspoon pure vanilla extract – Enhances the overall flavor profile beautifully.
- 1/2 teaspoon almond extract (optional, but highly recommended for an extra depth of flavor) – A secret ingredient for many bakery-style sugar cookies.
- For the Royal Icing:
- 4 cups (480g) powdered sugar, sifted – Essential for smooth, lump-free icing.
- 3 tablespoons meringue powder – The key ingredient for stable, quick-drying royal icing.
- 1/2 teaspoon pure vanilla extract – For flavor in the icing.
- 1/4 teaspoon almond extract (optional) – To match the cookie’s flavor profile.
- 1/2 cup (120ml) warm water, plus more as needed – Adjusts consistency.
- Gel food coloring: yellow, orange, and white (or leave a portion uncolored) – For achieving the iconic candy corn colors. Gel colors are preferred for vibrant results without thinning the icing too much.
- Equipment you’ll need:
- Large mixing bowls
- Electric mixer (stand mixer or hand mixer)
- Spatulas
- Measuring cups and spoons
- Rolling pin
- Round cookie cutters (various sizes, or just one if you plan to freehand cut the candy corn shape) or a specific candy corn shaped cutter if you have one. If not, a triangular cutter works wonders.
- Parchment paper or silicone baking mats
- Baking sheets
- Wire cooling rack
- Piping bags and small round tips (e.g., Wilton #2 or #3) for outlining and flooding, or squeeze bottles.
Preparing the Candy Corn Sugar Cookie Dough
Let’s get started on creating the delicious base for our Candy Corn Sugar Cookies! This recipe is designed to yield a dough that’s easy to work with, holds its shape beautifully, and bakes up into tender, flavorful cookies perfect for decorating.
-
Whisk Dry Ingredients: In a medium bowl, combine your 3 cups of all-purpose flour, 1 teaspoon of baking powder, and 1/2 teaspoon of salt. Give them a good whisk to ensure they’re thoroughly combined. This step is crucial for even leavening and seasoning throughout your cookies. Set this aside for a moment.
-
Cream Butter and Sugar: In a large mixing bowl, preferably using a stand mixer fitted with the paddle attachment (or with a hand mixer), cream together your 1 cup (226g) of softened unsalted butter and 1 cup (200g) of granulated sugar. Beat on medium-high speed for about 3-5 minutes, or until the mixture becomes light, fluffy, and pale in color. Don’t rush this step! Proper creaming incorporates air, which contributes to the cookies’ texture.
-
Add Wet Ingredients: Reduce the mixer speed to low. Add the large egg, 1 teaspoon of pure vanilla extract, and the optional 1/2 teaspoon of almond extract. Mix until just combined. Be careful not to overmix at this stage; we just want to incorporate everything fully. You might need to scrape down the sides of the bowl with a rubber spatula to ensure all ingredients are fully incorporated.
-
Gradually Add Dry to Wet: With the mixer still on low speed, gradually add the dry ingredient mixture (flour, baking powder, salt) to the wet ingredients. Add it in about three batches, mixing until just combined after each addition. The key here is to mix until just no streaks of flour remain. Overmixing develops gluten, which can lead to tough cookies. The dough will be soft but should pull away from the sides of the bowl.
-
Form and Chill the Dough: Turn the dough out onto a lightly floured surface. Gently gather it into a ball or a flattened disc. If you’re going to use a round cookie cutter and then shape them into candy corn, you might want to divide the dough into two or three discs to make it easier to work with. Wrap each disc tightly in plastic wrap. Refrigerate the dough for at least 1 hour, or preferably 2-3 hours. Chilling is non-negotiable for these Candy Corn Sugar Cookies. It firms up the butter, making the dough less sticky and much easier to roll out, preventing spreading during baking, and helping the cookies maintain their intricate shapes.
Chilling and Rolling the Dough
The chilling phase is a crucial interlude that significantly impacts the final texture and shape of your Candy Corn Sugar Cookies. Resist the urge to skip or shorten it!
-
Prepare Your Workspace: Once your cookie dough is adequately chilled, preheat your oven to 375°F (190°C). Line several baking sheets with parchment paper or silicone baking mats. This ensures your cookies won’t stick and helps with even baking.
-
Flour Your Surface and Rolling Pin: Take one disc of chilled dough from the refrigerator. Lightly flour your work surface, your rolling pin, and the top of your dough. This prevents sticking, making the rolling process much smoother.
-
Roll the Dough: Roll the dough out evenly to about 1/4 inch thick. Aim for a consistent thickness across the entire sheet of dough. Why 1/4 inch? It’s the ideal thickness for a sturdy yet tender cookie that can withstand decorating. If it’s too thin, they might become too crispy; too thick, and they might not bake evenly or feel too bready.
-
Cut Out Candy Corn Shapes:
- Option A (Candy Corn Cutter): If you have a candy corn-shaped cookie cutter, simply press it into the rolled-out dough and cut out your shapes.
- Option B (Round Cutter & Knife): If you don’t have a specific candy corn cutter, use a round cookie cutter (about 2.5-3 inches in diameter) to cut out circles. Then, using a small, sharp knife, carefully cut each circle into three roughly equal, wedge-like triangles. You can slightly round the wide end of the triangle to mimic the top of a candy corn. This method takes a bit more precision but works wonderfully.
- Option C (Triangular Cutter): A simple triangular cutter can also be used. You can then slightly round one of the corners if you wish for a more authentic candy corn look.
Carefully transfer the cut-out cookies to your prepared baking sheets, leaving about 1 inch between each cookie. Re-roll any scraps of dough, chilling again briefly if it becomes too warm or sticky, and cut out more cookies until all the dough is used.
Baking Your Candy Corn Sugar Cookies
The baking process is quick, so keep a close eye on your cookies to ensure they achieve that perfect golden edge without overbaking, which can make them dry.
-
Bake the Cookies: Place the baking sheets in your preheated oven. Bake for 8-12 minutes, or until the edges are lightly golden and the centers appear set. Baking time can vary based on your oven and the thickness of your cookies, so start checking around the 8-minute mark. For best results, bake one sheet at a time, or rotate sheets halfway through baking if using multiple racks, to ensure even cooking.
-
Cool Completely: Once baked, remove the baking sheets from the oven and let the cookies cool on the sheets for about 5 minutes. This allows them to firm up slightly before you move them. Then, carefully transfer the cookies to a wire rack to cool completely. It is absolutely essential that the cookies are completely cool before you even think about icing them. Warm cookies will melt your royal icing, creating a messy situation.
Preparing the Royal Icing
Royal icing is the traditional choice for decorated sugar cookies because it dries hard and smooth, providing a perfect canvas. It’s also fantastic for achieving those vibrant candy corn colors.
-
Sift Powdered Sugar: In a large mixing bowl (again, a stand mixer is ideal here), sift your 4 cups of powdered sugar. Sifting is paramount to prevent lumps in your finished icing.
-
Combine with Meringue Powder: Add 3 tablespoons of meringue powder to the sifted powdered sugar. Whisk these two dry ingredients together thoroughly.
-
Add Liquids: Gradually add 1/2 cup of warm water, 1/2 teaspoon of pure vanilla extract, and the optional 1/4 teaspoon of almond extract to the dry mixture. Start mixing on low speed until combined, then increase to high speed.
-
Beat to Stiff Peaks: Beat the mixture for 5-7 minutes on high speed until the icing is glossy and holds stiff peaks. When you lift the beater, the icing should hold its shape firmly. If the icing seems too thick and isn’t coming together, add more warm water, 1 teaspoon at a time, until it reaches the desired stiff consistency. If it’s too thin, you can add a little more sifted powdered sugar.
-
Divide and Color Icing: This is where our Candy Corn Sugar Cookies truly come to life! Divide the royal icing into three separate bowls.
- White Icing: Leave one portion uncolored. This will be the white tip of your candy corn.
- Yellow Icing: In the second bowl, add a few drops of yellow gel food coloring. Mix well until you achieve a vibrant candy corn yellow.
- Orange Icing: In the third bowl, add a few drops of orange gel food coloring. Mix thoroughly until you have a rich, opaque orange. You might need to combine a tiny bit of red with yellow gel color if you don’t have orange, or use a specific candy corn orange color if available.
-
Adjust Icing Consistencies: Now, for each color, you’ll need two different consistencies:
- Outline Consistency: Take about 1/4 of each colored icing and leave it as is, or thin it just slightly by adding a tiny bit (1/4 teaspoon) of water until it’s stiff enough to hold a definite line but can be piped smoothly. This is for outlining the edges of your cookies. When you draw a line with a spoon, it should hold its shape.
- Flood Consistency: To the remaining 3/4 of each colored icing, gradually add water (1/2 teaspoon at a time) until it reaches a “flooding” consistency. This means when you draw a line with a spoon through the icing, it should disappear and become smooth within 5-10 seconds. This thinner icing is used to fill in the outlined areas. This step is crucial for smooth surfaces on your Candy Corn Sugar Cookies.
-
Prepare Piping Bags: Transfer each consistency of colored icing into separate piping bags fitted with small round tips (e.g., Wilton #2 or #3), or into squeeze bottles, which are excellent for flooding.
Decorating the Candy Corn Sugar Cookies
Now for the fun part! This is where your cooled sugar cookies transform into adorable Candy Corn Sugar Cookies. Take your time, and don’t worry about perfection; homemade charm is always lovely!
-
Outline the White Tip: Pick up a cooled cookie. Using the white icing at outline consistency, carefully pipe a line across the top (the widest part of your candy corn shape) to create the white tip. Then, pipe along the very top edge of the cookie. Fill in this small section with the white flood icing. Use a scribe tool, toothpick, or a clean paintbrush to gently spread the icing to the edges and pop any air bubbles. Allow this white section to dry for at least 15-20 minutes, or until it forms a slight crust. This prevents the colors from bleeding into each other.
-
Add the Orange Middle Section: Once the white section has crusted over, use the orange icing at outline consistency to draw a line directly below the white section, following the contour of the cookie. Extend the lines down the sides to create the middle orange band. Fill this section immediately with the orange flood icing, again using your scribe tool or toothpick to spread it evenly. Allow the orange section to dry for another 15-20 minutes.
-
Complete with the Yellow Base: Finally, once the orange section has crusted, use the yellow icing at outline consistency to outline the remaining bottom portion of the cookie. Fill this final section with yellow flood icing. Smooth it out as before. This completes the classic Candy Corn Sugar Cookie look!
-
Full Drying Time: Once all your cookies are decorated, transfer them to a clean wire rack to dry completely. Royal icing can take anywhere from 6-24 hours to dry fully, depending on humidity and how thick you applied it. It’s crucial to let them dry completely before stacking or storing them, otherwise, the icing can smudge or stick together. Patience here will pay off with perfectly polished Candy Corn Sugar Cookies.
Tips for Success and Storage
To ensure your Candy Corn Sugar Cookies are a resounding success and stay fresh, here are a few extra pointers:
Humidity is the Enemy of Royal Icing:
If you live in a humid environment, royal icing can take longer to dry. Consider using a small fan to gently circulate air over your cookies, which can significantly speed up the drying process. Just make sure the fan isn’t blowing directly onto the icing at high speed, which could cause ripples or uneven drying.
Preventing Icing Bleed:
The waiting time between applying each color is truly important. While a 15-20 minute crusting time is often enough, if you have the patience, waiting even longer (30-60 minutes) between colors can virtually eliminate any risk of colors bleeding into one another. This is especially true for the strong contrast of white against orange and yellow.
Dough Management:
If your dough becomes too warm and sticky while rolling and cutting, simply pop it back into the refrigerator for 10-15 minutes. Cold dough is much easier to handle and ensures your cookies keep their shape.
Perfecting Icing Consistency:
Achieving the right consistency for royal icing is often the trickiest part for beginners. Don’t be discouraged if it takes a few tries! For outline consistency, think of toothpaste. For flood consistency, imagine honey or warm syrup. Practice on a piece of parchment paper before going straight to your cookies. If your flood icing isn’t smoothing out, it’s too thick. Add a tiny bit more water. If it runs off the cookie, it’s too thin, and you’ll need to add more sifted powdered sugar (a tablespoon at a time) and re-mix.
Creative Alternatives:
While the classic three-stripe candy corn design is iconic, don’t be afraid to experiment! You could add edible glitter, sprinkles, or even small sugar shapes to your Candy Corn Sugar Cookies for extra flair once the base icing is completely dry.
Storing Your Candy Corn Sugar Cookies:
Once your decorated Candy Corn Sugar Cookies are completely dry (this can take up to 24 hours), store them in an airtight container at room temperature. Layer them between sheets of parchment paper to protect the delicate icing. They will stay fresh and delicious for up to 1-2 weeks. For longer storage, you can freeze undecorated baked cookies for up to 3 months. Thaw them completely at room temperature before decorating.
Bringing the Cookies to Room Temperature:
If you’ve frozen your baked cookie dough, allow it to come to room temperature completely before rolling and cutting. If you’ve frozen baked cookies, allow them to thaw completely at room temperature before you begin the decorating process. This prevents condensation from forming on the cookies, which could affect the icing.
Enjoy the process of creating these festive and delicious Candy Corn Sugar Cookies! They’re perfect for fall gatherings, Halloween parties, or just a sweet treat to celebrate the season.
Conclusion:
Well, my friends, we’ve reached the sweet end of our culinary journey, and I genuinely hope you’re feeling as inspired as I am to whip up a batch of these truly exceptional treats. If there’s one recipe I could implore you to try this season, it would undoubtedly be this one. These aren’t just any ordinary cookies; they are an experience, a delightful fusion of classic comfort and festive charm. When you sink your teeth into one of these, you’re not just tasting a cookie; you’re tasting the very essence of autumn, the playful spirit of Halloween, and the warmth of homemade goodness. The base itself is a marvel: a tender, buttery sugar cookie, boasting that perfect balance of crisp edges and a wonderfully soft, chewy center. It’s the kind of cookie that melts in your mouth, leaving behind a subtle, sweet vanilla note that lingers just long enough to make you reach for another. But what truly elevates them, what makes them absolutely unforgettable, is the visual spectacle and the delightful textural contrast added by the iconic candy corn. The vibrant yellow, orange, and white swirls aren’t just pretty; they bring a charming nod to the season, making these cookies an instant hit at any gathering.
I find immense joy in how effortlessly these cookies come together, transforming simple ingredients into something truly magical. They are a testament to the idea that some of the best things in life are born from a bit of flour, sugar, and a whole lot of love. They are the perfect project for a cozy afternoon, a fantastic way to involve little helpers in the kitchen, or a soothing baking session for a moment of self-care. Imagine the aroma filling your home – that sweet, inviting scent of freshly baked cookies is, in itself, a reason to bake them. Beyond their incredible taste and charming appearance, these cookies carry a certain nostalgia, harkening back to simpler times and beloved childhood memories. They are more than just a dessert; they are a vessel for creating new cherished moments and traditions. Trust me when I say, once you’ve experienced the joy of baking and tasting these, they will earn a permanent spot in your fall baking repertoire.
Now, let’s talk about enjoying these beauties! While they are absolutely divine on their own, fresh out of the oven, there are so many wonderful ways to serve and savor them. Picture this: a warm Candy Corn Sugar Cookies nestled alongside a steaming mug of apple cider, a creamy pumpkin spice latte, or a classic glass of cold milk. They make an excellent addition to any fall dessert platter, standing out with their cheerful colors. For a more elaborate treat, consider turning them into cookie sandwiches by spreading a luscious layer of cream cheese frosting or a simple vanilla buttercream between two cookies. You could also crumble them slightly and use them as a topping for vanilla ice cream, adding a delightful crunch and burst of seasonal flavor. Thinking beyond just eating them, these cookies make absolutely adorable gifts. Package a few in clear cellophane bags tied with a festive ribbon, and you have a thoughtful, homemade present that anyone would be thrilled to receive. They are perfect for teachers, neighbors, or as a sweet surprise for a friend.
And the variations are endless, allowing you to truly make this recipe your own! While the classic candy corn aesthetic is wonderful, feel free to experiment with different extracts in the dough; a touch of almond extract can add a delightful depth, or a hint of orange zest could brighten the flavor profile beautifully. For other holidays, you could easily swap out the candy corn for different colored sprinkles or candies to match the theme – think red and green for Christmas, pastels for Easter, or even patriotic colors for the Fourth of July. You could also explore different shapes if you’re feeling ambitious; rolling out the dough and using cookie cutters can create a fun and personalized touch. Or, for an extra indulgent twist, try dipping half of the cooled cookie in melted white chocolate and then sprinkling with additional festive decorations before it sets. The possibilities are only limited by your imagination, and that’s what makes baking so much fun – the ability to personalize and innovate!
So, what are you waiting for? I wholeheartedly encourage you to roll up your sleeves, preheat your oven, and embark on this wonderfully delicious baking adventure. Don’t let another autumn pass by without experiencing the simple pleasure of these Candy Corn Sugar Cookies. They are easy to make, incredibly satisfying, and guaranteed to bring smiles to everyone who tries them. I am genuinely so excited for you to discover the magic of this recipe. Once you’ve baked your batch, I would absolutely love to hear about your experience! Did you stick to the classic design, or did you get creative with variations? What did your family and friends think? Please, come back and share your thoughts in the comments below, or better yet, snap a photo and share it on your favorite social media platform, tagging me so I can see your wonderful creations! Your feedback and shared joy are what make this community so special. Happy baking, my dear friends!
Candy Corn Sugar Cookies
Candy Corn Sugar Cookies are a truly captivating and unexpected treat that perfectly encapsulate the spirit of autumn! Forget any preconceived notions about the iconic, often-debated, tri-colored candy, because when it’s lovingly baked into a soft, chewy sugar cookie, a delightful transformation occurs, creating an irresistibly festive dessert. This recipe celebrates the season by merging two distinct yet beloved confections into one incredible bite.
Ingredients
-
3 cups (360g) all-purpose flour
-
1 teaspoon baking powder
-
1/2 teaspoon salt
-
1 cup (226g) unsalted butter, softened
-
1 cup (200g) granulated sugar
-
1 large egg
-
1 teaspoon pure vanilla extract
-
1/2 teaspoon almond extract (optional)
-
4 cups (480g) powdered sugar, sifted
-
3 tablespoons meringue powder
-
1/2 teaspoon pure vanilla extract
-
1/4 teaspoon almond extract (optional)
-
1/2 cup warm water, plus more as needed
-
Gel food coloring: yellow, orange, and white
Instructions
-
Step 1
Whisk together 3 cups all-purpose flour, 1 tsp baking powder, and 1/2 tsp salt. Set aside. -
Step 2
Cream 1 cup softened unsalted butter and 1 cup granulated sugar until light and fluffy (3-5 mins). -
Step 3
Beat in 1 large egg, 1 tsp pure vanilla extract, and optional 1/2 tsp almond extract until just combined. -
Step 4
Gradually add dry ingredients to wet, mixing on low speed until just combined and no flour streaks remain. -
Step 5
Form dough into a disc, wrap, and chill for at least 1-2 hours (or preferably 2-3 hours). -
Step 6
Preheat oven to 375°F (190°C). Line baking sheets with parchment paper or silicone mats. -
Step 7
Lightly flour work surface and rolling pin. -
Step 8
Roll chilled dough to 1/4 inch thickness. -
Step 9
Cut out candy corn shapes (using a specific cutter, or cut circles into wedges, or a triangular cutter). Carefully transfer to prepared baking sheets. -
Step 10
Bake for 8-12 minutes, until edges are lightly golden and centers are set. Bake one sheet at a time for best results. -
Step 11
Let cookies cool on baking sheets for 5 mins, then transfer to a wire rack to cool completely before decorating. -
Step 12
Sift 4 cups powdered sugar into a large mixing bowl. -
Step 13
Add 3 tbsp meringue powder and whisk well. -
Step 14
Gradually add 1/2 cup warm water, 1/2 tsp pure vanilla extract, and optional 1/4 tsp almond extract. Mix on low, then high, until combined. -
Step 15
Beat on high speed for 5-7 minutes until icing is glossy and holds stiff peaks. Adjust consistency with more water (1 tsp at a time) or powdered sugar (1 tbsp at a time). -
Step 16
Divide icing into three bowls. Color one yellow, one orange, and leave one white. -
Step 17
For each color, create an outline consistency (stiff) and a flood consistency (thinner, smooths in 5-10 secs). Transfer to piping bags or squeeze bottles. -
Step 18
Outline the top white section of a cooled cookie with white outline icing, then fill with white flood icing. Let dry for at least 15-20 minutes. -
Step 19
Outline the middle orange section directly below the white, then fill with orange flood icing. Let dry for another 15-20 minutes. -
Step 20
Outline the bottom yellow section, then fill with yellow flood icing. -
Step 21
Let all decorated cookies dry completely on a wire rack for 6-24 hours before stacking or storing.
Important Information
Nutrition Facts (Per Serving)
It is important to consider this information as approximate and not to use it as definitive health advice.
Allergy Information
Please check ingredients for potential allergens and consult a health professional if in doubt.


Leave a Comment